reset CHEVROLET TRAIL BLAZER 2006 1.G Owner's Guide
[x] Cancel search | Manufacturer: CHEVROLET, Model Year: 2006, Model line: TRAIL BLAZER, Model: CHEVROLET TRAIL BLAZER 2006 1.GPages: 534, PDF Size: 2.91 MB
Page 260 of 534
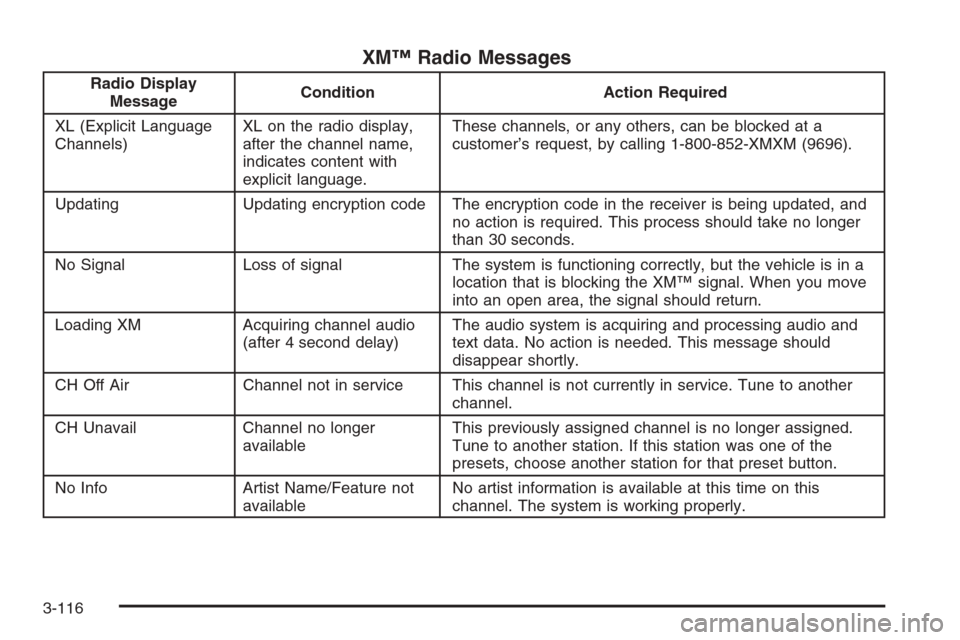
XM™ Radio Messages
Radio Display
MessageCondition Action Required
XL (Explicit Language
Channels)XL on the radio display,
after the channel name,
indicates content with
explicit language.These channels, or any others, can be blocked at a
customer’s request, by calling 1-800-852-XMXM (9696).
Updating Updating encryption code The encryption code in the receiver is being updated, and
no action is required. This process should take no longer
than 30 seconds.
No Signal Loss of signal The system is functioning correctly, but the vehicle is in a
location that is blocking the XM™ signal. When you move
into an open area, the signal should return.
Loading XM Acquiring channel audio
(after 4 second delay)The audio system is acquiring and processing audio and
text data. No action is needed. This message should
disappear shortly.
CH Off Air Channel not in service This channel is not currently in service. Tune to another
channel.
CH Unavail Channel no longer
availableThis previously assigned channel is no longer assigned.
Tune to another station. If this station was one of the
presets, choose another station for that preset button.
No Info Artist Name/Feature not
availableNo artist information is available at this time on this
channel. The system is working properly.
3-116
Page 264 of 534
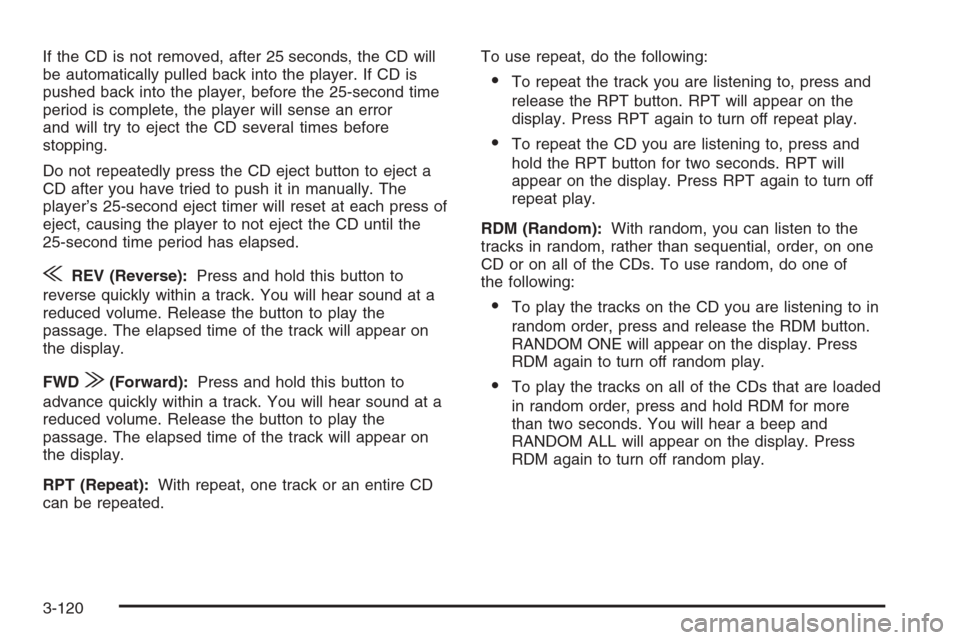
If the CD is not removed, after 25 seconds, the CD will
be automatically pulled back into the player. If CD is
pushed back into the player, before the 25-second time
period is complete, the player will sense an error
and will try to eject the CD several times before
stopping.
Do not repeatedly press the CD eject button to eject a
CD after you have tried to push it in manually. The
player’s 25-second eject timer will reset at each press of
eject, causing the player to not eject the CD until the
25-second time period has elapsed.
{REV (Reverse):Press and hold this button to
reverse quickly within a track. You will hear sound at a
reduced volume. Release the button to play the
passage. The elapsed time of the track will appear on
the display.
FWD
|(Forward):Press and hold this button to
advance quickly within a track. You will hear sound at a
reduced volume. Release the button to play the
passage. The elapsed time of the track will appear on
the display.
RPT (Repeat):With repeat, one track or an entire CD
can be repeated.To use repeat, do the following:
To repeat the track you are listening to, press and
release the RPT button. RPT will appear on the
display. Press RPT again to turn off repeat play.
To repeat the CD you are listening to, press and
hold the RPT button for two seconds. RPT will
appear on the display. Press RPT again to turn off
repeat play.
RDM (Random):With random, you can listen to the
tracks in random, rather than sequential, order, on one
CD or on all of the CDs. To use random, do one of
the following:
To play the tracks on the CD you are listening to in
random order, press and release the RDM button.
RANDOM ONE will appear on the display. Press
RDM again to turn off random play.
To play the tracks on all of the CDs that are loaded
in random order, press and hold RDM for more
than two seconds. You will hear a beep and
RANDOM ALL will appear on the display. Press
RDM again to turn off random play.
3-120
Page 271 of 534
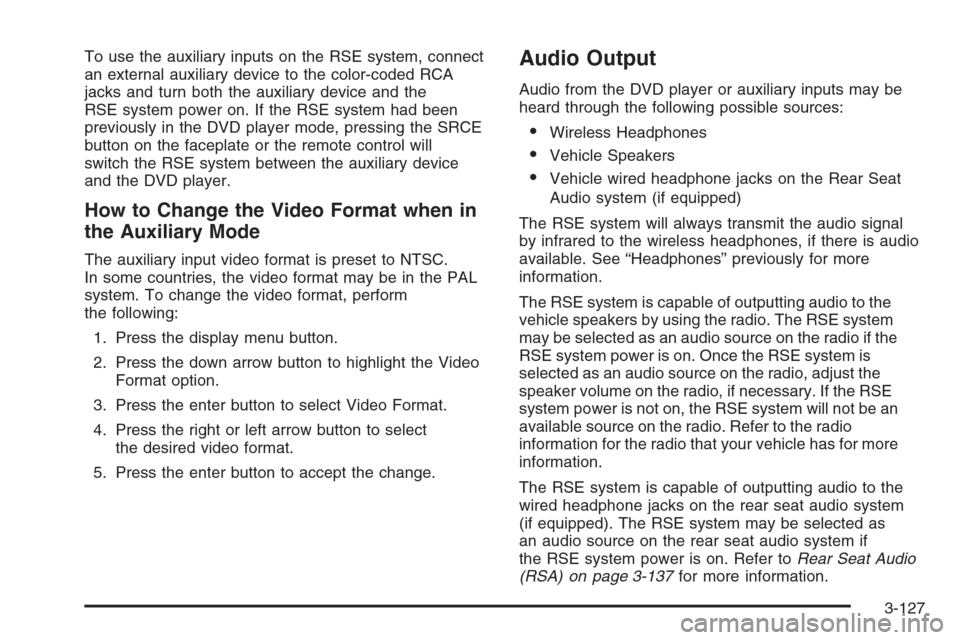
To use the auxiliary inputs on the RSE system, connect
an external auxiliary device to the color-coded RCA
jacks and turn both the auxiliary device and the
RSE system power on. If the RSE system had been
previously in the DVD player mode, pressing the SRCE
button on the faceplate or the remote control will
switch the RSE system between the auxiliary device
and the DVD player.
How to Change the Video Format when in
the Auxiliary Mode
The auxiliary input video format is preset to NTSC.
In some countries, the video format may be in the PAL
system. To change the video format, perform
the following:
1. Press the display menu button.
2. Press the down arrow button to highlight the Video
Format option.
3. Press the enter button to select Video Format.
4. Press the right or left arrow button to select
the desired video format.
5. Press the enter button to accept the change.
Audio Output
Audio from the DVD player or auxiliary inputs may be
heard through the following possible sources:
Wireless Headphones
Vehicle Speakers
Vehicle wired headphone jacks on the Rear Seat
Audio system (if equipped)
The RSE system will always transmit the audio signal
by infrared to the wireless headphones, if there is audio
available. See “Headphones” previously for more
information.
The RSE system is capable of outputting audio to the
vehicle speakers by using the radio. The RSE system
may be selected as an audio source on the radio if the
RSE system power is on. Once the RSE system is
selected as an audio source on the radio, adjust the
speaker volume on the radio, if necessary. If the RSE
system power is not on, the RSE system will not be an
available source on the radio. Refer to the radio
information for the radio that your vehicle has for more
information.
The RSE system is capable of outputting audio to the
wired headphone jacks on the rear seat audio system
(if equipped). The RSE system may be selected as
an audio source on the rear seat audio system if
the RSE system power is on. Refer toRear Seat Audio
(RSA) on page 3-137for more information.
3-127
Page 282 of 534
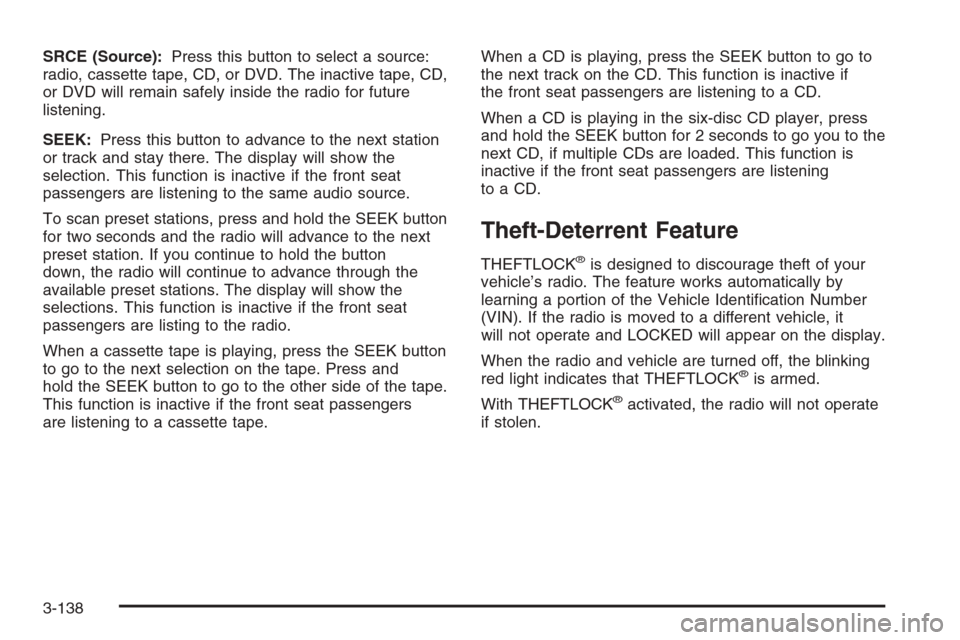
SRCE (Source):Press this button to select a source:
radio, cassette tape, CD, or DVD. The inactive tape, CD,
or DVD will remain safely inside the radio for future
listening.
SEEK:Press this button to advance to the next station
or track and stay there. The display will show the
selection. This function is inactive if the front seat
passengers are listening to the same audio source.
To scan preset stations, press and hold the SEEK button
for two seconds and the radio will advance to the next
preset station. If you continue to hold the button
down, the radio will continue to advance through the
available preset stations. The display will show the
selections. This function is inactive if the front seat
passengers are listing to the radio.
When a cassette tape is playing, press the SEEK button
to go to the next selection on the tape. Press and
hold the SEEK button to go to the other side of the tape.
This function is inactive if the front seat passengers
are listening to a cassette tape.When a CD is playing, press the SEEK button to go to
the next track on the CD. This function is inactive if
the front seat passengers are listening to a CD.
When a CD is playing in the six-disc CD player, press
and hold the SEEK button for 2 seconds to go you to the
next CD, if multiple CDs are loaded. This function is
inactive if the front seat passengers are listening
toaCD.
Theft-Deterrent Feature
THEFTLOCK®is designed to discourage theft of your
vehicle’s radio. The feature works automatically by
learning a portion of the Vehicle Identi�cation Number
(VIN). If the radio is moved to a different vehicle, it
will not operate and LOCKED will appear on the display.
When the radio and vehicle are turned off, the blinking
red light indicates that THEFTLOCK
®is armed.
With THEFTLOCK
®activated, the radio will not operate
if stolen.
3-138
Page 283 of 534
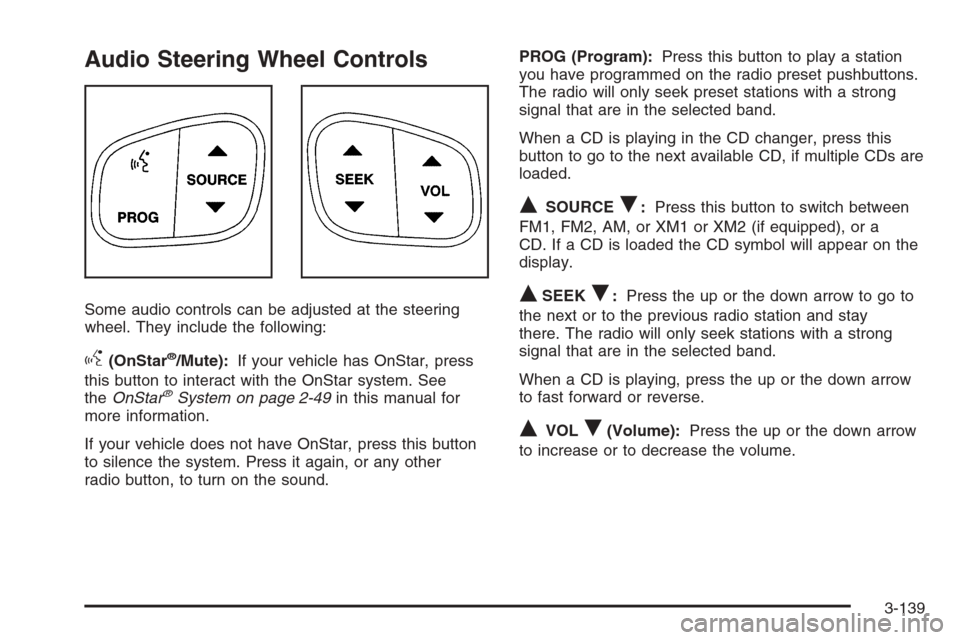
Audio Steering Wheel Controls
Some audio controls can be adjusted at the steering
wheel. They include the following:
g(OnStar®/Mute):If your vehicle has OnStar, press
this button to interact with the OnStar system. See
theOnStar
®System on page 2-49in this manual for
more information.
If your vehicle does not have OnStar, press this button
to silence the system. Press it again, or any other
radio button, to turn on the sound.PROG (Program):Press this button to play a station
you have programmed on the radio preset pushbuttons.
The radio will only seek preset stations with a strong
signal that are in the selected band.
When a CD is playing in the CD changer, press this
button to go to the next available CD, if multiple CDs are
loaded.
QSOURCER:Press this button to switch between
FM1, FM2, AM, or XM1 or XM2 (if equipped), or a
CD. If a CD is loaded the CD symbol will appear on the
display.
QSEEKR:Press the up or the down arrow to go to
the next or to the previous radio station and stay
there. The radio will only seek stations with a strong
signal that are in the selected band.
When a CD is playing, press the up or the down arrow
to fast forward or reverse.
QVOLR(Volume):Press the up or the down arrow
to increase or to decrease the volume.
3-139
Page 285 of 534
Care of the Cassette Tape Player
A tape player that is not cleaned regularly can cause
reduced sound quality, ruined cassettes, or a damaged
mechanism. Cassette tapes should be stored in their
cases away from contaminants, direct sunlight, and
extreme heat. If they are not, they may not operate
properly or may cause failure of the tape player.
The tape player should be cleaned regularly after every
50 hours of use. The radio may display CLEAN to
indicate that the tape player has been used for 50 hours
without resetting the tape clean timer. If this message
appears on the display, the cassette tape player
needs to be cleaned. It will still play tapes, but it should
be cleaned as soon as possible to prevent damage
to the tapes and player. If there is a reduction in sound
quality, try a known good cassette to see if the tape
or the tape player is at fault. If this other cassette has no
improvement in sound quality, clean the tape player.For best results, use a scrubbing action, non-abrasive
cleaning cassette with pads which scrub the tape
head as the hubs of the cleaner cassette turn. The
recommended cleaning cassette is available through
your dealer.
The broken tape detection feature of the cassette tape
player may identify the cleaning cassette as a
damaged tape, in error. To prevent the cleaning cassette
from being ejected, use the following steps:
1. Turn the ignition on.
2. Turn the radio off.
3. Press and hold the TAPE CD button for �ve seconds.
READY will appear on the display and a cassette
symbol will �ash for �ve seconds.
4. Insert the scrubbing action cleaning cassette.
5. Eject the cleaning cassette after the manufacturer’s
recommended cleaning time.
After the cleaning cassette is ejected, the broken
tape detection feature will be active again.
3-141
Page 286 of 534
A non-scrubbing action, wet-type cleaner which uses a
cassette with a fabric belt to clean the tape head
can be used. This type of cleaning cassette will not
eject on its own. A non-scrubbing action cleaner may not
clean as thoroughly as the scrubbing type cleaner.
The use of a non-scrubbing action, dry-type cleaning
cassette is not recommended.
After the player is cleaned, press and hold the EJT
button for �ve seconds to reset the CLEAN indicator.
The radio will display CLEANED to show the indicator
was reset.
Cassettes are subject to wear and the sound quality
may degrade over time. Always make sure the cassette
tape is in good condition before the tape player is
serviced.Care of Your CDs and DVDs
Handle CDs carefully. Store them in their original cases
or other protective cases and away from direct
sunlight and dust. The CD player scans the bottom
surface of the disc. If the surface of a CD is damaged,
such as cracked, broken, or scratched, the CD will
not play properly or not at all. If the surface of a CD is
soiled, take a soft, lint free cloth or dampen a clean, soft
cloth in a mild, neutral detergent solution mixed with
water, and clean it. Make sure the wiping process starts
from the center to the edge.
Do not touch the bottom side of a CD while handling it;
this could damage the surface. Pick up CDs by
grasping the outer edges or the edge of the hole and
the outer edge.
Care of the CD and DVD Player
The use of CD lens cleaners for CDs is not advised,
due to the risk of contaminating the lens of the CD optics
with lubricants internal to the CD mechanism.
3-142
Page 383 of 534
Your vehicle’s engine is �lled at the factory with a
Mobil 1®synthetic oil, which meets all requirements for
your vehicle.
Substitute Engine Oil: When adding oil to maintain
engine oil level, oil meeting GM Standard GM4718M
may not be available. You can add substitute oil
designated SAE 5W-30 with the starburst symbol at all
temperatures. Substitute oil not meeting GM Standard
GM4718M should not be used for an oil change.
Engine Oil Additives
Do not add anything to your oil. The recommended oils
with the starburst symbol that meet GM standards
are all you will need for good performance and engine
protection.
Engine Oil Life System
When to Change Engine Oil
Your vehicle has a computer system that lets you know
when to change the engine oil and �lter. This is
based on engine revolutions and engine temperature,
and not on mileage. Based on driving conditions,
the mileage at which an oil change will be indicated can
vary considerably. For the oil life system to work
properly, you must reset the system every time the oil is
changed.When the system has calculated that oil life has been
diminished, it will indicate that an oil change is
necessary. A change engine oil light will come on, or,
if your vehicle has a Driver Information Center (DIC),
a CHANGE ENGINE OIL message will come. See
Change Engine Oil Light on page 3-46orDIC Warnings
and Messages on page 3-55. Change your oil as
soon as possible within the next 600 miles (1 000 km).
It is possible that, if you are driving under the best
conditions, the oil life system may not indicate that an
oil change is necessary for over a year. However,
the engine oil and �lter must be changed at least once
a year and at this time the system must be reset.
Your dealer has GM-trained people who will perform
this work using genuine GM parts and reset the system.
It is also important to check the oil regularly and keep
it at the proper level.
If the system is ever reset accidentally, you must
change your oil at 3,000 miles (5 000 km) since the last
oil change. Remember to reset the oil life system
whenever the oil is changed.
5-23
Page 384 of 534
How to Reset the Engine Oil Life
System
The Engine Oil Life System calculates when to change
your engine oil and �lter based on vehicle use.
Anytime your oil is changed, reset the system so it can
calculate when the next oil change is required. If a
situation occurs where you change your oil prior to a
change engine oil light or CHANGE ENGINE OIL
message being turned on, reset the system.
To reset the Engine Oil Life System, do the following:
1. Turn the ignition key to RUN with the engine off.
2. Fully press and release the accelerator pedal slowly
three times within �ve seconds.
3. Turn the key to LOCK.
If the light/message comes back on when you start the
vehicle, the engine oil life system has not reset.
Repeat the procedure.
For vehicles with the Driver Information Center,
seeDriver Information Center (DIC) on page 3-50to
reset the system.
What to Do with Used Oil
Used engine oil contains certain elements that may be
unhealthy for your skin and could even cause cancer.
Do not let used oil stay on your skin for very long.Clean your skin and nails with soap and water, or a good
hand cleaner. Wash or properly dispose of clothing or
rags containing used engine oil. See the manufacturer’s
warnings about the use and disposal of oil products.
Used oil can be a threat to the environment. If you
change your own oil, be sure to drain all the oil from the
�lter before disposal. Never dispose of oil by putting it in
the trash, pouring it on the ground, into sewers, or into
streams or bodies of water. Instead, recycle it by taking it
to a place that collects used oil. If you have a problem
properly disposing of your used oil, ask your dealer, a
service station, or a local recycling center for help.
Engine Air Cleaner/Filter
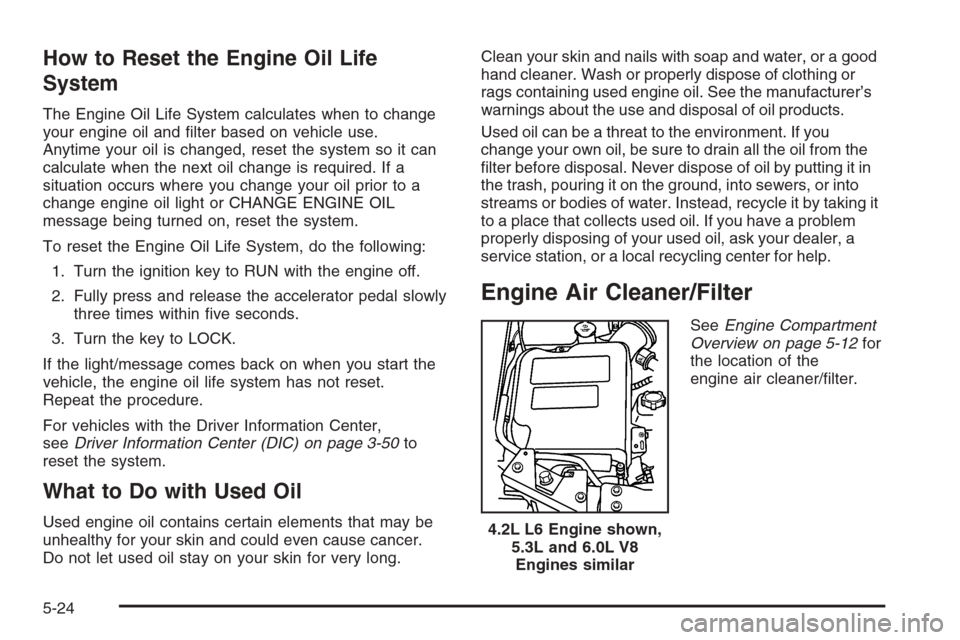
SeeEngine Compartment
Overview on page 5-12for
the location of the
engine air cleaner/�lter.
4.2L L6 Engine shown,
5.3L and 6.0L V8
Engines similar
5-24
Page 431 of 534
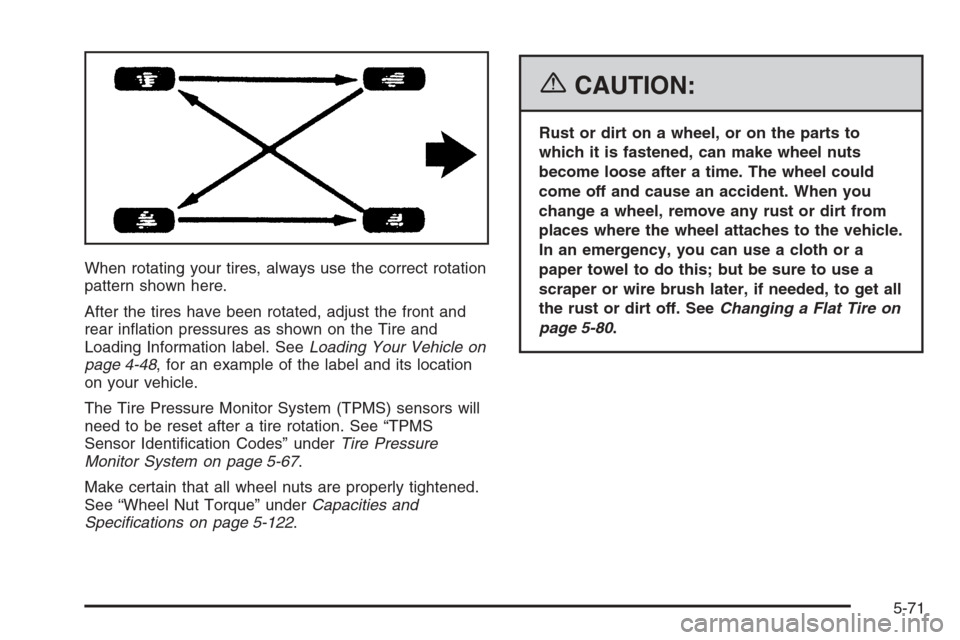
When rotating your tires, always use the correct rotation
pattern shown here.
After the tires have been rotated, adjust the front and
rear in�ation pressures as shown on the Tire and
Loading Information label. SeeLoading Your Vehicle on
page 4-48, for an example of the label and its location
on your vehicle.
The Tire Pressure Monitor System (TPMS) sensors will
need to be reset after a tire rotation. See “TPMS
Sensor Identi�cation Codes” underTire Pressure
Monitor System on page 5-67.
Make certain that all wheel nuts are properly tightened.
See “Wheel Nut Torque” underCapacities and
Speci�cations on page 5-122.
{CAUTION:
Rust or dirt on a wheel, or on the parts to
which it is fastened, can make wheel nuts
become loose after a time. The wheel could
come off and cause an accident. When you
change a wheel, remove any rust or dirt from
places where the wheel attaches to the vehicle.
In an emergency, you can use a cloth or a
paper towel to do this; but be sure to use a
scraper or wire brush later, if needed, to get all
the rust or dirt off. SeeChanging a Flat Tire on
page 5-80.
5-71