transmission CHEVROLET TRAVERSE 2014 1.G Owner's Manual
[x] Cancel search | Manufacturer: CHEVROLET, Model Year: 2014, Model line: TRAVERSE, Model: CHEVROLET TRAVERSE 2014 1.GPages: 430, PDF Size: 6.94 MB
Page 260 of 430
Black plate (24,1)Chevrolet Traverse Owner Manual (GMNA-Localizing-U.S./Canada/Mexico-
6014422) - 2014 - crc - 3/26/13
9-24 Driving and Operating
{Caution
If the vehicle accelerates slowly,
or does not shift gears, the
transmission could be damaged.
Have the vehicle serviced
right away.
If the vehicle is stopped on a hill,
with your foot off the brake pedal,
the vehicle may roll. This is normal
and is due to the torque converter
designed to improve fuel economy
and performance. Use the brake to
hold the vehicle on a hill. Do not use
the accelerator pedal.
L (Low): This position gives you
access to gear ranges. This
provides more engine braking but
lower fuel economy than D (Drive).
You can use it on very steep hills,
or in deep snow or mud. See
Manual Mode on page 9-24.
Manual Mode
Electronic Range Select
(ERS) Mode
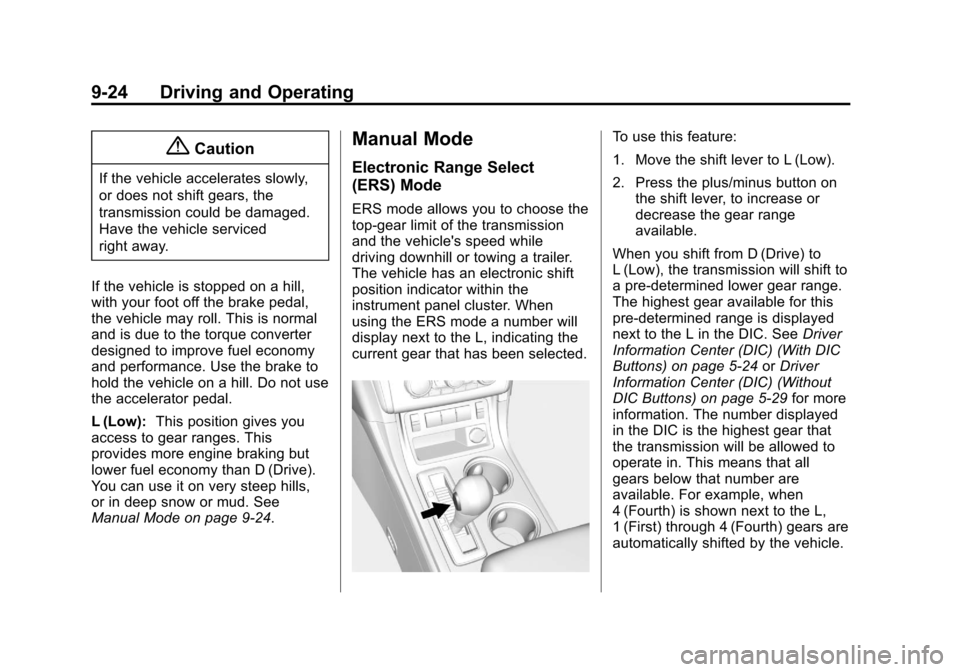
ERS mode allows you to choose the
top-gear limit of the transmission
and the vehicle's speed while
driving downhill or towing a trailer.
The vehicle has an electronic shift
position indicator within the
instrument panel cluster. When
using the ERS mode a number will
display next to the L, indicating the
current gear that has been selected.
To use this feature:
1. Move the shift lever to L (Low).
2. Press the plus/minus button on
the shift lever, to increase or
decrease the gear range
available.
When you shift from D (Drive) to
L (Low), the transmission will shift to
a pre-determined lower gear range.
The highest gear available for this
pre-determined range is displayed
next to the L in the DIC. See Driver
Information Center (DIC) (With DIC
Buttons) on page 5-24 orDriver
Information Center (DIC) (Without
DIC Buttons) on page 5-29 for more
information. The number displayed
in the DIC is the highest gear that
the transmission will be allowed to
operate in. This means that all
gears below that number are
available. For example, when
4 (Fourth) is shown next to the L,
1 (First) through 4 (Fourth) gears are
automatically shifted by the vehicle.
Page 261 of 430
Black plate (25,1)Chevrolet Traverse Owner Manual (GMNA-Localizing-U.S./Canada/Mexico-
6014422) - 2014 - crc - 3/26/13
Driving and Operating 9-25
The transmission will not shift into
5 (Fifth) until the + (Plus) button is
used or you shift back into D (Drive).
While in L (Low), the transmission
will prevent shifting to a lower gear
range if the engine speed is too
high. You have a brief period of time
to slow the vehicle. If vehicle speed
is not reduced within the time
allowed, the lower gear range shift
will not be completed. You must
further slow the vehicle, then press
the−(Minus) button to the desired
lower gear range.
Automatic Engine Grade Braking is
not available when the ERS is
active. It is available in D (Drive) for
both normal and Tow/Haul mode.
While using the ERS, cruise control
and the Tow/Haul mode can be
used. See Tow/Haul Mode following.Tow/Haul Mode
_
(Tow/Haul): If equipped with
Tow/Haul mode, the button is on the
center stack under the climate
controls.
Push the button to activate the
system. Push it again to deactivate
the system. You can use this feature
to assist when towing or hauling a
heavy load.
When Tow/Haul is activated, the
Tow/Haul symbol will come on in the
instrument cluster. See “Tow/Haul
Mode” underDriving Characteristics
and Towing Tips on page 9-47.
Automatic Engine Grade
Braking
Automatic Engine Grade Braking
assists when driving on a downhill
grade. It maintains vehicle speed by
automatically implementing a shift
schedule that uses the engine and
the transmission to slow the vehicle.
The system will automatically
command downshifts to reduce
vehicle speed, until the brake pedal
is no longer being pressed.
While in the Electronic Range
Select (ERS) mode, grade braking
is deactivated, allowing the driver to
select a range and limiting the
highest gear available. Grade
braking is available for normal
driving and in Tow/Haul mode.
See Automatic Transmission on
page 9-22.
Page 283 of 430
Black plate (47,1)Chevrolet Traverse Owner Manual (GMNA-Localizing-U.S./Canada/Mexico-
6014422) - 2014 - crc - 3/26/13
Driving and Operating 9-47
Trailer Towing
General Towing
Information
Only use towing equipment that has
been designed for the vehicle.
Contact your dealer or trailering
dealer for assistance with preparing
the vehicle for towing a trailer. Read
the entire section before towing a
trailer.
For towing a disabled vehicle, see
Towing the Vehicle on page 10-70.
For towing the vehicle behind
another vehicle such as a motor
home, seeRecreational Vehicle
Towing on page 10-70.
Driving Characteristics
and Towing Tips
Driving with a Trailer
When towing a trailer:
.Become familiar with the state
and local laws that apply
specifically to trailer towing.
.Do not tow a trailer during the
first 800 km (500 mi), to prevent
damage to the engine, axle or
other parts.
.Then, during the first 800 km
(500 mi) trailer towing, do not
drive over 80 km/h (50 mph) and
do not make starts at full throttle.
.The vehicle can tow in D (Drive)
but M (Manual Mode) is
recommended. See Manual
Mode on page 9-24. Use a lower
gear if the transmission shifts
too often.
.Turn off Park Assist when
towing.
{Warning
When towing a trailer, exhaust
gases may collect at the rear of
the vehicle and enter if the
liftgate, trunk/hatch, or rear-most
window is open.
When towing a trailer:
(Continued)
Warning (Continued)
.Do not drive with the liftgate,
trunk/hatch, or rear-most
window open.
.Fully open the air outlets on
or under the instrument
panel.
.Also adjust the Climate
Control system to a setting
that brings in only outside air.
See“Climate Control
Systems” in the Index.
For more information about
Carbon Monoxide, see Engine
Exhaust on page 9-21.
Towing a trailer requires a certain
amount of experience. The
combination you are driving is
longer and not as responsive as the
vehicle itself. Get acquainted with
the handling and braking of the rig
before setting out for the open road.
Page 285 of 430
Black plate (49,1)Chevrolet Traverse Owner Manual (GMNA-Localizing-U.S./Canada/Mexico-
6014422) - 2014 - crc - 3/26/13
Driving and Operating 9-49
lamps also flash, telling other
drivers the vehicle is turning,
changing lanes or stopping.
When towing a trailer, the arrows on
the instrument cluster flash for turns
even if the bulbs on the trailer are
burned out. Check occasionally to
be sure the trailer bulbs are still
working.
Driving on Grades
Reduce speed and shift to a lower
gear before starting down a long or
steep downgrade. If the
transmission is not shifted down, the
brakes might have to be used so
much that they would get hot and no
longer work well.
The vehicle can tow in D (Drive).
Use a lower gear if the transmission
shifts too often.
The Tow/Haul Mode may be used if
the transmission shifts too often.
SeeTow/Haul Mode on page 9-25.
When towing at high altitude on
steep uphill grades, engine coolant
boils at a lower temperature than at normal altitudes. If the engine is
turned off immediately after towing
at high altitude on steep uphill
grades, the vehicle could show
signs similar to engine overheating.
To avoid this, let the engine run
while parked, preferably on level
ground, with the transmission in
P (Park) for a few minutes before
turning the engine off. If the
overheat warning comes on, see
Engine Overheating on page 10-16.
Parking on Hills
{Warning
Parking the vehicle on a hill with
the trailer attached can be
dangerous. If something goes
wrong, the rig could start to move.
People can be injured, and both
the vehicle and the trailer can be
damaged. When possible, always
park the rig on a flat surface.
If parking the rig on a hill:
1. Press the brake pedal, but do
not shift into P (Park) yet. Turn
the wheels into the curb if facing
downhill or into traffic if facing
uphill.
2. Have someone place chocks under the trailer wheels.
3. When the wheel chocks are in place, release the brake pedal
until the chocks absorb the load.
4. Reapply the brake pedal. Then apply the parking brake and shift
into P (Park).
5. Release the brake pedal.
Leaving After Parking on a Hill
1. Apply and hold the brake pedal while you:
.Start the engine.
.Shift into a gear.
.Release the parking brake.
2. Let up on the brake pedal.
Page 286 of 430
Black plate (50,1)Chevrolet Traverse Owner Manual (GMNA-Localizing-U.S./Canada/Mexico-
6014422) - 2014 - crc - 3/26/13
9-50 Driving and Operating
3. Drive slowly until the trailer isclear of the chocks.
4. Stop and have someone pick up and store the chocks.
Maintenance When Trailer
Towing
The vehicle needs service more
often when pulling a trailer. See the
Maintenance Schedule on
page 11-3. Things that are
especially important in trailer
operation are automatic
transmission fluid, engine oil, axle
lubricant, belts, cooling system and
brake system. Inspect these before
and during the trip.
Check periodically to see that all
hitch nuts and bolts are tight.
Engine Cooling When Trailer
Towing
The cooling system may temporarily
overheat during severe operating
conditions. See Engine Overheating
on page 10-16.
Trailer Towing
Three important considerations
have to do with weight:
.The weight of the trailer.
.The weight of the trailer tongue.
.The total weight on the vehicle's
tires.
Weight of the Trailer
How heavy can a trailer safely be?
Speed, altitude, road grades,
outside temperature, special
equipment, and the amount of
tongue weight the vehicle can carry
must be considered. See “Weight of
the Trailer Tongue” later in this
section for more information. Maximum trailer weight is calculated
assuming only the driver is in the
tow vehicle and it has all the
required trailering equipment. The
weight of additional optional
equipment, passengers and cargo in
the tow vehicle must be subtracted
from the maximum trailer weight.
Use the following chart to determine
how much the vehicle can weigh,
based upon the vehicle model and
options.
Page 291 of 430
Black plate (1,1)Chevrolet Traverse Owner Manual (GMNA-Localizing-U.S./Canada/Mexico-
6014422) - 2014 - crc - 3/26/13
Vehicle Care 10-1
Vehicle Care
General Information
General Information . . . . . . . . . . 10-2
California Proposition65 Warning . . . . . . . . . . . . . . . . . 10-2
California Perchlorate Materials Requirements . . . . 10-2
Accessories and Modifications . . . . . . . . . . . . . . . 10-2
Vehicle Checks
Doing Your OwnService Work . . . . . . . . . . . . . . . 10-3
Hood . . . . . . . . . . . . . . . . . . . . . . . . 10-4
Engine Compartment Overview . . . . . . . . . . . . . . . . . . . 10-5
Engine Cover . . . . . . . . . . . . . . . . 10-6
Engine Oil . . . . . . . . . . . . . . . . . . . 10-7
Engine Oil Life System . . . . . . 10-9
Automatic Transmission Fluid . . . . . . . . . . . . . . . . . . . . . . 10-10
Engine Air Cleaner/Filter . . . . 10-11
Cooling System . . . . . . . . . . . . 10-12
Engine Coolant . . . . . . . . . . . . . 10-12
Engine Overheating . . . . . . . . 10-16 Overheated Engine
Protection
Operating Mode . . . . . . . . . . . 10-18
Power Steering Fluid . . . . . . . 10-18
Washer Fluid . . . . . . . . . . . . . . . 10-19
Brakes . . . . . . . . . . . . . . . . . . . . . 10-20
Brake Fluid . . . . . . . . . . . . . . . . . 10-21
Battery . . . . . . . . . . . . . . . . . . . . . 10-22
All-Wheel Drive . . . . . . . . . . . . . 10-23
Starter Switch Check . . . . . . . 10-23
Automatic Transmission Shift Lock Control Function
Check . . . . . . . . . . . . . . . . . . . . . 10-23
Ignition Transmission Lock Check . . . . . . . . . . . . . . . . . . . . . 10-24
Park Brake and P (Park) Mechanism Check . . . . . . . . 10-24
Wiper Blade Replacement . . . . . . . . . . . . . . 10-24
Headlamp Aiming
Headlamp Aiming . . . . . . . . . . 10-26
Bulb Replacement
Bulb Replacement . . . . . . . . . . 10-26
Taillamps, Turn Signal, andStoplamps . . . . . . . . . . . . . . . . 10-26
License Plate Lamp . . . . . . . . 10-27
Replacement Bulbs . . . . . . . . . 10-28
Electrical System
High Voltage Devices and Wiring . . . . . . . . . . . . . . . . . . . . . 10-28
Electrical System Overload . . . . . . . . . . . . . . . . . . 10-28
Fuses and Circuit
Breakers . . . . . . . . . . . . . . . . . . 10-29
Engine Compartment Fuse Block . . . . . . . . . . . . . . . . . . . . . 10-29
Instrument Panel Fuse Block . . . . . . . . . . . . . . . . . . . . . 10-32
Wheels and Tires
Tires . . . . . . . . . . . . . . . . . . . . . . . . 10-35
All-Season Tires . . . . . . . . . . . . 10-36
Winter Tires . . . . . . . . . . . . . . . . 10-36
Summer Tires . . . . . . . . . . . . . . 10-37
Tire Sidewall Labeling . . . . . . 10-37
Tire Designations . . . . . . . . . . . 10-39
Tire Terminology andDefinitions . . . . . . . . . . . . . . . . 10-40
Tire Pressure . . . . . . . . . . . . . . . 10-42
Tire Pressure Monitor System . . . . . . . . . . . . . . . . . . . 10-44
Tire Pressure Monitor Operation . . . . . . . . . . . . . . . . . 10-45
Tire Inspection . . . . . . . . . . . . . . 10-48
Tire Rotation . . . . . . . . . . . . . . . 10-48
Page 300 of 430
Black plate (10,1)Chevrolet Traverse Owner Manual (GMNA-Localizing-U.S./Canada/Mexico-
6014422) - 2014 - crc - 3/26/13
10-10 Vehicle Care
How to Reset the Engine Oil
Life System
Reset the system whenever the
engine oil is changed so that the
system can calculate the next
engine oil change. To reset the
system:
If the vehicle does not have Driver
Information Center (DIC) buttons:
1. Turn the ignition to ON/RUN,with the engine off. The vehicle
must be in P (Park) to access
this display. Press the trip
odometer reset stem until OIL
LIFE REMAINING displays.
2. Press and hold the trip odometer reset stem until OIL LIFE
REMAINING shows “100%.”
Three chimes sound and the
CHANGE ENGINE OIL SOON
message goes off. 3. Turn the key to LOCK/OFF.
If the CHANGE ENGINE OIL
SOON message comes back on
when the vehicle is started, the
engine oil life system has not
been reset. Repeat the
procedure.
If the vehicle has Driver Information
Center (DIC) buttons:
1. Turn the ignition to ON/RUN, with the engine off.
2. Press the vehicle information button until OIL LIFE
REMAINING displays.
3. Press and hold the set/reset button until “100%”is displayed.
Three chimes sound and the
CHANGE ENGINE OIL SOON
message goes off.
4. Turn the key to LOCK/OFF.
If the CHANGE ENGINE OIL SOON
message comes back on when the
vehicle is started, the engine oil life
system has not been reset. Repeat
the procedure.
Automatic Transmission
Fluid
It is not necessary to check the
transmission fluid level.
A transmission fluid leak is the only
reason for fluid loss. If a leak
occurs, take the vehicle to the
dealer and have it repaired as soon
as possible.
Change the fluid at the intervals
listed in Maintenance Schedule on
page 11-3, and be sure to use the
transmission fluid listed in
Recommended Fluids and
Lubricants on page 11-11.
{Caution
Use of the incorrect automatic
transmission fluid may damage
the vehicle, and the damage may
not be covered by the vehicle
warranty. Always use the
automatic transmission fluid listed
in Recommended Fluids and
Lubricants on page 11-11.
Page 301 of 430
Black plate (11,1)Chevrolet Traverse Owner Manual (GMNA-Localizing-U.S./Canada/Mexico-
6014422) - 2014 - crc - 3/26/13
Vehicle Care 10-11
The transmission fluid will not reach
the end of the dipstick unless the
transmission is at operating
temperature. If you need to check
the transmission fluid level, please
take the vehicle to your dealer.
Engine Air Cleaner/Filter
When to Inspect the Engine Air
Cleaner/Filter
Inspect the air cleaner/filter at the
scheduled maintenance intervals
and replace it at the first oil change
after each 80 000 km (50,000 mile)
interval. SeeMaintenance Schedule
on page 11-3. If driving in dusty/dirty
conditions, inspect the filter at each
engine oil change.
See Engine Compartment Overview
on page 10-5 for the location of the
engine air cleaner/filter.
How to Inspect the Engine Air
Cleaner/Filter
To inspect the air cleaner/filter,
remove the filter from the vehicle
and lightly shake the filter (away from vehicle) to release loose dust
and dirt. If the filter remains covered
with dirt, a new filter is required.
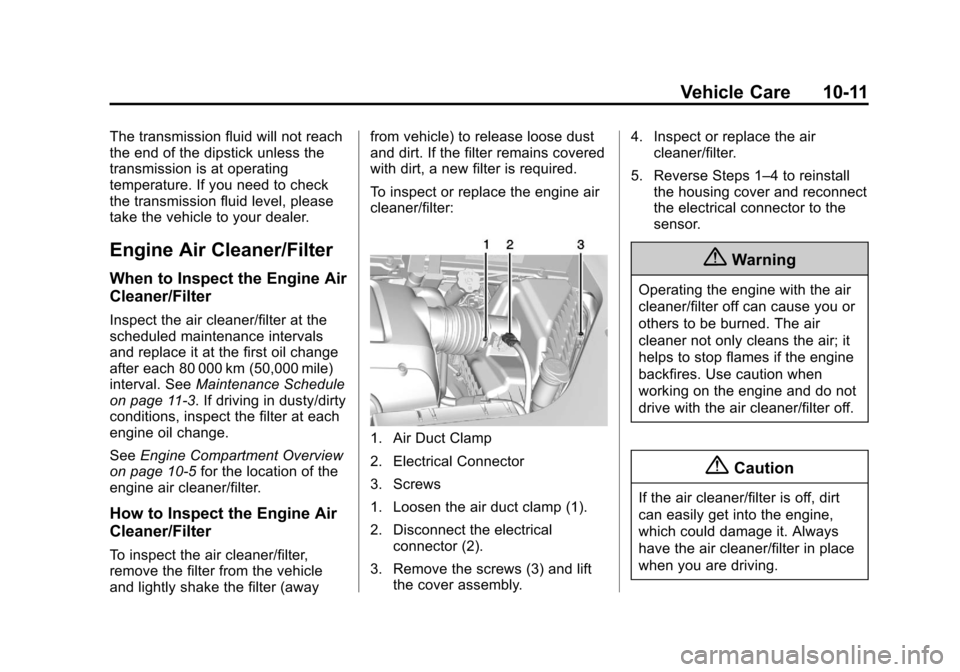
To inspect or replace the engine air
cleaner/filter:
1. Air Duct Clamp
2. Electrical Connector
3. Screws
1. Loosen the air duct clamp (1).
2. Disconnect the electrical
connector (2).
3. Remove the screws (3) and lift the cover assembly. 4. Inspect or replace the air
cleaner/filter.
5. Reverse Steps 1–4 to reinstall the housing cover and reconnect
the electrical connector to the
sensor.
{Warning
Operating the engine with the air
cleaner/filter off can cause you or
others to be burned. The air
cleaner not only cleans the air; it
helps to stop flames if the engine
backfires. Use caution when
working on the engine and do not
drive with the air cleaner/filter off.
{Caution
If the air cleaner/filter is off, dirt
can easily get into the engine,
which could damage it. Always
have the air cleaner/filter in place
when you are driving.
Page 313 of 430
Black plate (23,1)Chevrolet Traverse Owner Manual (GMNA-Localizing-U.S./Canada/Mexico-
6014422) - 2014 - crc - 3/26/13
Vehicle Care 10-23
Vehicle Storage
{Warning
Batteries have acid that can burn
you and gas that can explode.
You can be badly hurt if you are
not careful. SeeJump Starting on
page 10-66 for tips on working
around a battery without
getting hurt.
Infrequent Usage: Remove the
black, negative (−) cable from the
battery to keep the battery from
running down.
Extended Storage: Remove the
black, negative (−) cable from the
battery or use a battery trickle
charger.
All-Wheel Drive
Transfer case fluid does not require
checking unless there is a fluid leak
or unusual noise. If required, have
the transfer case serviced by your
dealer.
Starter Switch Check
{Warning
When you are doing this
inspection, the vehicle could
move suddenly. If the vehicle
moves, you or others could be
injured.
1. Before starting this check, be sure there is enough room
around the vehicle.
2. Firmly apply both the parking brake and the regular brake.
Do not use the accelerator
pedal, and be ready to turn off
the engine immediately if it
starts. 3. Try to start the engine in each
gear. The vehicle should start
only in P (Park) or N (Neutral).
If the vehicle starts in any other
position, contact your dealer for
service.
Automatic Transmission
Shift Lock Control
Function Check
{Warning
When you are doing this
inspection, the vehicle could
move suddenly. If the vehicle
moves, you or others could be
injured.
1. Before starting this check, be sure there is enough room
around the vehicle. It should be
parked on a level surface.
Page 314 of 430
Black plate (24,1)Chevrolet Traverse Owner Manual (GMNA-Localizing-U.S./Canada/Mexico-
6014422) - 2014 - crc - 3/26/13
10-24 Vehicle Care
2. Firmly apply the parking brake.Be ready to apply the regular
brake immediately if the vehicle
begins to move.
3. With the engine off, turn the ignition on, but do not start the
engine. Without applying the
regular brake, try to move the
shift lever out of P (Park) with
normal effort. If the shift lever
moves out of P (Park), contact
your dealer for service.
Ignition Transmission
Lock Check
While parked, and with the parking
brake set, try to turn the ignition to
LOCK/OFF in each shift lever
position.
.The ignition should turn to
LOCK/OFF only when the shift
lever is in P (Park).
.The ignition key should come
out only in LOCK/OFF.
Contact your dealer if service is
required.
Park Brake and P (Park)
Mechanism Check
{Warning
When you are doing this check,
the vehicle could begin to move.
You or others could be injured
and property could be damaged.
Make sure there is room in front
of the vehicle in case it begins to
roll. Be ready to apply the regular
brake at once should the vehicle
begin to move.
Park on a fairly steep hill, with the
vehicle facing downhill. Keeping
your foot on the regular brake, set
the parking brake.
.To check the parking brake's
holding ability: With the engine
running and the transmission in
N (Neutral), slowly remove foot
pressure from the regular brake
pedal. Do this until the vehicle is
held by the parking brake only.
.To check the P (Park)
mechanism's holding ability:
With the engine running, shift to
P (Park). Then release the
parking brake followed by the
regular brake.
Contact your dealer if service is
required.
Wiper Blade Replacement
Front Wiper Blade
Windshield wiper blades should be
inspected for wear or cracking. See
Maintenance Schedule on
page 11-3.
Replacement blades come in
different types and are removed in
different ways. For the proper type
and size, see Maintenance
Replacement Parts on page 11-12.
To replace the wiper blade
assembly:
1. Pull the windshield wiper assembly away from the
windshield.