Lift gate CHEVROLET TRAVERSE 2017 1.G Owner's Manual
[x] Cancel search | Manufacturer: CHEVROLET, Model Year: 2017, Model line: TRAVERSE, Model: CHEVROLET TRAVERSE 2017 1.GPages: 394, PDF Size: 6.47 MB
Page 289 of 394
Chevrolet Traverse Owner Manual (GMNA-Localizing-U.S./Canada/Mexico-
9955676) - 2017 - crc - 3/29/16
288 Vehicle Care
Headlamp Aiming
Headlamp aim has been preset and
should need no further adjustment.
If the vehicle is damaged in a crash,
the headlamp aim may be affected.
If adjustment to the headlamps is
necessary, see your dealer.
Bulb Replacement
For the proper type of replacement
bulbs, seeReplacement
Bulbs 0289.
For any bulb-changing procedure
not listed in this section, contact
your dealer.
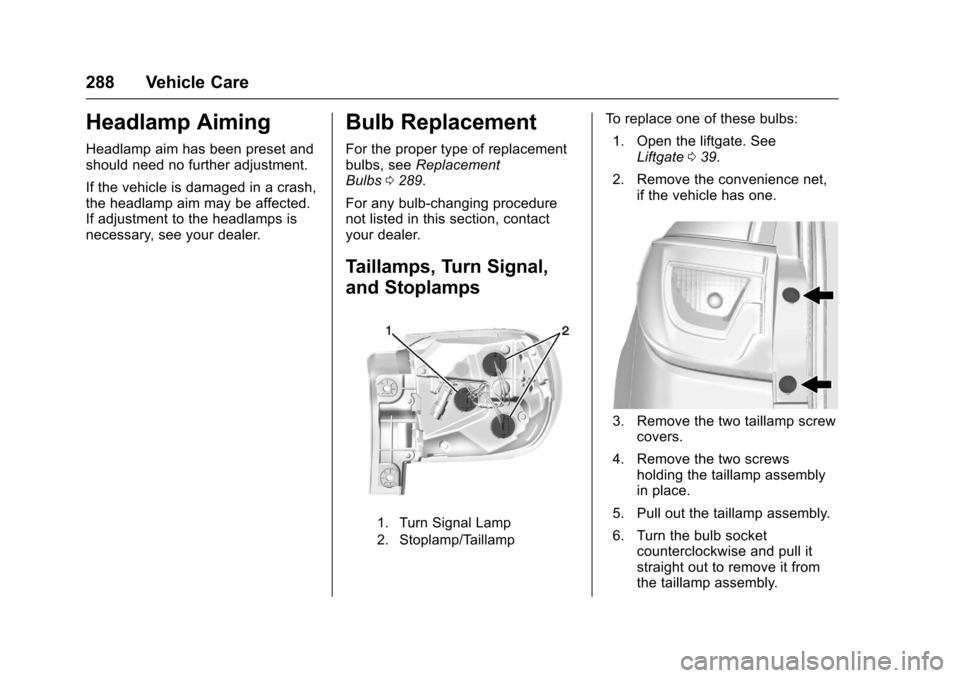
Taillamps, Turn Signal,
and Stoplamps
1. Turn Signal Lamp
2. Stoplamp/Taillamp
To replace one of these bulbs: 1. Open the liftgate. See Liftgate 039.
2. Remove the convenience net, if the vehicle has one.
3. Remove the two taillamp screwcovers.
4. Remove the two screws holding the taillamp assembly
in place.
5. Pull out the taillamp assembly.
6. Turn the bulb socket counterclockwise and pull it
straight out to remove it from
the taillamp assembly.
Page 290 of 394
Chevrolet Traverse Owner Manual (GMNA-Localizing-U.S./Canada/Mexico-
9955676) - 2017 - crc - 3/29/16
Vehicle Care 289
7. Pull the old bulb straight out ofthe bulb socket.
8. Push the new bulb straight into the bulb socket.
9. Push the taillamp assembly back into its original location.
When reinstalling the taillamp
assembly, make sure the pin
on the taillamp assembly lines
up and is inserted correctly into
the opening of the vehicle.
10. Reinstall the two screws that hold the taillamp assembly in
place.
11. Reinstall the two taillamp screw covers.
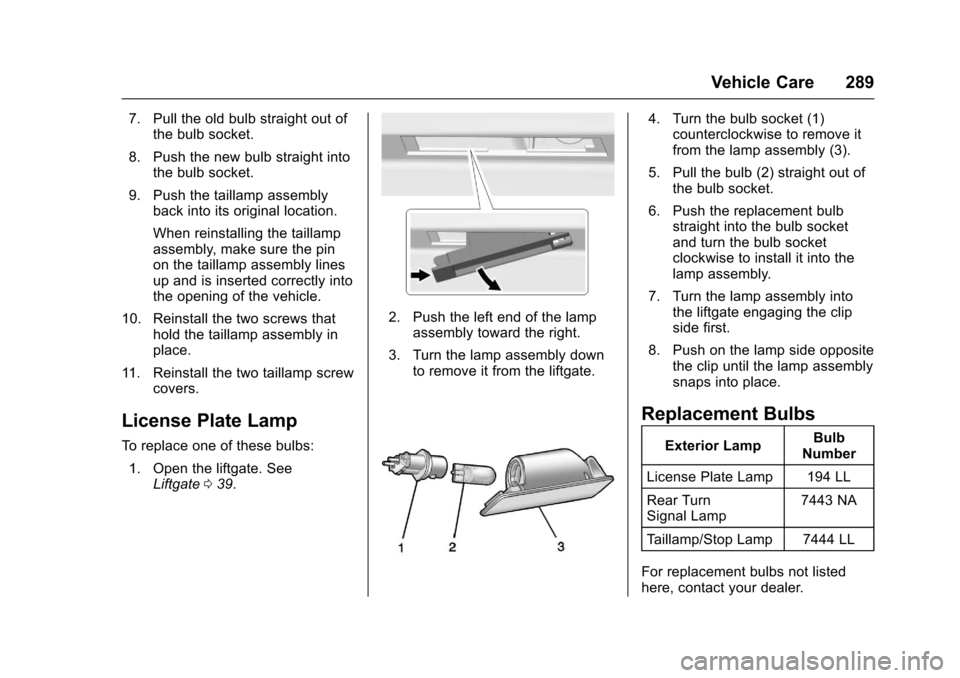
License Plate Lamp
To replace one of these bulbs:
1. Open the liftgate. See Liftgate 039.
2. Push the left end of the lamp
assembly toward the right.
3. Turn the lamp assembly down to remove it from the liftgate.
4. Turn the bulb socket (1)counterclockwise to remove it
from the lamp assembly (3).
5. Pull the bulb (2) straight out of the bulb socket.
6. Push the replacement bulb straight into the bulb socket
and turn the bulb socket
clockwise to install it into the
lamp assembly.
7. Turn the lamp assembly into the liftgate engaging the clip
side first.
8. Push on the lamp side opposite the clip until the lamp assembly
snaps into place.
Replacement Bulbs
Exterior Lamp Bulb
Number
License Plate Lamp 194 LL
Rear Turn
Signal Lamp 7443 NA
Taillamp/Stop Lamp 7444 LL
For replacement bulbs not listed
here, contact your dealer.
Page 294 of 394
Chevrolet Traverse Owner Manual (GMNA-Localizing-U.S./Canada/Mexico-
9955676) - 2017 - crc - 3/29/16
Vehicle Care 293
FusesUsage
FPM Fuel pump power module
HORN Horn
HTD MIR Heated exterior rearview mirror
HTD
STR WHL Heated steering
wheel
HUMIDITY/ MAF Humidity sensor/
MAF sensor
HVAC BLWR HVAC blower LT HI BEAM Left high-beam headlamp
LT LO BEAM Left low-beam headlamp
LT PRK Left parking lamp
LT TRLR
STOP/TRN Left trailer
stoplamp/Turn
signal lamp
ODD COILS Injector Coils –odd
PWR L/GATE Power liftgate
PWR
OUTLET Power outlet Fuses
Usage
RR APO Rear accessory power outlet
RR DEFOG Rear defogger RR HVAC Rear climate control system
RT HI BEAM Right high-beam headlamp
RT LO BEAM Right low-beam headlamp
RT PRK Right parking lamp
RT TRLR
STOP/TRN Right trailer
stoplamp/Turn
signal lamp
RVC SNSR Regulated voltage control sensor
S/ROOF/
SUNSHADE Sunroof
SERVICE Service repair SPARE –
STOP LAMP Stoplamps
STRTR StarterTCM Transmission control module Fuses
Usage
TRANS Transmission TRLR
BCK/UP Trailer reverse
lamps
TRLR BRK Trailer brake lamps TRLR
PRK LAMP Trailer parking
lamps
TRLR PWR Trailer power WPR/WSW Windshield wiper/ Washer
Relays Usage
A/C
CMPRSR CLTCH A/C clutch
AUX
VAC PUMP Auxiliary
vacuum pump
CRNK Switched power
FAN 1 Cooling fan 1
FAN 2 Cooling fan 2
FAN 3 Cooling fan 3
HI BEAM High-beam headlamps
Page 296 of 394
Chevrolet Traverse Owner Manual (GMNA-Localizing-U.S./Canada/Mexico-
9955676) - 2017 - crc - 3/29/16
Vehicle Care 295
The vehicle may not be equipped
with all of the fuses, relays, and
features shown.Fuses Usage
# GMC Non-HID = Low-beam
)GMC Non-HID =
High-shutter
) )Chevy = Fog lamps
) ) )Buick China = Rear
fog lamps
AIRBAG Airbag AMP Amplifier
BCK
UP/STOP Reverse lamps/
Stoplamps
BCM Body control module
CNSTR VENT Canister vent
CTSY Courtesy lamps
DR LCK Door locks DRL/
LO BEAM Daytime running
lamps relay/
Low-beam
headlamps relay Fuses Usage
DSPLY Display
FRT WSW Front windshield washer
HTD/
COOL SEAT Heated/Cooling
seats
HVAC HVAC
INADV PWR INT LAMPS Inadvertent power/
Interior light pipe
lamps
INFOTMNT/ MSM Infotainment/
Memory seat
module
LT TRN SIG Left turn signal lamp
OBS
DET/URS Rear park assist/
Side blind zone
alert/Forward
collision alert/
Universal remote
system
PDM Power mirrors/ Liftgate release
PWR MODE Power mode PWR MIR Power mirrors Fuses Usage
RDO Radio
REAR WPR Rear wiper
RT TRN SIG Right turn signal lamp
STR WHL ILLUM Steering wheel
illumination
USB CHRG USB charging
Page 297 of 394
Chevrolet Traverse Owner Manual (GMNA-Localizing-U.S./Canada/Mexico-
9955676) - 2017 - crc - 3/29/16
296 Vehicle Care
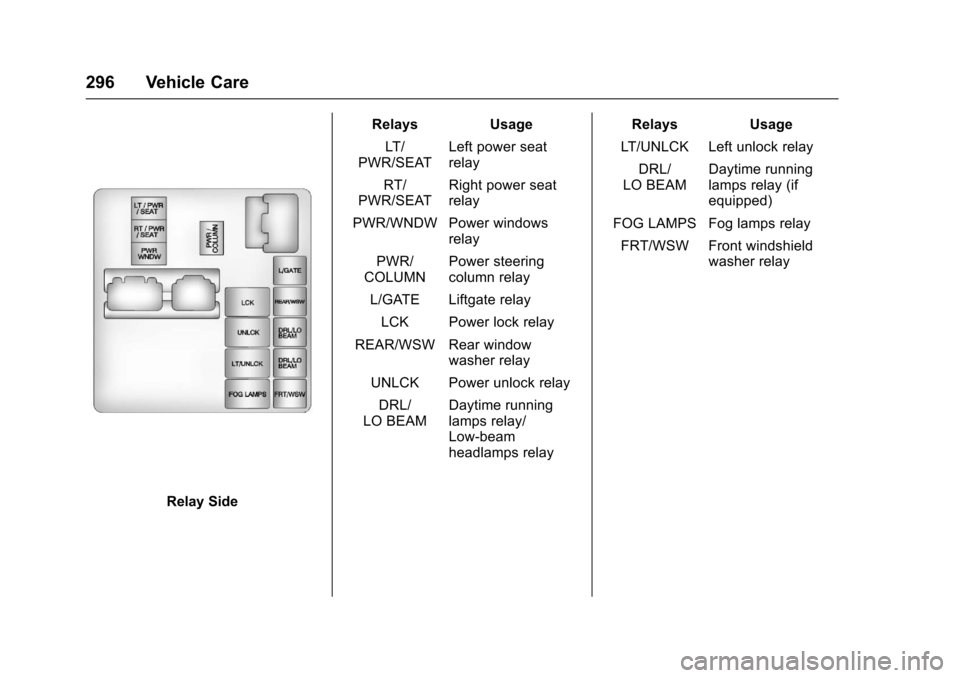
Relay SideRelays Usage
LT/
PWR/SEAT Left power seat
relay
RT/
PWR/SEAT Right power seat
relay
PWR/WNDW Power windows relay
PWR/
COLUMN Power steering
column relay
L/GATE Liftgate relay
LCK Power lock relay
REAR/WSW Rear window washer relay
UNLCK Power unlock relay
DRL/
LO BEAM Daytime running
lamps relay/
Low-beam
headlamps relay Relays Usage
LT/UNLCK Left unlock relay DRL/
LO BEAM Daytime running
lamps relay (if
equipped)
FOG LAMPS Fog lamps relay
FRT/WSW Front windshield washer relay
Page 319 of 394
Chevrolet Traverse Owner Manual (GMNA-Localizing-U.S./Canada/Mexico-
9955676) - 2017 - crc - 3/29/16
318 Vehicle Care
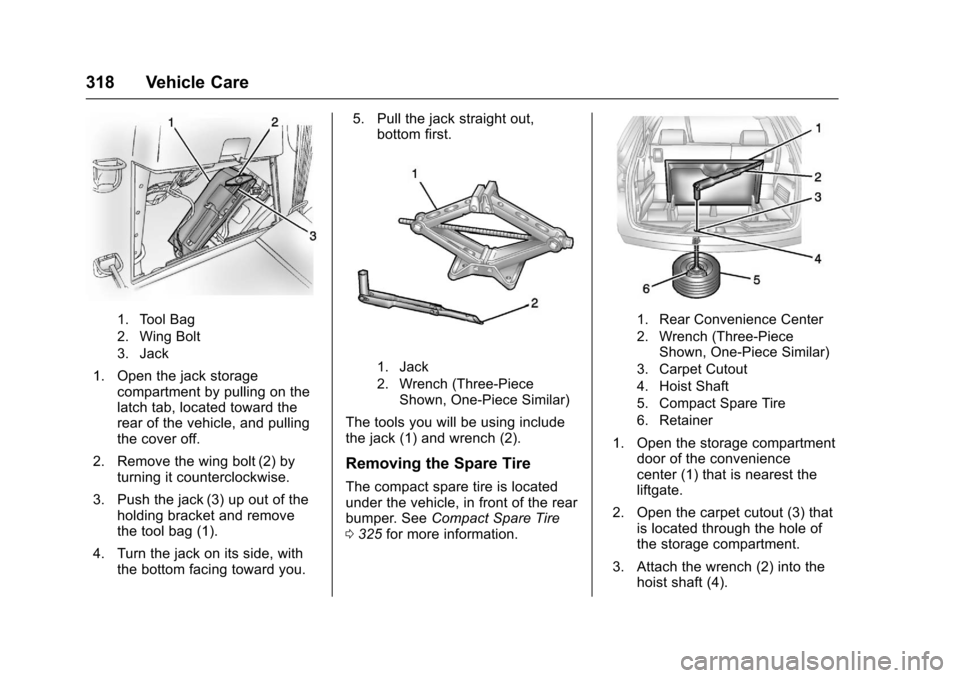
1. Tool Bag
2. Wing Bolt
3. Jack
1. Open the jack storagecompartment by pulling on the
latch tab, located toward the
rear of the vehicle, and pulling
the cover off.
2. Remove the wing bolt (2) by turning it counterclockwise.
3. Push the jack (3) up out of the holding bracket and remove
the tool bag (1).
4. Turn the jack on its side, with the bottom facing toward you. 5. Pull the jack straight out,
bottom first.1. Jack
2. Wrench (Three-Piece
Shown, One-Piece Similar)
The tools you will be using include
the jack (1) and wrench (2).
Removing the Spare Tire
The compact spare tire is located
under the vehicle, in front of the rear
bumper. See Compact Spare Tire
0 325 for more information.
1. Rear Convenience Center
2. Wrench (Three-Piece
Shown, One-Piece Similar)
3. Carpet Cutout
4. Hoist Shaft
5. Compact Spare Tire
6. Retainer
1. Open the storage compartment door of the convenience
center (1) that is nearest the
liftgate.
2. Open the carpet cutout (3) that is located through the hole of
the storage compartment.
3. Attach the wrench (2) into the hoist shaft (4).
Page 324 of 394
Chevrolet Traverse Owner Manual (GMNA-Localizing-U.S./Canada/Mexico-
9955676) - 2017 - crc - 3/29/16
Vehicle Care 323
{Warning
Storing a jack, a tire, or other
equipment in the passenger
compartment of the vehicle could
cause injury. In a sudden stop or
collision, loose equipment could
strike someone. Store all these in
the proper place.
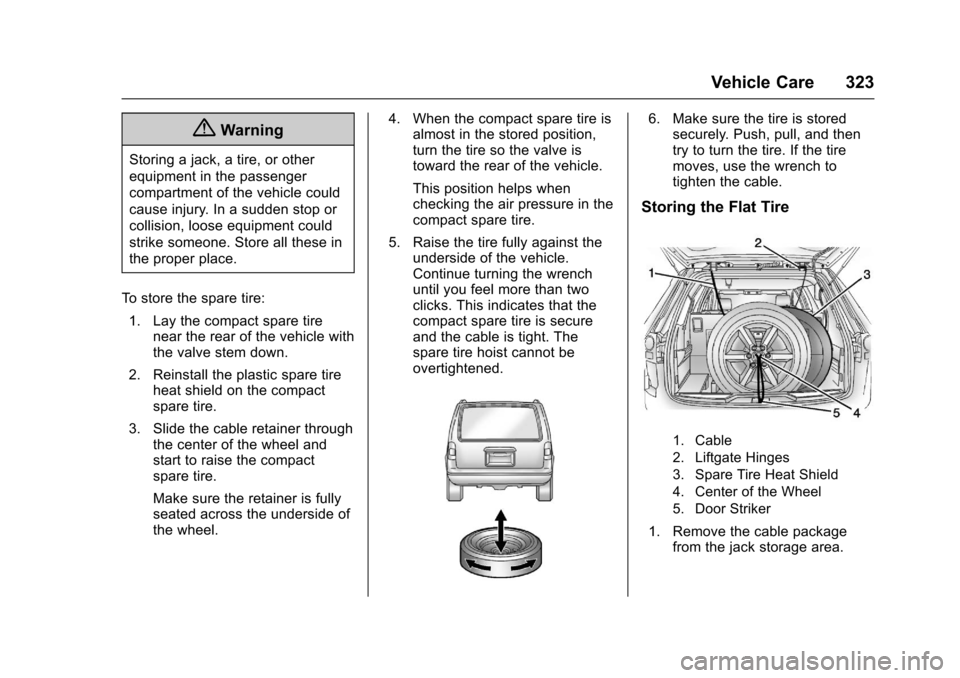
To store the spare tire: 1. Lay the compact spare tire near the rear of the vehicle with
the valve stem down.
2. Reinstall the plastic spare tire heat shield on the compact
spare tire.
3. Slide the cable retainer through the center of the wheel and
start to raise the compact
spare tire.
Make sure the retainer is fully
seated across the underside of
the wheel. 4. When the compact spare tire is
almost in the stored position,
turn the tire so the valve is
toward the rear of the vehicle.
This position helps when
checking the air pressure in the
compact spare tire.
5. Raise the tire fully against the underside of the vehicle.
Continue turning the wrench
until you feel more than two
clicks. This indicates that the
compact spare tire is secure
and the cable is tight. The
spare tire hoist cannot be
overtightened.
6. Make sure the tire is storedsecurely. Push, pull, and then
try to turn the tire. If the tire
moves, use the wrench to
tighten the cable.
Storing the Flat Tire
1. Cable
2. Liftgate Hinges
3. Spare Tire Heat Shield
4. Center of the Wheel
5. Door Striker
1. Remove the cable package
from the jack storage area.
Page 325 of 394
Chevrolet Traverse Owner Manual (GMNA-Localizing-U.S./Canada/Mexico-
9955676) - 2017 - crc - 3/29/16
324 Vehicle Care
2. Remove the small center capby tapping the back of the cap
with the extension of the shaft,
if the vehicle has aluminum
wheels.
3. Put the flat tire in the rear storage area with the valve
stem pointing toward the rear
of the vehicle.
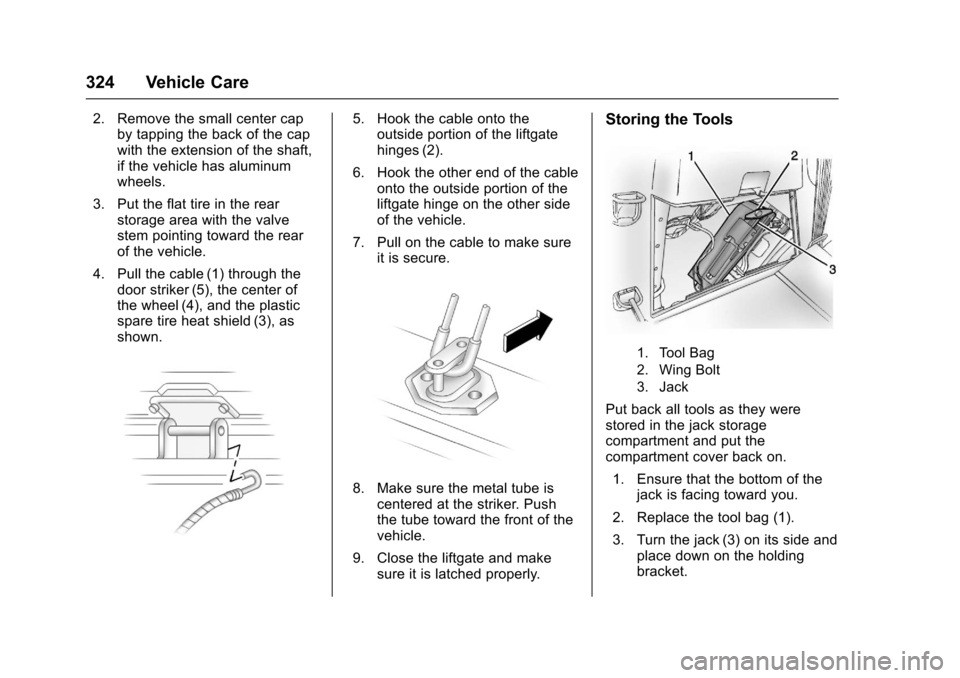
4. Pull the cable (1) through the door striker (5), the center of
the wheel (4), and the plastic
spare tire heat shield (3), as
shown.5. Hook the cable onto theoutside portion of the liftgate
hinges (2).
6. Hook the other end of the cable onto the outside portion of the
liftgate hinge on the other side
of the vehicle.
7. Pull on the cable to make sure it is secure.
8. Make sure the metal tube is
centered at the striker. Push
the tube toward the front of the
vehicle.
9. Close the liftgate and make sure it is latched properly.
Storing the Tools
1. Tool Bag
2. Wing Bolt
3. Jack
Put back all tools as they were
stored in the jack storage
compartment and put the
compartment cover back on.
1. Ensure that the bottom of the jack is facing toward you.
2. Replace the tool bag (1).
3. Turn the jack (3) on its side and place down on the holding
bracket.
Page 338 of 394
Chevrolet Traverse Owner Manual (GMNA-Localizing-U.S./Canada/Mexico-
9955676) - 2017 - crc - 3/29/16
Vehicle Care 337
Caution (Continued)
brushes. Damage could occur
and the repairs would not be
covered by the vehicle warranty.
Brake System
Visually inspect brake lines and
hoses for proper hook-up, binding,
leaks, cracks, chafing, etc. Inspect
disc brake pads for wear and rotors
for surface condition. Inspect drum
brake linings/shoes for wear or
cracks. Inspect all other brake parts.
Steering, Suspension, and
Chassis Components
Visually inspect steering,
suspension, and chassis
components for damaged, loose,
or missing parts or signs of wear at
least once a year.
Inspect power steering for proper
attachment, connections, binding,
leaks, cracks, chafing, etc.
Visually check constant velocity joint
boots and axle seals for leaks.
Body Component Lubrication
Lubricate all key lock cylinders,
hood hinges, liftgate hinges, and the
steel fuel door hinges, unless the
components are plastic. Applying
silicone grease on weatherstrips
with a clean cloth will make them
last longer, seal better, and not stick
or squeak.
Underbody Maintenance
At least twice a year, spring and fall,
use plain water to flush any
corrosive materials from the
underbody. Take care to thoroughly
clean any areas where mud and
other debris can collect.
Do not directly power wash the
transfer case and/or front/rear axle
output seals. High pressure water
can overcome the seals and
contaminate the fluid. Contaminated
fluid will decrease the life of the
transfer case and/or axles and
should be replaced.
Sheet Metal Damage
If the vehicle is damaged and
requires sheet metal repair or
replacement, make sure the body
repair shop applies anti-corrosion
material to parts repaired or
replaced to restore corrosion
protection.
Original manufacturer replacement
parts will provide the corrosion
protection while maintaining the
vehicle warranty.
Finish Damage
Quickly repair minor chips and
scratches with touch-up materials
available from your dealer to avoid
corrosion. Larger areas of finish
damage can be corrected in your
dealer's body and paint shop.
Chemical Paint Spotting
Airborne pollutants can fall upon
and attack painted vehicle surfaces
causing blotchy, ring-shaped
discolorations, and small, irregular
dark spots etched into the paint
surface. See“Finish Care”
previously in this section.
Page 385 of 394

Chevrolet Traverse Owner Manual (GMNA-Localizing-U.S./Canada/Mexico-
9955676) - 2017 - crc - 3/29/16
384 Index
AudioTheft-Deterrent Feature . . . . . . . 165
Audio Players CD . . . . . . . . . . . . . . . . . . . . . . 182, 184
MP3 . . . . . . . . . . . . . . . . . . . . . 186, 191
Automatic Dimming Mirrors . . . . . . . . . . . . . . . . 46
Door Locks . . . . . . . . . . . . . . . . . . . . . 38
Transmission . . . . . . . . . . . . . . . . . 235
Transmission Fluid . . . . . . . . . . . 274
Automatic Transmission
Manual Mode . . . . . . . . . . . . . . . . . 236
Shift Lock Control FunctionCheck . . . . . . . . . . . . . . . . . . . . . . . 286
Auxiliary Devices . . . . . . . . . . . . . . . . . . . . . . . 193
B
Battery
Load Management . . . . . . . . . . . . 162
Power Protection . . . . . . . . . . . . . 163
Voltage and ChargingMessages . . . . . . . . . . . . . . . . . . . 138
Battery - North America . . . . 284, 326
Blade Replacement, Wiper . . . . . 287
Bluetooth Overview . . . . . . . . . . . . . . . . . . . . . 196
Brake System Warning Light . . . . . . . . 126 Brakes . . . . . . . . . . . . . . . . . . . . . . . . . . 283
Antilock . . . . . . . . . . . . . . . . . . . . . . . 238
Assist . . . . . . . . . . . . . . . . . . . . . . . . . 240
Fluid . . . . . . . . . . . . . . . . . . . . . . . . . . 283
Parking . . . . . . . . . . . . . . . . . . . . . . . 239
System Messages . . . . . . . . . . . . 138
Braking . . . . . . . . . . . . . . . . . . . . . . . . . 218
Break-In, New Vehicle . . . . . . . . . . 227
Bulb Replacement . . . . . . . . . . . . . . 289
Headlamp Aiming . . . . . . . . . . . . . 288
Headlamps . . . . . . . . . . . . . . . . . . . 288
License Plate Lamps . . . . . . . . . 289
Taillamps, Turn Signal, andStoplamps . . . . . . . . . . . . . . . . . . 288
Buying New Tires . . . . . . . . . . . . . . . 311
C
Calibration . . . . . . . . . . . . . . . . . . . . . . 112
California Fuel Requirements . . . . . . . . . . . 254
Perchlorate MaterialsRequirements . . . . . . . . . . . . . . . 266
California Proposition
65 Warning . . . . . . . . . .266, 284, 326
Camera
Rear Vision (RVC) . . . . . . . . . . . . 244
Canadian Vehicle Owners . . . . . . . . 2 Capacities and
Specifications . . . . . . . . . . . . . . . . . 357
Carbon Monoxide Engine Exhaust . . . . . . . . . . . . . . . 234
Liftgate . . . . . . . . . . . . . . . . . . . . . . . . . 39
Winter Driving . . . . . . . . . . . . . . . . 221
Cargo
Cover . . . . . . . . . . . . . . . . . . . . . . . . . 105
Management System . . . . . . . . . 105
Tie-Downs . . . . . . . . . . . . . . . . . . . . 105
Caution, Danger, and Warning . . . . 2
CD Player . . . . . . . . . . . . . . . . . 182, 184
Center Console Storage . . . . . . . . 104
Chains, Tire . . . . . . . . . . . . . . . . . . . . 316
Charging System Light . . . . . . . . . 123
Check
Ignition Transmission Lock . . . 286
Malfunction IndicatorEngine Light . . . . . . . . . . . . . . . . 124
Child Restraints Infants and Young Children . . . . . 85
Lower Anchors and Tethers
for Children . . . . . . . . . . . . . . . . . . . 91
Older Children . . . . . . . . . . . . . . . . . . 84
Securing . . . . . . . . . . . . . . . . . . . . 97, 99
Systems . . . . . . . . . . . . . . . . . . . . . . . . 88
Circuit Breakers . . . . . . . . . . . . . . . . 291