CHEVROLET TRAX 2013 1.G Owners Manual
Manufacturer: CHEVROLET, Model Year: 2013, Model line: TRAX, Model: CHEVROLET TRAX 2013 1.GPages: 408, PDF Size: 6.59 MB
Page 261 of 408
Black plate (41,1)Chevrolet TRAX Owner Manual - 2013 - CRC - 3/6/13
Driving and Operating 9-41
SeeMalfunction Indicator Lamp on
page 5‑13. If this occurs, return to
your authorized dealer for diagnosis.
If it is determined that the condition
is caused by the type of fuel used,
repairs might not be covered by the
vehicle warranty.
Fuels in Foreign
Countries
Never use leaded gasoline or any
other fuel not recommended in the
previous text on fuel. Costly repairs
caused by use of improper fuel
would not be covered by the vehicle
warranty.
To check the fuel availability, ask an
auto club, or contact a major oil
company that does business in the
country where you will be driving.
Fuel Additives
Gasoline should contain detergent
additives that help prevent engine
and fuel system deposits from
forming. Clean fuel injectors and
intake valves will allow the emission
control system to work properly.
Some gasoline does not contain
sufficient quantities of additive to
keep fuel injectors and intake valves
clean. To make up for this lack of
detergency, it is recommended that
GM Fuel System Treatment PLUS
(GM Part No. 88861011) be added
to the fuel tank at every engine oil
change or every 15 000 km,
whichever occurs first.
Gasolines containing oxygenates,
such as ethers and ethanol, may
be available in your area.
However, fuels containing more
than 15% ethanol, such as
E85 (85% ethanol), or more
than 15% MTBE (an ether) should
not be used in vehicles that were
not designed for those fuels. See
Recommended Fluids and
Lubricants on page 11‑13 for
more information.
Notice: This vehicle was not
designed for fuel that contains
methanol. Do not use fuel
containing methanol. It can
corrode metal parts in the fuel
system and also damage plastic
and rubber parts. That damage
would not be covered under the
vehicle warranty.
Some gasolines can contain an
octane-enhancing additive called
methylcyclopentadienyl manganese
tricarbonyl (MMT); ask the attendant
where you buy gasoline whether the
fuel contains MMT. We recommend
against the use of such gasolines.
Fuels containing MMT can reduce
spark plug life and affect emission
control system performance. The
malfunction indicator lamp might
turn on. If this occurs, return to your
dealer for service.
Page 262 of 408
Black plate (42,1)Chevrolet TRAX Owner Manual - 2013 - CRC - 3/6/13
9-42 Driving and Operating
Filling the Tank
{WARNING
Fuel vapors and fuel fires burn
violently and can cause injury or
death.
.To help avoid injuries to you
and others, read and follow
all the instructions on the fuel
pump island.
.Turn off the engine when
refueling.
.Keep sparks, flames, and
smoking materials away
from fuel.
.Do not leave the fuel pump
unattended.
.Do not reenter the vehicle
while pumping fuel.(Continued)
WARNING (Continued)
.Keep children away from the
fuel pump and never let
children pump fuel.
.Fuel can spray out if the fuel
cap is opened too quickly.
This spray can happen if the
tank is nearly full, and is
more likely in hot weather.
Open the fuel cap slowly and
wait for any hiss noise to stop
then unscrew the cap all
the way
The tethered fuel cap is located
behind a hinged fuel door on the
right rear side of the vehicle. If
equipped, the fuel door is locked
when the vehicle doors are locked.
Press
Kon the RKE to unlock.
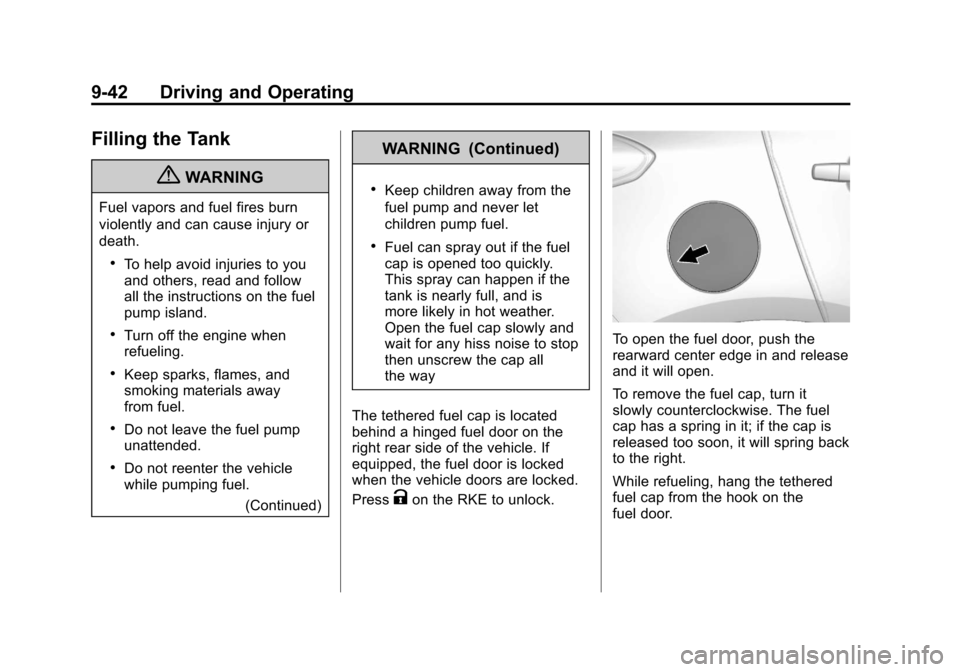
To open the fuel door, push the
rearward center edge in and release
and it will open.
To remove the fuel cap, turn it
slowly counterclockwise. The fuel
cap has a spring in it; if the cap is
released too soon, it will spring back
to the right.
While refueling, hang the tethered
fuel cap from the hook on the
fuel door.
Page 263 of 408
Black plate (43,1)Chevrolet TRAX Owner Manual - 2013 - CRC - 3/6/13
Driving and Operating 9-43
Be careful not to spill fuel. Do not
top off or overfill the tank and wait a
few seconds after you have finished
pumping before removing the
nozzle. Clean fuel from painted
surfaces as soon as possible. See
Exterior Care on page 10‑74.
When replacing the fuel cap, turn it
clockwise until it clicks. Make sure
the cap is fully installed. The
diagnostic system can determine if
the fuel cap has been left off or
improperly installed. This would
allow fuel to evaporate into the
atmosphere. SeeMalfunction
Indicator Lamp on page 5‑13.
{WARNING
If a fire starts while you are
refueling, do not remove the
nozzle. Shut off the flow of fuel by
shutting off the pump or by
notifying the station attendant.
Leave the area immediately. Notice:
If a new fuel cap is
needed, be sure to get the right
type of cap from your dealer. The
wrong type of fuel cap might not
fit properly, might cause the
malfunction indicator lamp to
light, and could damage the fuel
tank and emissions system. See
Malfunction Indicator Lamp on
page 5‑13.
Filling a Portable Fuel
Container
{WARNING
Filling a portable fuel container
while it is in the vehicle can cause
fuel vapors that can ignite either
by static electricity or other
means. You or others could be
badly burned and the vehicle
could be damaged.
(Continued)
WARNING (Continued)
Always:
.Use approved fuel
containers.
.Remove container from
vehicle, trunk, or pickup bed
before filling.
.Place container on the
ground.
.Place the nozzle inside the fill
opening of the container
before dispensing fuel, and
keep it in contact with the fill
opening until filling is
complete.
.Do not smoke while
pumping fuel.
Page 264 of 408
Black plate (44,1)Chevrolet TRAX Owner Manual - 2013 - CRC - 3/6/13
9-44 Driving and Operating
Towing
General Towing
Information
The vehicle is neither designed nor
intended to tow a trailer.
Conversions and
Add-Ons
Add-On Electrical
Equipment
Notice:Some electrical
equipment can damage the
vehicle or cause components to
not work and would not be
covered by the warranty. Always
check with your dealer before
adding electrical equipment.
Add-on equipment can drain the
vehicle's 12-volt battery, even if the
vehicle is not operating. The vehicle has an airbag system.
Before attempting to add anything
electrical to the vehicle, see
Servicing the Airbag-Equipped
Vehicle on page 3‑36
andAdding
Equipment to the Airbag-Equipped
Vehicle on page 3‑36.
Page 265 of 408
Black plate (1,1)Chevrolet TRAX Owner Manual - 2013 - CRC - 3/6/13
Vehicle Care 10-1
Vehicle Care
General Information
General Information . . . . . . . . . . 10-2
California Proposition65 Warning . . . . . . . . . . . . . . . . . 10-3
California Perchlorate Materials Requirements . . . . 10-3
Accessories and Modifications . . . . . . . . . . . . . . . 10-3
Vehicle Checks
Doing Your OwnService Work . . . . . . . . . . . . . . . 10-4
Hood . . . . . . . . . . . . . . . . . . . . . . . . 10-4
Engine Compartment Overview . . . . . . . . . . . . . . . . . . . 10-6
Engine Oil . . . . . . . . . . . . . . . . . . . 10-9
Engine Oil Life System . . . . . 10-11
Automatic Transmission Fluid . . . . . . . . . . . . . . . . . . . . . . 10-12
Manual Transmission Fluid . . . . . . . . . . . . . . . . . . . . . . 10-13 Hydraulic Clutch . . . . . . . . . . . . 10-13
Engine Air Cleaner/Filter . . . . 10-13
Cooling System . . . . . . . . . . . . 10-15
Engine Coolant . . . . . . . . . . . . . 10-16
Engine Overheating . . . . . . . . 10-18
Power Steering Fluid (1.4L
L4 Engine) . . . . . . . . . . . . . . . . 10-20
Power Steering Fluid (1.8L L4 Engine) . . . . . . . . . . . . . . . . 10-20
Washer Fluid . . . . . . . . . . . . . . . 10-21
Brakes . . . . . . . . . . . . . . . . . . . . . 10-21
Brake Fluid . . . . . . . . . . . . . . . . . 10-22
Battery . . . . . . . . . . . . . . . . . . . . . 10-24
All-Wheel Drive . . . . . . . . . . . . . 10-24
Starter Switch Check . . . . . . . 10-24
Automatic Transmission Shift Lock Control Function
Check . . . . . . . . . . . . . . . . . . . . . 10-25
Ignition Transmission Lock Check . . . . . . . . . . . . . . . . . . . . . 10-25
Park Brake and P (Park) Mechanism Check . . . . . . . . 10-26
Wiper Blade Replacement . . . . . . . . . . . . . . 10-26
Headlamp Aiming
Headlamp Aiming . . . . . . . . . . 10-28
Bulb Replacement
Bulb Replacement . . . . . . . . . . 10-28
Halogen Bulbs . . . . . . . . . . . . . . 10-28
Headlamps, Front TurnSignal and Parking
Lamps . . . . . . . . . . . . . . . . . . . . 10-28
Taillamps, Turn Signal, Sidemarker, Stoplamps,
and Back-Up Lamps . . . . . . 10-30
License Plate Lamp . . . . . . . . 10-31
Replacement Bulbs . . . . . . . . . 10-32
Electrical System
Electrical System Overload . . . . . . . . . . . . . . . . . . 10-32
Fuses and Circuit Breakers . . . . . . . . . . . . . . . . . . 10-33
Engine Compartment Fuse Block . . . . . . . . . . . . . . . . . . . . . 10-33
Instrument Panel Fuse Block . . . . . . . . . . . . . . . . . . . . . 10-36
Rear Compartment Fuse Block . . . . . . . . . . . . . . . . . . . . . 10-39
Page 266 of 408
Black plate (2,1)Chevrolet TRAX Owner Manual - 2013 - CRC - 3/6/13
10-2 Vehicle Care
Wheels and Tires
Tires . . . . . . . . . . . . . . . . . . . . . . . . 10-40
All-Season Tires . . . . . . . . . . . . 10-41
Winter Tires . . . . . . . . . . . . . . . . 10-42
Summer Tires . . . . . . . . . . . . . . 10-42
Tire Sidewall Labeling . . . . . . 10-42
Tire Designations . . . . . . . . . . . 10-44
Tire Terminology andDefinitions . . . . . . . . . . . . . . . . 10-45
Tire Pressure . . . . . . . . . . . . . . . 10-48
Tire Pressure Monitor System . . . . . . . . . . . . . . . . . . . 10-49
Tire Pressure Monitor Operation . . . . . . . . . . . . . . . . . 10-50
Tire Inspection . . . . . . . . . . . . . . 10-53
Tire Rotation . . . . . . . . . . . . . . . 10-54
When It Is Time for New Tires . . . . . . . . . . . . . . . . . . . . . . 10-55
Buying New Tires . . . . . . . . . . . 10-56
Different Size Tires and Wheels . . . . . . . . . . . . . . . . . . . 10-57 Uniform Tire Quality
Grading . . . . . . . . . . . . . . . . . . . 10-58
Wheel Alignment and Tire Balance . . . . . . . . . . . . . . . . . . . 10-59
Wheel Replacement . . . . . . . . 10-60
Tire Chains . . . . . . . . . . . . . . . . . 10-60
If a Tire Goes Flat . . . . . . . . . . 10-61
Tire Changing . . . . . . . . . . . . . . 10-62
Compact Spare Tire . . . . . . . . 10-67
Full-Size Spare Tire . . . . . . . . 10-67
Jump Starting
Jump Starting . . . . . . . . . . . . . . 10-68
Towing
Towing the Vehicle . . . . . . . . . 10-71
Recreational Vehicle
Towing . . . . . . . . . . . . . . . . . . . . 10-71
Appearance Care
Exterior Care . . . . . . . . . . . . . . . 10-74
Interior Care . . . . . . . . . . . . . . . . 10-77
Floor Mats . . . . . . . . . . . . . . . . . . 10-80
General Information
For service and parts needs, visit
your dealer. You will receive
genuine GM parts and GM-trained
and supported service people.
Genuine GM parts have one of
these marks:
Page 267 of 408
Black plate (3,1)Chevrolet TRAX Owner Manual - 2013 - CRC - 3/6/13
Vehicle Care 10-3
California Proposition
65 Warning
Most motor vehicles, including this
one, contain and/or emit chemicals
known to the State of California to
cause cancer and birth defects or
other reproductive harm. Engine
exhaust, many parts and systems,
many fluids, and some component
wear by-products contain and/or
emit these chemicals.
California Perchlorate
Materials Requirements
Certain types of automotive
applications, such as airbag
initiators, safety belt pretensioners,
and lithium batteries contained in
Remote Keyless Entry transmitters,
may contain perchlorate materials.
Special handling may be necessary.
For additional information, see
www.dtsc.ca.gov/hazardouswaste/
perchlorate.
Accessories and
Modifications
Adding non‐dealer accessories or
making modifications to the vehicle
can affect vehicle performance and
safety, including such things as
airbags, braking, stability, ride and
handling, emissions systems,
aerodynamics, durability, and
electronic systems like antilock
brakes, traction control, and stability
control. These accessories or
modifications could even cause
malfunction or damage not covered
by the vehicle warranty.
Damage to vehicle components
resulting from modifications or the
installation or use of non‐GM
certified parts, including control
module or software modifications, is
not covered under the terms of the
vehicle warranty and may affect
remaining warranty coverage for
affected parts.GM Accessories are designed to
complement and function with other
systems on the vehicle. See your
dealer to accessorize the vehicle
using genuine GM Accessories
installed by a dealer technician.
Also, see
Adding Equipment to the
Airbag-Equipped Vehicle on
page 3‑36.
Page 268 of 408
Black plate (4,1)Chevrolet TRAX Owner Manual - 2013 - CRC - 3/6/13
10-4 Vehicle Care
Vehicle Checks
Doing Your Own
Service Work
{WARNING
It can be dangerous to work on
your vehicle if you do not have
the proper knowledge, service
manual, tools, or parts. Always
follow owner manual procedures
and consult the service manual
for your vehicle before doing any
service work.
If doing some of your own service
work, use the proper service
manual. It tells you much more
about how to service the vehicle
than this manual can. To order the
proper service manual, see Service
Publications Ordering Information
on page 13‑15. This vehicle has an airbag system.
Before attempting to do your own
service work, see
Servicing the
Airbag-Equipped Vehicle on
page 3‑36.
Keep a record with all parts receipts
and list the mileage and the date of
any service work performed. See
Maintenance Records on
page 11‑16.
Notice: Even small amounts of
contamination can cause damage
to vehicle systems. Do not allow
contaminants to contact the
fluids, reservoir caps,
or dipsticks.
Hood
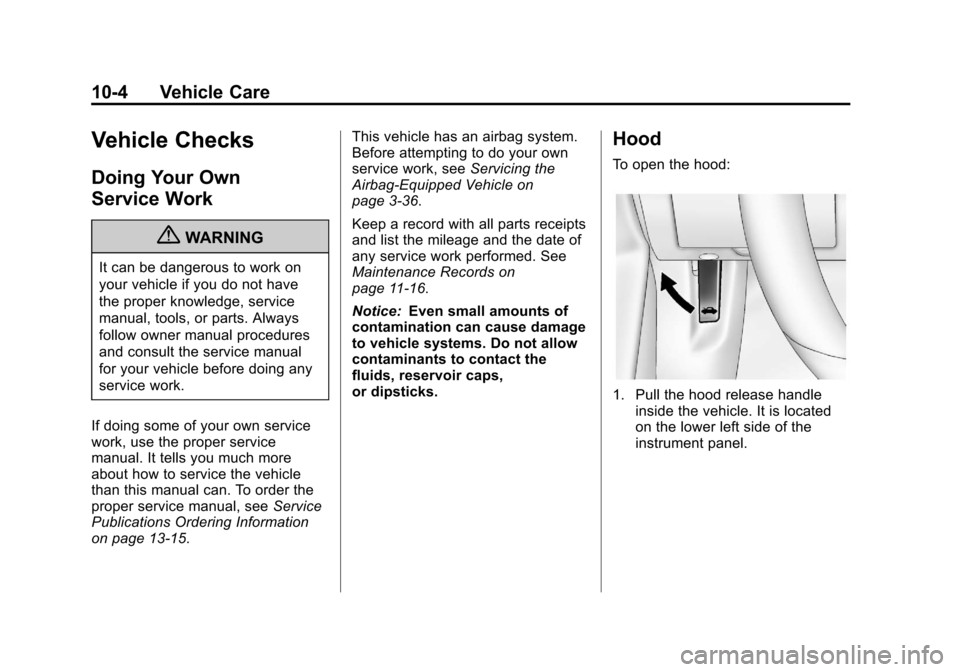
To open the hood:
1. Pull the hood release handle inside the vehicle. It is located
on the lower left side of the
instrument panel.
Page 269 of 408
Black plate (5,1)Chevrolet TRAX Owner Manual - 2013 - CRC - 3/6/13
Vehicle Care 10-5
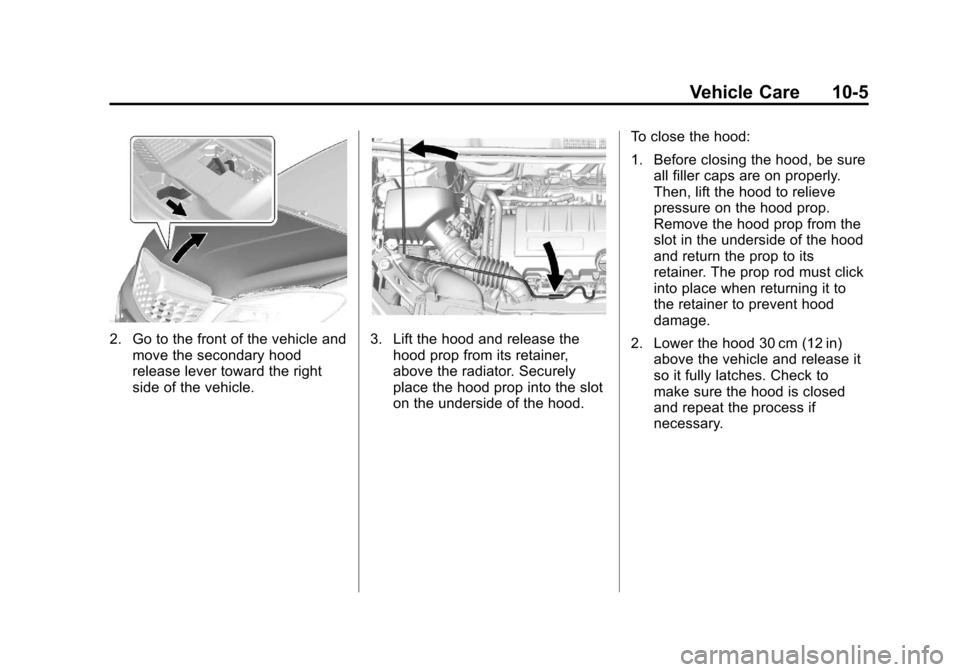
2. Go to the front of the vehicle andmove the secondary hood
release lever toward the right
side of the vehicle.3. Lift the hood and release thehood prop from its retainer,
above the radiator. Securely
place the hood prop into the slot
on the underside of the hood. To close the hood:
1. Before closing the hood, be sure
all filler caps are on properly.
Then, lift the hood to relieve
pressure on the hood prop.
Remove the hood prop from the
slot in the underside of the hood
and return the prop to its
retainer. The prop rod must click
into place when returning it to
the retainer to prevent hood
damage.
2. Lower the hood 30 cm (12 in) above the vehicle and release it
so it fully latches. Check to
make sure the hood is closed
and repeat the process if
necessary.
Page 270 of 408
Black plate (6,1)Chevrolet TRAX Owner Manual - 2013 - CRC - 3/6/13
10-6 Vehicle Care
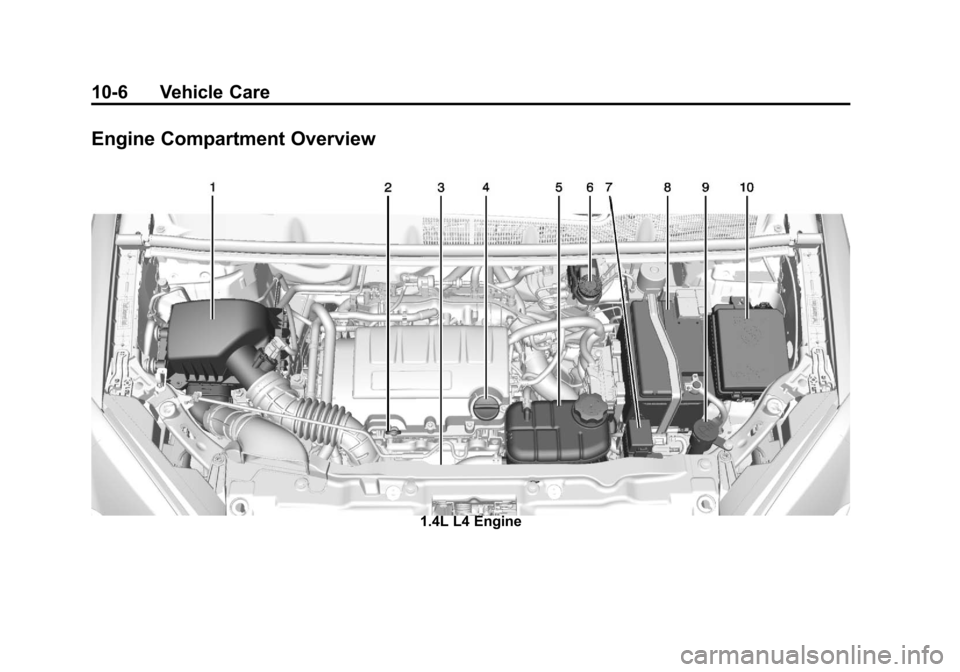
Engine Compartment Overview
1.4L L4 Engine