sensor CHEVROLET TRAX 2015 1.G User Guide
[x] Cancel search | Manufacturer: CHEVROLET, Model Year: 2015, Model line: TRAX, Model: CHEVROLET TRAX 2015 1.GPages: 409, PDF Size: 5.58 MB
Page 153 of 409
Black plate (2,1)Chevrolet TRAX Owner Manual (GMNA-Localizing-U.S./Canada/Mexico-
7576294) - 2015 - CRC - 2/6/15
6-2 Lighting
Headlamp High/
Low-Beam Changer
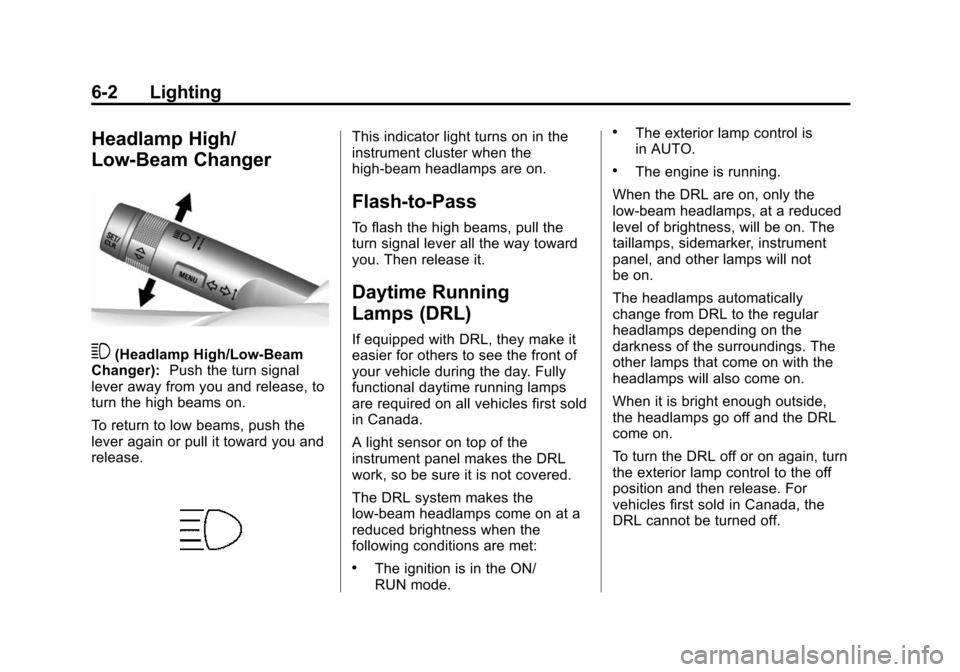
3(Headlamp High/Low-Beam
Changer): Push the turn signal
lever away from you and release, to
turn the high beams on.
To return to low beams, push the
lever again or pull it toward you and
release.
This indicator light turns on in the
instrument cluster when the
high-beam headlamps are on.
Flash-to-Pass
To flash the high beams, pull the
turn signal lever all the way toward
you. Then release it.
Daytime Running
Lamps (DRL)
If equipped with DRL, they make it
easier for others to see the front of
your vehicle during the day. Fully
functional daytime running lamps
are required on all vehicles first sold
in Canada.
A light sensor on top of the
instrument panel makes the DRL
work, so be sure it is not covered.
The DRL system makes the
low-beam headlamps come on at a
reduced brightness when the
following conditions are met:
.The ignition is in the ON/
RUN mode.
.The exterior lamp control is
in AUTO.
.The engine is running.
When the DRL are on, only the
low-beam headlamps, at a reduced
level of brightness, will be on. The
taillamps, sidemarker, instrument
panel, and other lamps will not
be on.
The headlamps automatically
change from DRL to the regular
headlamps depending on the
darkness of the surroundings. The
other lamps that come on with the
headlamps will also come on.
When it is bright enough outside,
the headlamps go off and the DRL
come on.
To turn the DRL off or on again, turn
the exterior lamp control to the off
position and then release. For
vehicles first sold in Canada, the
DRL cannot be turned off.
Page 154 of 409
Black plate (3,1)Chevrolet TRAX Owner Manual (GMNA-Localizing-U.S./Canada/Mexico-
7576294) - 2015 - CRC - 2/6/15
Lighting 6-3
Automatic Headlamp
System
If equipped, the headlamps come on
automatically when it is dark enough
outside and the exterior lamp
control is in the automatic position.
SeeExterior Lamp Controls on
page 6-1.
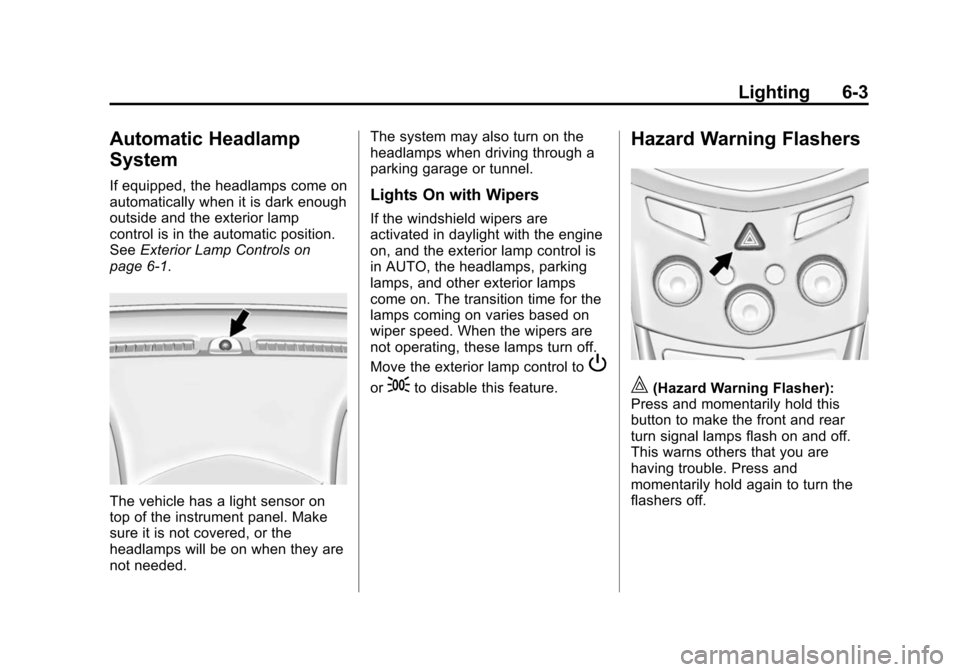
The vehicle has a light sensor on
top of the instrument panel. Make
sure it is not covered, or the
headlamps will be on when they are
not needed. The system may also turn on the
headlamps when driving through a
parking garage or tunnel.
Lights On with Wipers
If the windshield wipers are
activated in daylight with the engine
on, and the exterior lamp control is
in AUTO, the headlamps, parking
lamps, and other exterior lamps
come on. The transition time for the
lamps coming on varies based on
wiper speed. When the wipers are
not operating, these lamps turn off.
Move the exterior lamp control to
P
or;to disable this feature.
Hazard Warning Flashers
|(Hazard Warning Flasher):
Press and momentarily hold this
button to make the front and rear
turn signal lamps flash on and off.
This warns others that you are
having trouble. Press and
momentarily hold again to turn the
flashers off.
Page 262 of 409
Black plate (37,1)Chevrolet TRAX Owner Manual (GMNA-Localizing-U.S./Canada/Mexico-
7576294) - 2015 - CRC - 2/6/15
Driving and Operating 9-37
Driver Assistance
Systems
Parking Assist
For vehicles with the Rear Parking
Assist (RPA) system, it assists the
driver with parking and avoiding
objects while in R (Reverse). RPA
operates at speeds less than 8 km/h
(5 mph), and the sensors on the rear
bumper detect objects up to 2.5 m
(8 ft) behind the vehicle, and at least
20 cm (8 in) off the ground.
{Warning
The parking assist system does
not detect children, pedestrians,
bicyclists, animals, or objects
below the bumper or that are too
close or too far from the vehicle.
It is not available at speeds
greater than 8 km/h (5 mph). To
prevent injury, death, or vehicle
damage, even with parking assist,(Continued)
Warning (Continued)
always check the area around the
vehicle and check all mirrors
before backing.
How the System Works
RPA comes on automatically when
the shift lever is moved into
R (Reverse).
RPA operates only at speeds less
than 8 km/h (5 mph).
An obstacle is indicated by audible
beeps. The interval between the
beeps becomes shorter as the
vehicle gets closer to the obstacle.
When the distance is less than
40 cm (16 in) the beeping is a
continuous tone for five seconds.
To be detected, objects must be at
least 20 cm (8 in) off the ground and
below liftgate level. Objects must
also be within 2.5 m (8 ft) from the
rear bumper. The distance objects
can be detected may be less during
warmer or humid weather.
Turning the System On and Off
The RPA system can be turned on
and off using the infotainment
system controls. SeeVehicle
Personalization on page 5-28.
When the System Does Not
Seem to Work Properly
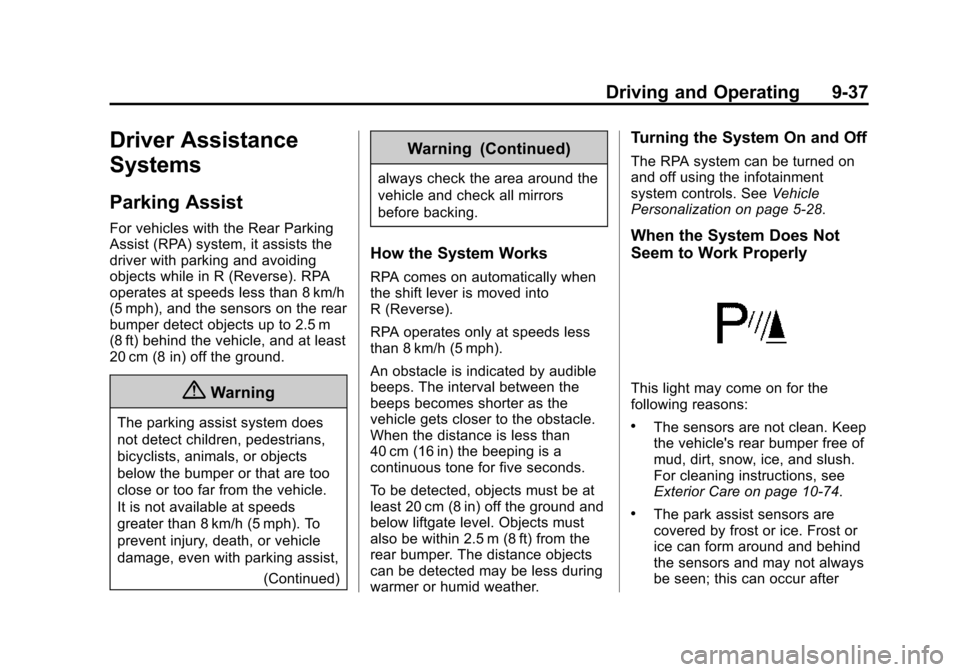
This light may come on for the
following reasons:
.The sensors are not clean. Keep
the vehicle's rear bumper free of
mud, dirt, snow, ice, and slush.
For cleaning instructions, see
Exterior Care on page 10-74.
.The park assist sensors are
covered by frost or ice. Frost or
ice can form around and behind
the sensors and may not always
be seen; this can occur after
Page 304 of 409
Black plate (35,1)Chevrolet TRAX Owner Manual (GMNA-Localizing-U.S./Canada/Mexico-
7576294) - 2015 - CRC - 2/6/15
Vehicle Care 10-35
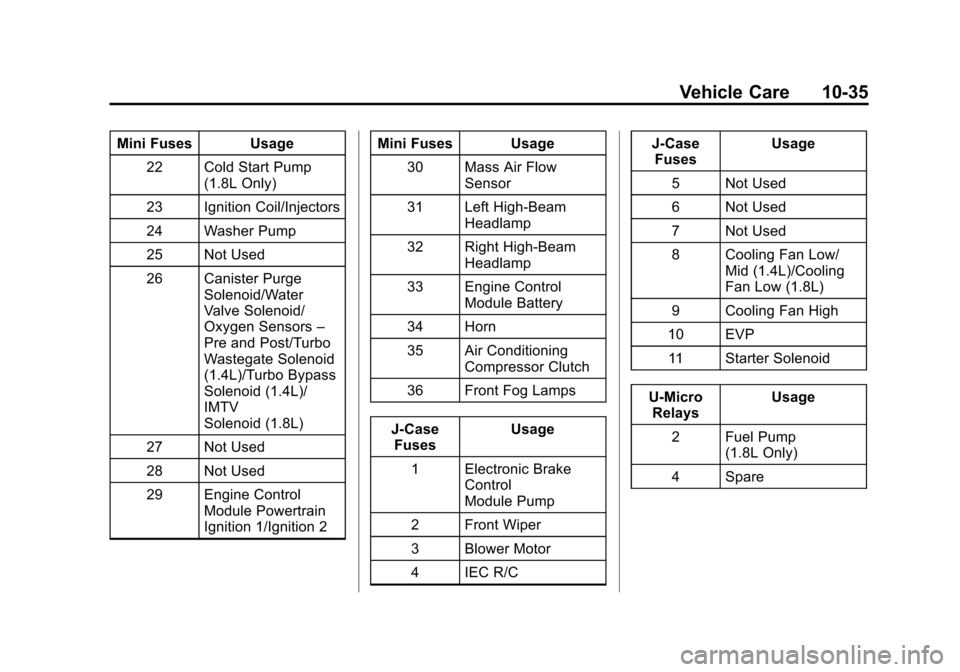
Mini Fuses Usage22 Cold Start Pump (1.8L Only)
23 Ignition Coil/Injectors
24 Washer Pump
25 Not Used
26 Canister Purge Solenoid/Water
Valve Solenoid/
Oxygen Sensors –
Pre and Post/Turbo
Wastegate Solenoid
(1.4L)/Turbo Bypass
Solenoid (1.4L)/
IMTV
Solenoid (1.8L)
27 Not Used
28 Not Used
29 Engine Control Module Powertrain
Ignition 1/Ignition 2 Mini Fuses Usage
30 Mass Air Flow Sensor
31 Left High-Beam Headlamp
32 Right High-Beam Headlamp
33 Engine Control Module Battery
34 Horn
35 Air Conditioning Compressor Clutch
36 Front Fog Lamps
J-Case Fuses Usage
1 Electronic Brake Control
Module Pump
2 Front Wiper
3 Blower Motor
4 IEC R/C J-Case
Fuses Usage
5 Not Used
6 Not Used
7 Not Used
8 Cooling Fan Low/ Mid (1.4L)/Cooling
Fan Low (1.8L)
9 Cooling Fan High
10 EVP
11 Starter Solenoid
U-Micro Relays Usage
2 Fuel Pump (1.8L Only)
4 Spare
Page 307 of 409
Black plate (38,1)Chevrolet TRAX Owner Manual (GMNA-Localizing-U.S./Canada/Mexico-
7576294) - 2015 - CRC - 2/6/15
10-38 Vehicle Care
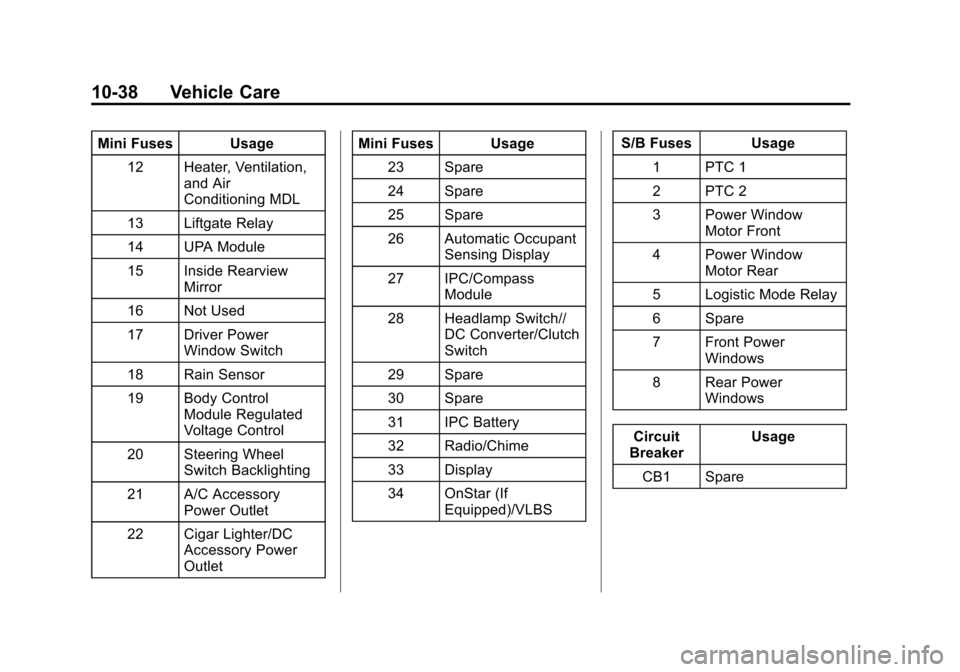
Mini Fuses Usage12 Heater, Ventilation, and Air
Conditioning MDL
13 Liftgate Relay
14 UPA Module
15 Inside Rearview Mirror
16 Not Used
17 Driver Power Window Switch
18 Rain Sensor
19 Body Control Module Regulated
Voltage Control
20 Steering Wheel Switch Backlighting
21 A/C Accessory Power Outlet
22 Cigar Lighter/DC Accessory Power
Outlet Mini Fuses Usage
23 Spare
24 Spare
25 Spare
26 Automatic Occupant Sensing Display
27 IPC/Compass Module
28 Headlamp Switch// DC Converter/Clutch
Switch
29 Spare
30 Spare
31 IPC Battery
32 Radio/Chime
33 Display
34 OnStar (If Equipped)/VLBS S/B Fuses Usage
1 PTC 1
2 PTC 2
3 Power Window Motor Front
4 Power Window Motor Rear
5 Logistic Mode Relay
6 Spare
7 Front Power Windows
8 Rear Power Windows
Circuit
Breaker Usage
CB1 Spare
Page 309 of 409
Black plate (40,1)Chevrolet TRAX Owner Manual (GMNA-Localizing-U.S./Canada/Mexico-
7576294) - 2015 - CRC - 2/6/15
10-40 Vehicle Care
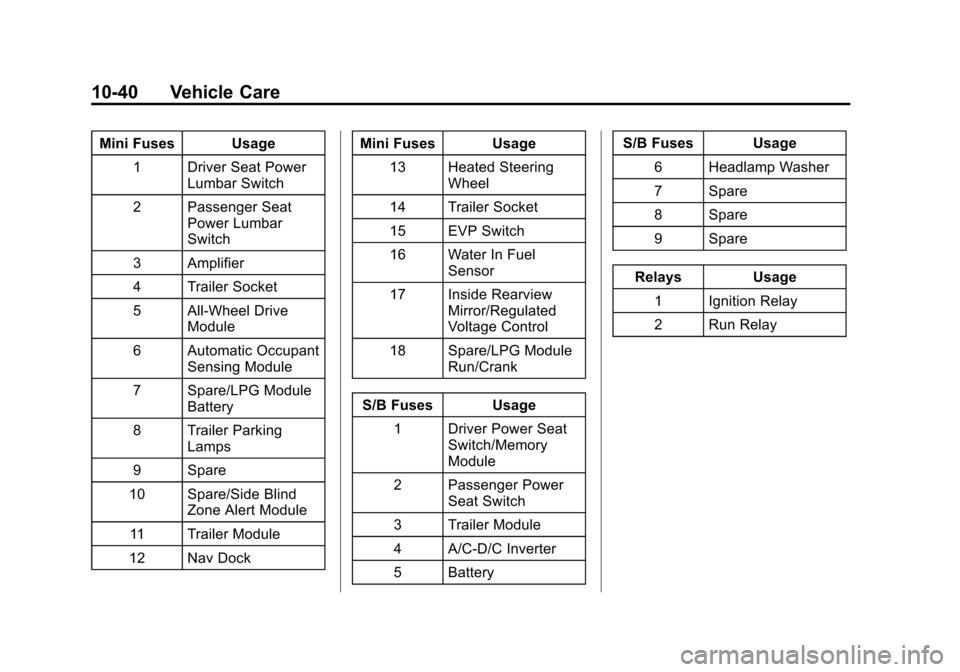
Mini Fuses Usage1 Driver Seat Power Lumbar Switch
2 Passenger Seat Power Lumbar
Switch
3 Amplifier
4 Trailer Socket
5 All-Wheel Drive Module
6 Automatic Occupant Sensing Module
7 Spare/LPG Module Battery
8 Trailer Parking Lamps
9 Spare
10 Spare/Side Blind Zone Alert Module
11 Trailer Module
12 Nav Dock Mini Fuses Usage
13 Heated Steering Wheel
14 Trailer Socket
15 EVP Switch
16 Water In Fuel Sensor
17 Inside Rearview Mirror/Regulated
Voltage Control
18 Spare/LPG Module Run/Crank
S/B Fuses Usage 1 Driver Power Seat Switch/Memory
Module
2 Passenger Power Seat Switch
3 Trailer Module
4 A/C-D/C Inverter
5 Battery S/B Fuses Usage
6 Headlamp Washer
7 Spare
8 Spare
9 Spare
Relays Usage 1 Ignition Relay
2 Run Relay
Page 319 of 409
Black plate (50,1)Chevrolet TRAX Owner Manual (GMNA-Localizing-U.S./Canada/Mexico-
7576294) - 2015 - CRC - 2/6/15
10-50 Vehicle Care
Tire Pressure Monitor
System
The Tire Pressure Monitor System
(TPMS) uses radio and sensor
technology to check tire pressure
levels. The TPMS sensors monitor
the air pressure in your tires and
transmit tire pressure readings to a
receiver located in the vehicle.
Each tire, including the spare (if
provided), should be checked
monthly when cold and inflated to
the inflation pressure recommended
by the vehicle manufacturer on the
vehicle placard or tire inflation
pressure label. (If your vehicle has
tires of a different size than the size
indicated on the vehicle placard or
tire inflation pressure label, you
should determine the proper tire
inflation pressure for those tires.)
As an added safety feature, your
vehicle has been equipped with a
tire pressure monitoring system
(TPMS) that illuminates a low tirepressure telltale when one or more
of your tires is significantly
under-inflated.
Accordingly, when the low tire
pressure telltale illuminates, you
should stop and check your tires as
soon as possible, and inflate them
to the proper pressure. Driving on a
significantly under-inflated tire
causes the tire to overheat and can
lead to tire failure. Under-inflation
also reduces fuel efficiency and tire
tread life, and may affect the
vehicle's handling and stopping
ability.
Please note that the TPMS is not a
substitute for proper tire
maintenance, and it is the driver's
responsibility to maintain correct tire
pressure, even if under-inflation has
not reached the level to trigger
illumination of the TPMS low tire
pressure telltale.
Your vehicle has also been
equipped with a TPMS malfunction
indicator to indicate when the
system is not operating properly.The TPMS malfunction indicator is
combined with the low tire pressure
telltale. When the system detects a
malfunction, the telltale will flash for
approximately one minute and then
remain continuously illuminated.
This sequence will continue upon
subsequent vehicle start-ups as
long as the malfunction exists.
When the malfunction indicator is
illuminated, the system may not be
able to detect or signal low tire
pressure as intended. TPMS
malfunctions may occur for a variety
of reasons, including the installation
of replacement or alternate tires or
wheels on the vehicle that prevent
the TPMS from functioning properly.
Always check the TPMS malfunction
telltale after replacing one or more
tires or wheels on your vehicle to
ensure that the replacement or
alternate tires and wheels allow the
TPMS to continue to function
properly.
See
Tire Pressure Monitor
Operation on page 10-51.
Page 320 of 409
Black plate (51,1)Chevrolet TRAX Owner Manual (GMNA-Localizing-U.S./Canada/Mexico-
7576294) - 2015 - CRC - 2/6/15
Vehicle Care 10-51
SeeRadio Frequency Statement on
page 13-11.
Tire Pressure Monitor
Operation
This vehicle may have a Tire
Pressure Monitor System (TPMS).
The TPMS is designed to warn the
driver when a low tire pressure
condition exists. TPMS sensors are
mounted onto each tire and wheel
assembly, excluding the spare tire
and wheel assembly. The TPMS
sensors monitor the air pressure in
the tires and transmit the tire
pressure readings to a receiver
located in the vehicle.
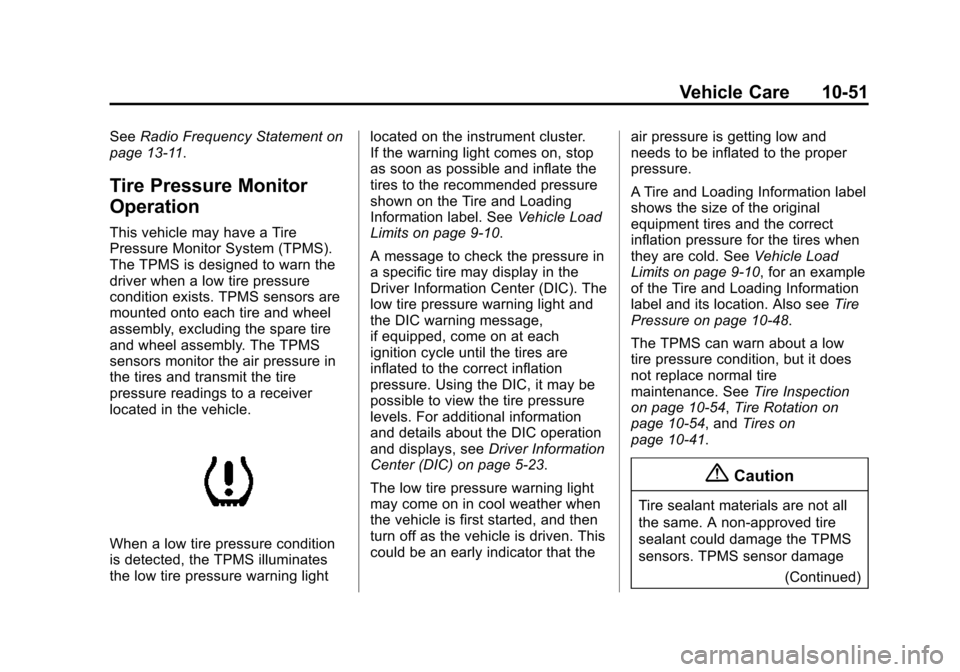
When a low tire pressure condition
is detected, the TPMS illuminates
the low tire pressure warning light located on the instrument cluster.
If the warning light comes on, stop
as soon as possible and inflate the
tires to the recommended pressure
shown on the Tire and Loading
Information label. See
Vehicle Load
Limits on page 9-10.
A message to check the pressure in
a specific tire may display in the
Driver Information Center (DIC). The
low tire pressure warning light and
the DIC warning message,
if equipped, come on at each
ignition cycle until the tires are
inflated to the correct inflation
pressure. Using the DIC, it may be
possible to view the tire pressure
levels. For additional information
and details about the DIC operation
and displays, see Driver Information
Center (DIC) on page 5-23.
The low tire pressure warning light
may come on in cool weather when
the vehicle is first started, and then
turn off as the vehicle is driven. This
could be an early indicator that the air pressure is getting low and
needs to be inflated to the proper
pressure.
A Tire and Loading Information label
shows the size of the original
equipment tires and the correct
inflation pressure for the tires when
they are cold. See
Vehicle Load
Limits on page 9-10, for an example
of the Tire and Loading Information
label and its location. Also see Tire
Pressure on page 10-48.
The TPMS can warn about a low
tire pressure condition, but it does
not replace normal tire
maintenance. See Tire Inspection
on page 10-54, Tire Rotation on
page 10-54, and Tires on
page 10-41.
{Caution
Tire sealant materials are not all
the same. A non-approved tire
sealant could damage the TPMS
sensors. TPMS sensor damage
(Continued)
Page 321 of 409
Black plate (52,1)Chevrolet TRAX Owner Manual (GMNA-Localizing-U.S./Canada/Mexico-
7576294) - 2015 - CRC - 2/6/15
10-52 Vehicle Care
Caution (Continued)
caused by using an incorrect tire
sealant is not covered by the
vehicle warranty. Always use only
the GM approved tire sealant
available through your dealer or
included in the vehicle.
TPMS Malfunction Light and
Message
The TPMS will not function properly
if one or more of the TPMS sensors
are missing or inoperable. When the
system detects a malfunction, the
low tire pressure warning light,
defined above, flashes for about
one minute and then stays on for
the remainder of the ignition cycle.
A DIC warning message may also
display. The malfunction light and
DIC warning message, if equipped,come on at each ignition cycle until
the problem is corrected. Some of
the conditions that can cause these
to come on are:
.One of the road tires has been
replaced with the spare tire. The
spare tire does not have a
TPMS sensor. The malfunction
light and the DIC message,
if equipped, should go off after
the road tire is replaced and the
sensor matching process is
performed successfully. See
"TPMS Sensor Matching
Process" later in this section.
.The TPMS sensor matching
process was not done or not
completed successfully after
rotating the tires. The
malfunction light and the DIC
message, if equipped, should go
off after successfully completing
the sensor matching process.
See "TPMS Sensor Matching
Process" later in this section.
.One or more TPMS sensors are
missing or damaged. The
malfunction light and the DIC
message, if equipped, should go
off when the TPMS sensors are
installed and the sensor
matching process is performed
successfully. See your dealer for
service.
.Replacement tires or wheels do
not match the original equipment
tires or wheels. Tires and wheels
other than those recommended
could prevent the TPMS from
functioning properly. See
Buying
New Tires on page 10-56.
.Operating electronic devices or
being near facilities using radio
wave frequencies similar to the
TPMS could cause the TPMS
sensors to malfunction.
If the TPMS is not functioning
properly, it cannot detect or signal a
low tire condition. See your dealer
for service if the TPMS malfunction
light and DIC message, if equipped,
come on and stay on.
Page 322 of 409
Black plate (53,1)Chevrolet TRAX Owner Manual (GMNA-Localizing-U.S./Canada/Mexico-
7576294) - 2015 - CRC - 2/6/15
Vehicle Care 10-53
TPMS Sensor Matching
Process
Each TPMS sensor has a unique
identification code. The identification
code needs to be matched to a new
tire/wheel position after rotating the
vehicle’s tires or replacing one or
more of the TPMS sensors. Also,
the TPMS sensor matching process
should be performed after replacing
a spare tire with a road tire
containing the TPMS sensor. The
malfunction light and the DIC
message, if equipped, should go off
at the next ignition cycle. The
sensors are matched to the tire/
wheel positions, using a TPMS
relearn tool, in the following order:
driver side front tire, passenger side
front tire, passenger side rear tire,
and driver side rear. See your
dealer for service or to purchase a
relearn tool. A TPMS relearn tool
can also be purchased. See Tire
Pressure Monitor Sensor Activation
Tool atwww.gmtoolsandequipment.com or
call 1-800-GM TOOLS
(1-800-468-6657).
There are two minutes to match the
first tire/wheel position, and
five minutes overall to match all four
tire/wheel positions. If it takes
longer, the matching process stops
and must be restarted.
The TPMS sensor matching
process is:
1. Set the parking brake.
2. Turn the ignition to ON/RUN with
the engine off.
3. Use the MENU button to select the Vehicle Information Menu
(Menu 2) in the Driver
Information Center (DIC).
4. Use the thumbwheel (or up and down arrows) to scroll to the Tire
Pressure Menu Item screen. 5. Press and hold the SET/CLR
button to begin the sensor
matching process.
A message requesting
acceptance of the process may
display.
6. If requested, press the SET/CLR button again to confirm the
selection.
The horn sounds twice to signal
the receiver is in relearn mode
and the TIRE LEARN or TIRE
LEARNING ACTIVE message
displays on the DIC screen.
7. Start with the driver side front tire.
8. Place the relearn tool against the tire sidewall, near the valve
stem. Then press the button to
activate the TPMS sensor.
A horn chirp confirms that the
sensor identification code has
been matched to this tire and
wheel position.