service indicator CHEVROLET TRAX 2021 User Guide
[x] Cancel search | Manufacturer: CHEVROLET, Model Year: 2021, Model line: TRAX, Model: CHEVROLET TRAX 2021Pages: 280, PDF Size: 8.76 MB
Page 89 of 280
Chevrolet TRAX Owner Manual (GMNA-Localizing-U.S./Canada-14609828) -
2021 - CRC - 8/21/20
88 Instruments and Controls
If the light is on and not flashing, the TCS,
and potentially the StabiliTrak/ESC system
have been disabled. A DIC message may
display. Check the DIC messages to
determine which feature is not functioning
and whether the vehicle requires service.
If the indicator/warning light is on and
flashing, the TCS and/or the StabiliTrak/ESC
system is actively working.
SeeTraction Control/Electronic Stability
Control 0152.
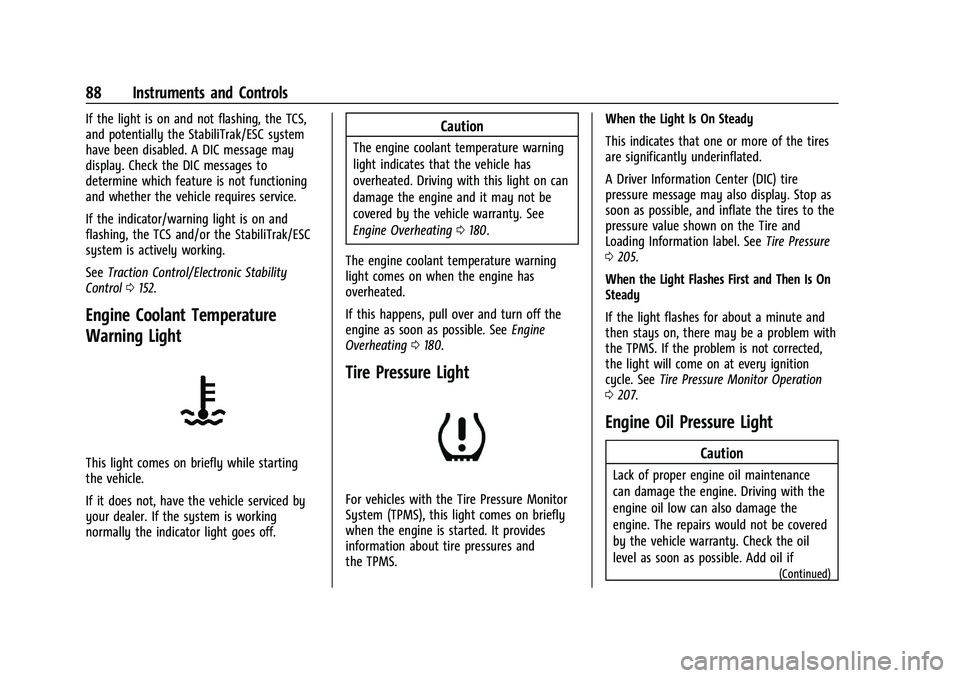
Engine Coolant Temperature
Warning Light
This light comes on briefly while starting
the vehicle.
If it does not, have the vehicle serviced by
your dealer. If the system is working
normally the indicator light goes off.
Caution
The engine coolant temperature warning
light indicates that the vehicle has
overheated. Driving with this light on can
damage the engine and it may not be
covered by the vehicle warranty. See
Engine Overheating 0180.
The engine coolant temperature warning
light comes on when the engine has
overheated.
If this happens, pull over and turn off the
engine as soon as possible. See Engine
Overheating 0180.
Tire Pressure Light
For vehicles with the Tire Pressure Monitor
System (TPMS), this light comes on briefly
when the engine is started. It provides
information about tire pressures and
the TPMS. When the Light Is On Steady
This indicates that one or more of the tires
are significantly underinflated.
A Driver Information Center (DIC) tire
pressure message may also display. Stop as
soon as possible, and inflate the tires to the
pressure value shown on the Tire and
Loading Information label. See
Tire Pressure
0 205.
When the Light Flashes First and Then Is On
Steady
If the light flashes for about a minute and
then stays on, there may be a problem with
the TPMS. If the problem is not corrected,
the light will come on at every ignition
cycle. See Tire Pressure Monitor Operation
0 207.
Engine Oil Pressure Light
Caution
Lack of proper engine oil maintenance
can damage the engine. Driving with the
engine oil low can also damage the
engine. The repairs would not be covered
by the vehicle warranty. Check the oil
level as soon as possible. Add oil if
(Continued)
Page 90 of 280
Chevrolet TRAX Owner Manual (GMNA-Localizing-U.S./Canada-14609828) -
2021 - CRC - 8/21/20
Instruments and Controls 89
Caution (Continued)
required, but if the oil level is within the
operating range and the oil pressure is
still low, have the vehicle serviced.
Always follow the maintenance schedule
for changing engine oil.
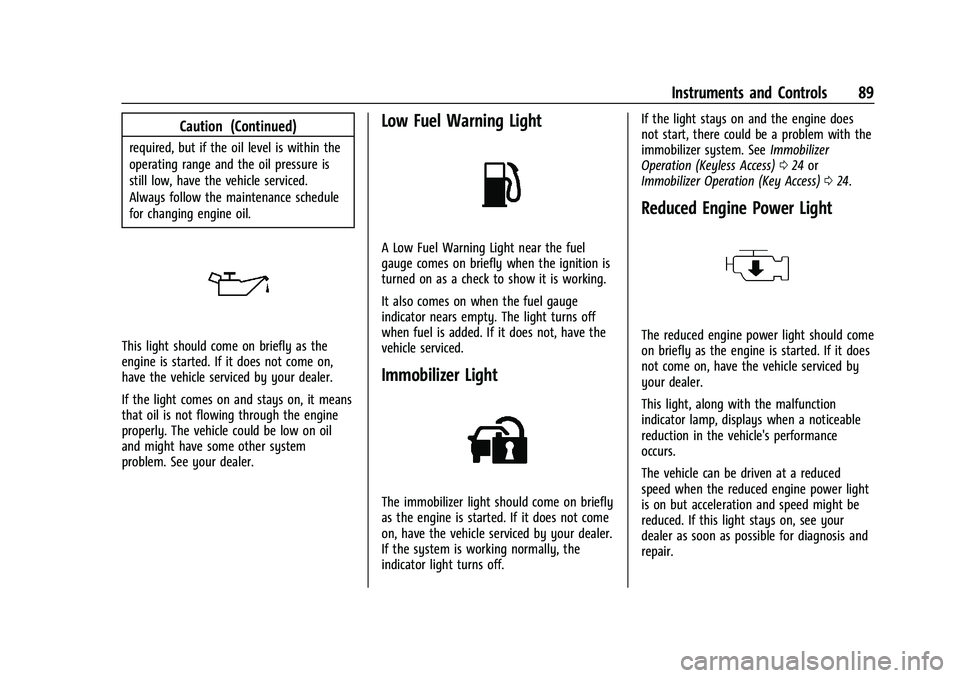
This light should come on briefly as the
engine is started. If it does not come on,
have the vehicle serviced by your dealer.
If the light comes on and stays on, it means
that oil is not flowing through the engine
properly. The vehicle could be low on oil
and might have some other system
problem. See your dealer.
Low Fuel Warning Light
A Low Fuel Warning Light near the fuel
gauge comes on briefly when the ignition is
turned on as a check to show it is working.
It also comes on when the fuel gauge
indicator nears empty. The light turns off
when fuel is added. If it does not, have the
vehicle serviced.
Immobilizer Light
The immobilizer light should come on briefly
as the engine is started. If it does not come
on, have the vehicle serviced by your dealer.
If the system is working normally, the
indicator light turns off.If the light stays on and the engine does
not start, there could be a problem with the
immobilizer system. See
Immobilizer
Operation (Keyless Access) 024 or
Immobilizer Operation (Key Access) 024.
Reduced Engine Power Light
The reduced engine power light should come
on briefly as the engine is started. If it does
not come on, have the vehicle serviced by
your dealer.
This light, along with the malfunction
indicator lamp, displays when a noticeable
reduction in the vehicle's performance
occurs.
The vehicle can be driven at a reduced
speed when the reduced engine power light
is on but acceleration and speed might be
reduced. If this light stays on, see your
dealer as soon as possible for diagnosis and
repair.
Page 140 of 280
Chevrolet TRAX Owner Manual (GMNA-Localizing-U.S./Canada-14609828) -
2021 - CRC - 8/21/20
Driving and Operating 139
In an emergency, if the vehicle cannot be
pulled over and must be turned off while
driving:1. Push the key all the way in toward the steering column, then turn the key to
ACC/ACCESSORY.
2. Brake using firm and steady pressure. Do not pump the brakes repeatedly. This
may deplete power assist, requiring
increased brake pedal force.
3. Shift the vehicle to N (Neutral). This can be done while the vehicle is moving.
Continue braking and steer the vehicle to
a safe location.
4. Come to a complete stop.
5. Shift to P (Park).
6. Continue to hold the brake pedal, then set the parking brake. See Parking Brake
0 151.
7. Push the key all the way in toward the steering column, then turn the ignition
to LOCK/OFF.
8. Remove the key.
9. Release the brake pedal.Caution
Use the correct key, make sure it is all
the way in —or pushed all the way in
toward the steering column when turning
off the vehicle —and turn it only with
your hand.
1 (ACC/ACCESSORY) : This position allows
features such as the infotainment system to
operate while the vehicle is off. It also
unlocks the steering column, if equipped
with a locking steering column. Use this
position if the vehicle must be pushed or
towed. See Retained Accessory Power (RAP)
0 145.
From ON/RUN, push the key all the way in
toward the steering column, then turn the
key to ACC/ACCESSORY.
If the key is left in ACC/ACCESSORY with the
engine off, the battery could drain and the
vehicle may not start.
A warning chime will sound when the driver
door is opened and the key is in the
ignition.
2 (ON/RUN) : This position can be used to
operate the electrical accessories and to
display some instrument cluster warning
and indicator lights. This position can also be used for service and diagnostics, and to
verify the proper operation of the
malfunction indicator lamp as may be
required for emission inspection purposes.
The switch stays in this position when the
engine is running. The transmission is also
unlocked in this position.
If the key is left in ON/RUN with the engine
off, the battery could drain and the vehicle
may not start.
3 (START) :
This is the position that starts
the engine. When the engine starts, release
the key. The ignition returns to ON/RUN for
driving.
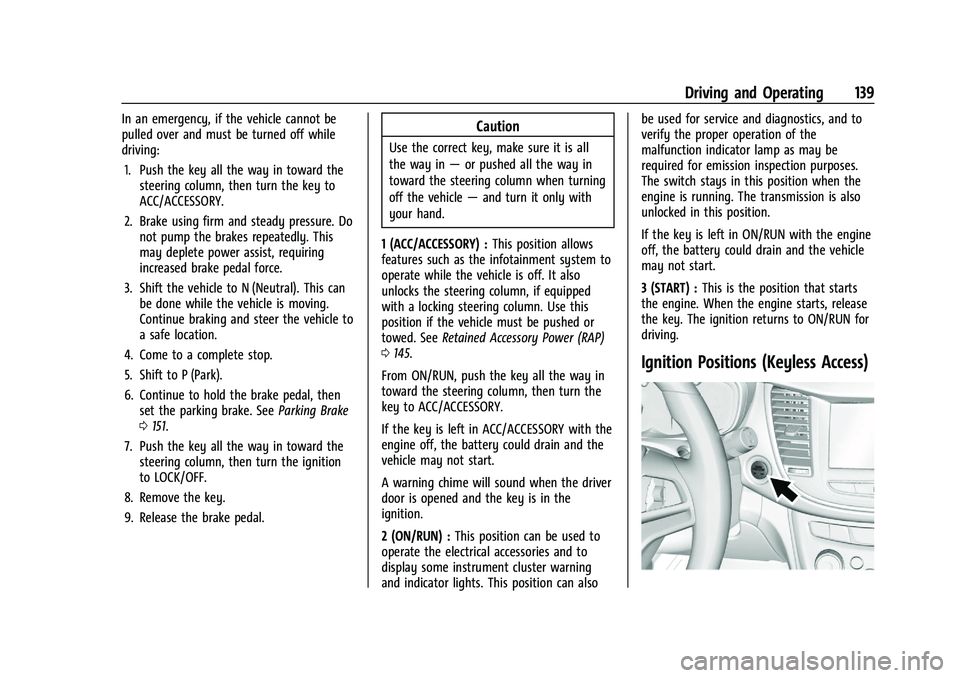
Ignition Positions (Keyless Access)
Page 141 of 280
Chevrolet TRAX Owner Manual (GMNA-Localizing-U.S./Canada-14609828) -
2021 - CRC - 8/21/20
140 Driving and Operating
The vehicle may be equipped with an
electronic keyless ignition with pushbutton
start.
The RKE transmitter must be in the vehicle
for the system to operate.
If the vehicle is not working, the vehicle
may be near a strong antenna signal
causing interference to the Keyless Access
system. SeeRemote Keyless Entry (RKE)
System Operation (Key Access) 09or
Remote Keyless Entry (RKE) System
Operation (Keyless Access) 012.
To shift out of P (Park), the ignition must be
turned on or in Service Mode, and the brake
must be applied.
Stopping the Engine/LOCK/OFF (No Indicator
Lights) : When the vehicle is stopped, press
ENGINE START/STOP once to turn the engine
off. If the vehicle is in P (Park), the ignition
will turn off, and Retained Accessory
Power (RAP) will remain active. See Retained
Accessory Power (RAP) 0145.
If the vehicle is not in P (Park), the ignition
will return to ACC/ACCESSORY and the Driver
Information Center (DIC) will display the
message SHIFT TO PARK.
When the vehicle is shifted into P (Park), the
ignition system will switch off. Do not turn the engine off when the vehicle
is moving. This will cause a loss of power
assist in the brake and steering systems and
disable the airbags.
If the vehicle must be shut off in an
emergency:
1. Brake using a firm steady pressure. Do not pump the brakes repeatedly. This
may deplete power assist, requiring
increased brake pedal force.
2. Shift the vehicle to N (Neutral). This can be done while the vehicle is moving.
After shifting to N (Neutral), firmly apply
the brakes and steer the vehicle to a
safe location.
3. Come to a complete stop, shift to P (Park), and turn the ignition off. The
shift lever must be in P (Park) to turn the
ignition off.
4. Set the parking brake. See Parking Brake
0 151.{Warning
Turning off the vehicle while moving may
cause loss of power assist in the brake
and steering systems and disable the
airbags. While driving, only shut the
vehicle off in an emergency.
If the vehicle cannot be pulled over, and
must be shut off while driving, press and
hold ENGINE START/STOP for longer than
two seconds, or press twice in five seconds.
ACC/ACCESSORY (Amber Indicator Light) :
This mode allows you to use some electrical
accessories when the engine is off. With the
ignition off, pressing ENGINE START/STOP
one time without the brake pedal applied
will place the ignition system in ACC/
ACCESSORY.
The ignition will switch from ACC/
ACCESSORY to OFF after five minutes to
prevent battery rundown.
ON/RUN/START (Green Indicator Light) : This
mode is for driving and starting. With the
ignition off, and the brake pedal applied,
pressing ENGINE START/STOP once will place
the ignition system in ON/RUN/Start.
Page 142 of 280

Chevrolet TRAX Owner Manual (GMNA-Localizing-U.S./Canada-14609828) -
2021 - CRC - 8/21/20
Driving and Operating 141
Once engine cranking begins, release ENGINE
START/STOP. Engine cranking will continue
until the engine starts. SeeStarting the
Engine 0141.
The engine will then remain in ON/RUN.
Service Mode
This power mode is available for service and
diagnostics, and to verify the proper
operation of the malfunction indicator lamp
as may be required for emission inspection
purposes.
With the vehicle off, and the brake pedal
not applied, pressing and holding ENGINE
START/STOP for more than five seconds will
place the vehicle in Service Mode.
The instruments and audio system will
operate as they do in ON/RUN, but the
vehicle will not be able to be driven. The
engine will not start in Service Mode.
Press ENGINE START/STOP again to turn the
vehicle off.Starting the Engine
Place the transmission in the proper gear.
Caution
If you add electrical parts or accessories,
you could change the way the engine
operates. Any resulting damage would
not be covered by the vehicle warranty.
See Add-On Electrical Equipment 0164.
Caution
If the steering wheel is turned until it
reaches the end of its travel, and is held
in that position while starting the vehicle,
damage may occur to the hydraulic
power steering system and there may be
loss of power steering assist.
Move the shift lever to P (Park) or
N (Neutral). To restart the vehicle when it is
already moving, use N (Neutral) only.
Caution
Do not try to shift to P (Park) if the
vehicle is moving. If you do, you could
damage the transmission. Shift to P (Park)
only when the vehicle is stopped. Starting Procedure (Key Access)
1. With your foot off the accelerator pedal, turn the ignition key to START. When
the engine starts, let go of the ignition.
The idle speed will go down as the
engine gets warm. Do not race the
engine immediately after starting it.
Operate the engine and transmission
gently to allow the oil to warm up and
lubricate all moving parts.
Caution
Cranking the engine for long periods of
time, by returning the ignition to the
START position immediately after
cranking has ended, can overheat and
damage the cranking motor, and drain
the battery. Wait at least 15 seconds
between each try, to let the cranking
motor cool down.
2. If the engine does not start after five to 10 seconds, especially in very cold
weather (below −18 °C or 0 °F), it could
be flooded with too much gasoline. Try
pushing the accelerator pedal all the way
to the floor and holding it there as you
hold the key in START for up to a
maximum of 15 seconds. Wait at least
Page 165 of 280
Chevrolet TRAX Owner Manual (GMNA-Localizing-U.S./Canada-14609828) -
2021 - CRC - 8/21/20
164 Driving and Operating
{Warning
If a fire starts while you are refueling, do
not remove the fill nozzle. Shut off the
flow of fuel by shutting off the pump or
by notifying the station attendant. Leave
the area immediately.
Caution
If a new fuel cap is needed, get the right
type of cap from your dealer. The wrong
type of fuel cap may not fit properly,
may turn on the malfunction indicator
lamp, and could damage the fuel system
and emissions system. SeeMalfunction
Indicator Lamp (Check Engine Light) 084.
Filling a Portable Fuel Container
{Warning
Never fill a portable fuel container while
it is in the vehicle. Static electricity
discharge from the container can ignite
the fuel vapor. You or others could be
(Continued)
Warning (Continued)
badly burned and the vehicle could be
damaged. To help avoid injury to you
and others:
.Dispense fuel only into approved
containers.
.Do not fill a container while it is
inside a vehicle, in a vehicle's trunk, in
a pickup bed, or on any surface other
than the ground.
.Bring the fill nozzle in contact with
the inside of the fill opening before
operating the nozzle. Maintain contact
until filling is complete.
.Keep sparks, flames, and smoking
materials away from fuel.
.Avoid using electronic devices while
pumping fuel.
Trailer Towing
General Towing Information
{Warning
Never tow a trailer with your vehicle.
It was not designed or intended to tow a
trailer.
Conversions and Add-Ons
Add-On Electrical Equipment
{Warning
The Data Link Connector (DLC) is used for
vehicle service and Emission Inspection/
Maintenance testing. SeeMalfunction
Indicator Lamp (Check Engine Light) 084.
A device connected to the DLC —such as
an aftermarket fleet or driver-behavior
tracking device —may interfere with
vehicle systems. This could affect vehicle
operation and cause a crash. Such devices
may also access information stored in the
vehicle’s systems.
Page 181 of 280
Chevrolet TRAX Owner Manual (GMNA-Localizing-U.S./Canada-14609828) -
2021 - CRC - 8/21/20
180 Vehicle Care
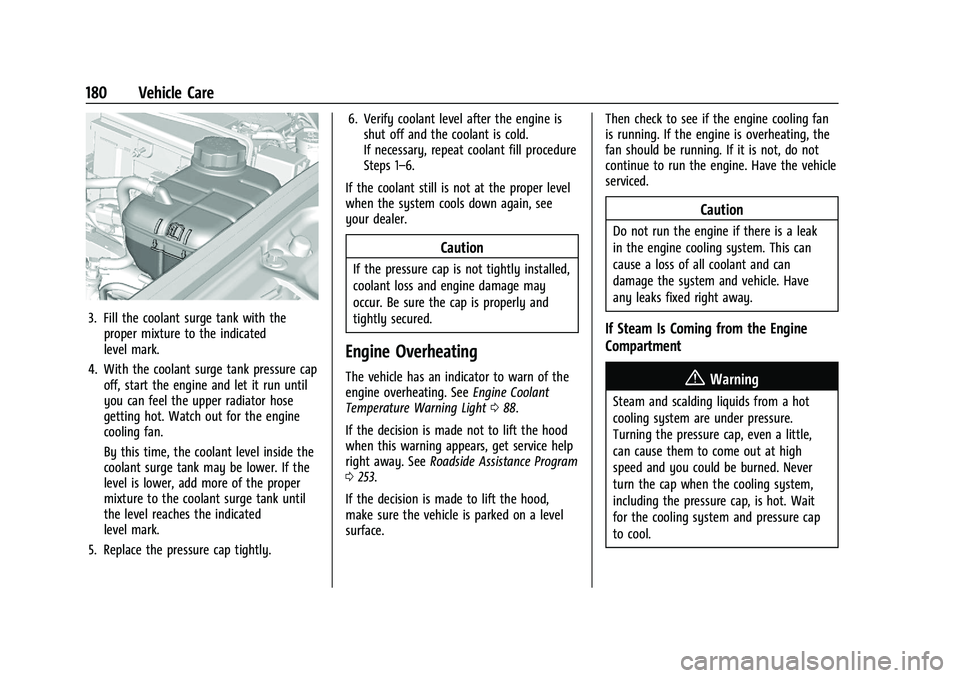
3. Fill the coolant surge tank with theproper mixture to the indicated
level mark.
4. With the coolant surge tank pressure cap off, start the engine and let it run until
you can feel the upper radiator hose
getting hot. Watch out for the engine
cooling fan.
By this time, the coolant level inside the
coolant surge tank may be lower. If the
level is lower, add more of the proper
mixture to the coolant surge tank until
the level reaches the indicated
level mark.
5. Replace the pressure cap tightly. 6. Verify coolant level after the engine is
shut off and the coolant is cold.
If necessary, repeat coolant fill procedure
Steps 1–6.
If the coolant still is not at the proper level
when the system cools down again, see
your dealer.
Caution
If the pressure cap is not tightly installed,
coolant loss and engine damage may
occur. Be sure the cap is properly and
tightly secured.
Engine Overheating
The vehicle has an indicator to warn of the
engine overheating. See Engine Coolant
Temperature Warning Light 088.
If the decision is made not to lift the hood
when this warning appears, get service help
right away. See Roadside Assistance Program
0 253.
If the decision is made to lift the hood,
make sure the vehicle is parked on a level
surface. Then check to see if the engine cooling fan
is running. If the engine is overheating, the
fan should be running. If it is not, do not
continue to run the engine. Have the vehicle
serviced.
Caution
Do not run the engine if there is a leak
in the engine cooling system. This can
cause a loss of all coolant and can
damage the system and vehicle. Have
any leaks fixed right away.
If Steam Is Coming from the Engine
Compartment
{Warning
Steam and scalding liquids from a hot
cooling system are under pressure.
Turning the pressure cap, even a little,
can cause them to come out at high
speed and you could be burned. Never
turn the cap when the cooling system,
including the pressure cap, is hot. Wait
for the cooling system and pressure cap
to cool.
Page 183 of 280
Chevrolet TRAX Owner Manual (GMNA-Localizing-U.S./Canada-14609828) -
2021 - CRC - 8/21/20
182 Vehicle Care
Brakes
Disc brake linings have built-in wear
indicators that make a high-pitched warning
sound when the brake linings are worn and
new linings are needed. The sound can come
and go or can be heard all the time when
the vehicle is moving, except when applying
the brake pedal firmly.
{Warning
The brake wear warning sound means
that soon the brakes will not work well.
That could lead to a crash. When the
brake wear warning sound is heard, have
the vehicle serviced.
Caution
Continuing to drive with worn-out brake
linings could result in costly brake
repairs.
Some driving conditions or climates can
cause a brake squeal when the brakes are
first applied, clearing up following several
applies. This does not mean something is
wrong with the brakes. Properly torqued wheel nuts are necessary
to help prevent brake pulsation. When tires
are rotated, inspect brake linings for wear
and evenly tighten wheel nuts in the proper
sequence to torque specifications. See
Capacities and Specifications
0248.
If the vehicle has rear drum brakes, they do
not have wear indicators. Drum brakes have
an inspection hole to inspect lining wear
during scheduled maintenance. When the
front brake linings are replaced, have the
rear brakes inspected. If a rear brake rubbing
noise is heard, have the rear brake linings
inspected immediately. Rear brake drums
should be removed and inspected each time
the tires are removed for rotation or
changing.
Brake pads should be replaced as complete
axle sets.Brake Pedal Travel
See your dealer if the brake pedal does not
return to normal height, or if there is a
rapid increase in pedal travel. This could be
a sign that brake service may be required.
Replacing Brake System Parts
Always replace brake system parts with
new, approved replacement parts. If this is
not done, the brakes may not work
properly. The braking performance can
change in many ways if the wrong brake
parts are installed or if parts are improperly
installed.
Brake Fluid
The brake master cylinder reservoir is filled
with GM approved DOT 4 brake fluid as
indicated on the reservoir cap. See Engine
Compartment Overview 0170 for the
location of the reservoir.
Checking Brake Fluid
With the vehicle in P (Park) on a level
surface, the brake fluid level should be
between the minimum and maximum marks
on the brake fluid reservoir.
Page 210 of 280
Chevrolet TRAX Owner Manual (GMNA-Localizing-U.S./Canada-14609828) -
2021 - CRC - 8/21/20
Vehicle Care 209
2. Turn the ignition on without starting thevehicle or place the vehicle in Service
Mode. See Ignition Positions (Key Access)
0 138 or
Ignition Positions (Keyless Access) 0139.
3. Use the MENU button to select the Vehicle Information Menu (Menu 2) in
the Driver Information Center (DIC). See
Driver Information Center (DIC) 090.
4. Use the thumbwheel (or up and down arrows) to scroll to the Tire Pressure
Menu Item screen.
5. Press and hold the SET/CLR button to begin the sensor matching process.
A message requesting acceptance of the
process may display.
6. If requested, press the SET/CLR button again to confirm the selection.
The horn sounds twice to signal the
receiver is in relearn mode and the TIRE
LEARN or TIRE LEARNING ACTIVE message
displays on the DIC screen.
7. Start with the driver side front tire.
8. Place the relearn tool against the tire sidewall, near the valve stem. Then press
the button to activate the TPMS sensor. A horn chirp confirms that the sensor
identification code has been matched to
this tire and wheel position.
9. Proceed to the passenger side front tire, and repeat the procedure in Step 8.
10. Proceed to the passenger side rear tire, and repeat the procedure in Step 8.
11. Proceed to the driver side rear tire, and repeat the procedure in Step 8. The horn
sounds two times to indicate the sensor
identification code has been matched to
the driver side rear tire, and the TPMS
sensor matching process is no longer
active. The TIRE LEARN or TIRE LEARNING
ACTIVE message on the DIC display
screen goes off.
12. Turn the vehicle off.
13. Set all four tires to the recommended air pressure level as indicated on the Tire
and Loading Information label.
Tire Inspection
We recommend that the tires, including
the spare tire, if the vehicle has one, be
inspected for signs of wear or damage
at least once a month. Replace the tire if:
.The indicators at three or more
places around the tire can be seen.
.There is cord or fabric showing
through the tire's rubber.
.The tread or sidewall is cracked, cut,
or snagged deep enough to show
cord or fabric.
.The tire has a bump, bulge, or split.
.The tire has a puncture, cut, or other
damage that cannot be repaired well
because of the size or location of the
damage.
Tire Rotation
Tires should be rotated every 12 000 km
(7,500 mi). See
Maintenance Schedule
0 235.
Tires are rotated to achieve a more
uniform wear for all tires. The first
rotation is the most important.
Anytime unusual wear is noticed, rotate
the tires as soon as possible, check for
proper tire inflation pressure, and check
for damaged tires or wheels. If the
Page 242 of 280

Chevrolet TRAX Owner Manual (GMNA-Localizing-U.S./Canada-14609828) -
2021 - CRC - 8/21/20
Service and Maintenance 241
.Trained dealer technicians have the
diagnostic equipment to test the battery
and ensure that the connections and
cables are corrosion-free.
Belts
.Belts may need replacing if they squeak
or show signs of cracking or splitting.
.Trained dealer technicians have access to
tools and equipment to inspect the belts
and recommend adjustment or
replacement when necessary.
Brakes
Brakes stop the vehicle and are crucial to
safe driving.
.Signs of brake wear may include chirping,
grinding, or squealing noises, or difficulty
stopping.
.Trained dealer technicians have access to
tools and equipment to inspect the brakes
and recommend quality parts engineered
for the vehicle.
Fluids
Proper fluid levels and approved fluids
protect the vehicle’s systems and
components. See Recommended Fluids and
Lubricants 0243 for GM approved fluids.
.Engine oil and windshield washer fluid
levels should be checked at every fuel fill.
.Instrument cluster lights may come on to
indicate that fluids may be low and need
to be filled.
Hoses
Hoses transport fluids and should be
regularly inspected to ensure that there are
no cracks or leaks. With a multi-point
inspection, your dealer can inspect the hoses
and advise if replacement is needed.
Lamps
Properly working headlamps, taillamps, and
brake lamps are important to see and be
seen on the road.
.Signs that the headlamps need attention
include dimming, failure to light, cracking,
or damage. The brake lamps need to be
checked periodically to ensure that they
light when braking.
.With a multi-point inspection, your dealer
can check the lamps and note any
concerns.
Shocks and Struts
Shocks and struts help aid in control for a
smoother ride.
.Signs of wear may include steering wheel
vibration, bounce/sway while braking,
longer stopping distance, or uneven
tire wear.
.As part of the multi-point inspection,
trained dealer technicians can visually
inspect the shocks and struts for signs of
leaking, blown seals, or damage, and can
advise when service is needed.
Tires
Tires need to be properly inflated, rotated,
and balanced. Maintaining the tires can save
money and fuel, and can reduce the risk of
tire failure.
.Signs that the tires need to be replaced
include three or more visible treadwear
indicators; cord or fabric showing through
the rubber; cracks or cuts in the tread or
sidewall; or a bulge or split in the tire.
.Trained dealer technicians can inspect and
recommend the right tires. Your dealer
can also provide tire/wheel balancing
services to ensure smooth vehicle
operation at all speeds. Your dealer sells
and services name brand tires.