seats CHEVROLET TRAX 2024 Service Manual
[x] Cancel search | Manufacturer: CHEVROLET, Model Year: 2024, Model line: TRAX, Model: CHEVROLET TRAX 2024Pages: 328, PDF Size: 7.3 MB
Page 68 of 328

Chevrolet TRAX Owner Manual (GMNA-Localizing-U.S./Canada/Mexico-
17041293) - 2024 - CRC - 12/7/22
Seats and Restraints 67
2. Secure the child restraint in the rightfront seating position with the seat belt.
See Securing Child Restraints (With the
Seat Belt in the Rear Seat) 068 or
Securing Child Restraints (With the Seat
Belt in the Front Seat) 070.
3. Before placing a child in the child restraint, make sure it is securely held in
place. To check, grasp the child restraint
at the belt path and attempt to move it
side to side and back and forth. There
should be no more than 2.5 cm (1 in) of
movement for proper installation.
Sedan Models 1. Attach and tighten the lower attachments to the lower anchors. If the
child restraint does not have lower
attachments or the desired seating
position does not have lower anchors,
secure the child restraint with the top
tether and the seat belt. Refer to the
child restraint manufacturer instructions
and the instructions in this manual.
1.1. Find the lower anchors for the desired seating position.
1.2. Put the child restraint on the seat. 1.3. Attach and tighten the lower
attachments on the child restraint
to the lower anchors.
2. If the child restraint manufacturer recommends that the top tether be
attached, attach and tighten the top
tether to the top tether anchor,
if equipped. Refer to the child restraint
instructions and the following steps:
2.1. Find the top tether anchor.
2.2. Route, attach and tighten the top
tether according to your child
restraint instructions and the
following instructions:
If the position you are using does
not have a head restraint and you
are using a single tether, route the
tether over the seatback.
If the position you are using does
not have a head restraint and you
are using a dual tether, route the
tether over the seatback.
If the position you are using has an
adjustable headrest or head
restraint and you are using a single
tether, raise the headrest or head
restraint and route the tether under
Page 69 of 328

Chevrolet TRAX Owner Manual (GMNA-Localizing-U.S./Canada/Mexico-
17041293) - 2024 - CRC - 12/7/22
68 Seats and Restraints
the headrest or head restraint and
in between the headrest or head
restraint posts.
If the position you are using has an
adjustable headrest or head
restraint and you are using a dual
tether, raise the headrest or head
restraint and route the tether under
the headrest or head restraint and
in between the headrest or head
restraint posts.
If the child restraint is installed next
to a center seat, make sure the top
tether does not interfere with the
center seating position shoulder
belt/retractor. If it does, find
another suitable seating position to
install the child restraint.3. Before placing a child in the child
restraint, make sure it is securely held in
place. To check, grasp the child restraint
at the LATCH path and attempt to move
it side to side and back and forth. There
should be no more than 2.5 cm (1 in) of
movement, for proper installation.
Replacing LATCH System Parts
After a Crash
{Warning
A crash can damage the LATCH system in
the vehicle. A damaged LATCH system
may not properly secure the child
restraint, resulting in serious injury or
even death in a crash. To help make sure
the LATCH system is working properly
after a crash, see your dealer to have the
system inspected and any necessary
replacements made as soon as possible.
If the vehicle has the LATCH system and it
was being used during a crash, new LATCH
system parts may be needed.
New parts and repairs may be necessary
even if the LATCH system was not being
used at the time of the crash.
Securing Child Restraints (With
the Seat Belt in the Rear Seat)
When securing a child restraint with the
seat belts in a rear seat position, study the
instructions that came with the child
restraint to make sure it is compatible with
this vehicle.
If the child restraint has the LATCH system,
see Lower Anchors and Tethers for Children
(LATCH System) 060 for how and where to
install the child restraint using LATCH. If a
child restraint is secured in the vehicle using
a seat belt and it uses a top tether, see
Lower Anchors and Tethers for Children
(LATCH System) 060 for top tether anchor
locations.
Do not secure a child seat in a position
without a top tether anchor if a national or
local law requires that the top tether be
anchored, or if the instructions that come
with the child restraint say that the top
tether must be anchored. Refer to the
instructions that came with the child
restraint and see Lower Anchors and Tethers
for Children (LATCH System) 060.
Page 70 of 328
Chevrolet TRAX Owner Manual (GMNA-Localizing-U.S./Canada/Mexico-
17041293) - 2024 - CRC - 12/7/22
Seats and Restraints 69
In Canada, the law requires that
forward-facing child restraints have a top
tether, and that the tether be attached.
If the child restraint or vehicle seat position
does not have the LATCH system, you will
be using the seat belt to secure the child
restraint. Be sure to follow the instructions
that came with the child restraint.
If more than one child restraint needs to be
installed in the rear seat, be sure to read
Where to Put the Restraint059.
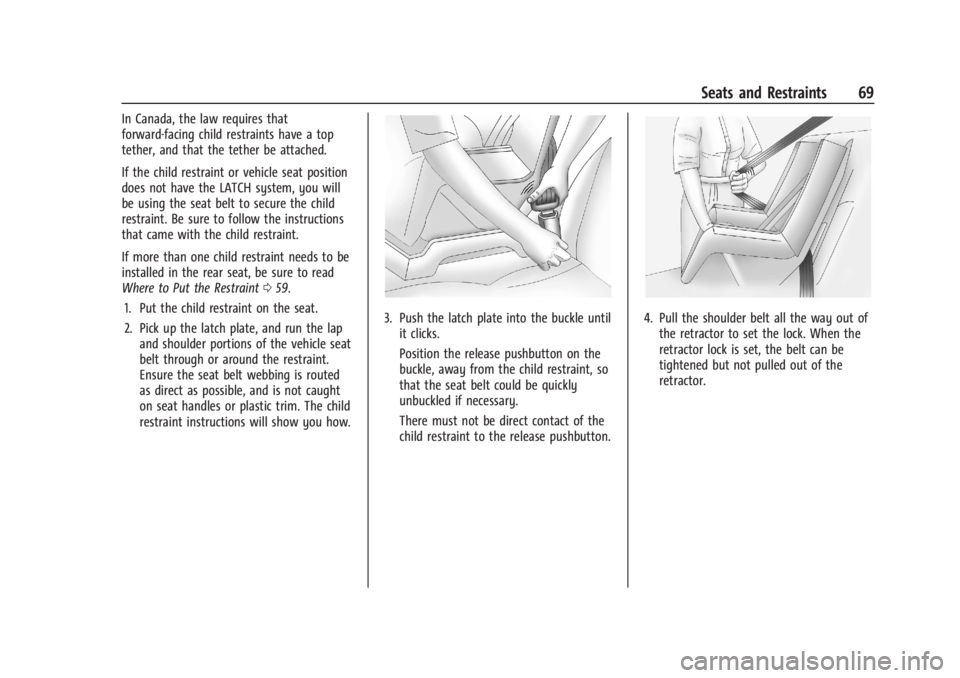
1. Put the child restraint on the seat.
2. Pick up the latch plate, and run the lap and shoulder portions of the vehicle seat
belt through or around the restraint.
Ensure the seat belt webbing is routed
as direct as possible, and is not caught
on seat handles or plastic trim. The child
restraint instructions will show you how.
3. Push the latch plate into the buckle untilit clicks.
Position the release pushbutton on the
buckle, away from the child restraint, so
that the seat belt could be quickly
unbuckled if necessary.
There must not be direct contact of the
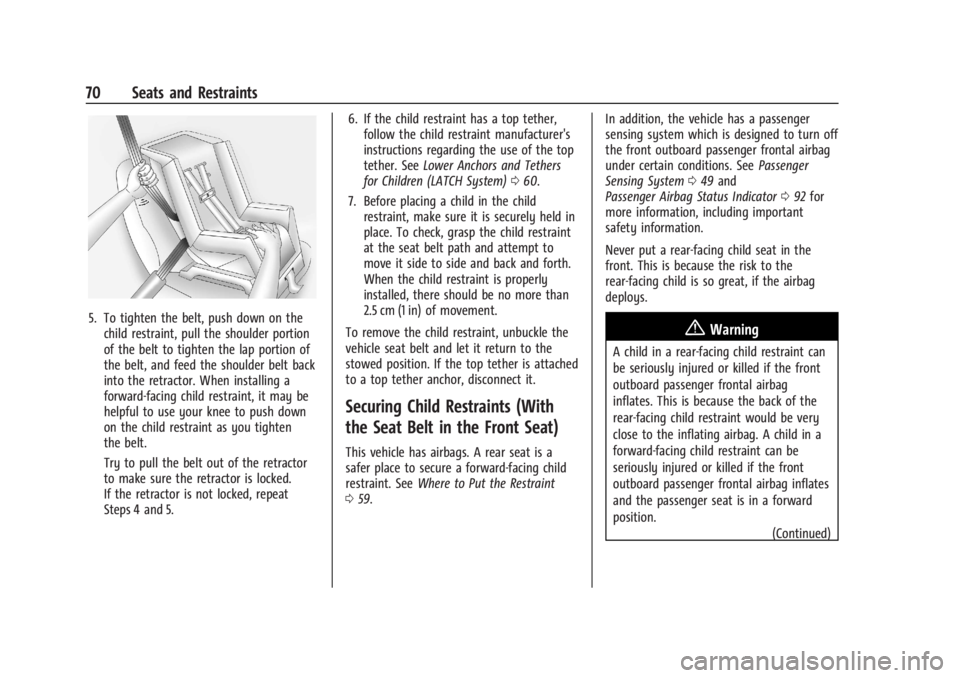
child restraint to the release pushbutton.4. Pull the shoulder belt all the way out ofthe retractor to set the lock. When the
retractor lock is set, the belt can be
tightened but not pulled out of the
retractor.
Page 71 of 328
Chevrolet TRAX Owner Manual (GMNA-Localizing-U.S./Canada/Mexico-
17041293) - 2024 - CRC - 12/7/22
70 Seats and Restraints
5. To tighten the belt, push down on thechild restraint, pull the shoulder portion
of the belt to tighten the lap portion of
the belt, and feed the shoulder belt back
into the retractor. When installing a
forward-facing child restraint, it may be
helpful to use your knee to push down
on the child restraint as you tighten
the belt.
Try to pull the belt out of the retractor
to make sure the retractor is locked.
If the retractor is not locked, repeat
Steps 4 and 5. 6. If the child restraint has a top tether,
follow the child restraint manufacturer's
instructions regarding the use of the top
tether. See Lower Anchors and Tethers
for Children (LATCH System) 060.
7. Before placing a child in the child restraint, make sure it is securely held in
place. To check, grasp the child restraint
at the seat belt path and attempt to
move it side to side and back and forth.
When the child restraint is properly
installed, there should be no more than
2.5 cm (1 in) of movement.
To remove the child restraint, unbuckle the
vehicle seat belt and let it return to the
stowed position. If the top tether is attached
to a top tether anchor, disconnect it.
Securing Child Restraints (With
the Seat Belt in the Front Seat)
This vehicle has airbags. A rear seat is a
safer place to secure a forward-facing child
restraint. See Where to Put the Restraint
0 59. In addition, the vehicle has a passenger
sensing system which is designed to turn off
the front outboard passenger frontal airbag
under certain conditions. See
Passenger
Sensing System 049 and
Passenger Airbag Status Indicator 092 for
more information, including important
safety information.
Never put a rear-facing child seat in the
front. This is because the risk to the
rear-facing child is so great, if the airbag
deploys.
{Warning
A child in a rear-facing child restraint can
be seriously injured or killed if the front
outboard passenger frontal airbag
inflates. This is because the back of the
rear-facing child restraint would be very
close to the inflating airbag. A child in a
forward-facing child restraint can be
seriously injured or killed if the front
outboard passenger frontal airbag inflates
and the passenger seat is in a forward
position.
(Continued)
Page 72 of 328
Chevrolet TRAX Owner Manual (GMNA-Localizing-U.S./Canada/Mexico-
17041293) - 2024 - CRC - 12/7/22
Seats and Restraints 71
Warning (Continued)
Even if the passenger sensing system has
turned off the front outboard passenger
frontal airbag, no system is fail-safe. No
one can guarantee that an airbag will not
deploy under some unusual circumstance,
even though it is turned off.
Secure rear-facing child restraints in a
rear seat, even if the airbag is off. If you
secure a forward-facing child restraint in
the front outboard passenger seat,
always move the seat as far back as it
will go. It is better to secure the child
restraint in a rear seat.
SeePassenger Sensing System 049 for
additional information.
If the vehicle does not have a rear seat that
will accommodate a rear-facing child
restraint, a rear-facing child restraint should
not be installed in the vehicle, even if the
airbag is off.
If the child restraint uses a top tether, see
Lower Anchors and Tethers for Children
(LATCH System) 060 for top tether anchor
locations. Do not secure a child seat in a position
without a top tether anchor if a national or
local law requires that the top tether be
anchored, or if the instructions that come
with the child restraint say that the top
tether must be anchored.
In Canada, the law requires that
forward-facing child restraints have a top
tether, and that the tether be attached.
When using the lap-shoulder belt to secure
the child restraint in this position, follow the
instructions that came with the child
restraint and the following instructions:
1. Move the seat as far back as it will go before securing the forward-facing child
restraint. Move the seat upward or the
seatback to an upright position,
if needed, to get a tight installation of
the child restraint. There must be finger
clearance between the release
pushbutton and the child restraint.
When the passenger sensing system has
turned off the front outboard passenger
frontal airbag, the OFF indicator on the
passenger airbag status indicator should
light and stay lit when you start the
vehicle. See Passenger Airbag Status
Indicator 092. 2. Put the child restraint on the seat.
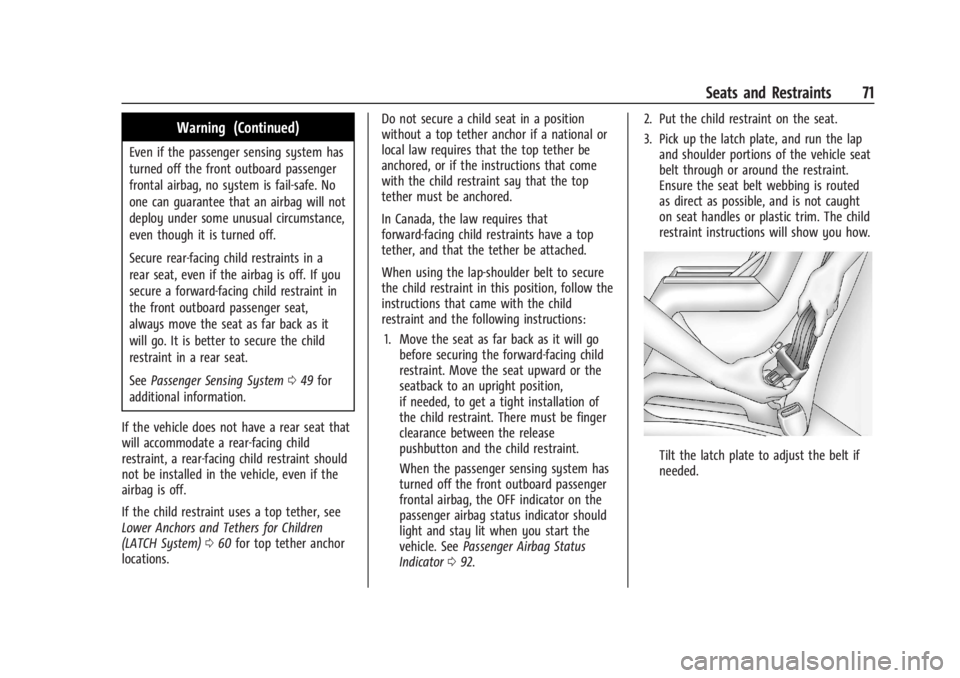
3. Pick up the latch plate, and run the lap
and shoulder portions of the vehicle seat
belt through or around the restraint.
Ensure the seat belt webbing is routed
as direct as possible, and is not caught
on seat handles or plastic trim. The child
restraint instructions will show you how.
Tilt the latch plate to adjust the belt if
needed.
Page 73 of 328
Chevrolet TRAX Owner Manual (GMNA-Localizing-U.S./Canada/Mexico-
17041293) - 2024 - CRC - 12/7/22
72 Seats and Restraints
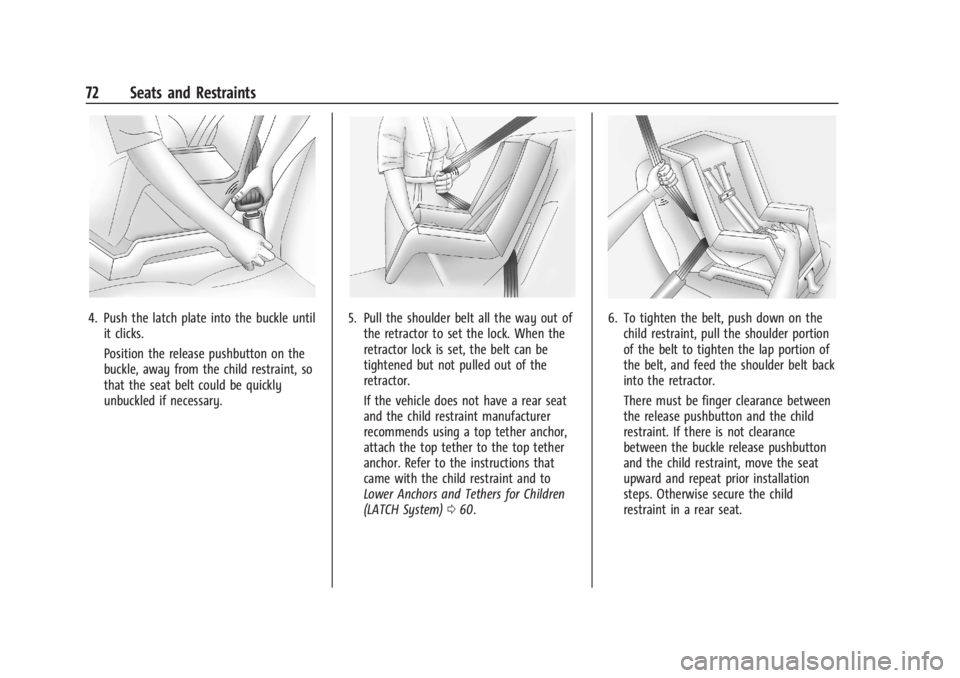
4. Push the latch plate into the buckle untilit clicks.
Position the release pushbutton on the
buckle, away from the child restraint, so
that the seat belt could be quickly
unbuckled if necessary.5. Pull the shoulder belt all the way out ofthe retractor to set the lock. When the
retractor lock is set, the belt can be
tightened but not pulled out of the
retractor.
If the vehicle does not have a rear seat
and the child restraint manufacturer
recommends using a top tether anchor,
attach the top tether to the top tether
anchor. Refer to the instructions that
came with the child restraint and to
Lower Anchors and Tethers for Children
(LATCH System) 060.6. To tighten the belt, push down on the
child restraint, pull the shoulder portion
of the belt to tighten the lap portion of
the belt, and feed the shoulder belt back
into the retractor.
There must be finger clearance between
the release pushbutton and the child
restraint. If there is not clearance
between the buckle release pushbutton
and the child restraint, move the seat
upward and repeat prior installation
steps. Otherwise secure the child
restraint in a rear seat.
Page 74 of 328
Chevrolet TRAX Owner Manual (GMNA-Localizing-U.S./Canada/Mexico-
17041293) - 2024 - CRC - 12/7/22
Seats and Restraints 73
When installing a forward-facing child
restraint, it may be helpful to use your
knee to push down on the child restraint
as you tighten the belt.
Try to pull the belt out of the retractor
to make sure the retractor is locked.
If the retractor is not locked, repeat
Steps 5 and 6.
7. If the vehicle does not have a rear seat and the child restraint manufacturer
recommends using a top tether anchor,
attach the top tether to the top tether
anchor. Refer to the instructions that
came with the child restraint and to
Lower Anchors and Tethers for Children
(LATCH System) 060.
8. Before placing a child in the child restraint, make sure it is securely held in
place. To check, grasp the child restraint
at the seat belt path and attempt to
move it side to side and back and forth.
When the child restraint is properly
installed, there should be no more than
2.5 cm (1 in) of movement.
If the airbags are off, the OFF indicator in
the passenger airbag status indicator will
come on and stay on when the vehicle is
started. If a child restraint has been installed and
the ON indicator is lit, see
“If the On
Indicator Is Lit for a Child Restraint” under
Passenger Sensing System 049.
To remove the child restraint, unbuckle the
vehicle seat belt and let it return to the
stowed position.
Page 77 of 328
Chevrolet TRAX Owner Manual (GMNA-Localizing-U.S./Canada/Mexico-
17041293) - 2024 - CRC - 12/2/22
76 Storage
To install the cargo cover:1. Connect each end of cover to the pivot supports on the trim panel (2).
2. Reconnect both of the cords to the hooks at the top of the liftgate (1).
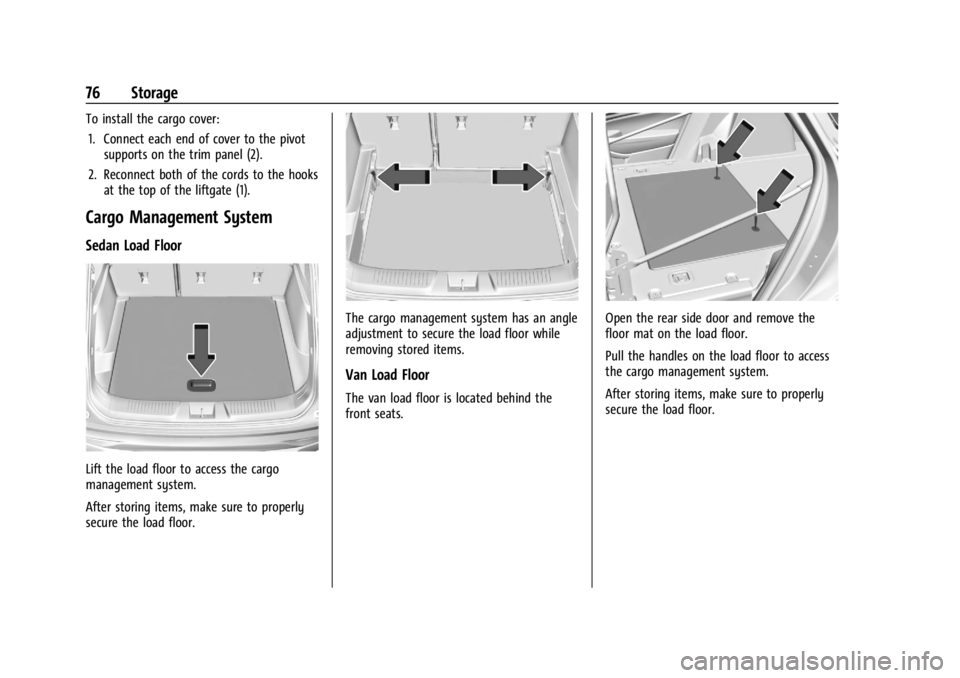
Cargo Management System
Sedan Load Floor
Lift the load floor to access the cargo
management system.
After storing items, make sure to properly
secure the load floor.
The cargo management system has an angle
adjustment to secure the load floor while
removing stored items.
Van Load Floor
The van load floor is located behind the
front seats.
Open the rear side door and remove the
floor mat on the load floor.
Pull the handles on the load floor to access
the cargo management system.
After storing items, make sure to properly
secure the load floor.
Page 81 of 328

Chevrolet TRAX Owner Manual (GMNA-Localizing-U.S./Canada/Mexico-
17041293) - 2024 - CRC - 12/2/22
80 Instruments and Controls
Controls
Steering Wheel Adjustment
To adjust the steering wheel:1. Pull the lever down.
2. Move the steering wheel up, down, forward, and backward.
3. Pull the lever up to lock the steering wheel in place.
Do not adjust the steering wheel while
driving.
Heated Steering Wheel
(: If equipped with a heated steering
wheel, press to turn on or off. A light near
the button displays when the feature is
turned on.
The steering wheel takes about
three minutes to reach maximum heat.
Automatic Heated Steering Wheel
If equipped with remote start, the heated
steering wheel will turn on automatically
during a remote start along with the heated
seats when it is cold outside. The heated
steering wheel indicator light may come on. If equipped with auto heated seats, the
heated steering wheel will turn on when the
auto heated seat is activated. The heated
steering wheel indicator will display the
state of the steering wheel heat.
Horn
Pressaon the steering wheel pad to
sound the horn.
Windshield Wiper/Washer
Windshield Wiper with Intermittent Wipes
(INT Shown)
Page 113 of 328

Chevrolet TRAX Owner Manual (GMNA-Localizing-U.S./Canada/Mexico-
17041293) - 2024 - CRC - 12/2/22
112 Lighting
Interior Lighting
Instrument Panel Illumination
Control
This feature adjusts the brightness of all
illuminated controls. The instrument panel
illumination control is next to the exterior
lamp control.
Push the knob in all the way until it extends
out and then turn the knob clockwise or
counterclockwise to brighten or dim the
lights. Push the knob back in when finished.
The knob is functional at night, or when the
headlamps or parking lamps are ON.
Courtesy Lamps
The courtesy lamps come on when any door
is opened,
Kon the Remote Keyless Entry
(RKE) transmitter is pressed, or when the
ignition is switched off. See Dome Lamps
0 112.
Dome Lamps
The front dome lamp controls are in the
overhead console.
/:Press to turn the lamps off, even when
a door is open.
H: When the button is returned to the
middle position, the lamps turn on
automatically when a door is opened.
.: Press to turn on the dome lamps.
If equipped, the rear dome lamp controls are
in the headliner above the rear seats.
OFF is normal position and not pushed.