instrument panel CHEVROLET VENTURE 2003 1.G Service Manual
[x] Cancel search | Manufacturer: CHEVROLET, Model Year: 2003, Model line: VENTURE, Model: CHEVROLET VENTURE 2003 1.GPages: 486, PDF Size: 3.3 MB
Page 295 of 486

If your vehicle is in cruise control when the traction
control system begins to limit wheel spin, the cruise
control will automatically disengage. When road
conditions allow you to safely use it again, you may
reengage the cruise control. See ªCruise Controlº under
Turn Signal/Multifunction Lever on page 3-7.
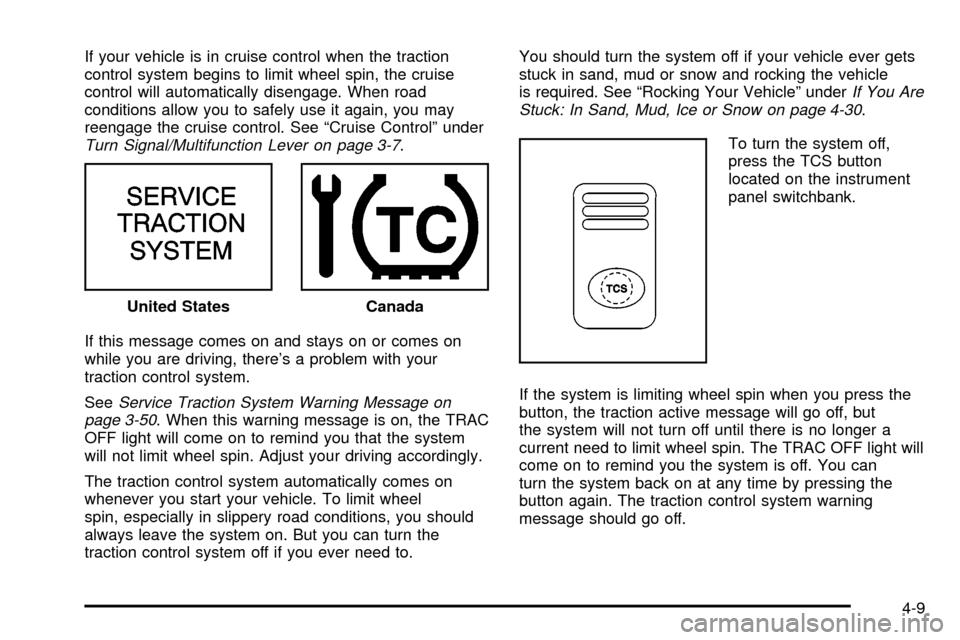
If this message comes on and stays on or comes on
while you are driving, there's a problem with your
traction control system.
See
Service Traction System Warning Message on
page 3-50. When this warning message is on, the TRAC
OFF light will come on to remind you that the system
will not limit wheel spin. Adjust your driving accordingly.
The traction control system automatically comes on
whenever you start your vehicle. To limit wheel
spin, especially in slippery road conditions, you should
always leave the system on. But you can turn the
traction control system off if you ever need to.You should turn the system off if your vehicle ever gets
stuck in sand, mud or snow and rocking the vehicle
is required. See ªRocking Your Vehicleº under
If You Are
Stuck: In Sand, Mud, Ice or Snow on page 4-30.
To turn the system off,
press the TCS button
located on the instrument
panel switchbank.
If the system is limiting wheel spin when you press the
button, the traction active message will go off, but
the system will not turn off until there is no longer a
current need to limit wheel spin. The TRAC OFF light will
come on to remind you the system is off. You can
turn the system back on at any time by pressing the
button again. The traction control system warning
message should go off. United States
Canada
4-9
Page 327 of 486

Following Distance
Stay at least twice as far behind the vehicle ahead as
you would when driving your vehicle without a trailer.
This can help you avoid situations that require
heavy braking and sudden turns.
Passing
You'll need more passing distance up ahead when
you're towing a trailer. And, because you're a good deal
longer, you'll need to go much farther beyond the
passed vehicle before you can return to your lane.
Backing Up
Hold the bottom of the steering wheel with one hand.
Then, to move the trailer to the left, just move that hand
to the left. To move the trailer to the right, move your
hand to the right. Always back up slowly and, if possible,
have someone guide you.
Making Turns
Notice:Making very sharp turns while trailering
could cause the trailer to come in contact with the
vehicle. Your vehicle could be damaged. Avoid
making very sharp turns while trailering.
When you're turning with a trailer, make wider turns
than normal. Do this so your trailer won't strike
soft shoulders, curbs, road signs, trees or other objects.
Avoid jerky or sudden maneuvers. Signal well in
advance.
Turn Signals When Towing a Trailer
When you tow a trailer, your vehicle has to have extra
wiring.
The arrows on your instrument panel will ¯ash whenever
you signal a turn or lane change. Properly hooked up,
the trailer lamps will also ¯ash, telling other drivers
you're about to turn, change lanes or stop.
When towing a trailer, the arrows on your instrument
panel will ¯ash for turns even if the bulbs on the trailer
are burned out. Thus, you may think drivers behind
you are seeing your signal when they are not. It's
important to check occasionally to be sure the trailer
bulbs are still working.
4-41
Page 340 of 486

Checking Things Under
the Hood
{CAUTION:
An electric fan under the hood can start up
and injure you even when the engine is not
running. Keep hands, clothing and tools away
from any underhood electric fan.
{CAUTION:
Things that burn can get on hot engine parts
and start a ®re. These include liquids like fuel,
oil, coolant, brake ¯uid, windshield washer and
other ¯uids, and plastic or rubber. You or
others could be burned. Be careful not to drop
or spill things that will burn onto a hot engine.
Hood Release
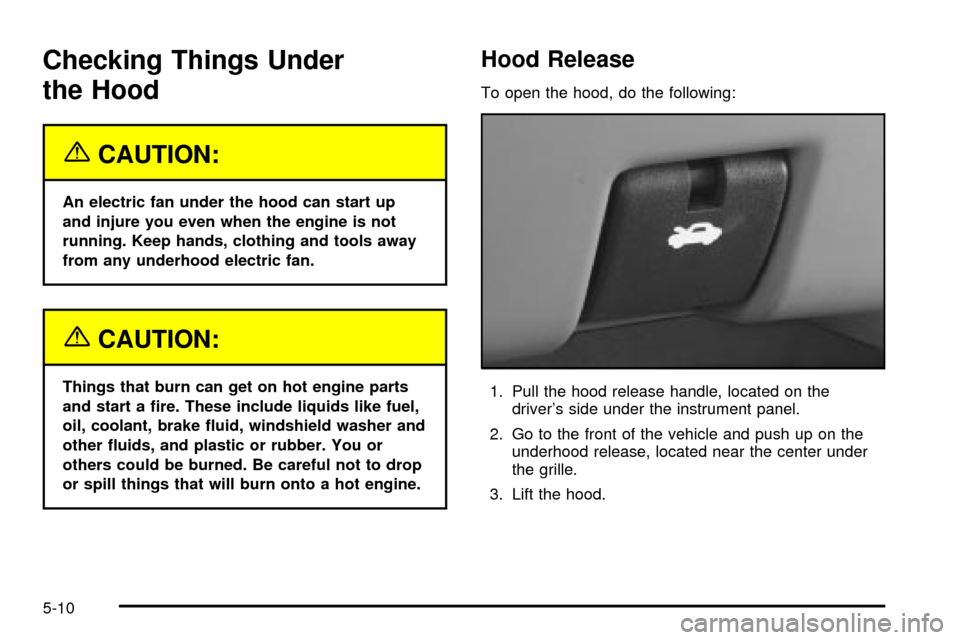
To open the hood, do the following:
1. Pull the hood release handle, located on the
driver's side under the instrument panel.
2. Go to the front of the vehicle and push up on the
underhood release, located near the center under
the grille.
3. Lift the hood.
5-10
Page 356 of 486

Radiator Pressure Cap
Notice:The radiator cap on your vehicle is a
pressure-type cap and must be tightly installed to
prevent coolant loss and possible engine damage
from overheating. Be sure the arrows on the cap line
up with the over¯ow tube on the radiator ®ller neck.
The radiator pressure cap is located at the front of the
engine compartment on the passenger's side of the
vehicle. See
Engine Compartment Overview on
page 5-12for more information on location.
Engine Overheating
You will ®nd an engine coolant temperature gage on
your vehicle's instrument panel cluster. SeeEngine
Coolant Temperature Gage on page 3-44. You
also have an engine coolant temperature warning
message on your instrument panel. See
Engine Coolant
Temperature Warning Message on page 3-51.
Overheated Engine Protection
Operating Mode
This emergency operating mode allows your vehicle to
be driven to a safe place in an emergency situation.
If an overheated engine condition exists, an overheat
protection mode which alternates ®ring groups of
cylinders helps prevent engine damage. In this mode,
you will notice a signi®cant loss in power and engine
performance. The temperature gage will indicate
an overheat condition exists. Driving extended miles
(km) and/or towing a trailer in the overheat protection
mode should be avoided.
Notice:After driving in the overheated engine
protection operating mode, to avoid engine damage,
allow the engine to cool before attempting any
repair. The engine oil will be severely degraded.
Repair the cause of coolant loss, change the oil and
reset the oil life system. See ªEngine Oilº in the
Index.
5-26
Page 416 of 486

Compact Spare Tire
Although the compact spare tire was fully in¯ated when
your vehicle was new, it can lose air after a time.
Check the in¯ation pressure regularly. It should be
60 psi (420 kPa).
After installing the compact spare on your vehicle, you
should stop as soon as possible and make sure
your spare tire is correctly in¯ated. The compact spare
is made to perform well at speeds up to 65 mph
(105 km/h) for distances up to 3,000 miles (5 000 km),
so you can ®nish your trip and have your full-size
tire repaired or replaced where you want. Of course, it's
best to replace your spare with a full-size tire as
soon as you can. Your spare will last longer and be in
good shape in case you need it again.
Notice:When the compact spare is installed, don't
take your vehicle through an automatic car wash
with guide rails. The compact spare can get caught
on the rails. That can damage the tire and wheel,
and maybe other parts of your vehicle.
Don't use your compact spare on other vehicles.
And don't mix your compact spare tire or wheel with
other wheels or tires. They won't ®t. Keep your spare tire
and its wheel together.
Notice:Tire chains won't ®t your compact spare.
Using them can damage your vehicle and can
damage the chains too. Don't use tire chains on
your compact spare.
All-Wheel Drive
After installing a compact spare tire on a vehicle with
all-wheel drive you will need to drive with light to
moderate acceleration, for 10 seconds, in a straight line.
This action will allow the vehicle to detect the compact
spare tire and disable the all-wheel drive system.
The AWD DISABLE message will come on the
instrument panel cluster indicating that the all-wheel
drive system is off. You may detect a slight pull during
this time, but this is normal.
Notice:You may damage your vehicle's all-wheel
drive system if your vehicle is driven for an
extended period with a compact spare tire installed
and the all-wheel drive system in operation. See
ªAll-Wheel Drive Systemº and ªAWD Disable
Warning Messageº in the Index for more
information.
5-86
Page 419 of 486

Stains caused by candy, ice cream, mayonnaise, chili
sauce and unknown stains can be removed as follows:
1. Carefully scrape off excess stain.
2. First, clean with cool water and allow to dry
completely.
3. If a stain remains, follow the cleaner instructions
described earlier.
Cleaning Vinyl
Use warm water and a clean cloth.
·Rub with a clean, damp cloth to remove dirt. You
may have to do this more than once.
·Things like tar, asphalt and shoe polish will stain if
you don't get them off quickly. Use a clean cloth
and vinyl/leather cleaner. See your dealer for
this product.
Cleaning Leather
Use a soft cloth with lukewarm water and a mild soap or
saddle soap and wipe dry with a soft cloth. Then, let
the leather dry naturally. Do not use heat to dry.
·For stubborn stains, use a leather cleaner.
·Neveruse oils, varnishes, solvent-based or abrasive
cleaners, furniture polish or shoe polish on leather.
·Soiled or stained leather should be cleaned
immediately. If dirt is allowed to work into the ®nish,
it can harm the leather.
Cleaning the Top of the Instrument
Panel
Use only mild soap and water to clean the top surfaces
of the instrument panel. Sprays containing silicones
or waxes may cause annoying re¯ections in the
windshield and even make it difficult to see through the
windshield under certain conditions.
Cleaning Interior Plastic Components
Use only a mild soap and water solution on a soft cloth
or sponge. Commercial cleaners may affect the
surface ®nish.
Cleaning Glass Surfaces
Glass should be cleaned often. GM Glass Cleaner or a
liquid household glass cleaner will remove normal
tobacco smoke and dust ®lms on interior glass. See
Vehicle Care/Appearance Materials on page 5-94.
Notice:If you use abrasive cleaners when cleaning
glass surfaces on your vehicle, you could scratch
the glass and/or cause damage to the rear window
defogger and the integrated radio antenna. When
cleaning the glass on your vehicle, use only a soft
cloth and glass cleaner.
5-89
Page 425 of 486

Vehicle Identi®cation
Vehicle Identi®cation Number (VIN)
This is the legal identi®er for your vehicle. It appears on
a plate in the front corner of the instrument panel, on
the driver's side. You can see it if you look through the
windshield from outside your vehicle. The VIN also
appears on the Vehicle Certi®cation and Service Parts
labels and the certi®cates of title and registration.
Engine Identi®cation
The 8th character in your VIN is the engine code. This
code will help you identify your engine, speci®cations
and replacement parts.
Service Parts Identi®cation Label
You'll ®nd this label on the inside of the glove box door.
It's very helpful if you ever need to order parts.
On this label is:
·your VIN,
·the model designation,
·paint information and
·a list of all production options and special
equipment.
Be sure that this label is not removed from the vehicle.
5-95
Page 426 of 486

Electrical System
Add-On Electrical Equipment
Notice:Don't add anything electrical to your vehicle
unless you check with your dealer ®rst. Some
electrical equipment can damage your vehicle and
the damage wouldn't be covered by your warranty.
Some add-on electrical equipment can keep other
components from working as they should.
Your vehicle has an air bag system. Before attempting
to add anything electrical to your vehicle, see
Servicing Your Air Bag-Equipped Vehicle on page 1-102.
Headlamp Wiring
The headlamp wiring is protected by an internal circuit
breaker in the instrument panel fuse panel. An electrical
overload will cause the lamps to go on and off, or in
some cases to remain off. If this happens, have
your headlamp wiring checked right away.
Windshield Wiper Fuses
The windshield wiper motor is protected by an internal
circuit breaker and a fuse. If the motor overheats due to
heavy snow, etc., the wiper will stop until the motor
cools. If the overload is caused by some electrical
problem, be sure to get it ®xed.
Power Windows and Other Power
Options
Circuit breakers in the instrument panel fuse panel
protect the power windows and other power accessories.
When the current load is too heavy, the circuit breaker
opens and closes, protecting the circuit until the
problem is ®xed.
Fuses and Circuit Breakers
The wiring circuits in your vehicle are protected from
short circuits by a combination of fuses, circuit breakers
and fusible thermal links.
Look at the silver-colored band inside the fuse. If the
band is broken or melted, replace the fuse. Be sure you
replace a bad fuse with a new one of the identical
size and rating.
If you ever have a problem on the road and don't have
a spare fuse, you can borrow one that has the same
amperage or use one of the spare fuses in the
underhood fuse block. Just pick some feature of your
vehicle that you can get along without ± like the radio or
cigarette lighter ± and use its fuse, if it is the right
amperage. Replace it as soon as you can.
There are two fuse blocks in your vehicle, the instrument
panel fuse block and the underhood fuse block.
5-96
Page 427 of 486

Instrument Panel Fuse Block
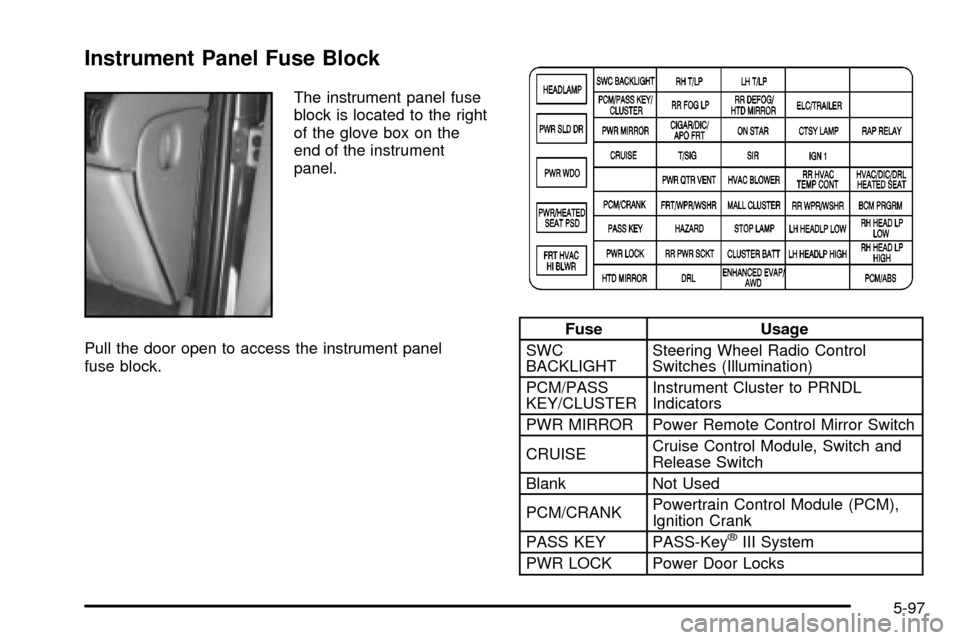
The instrument panel fuse
block is located to the right
of the glove box on the
end of the instrument
panel.
Pull the door open to access the instrument panel
fuse block.
Fuse Usage
SWC
BACKLIGHTSteering Wheel Radio Control
Switches (Illumination)
PCM/PASS
KEY/CLUSTERInstrument Cluster to PRNDL
Indicators
PWR MIRROR Power Remote Control Mirror Switch
CRUISECruise Control Module, Switch and
Release Switch
Blank Not Used
PCM/CRANKPowertrain Control Module (PCM),
Ignition Crank
PASS KEY PASS-Key
žIII System
PWR LOCK Power Door Locks
5-97
Page 428 of 486

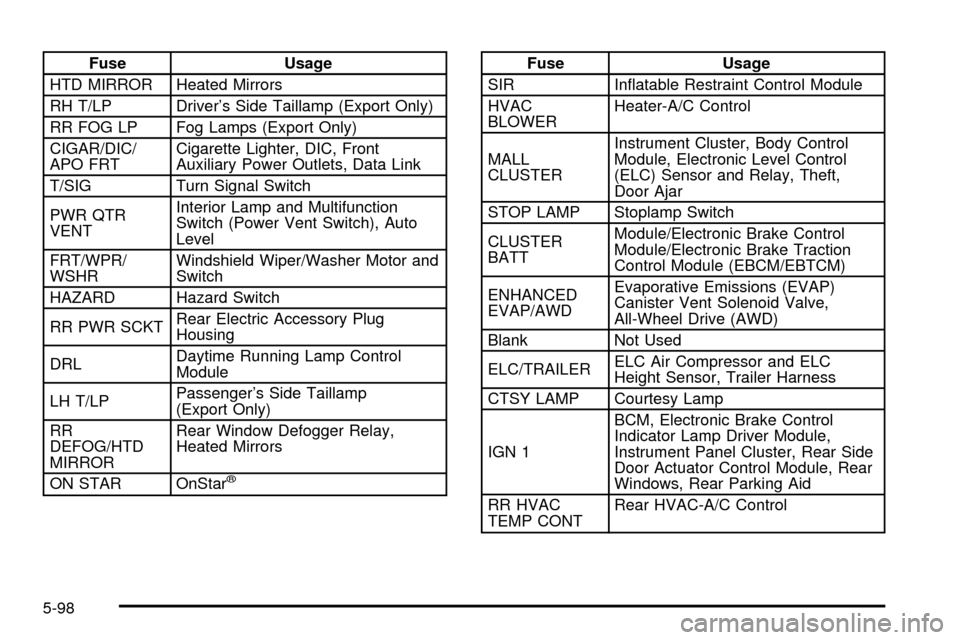
Fuse Usage
HTD MIRROR Heated Mirrors
RH T/LP Driver's Side Taillamp (Export Only)
RR FOG LP Fog Lamps (Export Only)
CIGAR/DIC/
APO FRTCigarette Lighter, DIC, Front
Auxiliary Power Outlets, Data Link
T/SIG Turn Signal Switch
PWR QTR
VENTInterior Lamp and Multifunction
Switch (Power Vent Switch), Auto
Level
FRT/WPR/
WSHRWindshield Wiper/Washer Motor and
Switch
HAZARD Hazard Switch
RR PWR SCKTRear Electric Accessory Plug
Housing
DRLDaytime Running Lamp Control
Module
LH T/LPPassenger's Side Taillamp
(Export Only)
RR
DEFOG/HTD
MIRRORRear Window Defogger Relay,
Heated Mirrors
ON STAR OnStar
ž
Fuse Usage
SIR In¯atable Restraint Control Module
HVAC
BLOWERHeater-A/C Control
MALL
CLUSTERInstrument Cluster, Body Control
Module, Electronic Level Control
(ELC) Sensor and Relay, Theft,
Door Ajar
STOP LAMP Stoplamp Switch
CLUSTER
BATTModule/Electronic Brake Control
Module/Electronic Brake Traction
Control Module (EBCM/EBTCM)
ENHANCED
EVAP/AWDEvaporative Emissions (EVAP)
Canister Vent Solenoid Valve,
All-Wheel Drive (AWD)
Blank Not Used
ELC/TRAILERELC Air Compressor and ELC
Height Sensor, Trailer Harness
CTSY LAMP Courtesy Lamp
IGN 1BCM, Electronic Brake Control
Indicator Lamp Driver Module,
Instrument Panel Cluster, Rear Side
Door Actuator Control Module, Rear
Windows, Rear Parking Aid
RR HVAC
TEMP CONTRear HVAC-A/C Control
5-98