air filter CHEVROLET VENTURE 2003 1.G Owners Manual
[x] Cancel search | Manufacturer: CHEVROLET, Model Year: 2003, Model line: VENTURE, Model: CHEVROLET VENTURE 2003 1.GPages: 486, PDF Size: 3.3 MB
Page 181 of 486
Instrument Panel Overview...............................3-4
Hazard Warning Flashers................................3-6
Other Warning Devices...................................3-6
Horn.............................................................3-7
Tilt Wheel.....................................................3-7
Turn Signal/Multifunction Lever.........................3-7
Exterior Lamps.............................................3-15
Interior Lamps..............................................3-17
Switchbanks.................................................3-20
Instrument Panel Switchbank..........................3-21
Overhead Console Switchbank.......................3-21
Ultrasonic Rear Parking
Assist (URPA)...........................................3-22
Accessory Power Outlets...............................3-24
Climate Controls............................................3-25
Climate Control System.................................3-25
Outlet Adjustment.........................................3-28
Rear Climate Control System (Without
Entertainment System)...............................3-29
Rear Climate Control System
(With Entertainment System).......................3-31
Passenger Compartment Air Filter...................3-33
Warning Lights, Gages and Indicators.............3-35
Instrument Panel Cluster................................3-36
Speedometer and Odometer...........................3-38Tachometer.................................................3-39
Safety Belt Reminder Light.............................3-40
Air Bag Readiness Light................................3-40
Brake System Warning Light..........................3-41
Anti-Lock Brake System Warning Light.............3-42
Traction Control System (TCS)
Warning Light...........................................3-43
Engine Coolant Temperature Gage..................3-44
Malfunction Indicator Lamp.............................3-45
Fuel Gage...................................................3-48
Message Center.............................................3-50
Service Traction System Warning Message......3-50
Traction Active Message................................3-51
Engine Coolant Temperature Warning
Message..................................................3-51
Charging System Indicator Message................3-52
Low Oil Pressure Message............................3-52
Low Engine Oil Level Message.......................3-53
Change Engine Oil Message..........................3-54
Power Sliding Door Warning Message.............3-54
Door Ajar Warning Message...........................3-55
Rear Hatch Ajar Warning Message..................3-56
PASS-Key
žIII Security Message....................3-56
All-Wheel Drive Disable Warning Message.......3-57
Low Fuel Warning Message...........................3-57
Section 3 Instrument Panel
3-1
Page 213 of 486
Rear Air Outlets
To increase air¯ow through the rear ¯oor outlets, place
the left bucket seat in the second row in the forward
position. For more information, see
Rear Seat Operation
on page 1-7.
The outlet behind the left rear seat is the cold air return
outlet. Be sure to keep it free from obstructions.
Also, keep the area around the base of the center
instrument panel console, between and under the front
seats, free of objects that could also obstruct air¯ow
to the rear-seating area.
For more information on how to use the main climate
control system, see ªClimate Control Systemº listed
previously in this section. For information on ventilation,
see ªOutlet Adjustmentº under ªClimate Control
Systemº listed previously in this section.
Passenger Compartment Air Filter
Passenger compartment air, both outside and
recirculated air, is routed through a passenger
compartment ®lter. The ®lter removes certain
contaminants from the air, including pollen and dust
particles. Reductions in air¯ow, which may occur more
quickly in dusty areas, indicate that the ®lter needs
to be replaced early. For how often to change the air
®lter, see
Part A: Scheduled Maintenance Services
on page 6-4.The access panel for the passenger compartment air
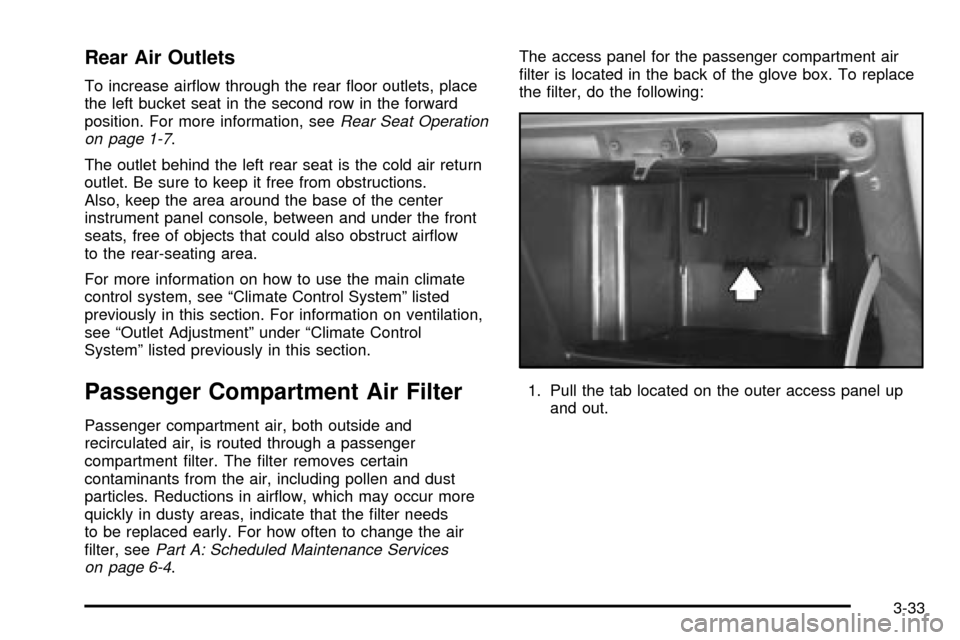
®lter is located in the back of the glove box. To replace
the ®lter, do the following:
1. Pull the tab located on the outer access panel up
and out.
3-33
Page 331 of 486
Service............................................................5-3
Doing Your Own Service Work.........................5-3
Adding Equipment to the Outside of
Your Vehicle..............................................5-4
Fuel................................................................5-4
Gasoline Octane............................................5-4
Gasoline Speci®cations....................................5-5
California Fuel...............................................5-5
Additives.......................................................5-6
Fuels in Foreign Countries...............................5-6
Filling Your Tank............................................5-7
Filling a Portable Fuel Container.......................5-9
Checking Things Under the Hood....................5-10
Hood Release..............................................5-10
Engine Compartment Overview.......................5-12
Engine Oil...................................................5-13
Engine Air Cleaner/Filter................................5-18
Automatic Transaxle Fluid..............................5-20
Engine Coolant.............................................5-23
Radiator Pressure Cap..................................5-26
Engine Overheating.......................................5-26
Cooling System............................................5-29
Power Steering Fluid.....................................5-37
Windshield Washer Fluid................................5-38
Brakes........................................................5-40Battery........................................................5-43
Jump Starting...............................................5-44
All-Wheel Drive..............................................5-50
Bulb Replacement..........................................5-52
Halogen Bulbs..............................................5-52
Headlamps..................................................5-52
Front Turn Signal, Sidemarker and
Parking Lamps..........................................5-54
Taillamps, Turn Signal, Stoplamps and
Back-up Lamps.........................................5-56
Replacement Bulbs.......................................5-57
Windshield Wiper Blade Replacement..............5-58
Tires..............................................................5-60
In¯ation - Tire Pressure.................................5-61
Tire Inspection and Rotation...........................5-62
When It Is Time for New Tires.......................5-63
Buying New Tires.........................................5-64
Uniform Tire Quality Grading..........................5-65
Wheel Alignment and Tire Balance..................5-66
Wheel Replacement......................................5-66
Tire Chains..................................................5-67
Accessory In¯ator.........................................5-68
If a Tire Goes Flat........................................5-70
Changing a Flat Tire.....................................5-71
Compact Spare Tire......................................5-86
Section 5 Service and Appearance Care
5-1
Page 343 of 486
A. Underhood Fuse Block. SeeFuses and Circuit
Breakers on page 5-96.
B. Remote Positive (+) Terminal. See
Jump Starting on
page 5-44.
C. Windshield Washer Fluid Reservoir. See
Windshield
Washer Fluid on page 5-38.
D. Radiator Pressure Cap. See
Radiator Pressure Cap
on page 5-26.
E. Power Steering Fluid Reservoir. See
Power Steering
Fluid on page 5-37.
F. Engine Oil Fill Cap. See
Engine Oil on page 5-13.
G. Engine Oil Dipstick. See
Engine Oil on page 5-13.
H. Transaxle Fluid Dipstick. See
Automatic Transaxle
Fluid on page 5-20.
I. Brake Master Cylinder Reservoir. See
Brakes on
page 5-40.
J. Engine Air Cleaner/Filter. See
Engine Air
Cleaner/Filter on page 5-18.
K. Coolant Recovery Tank. See
Cooling System on
page 5-29.
Engine Oil
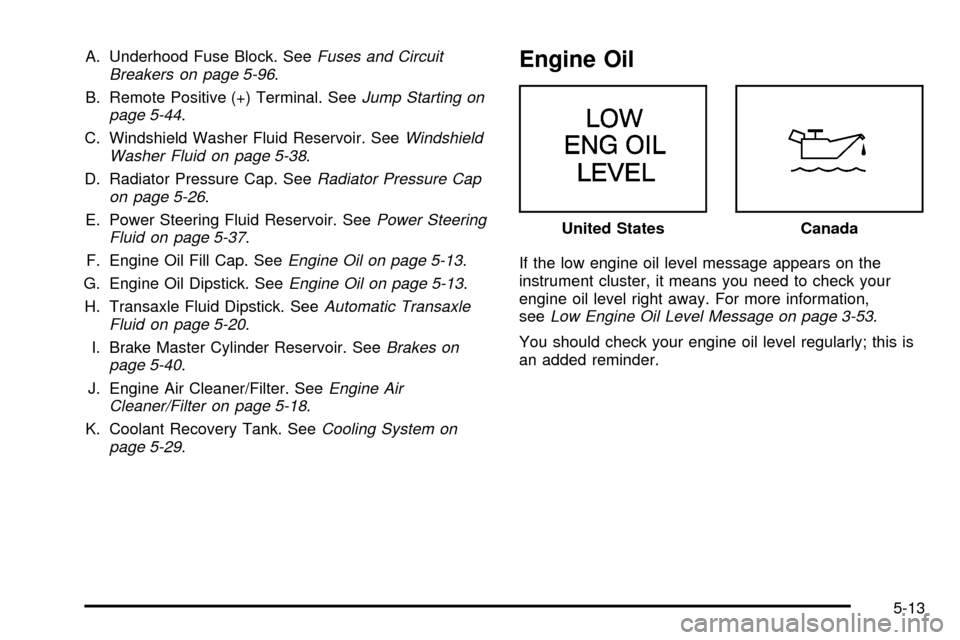
If the low engine oil level message appears on the
instrument cluster, it means you need to check your
engine oil level right away. For more information,
see
Low Engine Oil Level Message on page 3-53.
You should check your engine oil level regularly; this is
an added reminder.United States
Canada
5-13
Page 348 of 486
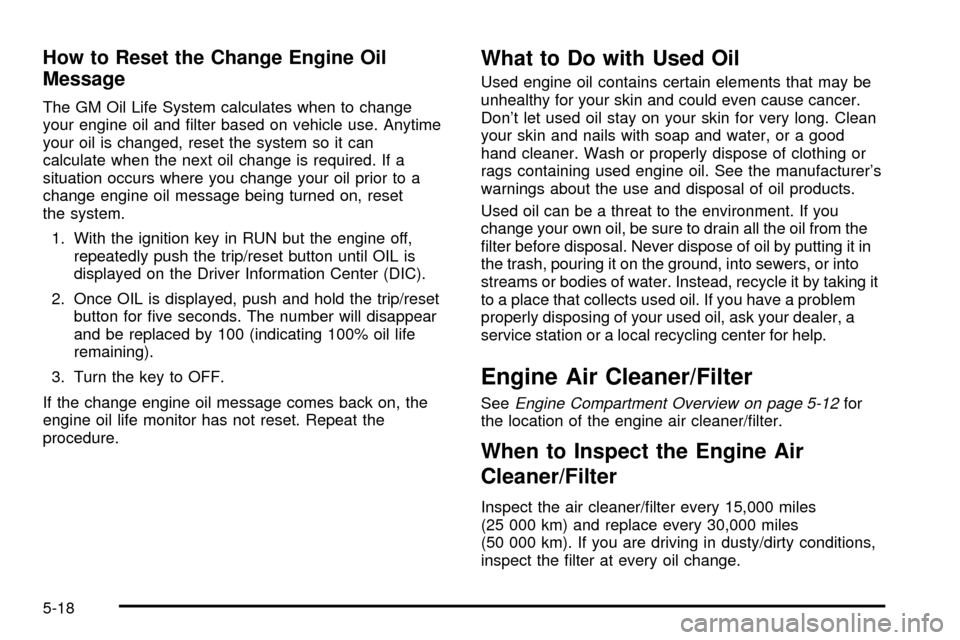
How to Reset the Change Engine Oil
Message
The GM Oil Life System calculates when to change
your engine oil and ®lter based on vehicle use. Anytime
your oil is changed, reset the system so it can
calculate when the next oil change is required. If a
situation occurs where you change your oil prior to a
change engine oil message being turned on, reset
the system.
1. With the ignition key in RUN but the engine off,
repeatedly push the trip/reset button until OIL is
displayed on the Driver Information Center (DIC).
2. Once OIL is displayed, push and hold the trip/reset
button for ®ve seconds. The number will disappear
and be replaced by 100 (indicating 100% oil life
remaining).
3. Turn the key to OFF.
If the change engine oil message comes back on, the
engine oil life monitor has not reset. Repeat the
procedure.
What to Do with Used Oil
Used engine oil contains certain elements that may be
unhealthy for your skin and could even cause cancer.
Don't let used oil stay on your skin for very long. Clean
your skin and nails with soap and water, or a good
hand cleaner. Wash or properly dispose of clothing or
rags containing used engine oil. See the manufacturer's
warnings about the use and disposal of oil products.
Used oil can be a threat to the environment. If you
change your own oil, be sure to drain all the oil from the
®lter before disposal. Never dispose of oil by putting it in
the trash, pouring it on the ground, into sewers, or into
streams or bodies of water. Instead, recycle it by taking it
to a place that collects used oil. If you have a problem
properly disposing of your used oil, ask your dealer, a
service station or a local recycling center for help.
Engine Air Cleaner/Filter
SeeEngine Compartment Overview on page 5-12for
the location of the engine air cleaner/®lter.
When to Inspect the Engine Air
Cleaner/Filter
Inspect the air cleaner/®lter every 15,000 miles
(25 000 km) and replace every 30,000 miles
(50 000 km). If you are driving in dusty/dirty conditions,
inspect the ®lter at every oil change.
5-18
Page 349 of 486
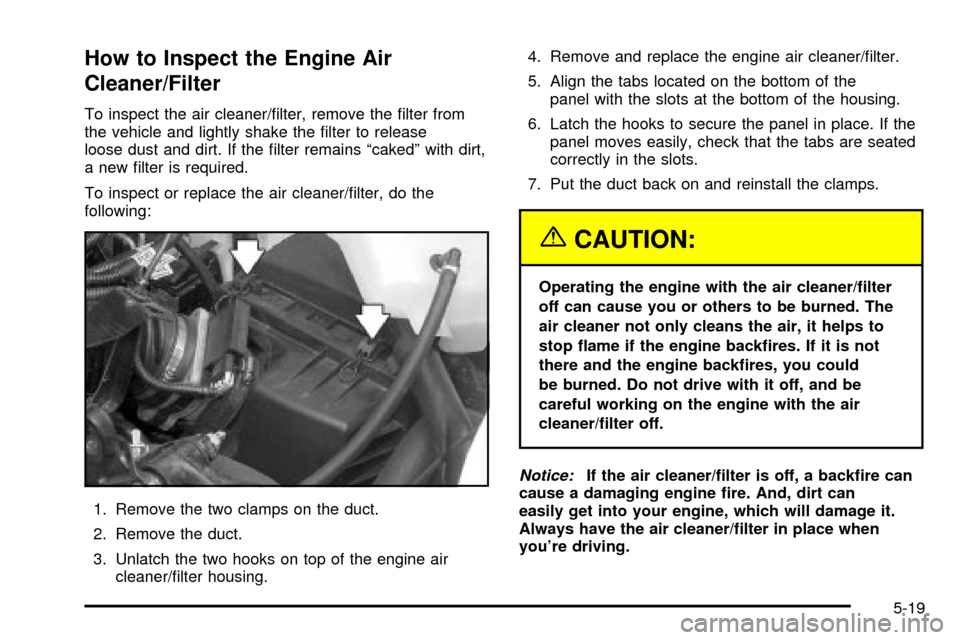
How to Inspect the Engine Air
Cleaner/Filter
To inspect the air cleaner/®lter, remove the ®lter from
the vehicle and lightly shake the ®lter to release
loose dust and dirt. If the ®lter remains ªcakedº with dirt,
a new ®lter is required.
To inspect or replace the air cleaner/®lter, do the
following:
1. Remove the two clamps on the duct.
2. Remove the duct.
3. Unlatch the two hooks on top of the engine air
cleaner/®lter housing.4. Remove and replace the engine air cleaner/®lter.
5. Align the tabs located on the bottom of the
panel with the slots at the bottom of the housing.
6. Latch the hooks to secure the panel in place. If the
panel moves easily, check that the tabs are seated
correctly in the slots.
7. Put the duct back on and reinstall the clamps.
{CAUTION:
Operating the engine with the air cleaner/®lter
off can cause you or others to be burned. The
air cleaner not only cleans the air, it helps to
stop ¯ame if the engine back®res. If it is not
there and the engine back®res, you could
be burned. Do not drive with it off, and be
careful working on the engine with the air
cleaner/®lter off.
Notice:If the air cleaner/®lter is off, a back®re can
cause a damaging engine ®re. And, dirt can
easily get into your engine, which will damage it.
Always have the air cleaner/®lter in place when
you're driving.
5-19
Page 433 of 486
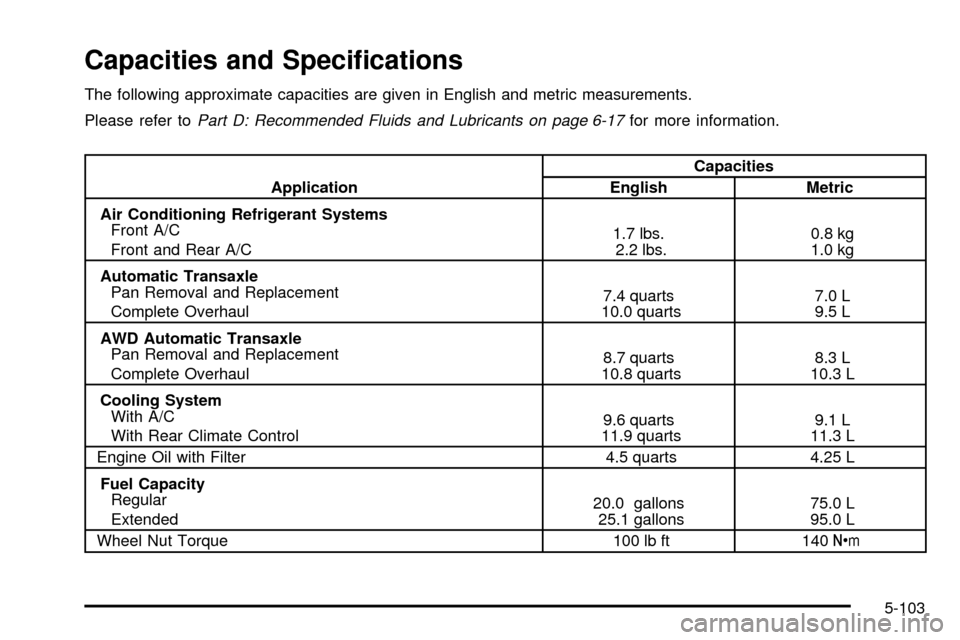
Capacities and Speci®cations
The following approximate capacities are given in English and metric measurements.
Please refer to
Part D: Recommended Fluids and Lubricants on page 6-17for more information.
ApplicationCapacities
English Metric
Air Conditioning Refrigerant Systems
Front A/C
Front and Rear A/C1.7 lbs.
2.2 lbs.0.8 kg
1.0 kg
Automatic Transaxle
Pan Removal and Replacement
Complete Overhaul7.4 quarts
10.0 quarts7.0 L
9.5 L
AWD Automatic Transaxle
Pan Removal and Replacement
Complete Overhaul8.7 quarts
10.8 quarts8.3 L
10.3 L
Cooling System
With A/C
With Rear Climate Control9.6 quarts
11.9 quarts9.1 L
11.3 L
Engine Oil with Filter 4.5 quarts 4.25 L
Fuel Capacity
Regular
Extended20.0 gallons
25.1 gallons75.0 L
95.0 L
Wheel Nut Torque 100 lb ft 140Y
5-103
Page 434 of 486
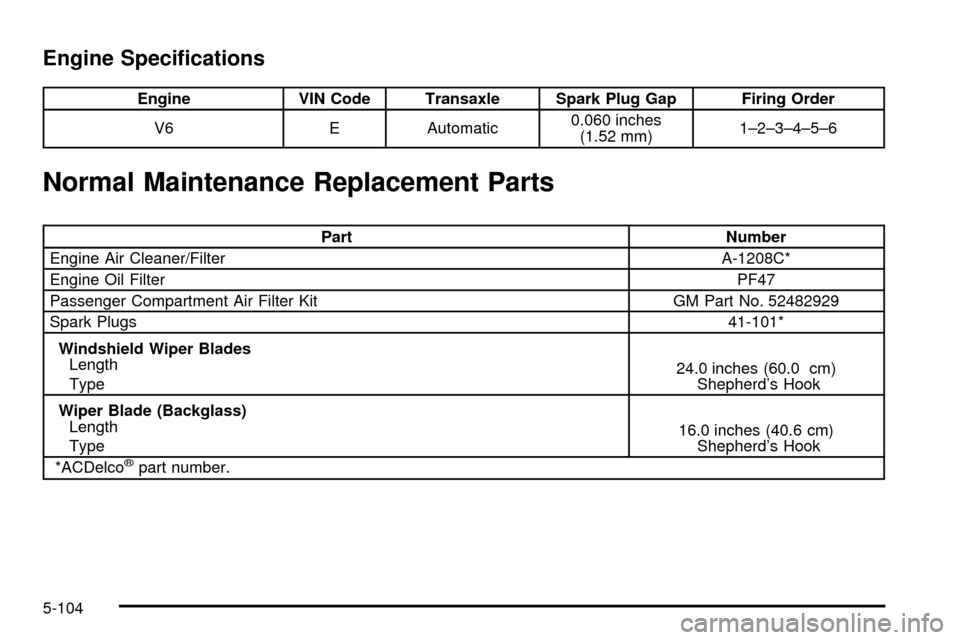
Engine Speci®cations
Engine VIN Code Transaxle Spark Plug Gap Firing Order
V6 E Automatic0.060 inches
(1.52 mm)1±2±3±4±5±6
Normal Maintenance Replacement Parts
Part Number
Engine Air Cleaner/Filter A-1208C*
Engine Oil FilterPF47
Passenger Compartment Air Filter Kit GM Part No. 52482929
Spark Plugs41-101*
Windshield Wiper Blades
Length
Type24.0 inches (60.0 cm)
Shepherd's Hook
Wiper Blade (Backglass)
Length
Type16.0 inches (40.6 cm)
Shepherd's Hook
*ACDelco
žpart number.
5-104
Page 441 of 486
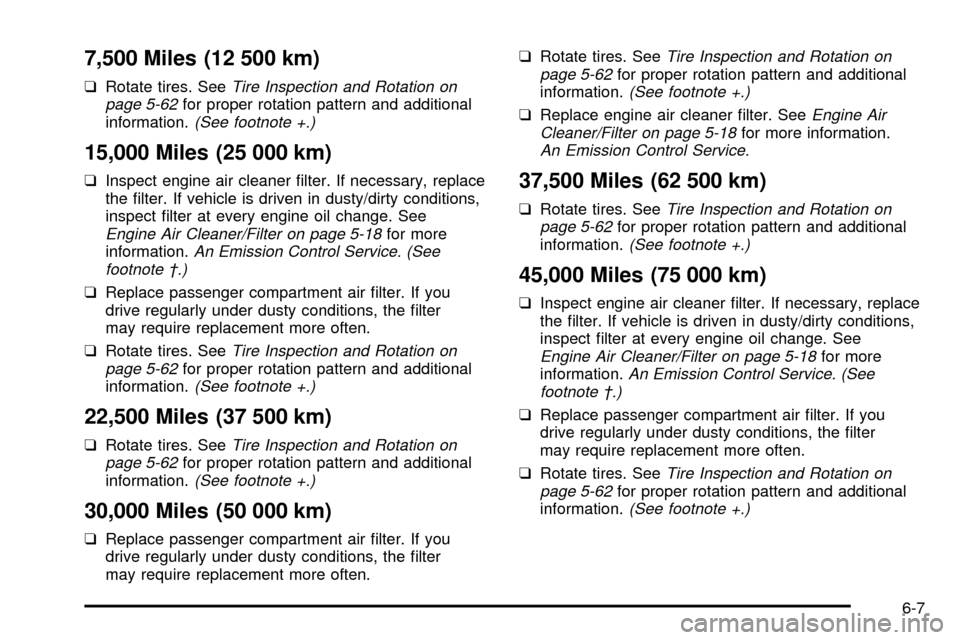
7,500 Miles (12 500 km)
qRotate tires. SeeTire Inspection and Rotation on
page 5-62for proper rotation pattern and additional
information.(See footnote +.)
15,000 Miles (25 000 km)
qInspect engine air cleaner ®lter. If necessary, replace
the ®lter. If vehicle is driven in dusty/dirty conditions,
inspect ®lter at every engine oil change. See
Engine Air Cleaner/Filter on page 5-18for more
information.An Emission Control Service. (See
footnote ².)
qReplace passenger compartment air ®lter. If you
drive regularly under dusty conditions, the ®lter
may require replacement more often.
qRotate tires. See
Tire Inspection and Rotation on
page 5-62for proper rotation pattern and additional
information.(See footnote +.)
22,500 Miles (37 500 km)
qRotate tires. SeeTire Inspection and Rotation on
page 5-62for proper rotation pattern and additional
information.(See footnote +.)
30,000 Miles (50 000 km)
qReplace passenger compartment air ®lter. If you
drive regularly under dusty conditions, the ®lter
may require replacement more often.qRotate tires. See
Tire Inspection and Rotation on
page 5-62for proper rotation pattern and additional
information.(See footnote +.)
qReplace engine air cleaner ®lter. SeeEngine Air
Cleaner/Filter on page 5-18for more information.An Emission Control Service.
37,500 Miles (62 500 km)
qRotate tires. SeeTire Inspection and Rotation on
page 5-62for proper rotation pattern and additional
information.(See footnote +.)
45,000 Miles (75 000 km)
qInspect engine air cleaner ®lter. If necessary, replace
the ®lter. If vehicle is driven in dusty/dirty conditions,
inspect ®lter at every engine oil change. See
Engine Air Cleaner/Filter on page 5-18for more
information.An Emission Control Service. (See
footnote ².)
qReplace passenger compartment air ®lter. If you
drive regularly under dusty conditions, the ®lter
may require replacement more often.
qRotate tires. See
Tire Inspection and Rotation on
page 5-62for proper rotation pattern and additional
information.(See footnote +.)
6-7
Page 442 of 486
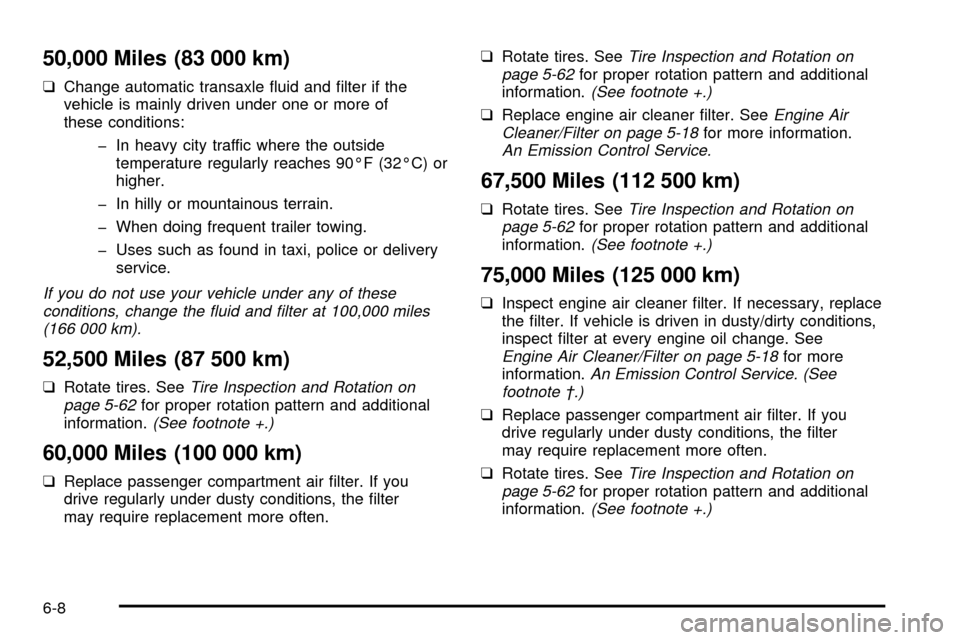
50,000 Miles (83 000 km)
qChange automatic transaxle ¯uid and ®lter if the
vehicle is mainly driven under one or more of
these conditions:
þ In heavy city traffic where the outside
temperature regularly reaches 90ÉF (32ÉC) or
higher.
þ In hilly or mountainous terrain.
þ When doing frequent trailer towing.
þ Uses such as found in taxi, police or delivery
service.
If you do not use your vehicle under any of these
conditions, change the ¯uid and ®lter at 100,000 miles
(166 000 km).
52,500 Miles (87 500 km)
qRotate tires. SeeTire Inspection and Rotation on
page 5-62for proper rotation pattern and additional
information.(See footnote +.)
60,000 Miles (100 000 km)
qReplace passenger compartment air ®lter. If you
drive regularly under dusty conditions, the ®lter
may require replacement more often.qRotate tires. See
Tire Inspection and Rotation on
page 5-62for proper rotation pattern and additional
information.(See footnote +.)
qReplace engine air cleaner ®lter. SeeEngine Air
Cleaner/Filter on page 5-18for more information.An Emission Control Service.
67,500 Miles (112 500 km)
qRotate tires. SeeTire Inspection and Rotation on
page 5-62for proper rotation pattern and additional
information.(See footnote +.)
75,000 Miles (125 000 km)
qInspect engine air cleaner ®lter. If necessary, replace
the ®lter. If vehicle is driven in dusty/dirty conditions,
inspect ®lter at every engine oil change. See
Engine Air Cleaner/Filter on page 5-18for more
information.An Emission Control Service. (See
footnote ².)
qReplace passenger compartment air ®lter. If you
drive regularly under dusty conditions, the ®lter
may require replacement more often.
qRotate tires. See
Tire Inspection and Rotation on
page 5-62for proper rotation pattern and additional
information.(See footnote +.)
6-8