set clock CHEVROLET VENTURE 2003 1.G Owners Manual
[x] Cancel search | Manufacturer: CHEVROLET, Model Year: 2003, Model line: VENTURE, Model: CHEVROLET VENTURE 2003 1.GPages: 486, PDF Size: 3.3 MB
Page 166 of 486

Notice:Loading cargo on the luggage carrier that
weighs more than 150 lbs. (68 kg) or hangs over the
rear or sides of the vehicle may damage your
vehicle. Load cargo so that it rests on the slats as
far forward as possible and against the side
rails, making sure to fasten it securely.
When you carry cargo on the luggage carrier of a
proper size and weight, put it on the slats, as far forward
as you can. Then slide the crossrail up against the
rear of the load, to help keep it from moving. You can
then tie it down.Don't exceed the maximum vehicle capacity when
loading your vehicle. For more information on vehicle
capacity and loading, see
Loading Your Vehicle on
page 4-34.
To prevent damage or loss of cargo as you're driving,
check now and then to make sure the luggage
carrier and cargo are still securely fastened.
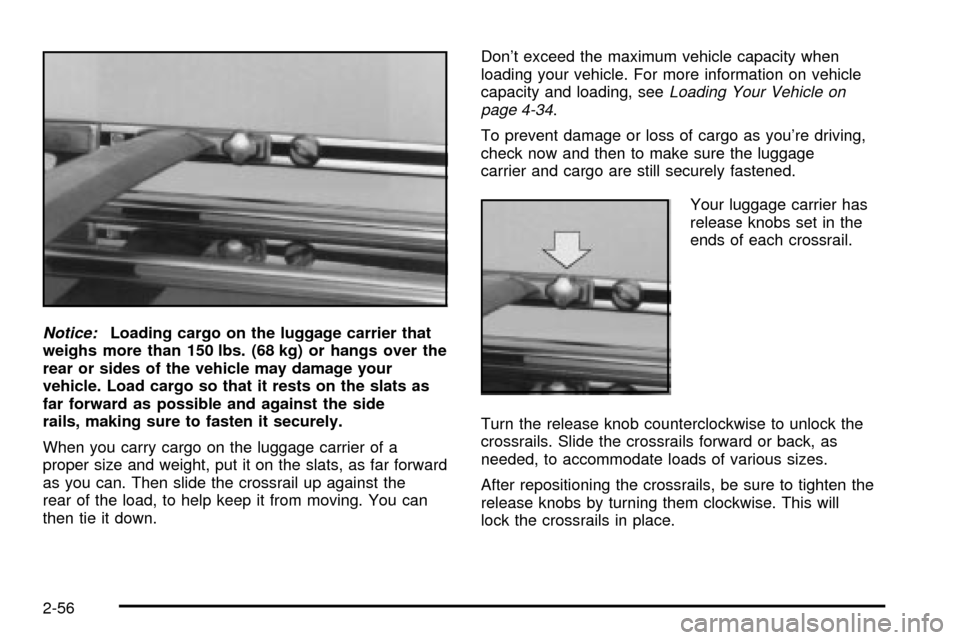
Your luggage carrier has
release knobs set in the
ends of each crossrail.
Turn the release knob counterclockwise to unlock the
crossrails. Slide the crossrails forward or back, as
needed, to accommodate loads of various sizes.
After repositioning the crossrails, be sure to tighten the
release knobs by turning them clockwise. This will
lock the crossrails in place.
2-56
Page 210 of 486

Directing the Air¯ow
To direct the air¯ow to the rear-seating area, use the
right knob located on the main climate-control panel.
·Select vent or bi-level mode to direct air to the
rear of the vehicle through the overhead outlets.
·Select ¯oor, defog or defrost mode to direct air to
the rear of the vehicle through the ¯oor outlets.
Generally the upper outlets are used for air conditioning
and the ¯oor outlets are used for heating.
Selecting the Fan Speed
9
(Fan):Turn the fan knob on either rear fan control
to numeral 1, 2, or 3 to increase or decrease air¯ow
to the rear-seating area. Turn the fan knob on either rear
fan control to 0 or OFF to turn off the fan.
Setting the Temperature
If the driver is adjusting the temperature, do the
following:
To increase or decrease the temperature for the entire
vehicle, use the temperature controls located on the
main climate-control panel.If using the main climate-control panel, then the
air-conditioning system must be on to direct cooled air
to the rear of the vehicle. If it is not on, then the
temperature in the rear of the vehicle will remain at
cabin temperature.
If a rear-seat passenger is adjusting the temperature, do
the following:
Turn the right knob, located on the overhead rear-control
panel, behind the driver's seat, clockwise or
counterclockwise to raise or lower the temperature in
the rear-seating area only.
Rear Air Outlets
To increase air¯ow through the rear ¯oor outlets, place
the left bucket seat in the second row in the forward
position. For more information, see
Rear Seat Operation
on page 1-7.
The outlet behind the left rear seat is the cold air return
outlet. Be sure to keep it free from obstructions.
Also, keep the area around the base of the center
instrument panel console, between and under the front
seats, free of objects that could also obstruct air¯ow
to the rear-seating area.
For more information on how to use the main climate
control system, see ªClimate Control Systemº listed
previously in this section. For information on ventilation,
see ªOutlet Adjustmentº under ªClimate Control
Systemº listed previously in this section.
3-30
Page 259 of 486

Cassette Tape Messages
CHK TAPE (Check Tape):If this message appears on
the radio display, the tape won't play because of one
of the following errors.
·The tape is tight and the player can't turn the tape
hubs. Remove the tape. Hold the tape with the
open end down and try to turn the right hub
counterclockwise with a pencil. Turn the tape over
and repeat. If the hubs do not turn easily, your
tape may be damaged and should not be used in
the player. Try a new tape to make sure your player
is working properly.
·The tape is broken. Try a new tape.
·The tape is wrapped around the tape head. Attempt
to get the cassette out. Try a new tape.
CLEAN:If this message appears on the display, the
cassette tape player needs to be cleaned. It will still play
tapes, but you should clean it as soon as possible to
prevent damage to the tapes and player. See
Care
of Your Cassette Tape Player on page 3-104.
If any error occurs repeatedly or if an error can't be
corrected, contact your dealer.
CD Adapter Kits
It is possible to use a portable CD player adapter kit
with your cassette tape player after disabling the
tight/loose tape sensing feature on your tape player.
To disable the feature, use the following steps:
1. Turn the ignition on.
2. Turn the radio off.
3. Press and hold the TAPE CD button. The radio will
display READY and ¯ash the cassette symbol.
4. Insert the adapter into the cassette slot. It will
power up the radio and begin playing.
The override feature will remain active until EJT is
pressed.
Playing a Compact Disc
Insert a disc partway into the slot, label side up. The
player will pull it in and the disc should begin playing.
The display will show the CD symbol. If you want
to insert a compact disc with the ignition off, ®rst press
DISPL or EJT.
If an error appears on the display, see ªCompact Disc
Messagesº later in this section.
3-79