radio controls CHEVROLET VENTURE 2005 1.G Owners Manual
[x] Cancel search | Manufacturer: CHEVROLET, Model Year: 2005, Model line: VENTURE, Model: CHEVROLET VENTURE 2005 1.GPages: 470, PDF Size: 2.76 MB
Page 162 of 470
Message Center.............................................3-46
Service Traction System Warning Message......3-46
Traction Active Message................................3-47
Engine Coolant Temperature Warning
Message..................................................3-48
Charging System Indicator Message................3-48
Low Oil Pressure Message............................3-49
Change Engine Oil Message..........................3-50
Power Sliding Door Warning Message.............3-50
Door Ajar Warning Message...........................3-51
Rear Hatch Ajar Warning Message..................3-51
PASS-Key
®III Security Message....................3-52
Low Fuel Warning Message...........................3-52
Driver Information Center (DIC).......................3-53
Audio System(s).............................................3-56
Setting the Time for Radios without
Radio Data Systems (RDS)........................3-56
Setting the Time for Radios with Radio
Data Systems (RDS)..................................3-56
AM-FM Radio...............................................3-57Radio with CD (Base Level)...........................3-59
Radio with CD (MP3)....................................3-69
Radio with Cassette and CD..........................3-84
Radio with Six-Disc CD.................................3-94
Entertainment System..................................3-108
Rear Seat Audio (RSA) (Without
Entertainment System)..............................3-114
Rear Seat Audio (RSA) (With
Entertainment System)..............................3-116
Theft-Deterrent Feature
(Non-RDS Radios)...................................3-118
Theft-Deterrent Feature
(RDS Radios)..........................................3-118
Audio Steering Wheel Controls......................3-118
Radio Reception.........................................3-119
Care of Your Cassette Tape Player...............3-120
Care of Your CDs and DVDs........................3-121
Care of Your CD and DVD Player.................3-121
Fixed Mast Antenna....................................3-121
XM™ Satellite Radio Antenna System............3-121
Section 3 Instrument Panel
3-2
Page 216 of 470
Audio System(s)
Notice:Before adding any sound equipment to
your vehicle, like a tape player, CB radio, mobile
telephone, or two-way radio, make sure that it can
be added by checking with your dealer. Also,
check federal rules covering mobile radio and
telephone units. If sound equipment can be added,
it is very important to do it properly. Added
sound equipment may interfere with the operation
of your vehicle’s engine, radio, or other systems,
and even damage them. Your vehicle’s systems may
interfere with the operation of sound equipment
that has been added improperly.
Figure out which audio system is in your vehicle, �nd
out what your audio system can do, and how to operate
all of its controls.
Your vehicle has a feature called Retained Accessory
Power (RAP). With RAP, the audio system can be
played even after the ignition is turned off. SeeRetained
Accessory Power (RAP) on page 2-31for more
information.
Setting the Time for Radios without
Radio Data Systems (RDS)
Press and hold the HR or MIN arrow for two seconds.
Then press HR until the correct hour appears on
the display. Press and hold MIN until the correct minute
appears on the display. The time can be set with the
ignition on or off.
Setting the Time for Radios with
Radio Data Systems (RDS)
The radio may have a button marked with an H or HR to
represent hours and an M or MN to represent minutes.
Press and hold the hour button until the correct hour
appears on the display. AM will appear on the display for
morning hours. Press and hold the minute button until
the correct minute appears on the display. The time can
be set with the ignition on or off.
To synchronize the time with an FM station broadcasting
Radio Data System (RDS) information, press and hold
the hour and minute buttons at the same time until
UPDATED appears on the display. If the time is not
available from the station, NO UPDAT will appear on
the display.
RDS time is broadcast once a minute. After tuning to an
RDS broadcast station, it may take a few minutes for
the time to update.
3-56
Page 218 of 470
Setting Preset Stations
Up to 18 stations (six FM1, six FM2, and six AM) can be
programmed on the six numbered pushbuttons, by
performing the following steps:
1. Turn the radio on.
2. Press AM FM to select FM1, FM2, or AM.
3. Tune in the desired station.
4. Press and hold one of the six numbered
pushbuttons until you hear a beep. Whenever that
numbered pushbutton is pressed, the station
that was set will return.
5. Repeat the steps for each pushbutton.
Setting the Tone (Bass/Treble)
AUDIO:To adjust the bass and the treble, press and
release AUDIO until BAS or TRE appears on the
display. Then press and hold the up or the down arrow
to increase or to decrease. If a station is weak or
noisy, decrease the treble.
To adjust bass or treble to the middle position, select
BAS or TRE. Then press and hold AUDIO for more than
two seconds until you hear a beep. B and a zero or T
and a zero will appear on the display.To adjust both tone controls and both speaker controls
to the middle position, �rst end out of audio mode
by pressing another button, causing the radio to perform
that function, or by waiting �ve seconds for the display
to return to time of day. Then press and hold AUDIO for
more than two seconds until you hear a beep. CEN
will appear on the display.
Adjusting the Speakers (Balance/Fade)
AUDIO:To adjust the balance between the right
and the left speakers, press and release the AUDIO
button until BAL appears on the display. Then press and
hold the up or the down arrow to move the sound
toward the right or the left speakers.
To adjust the fade between the front and the rear
speakers, press and release AUDIO until FAD appears
on the display. Then press and hold the up or the
down arrow to move the sound toward the front or the
rear speakers.
To adjust balance or fade to the middle position, select
BAL or FAD. Then press and hold AUDIO for more
than two seconds until you hear a beep. L and a zero
or F and a zero will appear on the display.
3-58
Page 219 of 470
To adjust both tone controls and both speaker controls
to the middle position, �rst end out of audio mode
by pressing another button, causing the radio to perform
that function, or by waiting �ve seconds for the display
to return to time of day. Then press and hold AUDIO for
more than two seconds until you hear a beep. CEN
will appear on the display.
Radio Messages
CAL (Calibration):The audio system has been
calibrated for your vehicle from the factory. If CAL
appears on the display it means that the radio has not
been con�gured properly for your vehicle and must
be returned to the dealer for service.
LOC (Locked):This message is displayed when the
THEFTLOCK
®system has locked up. Take the vehicle
to the dealer for service.
If any error occurs repeatedly or if an error cannot be
corrected, contact your dealer.
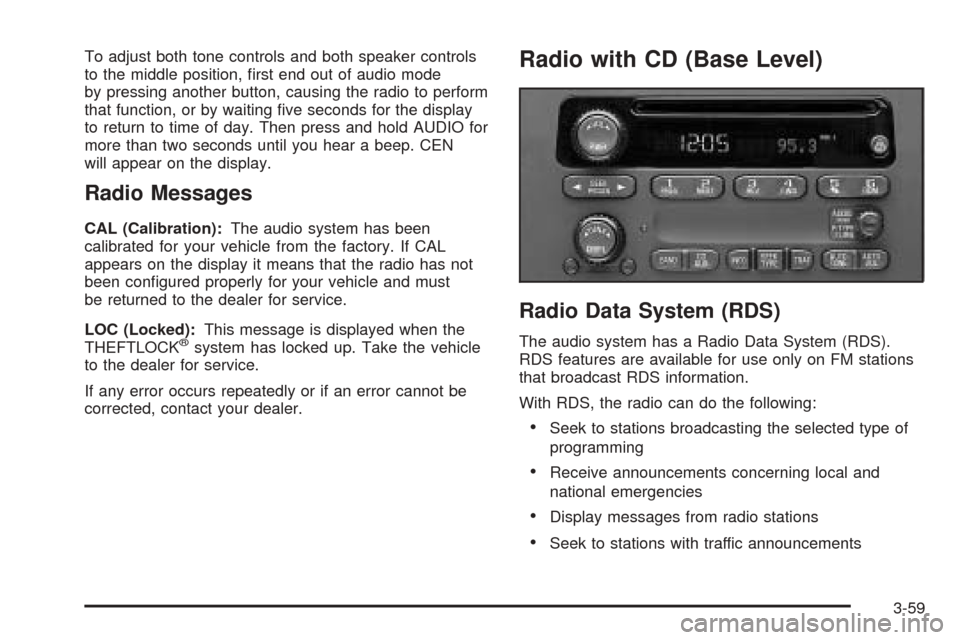
Radio with CD (Base Level)
Radio Data System (RDS)
The audio system has a Radio Data System (RDS).
RDS features are available for use only on FM stations
that broadcast RDS information.
With RDS, the radio can do the following:
Seek to stations broadcasting the selected type of
programming
Receive announcements concerning local and
national emergencies
Display messages from radio stations
Seek to stations with traffic announcements
3-59
Page 222 of 470
Setting the Tone (Bass/Treble)
AUDIO:Push and release the AUDIO knob until BASS
or TREB appears on the display. Turn the knob to
increase or to decrease. The display will show the bass
or the treble level. If a station is weak or noisy,
decrease the treble.
To adjust the bass and the treble to the middle position,
push and hold the AUDIO knob. The radio will produce
one beep and adjust the display level to the middle
position.
To adjust all tone and speaker controls to the middle
position, push and hold the AUDIO knob when no tone
or speaker control is displayed. ALL will appear on
the display, you will hear a beep, and the display level
will be adjusted to the middle position.
AUTO TONE (Automatic Tone):Press this button to
select customized equalization settings designed
for country/western, jazz, talk, pop, rock, and classical.
To return the bass and treble to the manual mode,
push and release the AUDIO knob until MANUAL
appears on the display.
Adjusting the Speakers (Balance/Fade)
AUDIO:To adjust the balance between the right
and the left speakers, push and release the AUDIO
knob until BAL appears on the display. Turn the knob to
move the sound toward the right or the left speakers.
To adjust the fade between the front and the rear
speakers, push and release the AUDIO knob until FADE
appears on the display. Turn the knob to move the
sound toward the front or the rear speakers.
To adjust the balance and the fade to the middle
position, push the AUDIO knob, then push it again and
hold it until you hear one beep. The balance and the
fade will be adjusted to the middle position and the
display will show the speaker balance.
To adjust all tone and speaker controls to the middle
position, push and hold the AUDIO knob when no tone
or speaker control is displayed. ALL will appear on
the display, you will hear a beep, and the display level
will be adjusted to the middle position.
3-62
Page 231 of 470
oPSCANp(Preset Scan):Press and hold either
arrow for more than two seconds. SCAN will appear on
the display and the radio will produce one beep. The
radio will go to the �rst preset station stored on the
pushbuttons, play for a few seconds, then go on to the
next preset station. Press either arrow again or one
of the pushbuttons to stop scanning presets.
The radio will only scan the preset stations with a strong
signal that are in the selected band.
Setting Preset Stations
Up to 30 stations (six FM1, six FM2, and six AM,
six XM1 and six XM2 (if equipped)), can be programmed
on the six numbered pushbuttons, by performing the
following steps:
1. Turn the radio on.
2. Press BAND to select FM1, FM2, AM, or XM1
or XM2.
3. Tune in the desired station.
4. Press AUTO TONE to select the equalization.
5. Press and hold one of the six numbered
pushbuttons until you hear a beep. Whenever that
numbered pushbutton is pressed, the station
that was set will return and the equalization that
was selected will be stored for that pushbutton.
6. Repeat the steps for each pushbutton.
Setting the Tone (Bass/Treble)
AUDIO:Push and release the AUDIO knob until BASS
or TREB appears on the display. Turn the knob to
increase or to decrease. The display will show the bass
or the treble level. If a station is weak or noisy,
decrease the treble.
To adjust the bass and the treble to the middle position,
push and hold the AUDIO knob. The radio will produce
one beep.
To adjust all tone and speaker controls to the middle
position, push and hold the AUDIO knob when no tone
or speaker control is displayed. ALL will appear on
the display and you will hear a beep.
AUTO TONE (Automatic Tone):Press this button to
select customized equalization settings designed
for country/western, jazz, talk, pop, rock, and classical.
To return the bass and treble to the manual mode,
push and release the AUDIO knob until MANUAL
appears on the display.
3-71
Page 245 of 470
qPSCANr(Preset Scan):Press and hold either
arrow for more than two seconds. SCAN will appear on
the display and you will hear a beep. The radio will go to
the �rst preset station, play for a few seconds, then go on
to the next preset station. Press either arrow again or one
of the pushbuttons to stop scanning presets.
The radio will only scan stations with a strong signal that
are in the selected band.
Setting Preset Stations
Up to 30 stations (six FM1, six FM2, and six AM), can
be programmed on the six numbered pushbuttons,
by performing the following steps:
1. Turn the radio on.
2. Press BAND to select FM1, FM2, or AM.
3. Tune in the desired station.
4. Press AUTO TONE to select the equalization.
5. Press and hold one of the six numbered
pushbuttons until you hear a beep. Whenever that
numbered pushbutton is pressed, the station
that was set will return and the equalization that
was selected will be stored for that pushbutton.
6. Repeat the steps for each pushbutton.
Setting the Tone (Bass/Treble)
AUDIO:Push and release the AUDIO knob until BASS
or TREB appears on the display. Turn the knob to
increase or to decrease. The display will show the bass
or the treble level. If a station is weak or noisy,
decrease the treble.
To adjust the bass and the treble to the middle position,
push and hold the AUDIO knob. You will hear a beep and
the display level will be adjusted to the middle position.
To adjust all tone and speaker controls to the middle
position, push and hold the AUDIO knob when no tone or
speaker control is displayed. ALL will appear on the
display, you will hear a beep, and the display level will be
adjusted to the middle position.
AUTO TONE (Automatic Tone):Press this button to
select customized equalization settings designed
for country/western, jazz, talk, pop, rock, and classical.
To return the bass and treble to the manual mode,
push and release the AUDIO knob until MANUAL
appears on the display.
3-85
Page 246 of 470
Adjusting the Speakers (Balance/Fade)
AUDIO:To adjust the balance between the right
and the left speakers, push and release the AUDIO
knob until BAL appears on the display. Turn the knob to
move the sound toward the right or the left speakers.
To adjust the fade between the front and the rear
speakers, push and release the AUDIO knob until FADE
appears on the display. Turn the knob to move the
sound toward the front or the rear speakers.
To adjust the balance and fade to the middle position,
push the AUDIO knob, then push it again and hold
it until you hear a beep. The display level will be
adjusted to the middle position.
To adjust all tone and speaker controls to the middle
position, push and hold the AUDIO knob when no tone
or speaker control is displayed. ALL will appear on
the display, you will hear a beep, and the display level
will be adjusted to the middle position.
Radio Data System (RDS)
The audio system has a Radio Data System (RDS).
RDS features are available for use only on FM stations
that broadcast RDS information.
With RDS, the radio can do the following:
Seek to stations broadcasting the selected type of
programming
Receive announcements concerning local and
national emergencies
Display messages from radio stations
Seek to stations with traffic announcements.
This system relies upon receiving speci�c information
from these stations and will only work when the
information is available. In rare cases, a radio station
may broadcast incorrect information that will cause
the radio features to work improperly. If this happens,
contact the radio station.
While the radio is tuned to an RDS station, the station
name or call letters will appear on the display instead of
the frequency. RDS stations may also provide the time of
day, a program type (PTY) for current programming, and
the name of the program being broadcast.
3-86
Page 249 of 470
Radio Messages
CAL ERR (Calibration Error):The audio system has
been calibrated for your vehicle from the factory. If
CAL ERR appears on the display, it means that the radio
has not been con�gured properly for the vehicle and
must be returned to your GM dealer for service.
LOCKED:This message is displayed when the
THEFTLOCK
®system has locked up. Return your
vehicle to your GM dealer for service.
If any error occurs repeatedly or if an error cannot be
corrected, contact your GM dealer.
Playing a Cassette Tape
The tape player is built to work best with tapes that are
up to 30 to 45 minutes long on each side. Tapes
longer than that are so thin they may not work well in
this player. The longer side with the tape visible should
face to the right. If you hear nothing or hear a garbled
sound, the tape may not be in squarely. Press the EJT
button to remove the tape and start over.
If the ignition and radio are off, press the EJT button or
the DISPL knob. If the ignition is on and the radio is
off, the tape can be inserted and will begin to play the
tape. A tape symbol will appear on the display whenever
a tape is inserted.While the tape is playing, use the VOL, AUDIO, and
SEEK controls just as you do for the radio. TAPE and an
arrow showing which side of the tape is playing will
appear on the display.
Cassette tape adapter kits for portable CD players will
work in the cassette tape player. See “CD Adapter Kits”
later for more information.
The tape bias is set automatically when a metal or
chrome tape is inserted.
If an error appears on the display, see “Cassette Tape
Messages” later in this section.
1 PREV (Previous):The tape must have at least
three seconds of silence between each selection for
previous to work. Press this pushbutton to go to the
previous selection on the tape if the current selection has
been playing for less than three seconds. If pressed when
the current selection has been playing from 3 to
13 seconds, it will go to the beginning of the previous
selection or the beginning of the current selection,
depending upon the position on the tape. If pressed when
the current selection has been playing for more than
13 seconds, it will go to the beginning of the current
selection.
SEEK and a negative number will appear on the display
while the cassette player is in the previous mode.
Pressing this pushbutton multiple times or holding it will
increase the number of selections to be searched back,
up to -9.
3-89
Page 274 of 470
Battery Replacement
To change the batteries, do the following:
1. Remove the screw and open the battery door
located on the back of the remote control.
2. Replace the two AAA batteries in the compartment.
Make sure that they are installed correctly.
3. Replace the battery door and screw.
If the remote control is to be stored for a long period of
time, remove the batteries and keep them in a cool,
dry place.
DVD Distortion
There may be an experience with video distortion when
operating cellular phones, scanners, CB radios,
Global Position Systems (GPS)*, two-way radios, mobile
fax, or walkie talkies.
It may be necessary to turn off the DVD player when
operating one of these devices in or near the vehicle.
*Excludes the OnStar
®System.
Cleaning the DVD Player
When cleaning the outside DVD faceplate and buttons,
use only a clean cloth dampened with clean water.
Cleaning the Video Screen
When cleaning the video screen, use only a clean cloth
dampened with clean water. Use care when directly
touching or cleaning the screen, as damage may result.
Rear Seat Audio (RSA) (Without
Entertainment System)
This feature allows rear seat passengers to listen to and
control any of the sources: radio and CDs. However,
the rear seat passengers can only control the sources
that the front seat passengers are not listening to.
For example, rear seat passengers may listen to and
control a CD through headphones, while the driver
listens to the radio through the front speakers. The rear
seat passengers have control of the volume for each
set of headphones.
The front seat audio controls always have priority over
the RSA controls. If the front seat passengers switch
the source for the main radio to a remote source,
the RSA will not be able to control the remote source.
You can operate the RSA when the main radio is off.
Primary Radio Controls
The following function is controlled by the main radio:
PWR (Power):Press this knob twice to turn RSA off.
3-114