change wheel CHEVROLET VOLT 2012 1.G Owners Manual
[x] Cancel search | Manufacturer: CHEVROLET, Model Year: 2012, Model line: VOLT, Model: CHEVROLET VOLT 2012 1.GPages: 454, PDF Size: 7.89 MB
Page 5 of 454
Black plate (5,1)Chevrolet Volt Owner Manual - 2012
Introduction v
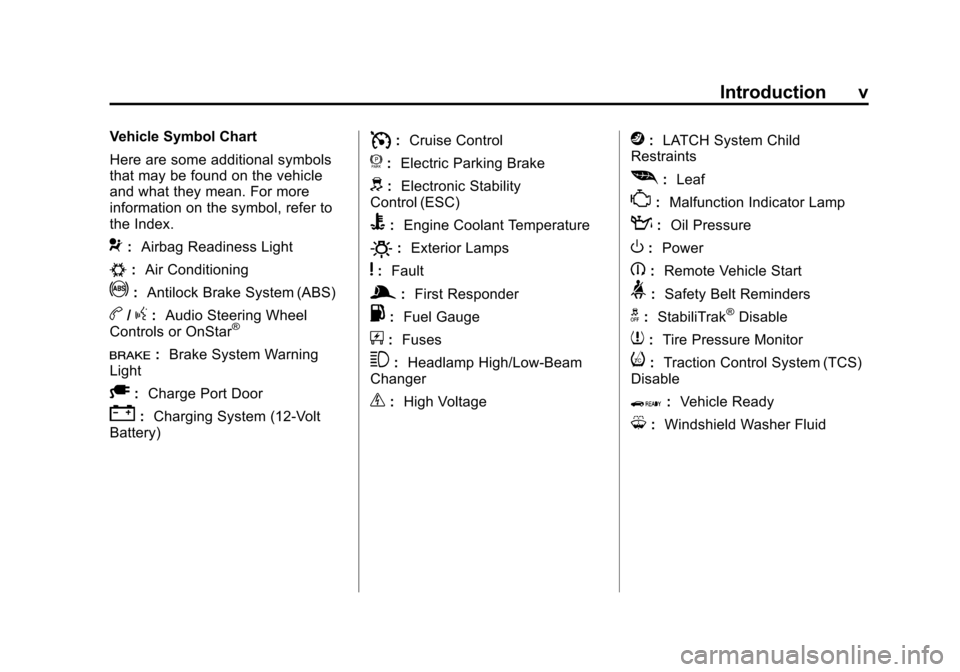
Vehicle Symbol Chart
Here are some additional symbols
that may be found on the vehicle
and what they mean. For more
information on the symbol, refer to
the Index.
9:Airbag Readiness Light
#:Air Conditioning
!:Antilock Brake System (ABS)
b/g:Audio Steering Wheel
Controls or OnStar®
I: Brake System Warning
Light
A: Charge Port Door
":Charging System (12‐Volt
Battery)
I: Cruise Control
f: Electric Parking Brake
d:Electronic Stability
Control (ESC)
B: Engine Coolant Temperature
O:Exterior Lamps
y:Fault
g:First Responder
.: Fuel Gauge
+:Fuses
3: Headlamp High/Low-Beam
Changer
_: High Voltage
j:LATCH System Child
Restraints
[: Leaf
*:Malfunction Indicator Lamp
::Oil Pressure
O:Power
B:Remote Vehicle Start
>:Safety Belt Reminders
g:StabiliTrak®Disable
7:Tire Pressure Monitor
i:Traction Control System (TCS)
Disable
Q: Vehicle Ready
M:Windshield Washer Fluid
Page 9 of 454

Black plate (3,1)Chevrolet Volt Owner Manual - 2012
In Brief 1-3
A.Air Vents on page 8‑8.
B. Turn and Lane‐Change Lever. See Turn and Lane-Change
Signals on page 6‑4.
Exterior Lamp Controls on
page 6‑1.
Pedestrian Friendly Alert on
page 5‑6.
C. Instrument Cluster on page 5‑9.
Driver Information Center (DIC)
Display. See Driver Information
Center (DIC) on page 5‑45.
D. Windshield Wiper/Washer on
page 5‑6.
E. Heated Front Seats on page 3‑6
(If Equipped).
F. Center Stack Display on
page 5‑29.
G. Charging Status Indicator. See Charging Status Feedback on
page 9‑52. H. Light Sensor. See
Daytime
Running Lamps (DRL) on
page 6‑2.
I. Instrument Panel Storage on
page 4‑1.
J. Automatic Climate Control
System on page 8‑1.
K. Driver Information Center (DIC) Controls. See Driver Information
Center (DIC) on page 5‑45.
L. Instrument Panel Illumination
Control on page 6‑4.
M. Data Link Connector (DLC) (Out of View). See Malfunction
Indicator Lamp on page 5‑19.
N. Cruise Control on page 9‑40.
O. Steering Wheel Adjustment on
page 5‑5.
P. Horn on page 5‑6. Q.
Steering Wheel Controls on
page 5‑5 (If Equipped).
R. Leaf Button. See Center Stack
Display on page 5‑29.
S. DRIVE MODE Button. See Driver Selected Operating
Modes on page 9‑25.
T. Power Button on page 9‑18.
U. Shift Lever. See Electric Drive
Unit on page 9‑31.
V. Infotainment on page 7‑1.
Navigation System. See the
separate navigation system
manual.
W. Electric Parking Brake on
page 9‑34.
X. Power Door Locks on
page 2‑12.
Y. Hazard Warning Flashers on
page 6‑3.
Page 25 of 454
Black plate (19,1)Chevrolet Volt Owner Manual - 2012
In Brief 1-19
Satellite Radio
Vehicles with an XM™satellite radio
tuner and a valid XM satellite radio
subscription can receive XM
programming.
XM Satellite Radio Service
XM is a satellite radio service based
in the 48 contiguous United States
and 10 Canadian provinces. XM
satellite radio has a wide variety of
programming and commercial-free
music, coast to coast, and in
digital-quality sound. A fee is
required to receive the XM service.
For more information refer to:
.www.xmradio.com or call
1-800-929-2100 (U.S.).
.www.xmradio.ca or call
1-877-438-9677 (Canada).
For more information, see Satellite
Radio on page 7‑11.
Portable Audio Devices
This vehicle has a 3.5 mm (1/8 in)
auxiliary input and a USB port
located in the center stack. External
devices such as iPods
®, laptop
computers, MP3 players, CD
changers, and USB storage devices
may be connected, depending on
the audio system.
For more information, see Auxiliary
Devices on page 7‑18.
Bluetooth®
The Bluetooth system allows users
with a Bluetooth-enabled cell phone
to make and receive hands-free
calls using the vehicle audio system
and controls.
The Bluetooth-enabled cell phone
must be paired with the in-vehicle
Bluetooth system before it can be
used in the vehicle. Not all phones
will support all functions. See
Bluetooth (Overview) on
page 7‑22 orBluetooth
(Infotainment Controls) on
page 7‑24 orBluetooth (Voice
Recognition) on page 7‑28.
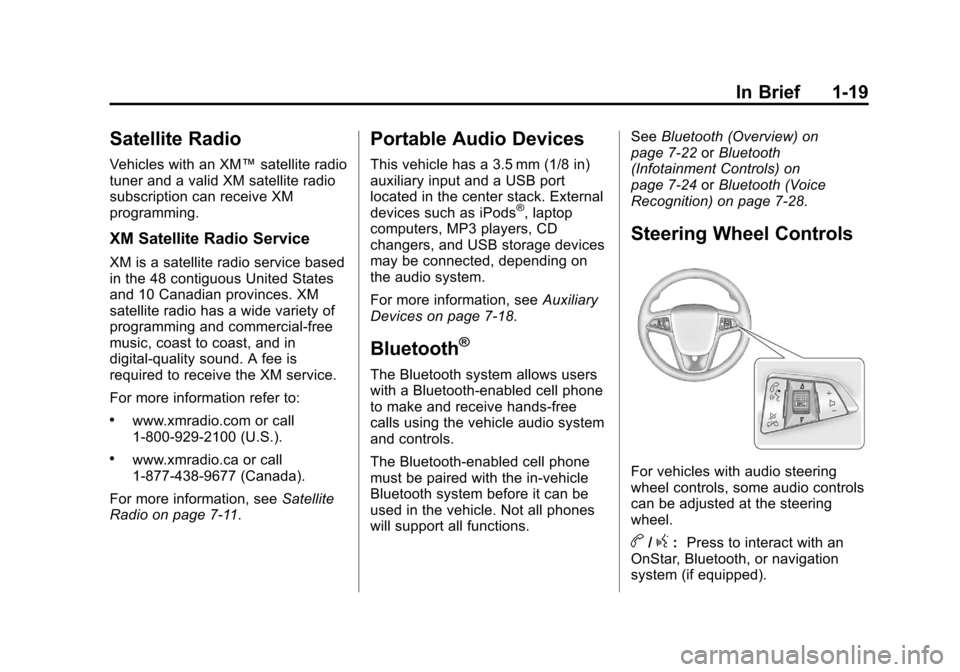
Steering Wheel Controls
For vehicles with audio steering
wheel controls, some audio controls
can be adjusted at the steering
wheel.
b/g: Press to interact with an
OnStar, Bluetooth, or navigation
system (if equipped).
Page 26 of 454
Black plate (20,1)Chevrolet Volt Owner Manual - 2012
1-20 In Brief
$/i:Press to silence the
vehicle speakers only. Press again
to turn the sound on. For vehicles
with OnStar or Bluetooth systems,
press to reject an incoming call,
or to end a current call.
_SRC^: Use this control to select
a radio band or audio source.
Use
_or^to select the next or
previous favorite radio station, CD
track, DVD track/chapter (with
navigation), or MP3 track.
Press SRC to change between
radio and CD or DVD.
Press and hold SRC to interact with
the navigation system.
+
x−: Press + to increase or −to
decrease the volume.
For more information, see Steering
Wheel Controls on page 5‑5.
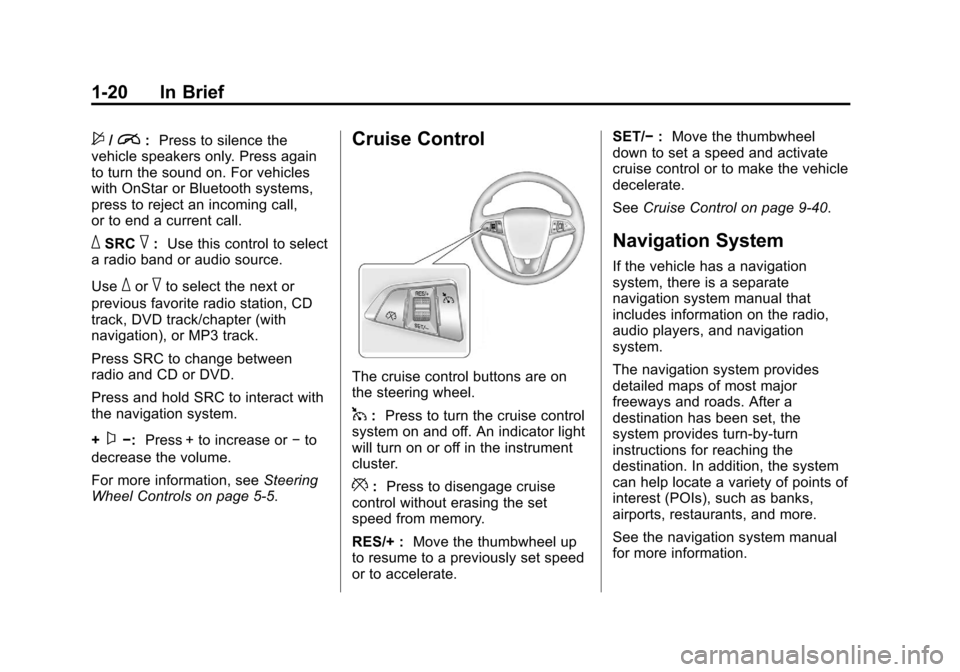
Cruise Control
The cruise control buttons are on
the steering wheel.
1: Press to turn the cruise control
system on and off. An indicator light
will turn on or off in the instrument
cluster.
*: Press to disengage cruise
control without erasing the set
speed from memory.
RES/+ : Move the thumbwheel up
to resume to a previously set speed
or to accelerate. SET/−
:Move the thumbwheel
down to set a speed and activate
cruise control or to make the vehicle
decelerate.
See Cruise Control on page 9‑40.
Navigation System
If the vehicle has a navigation
system, there is a separate
navigation system manual that
includes information on the radio,
audio players, and navigation
system.
The navigation system provides
detailed maps of most major
freeways and roads. After a
destination has been set, the
system provides turn-by-turn
instructions for reaching the
destination. In addition, the system
can help locate a variety of points of
interest (POIs), such as banks,
airports, restaurants, and more.
See the navigation system manual
for more information.
Page 89 of 454
Black plate (31,1)Chevrolet Volt Owner Manual - 2012
Seats and Restraints 3-31
Servicing the
Airbag-Equipped Vehicle
Airbags affect how the vehicle
should be serviced. There are parts
of the airbag system in several
places around the vehicle. Your
dealer and the service manual have
information about servicing the
vehicle and the airbag system. To
purchase a service manual, see
Service Publications Ordering
Information on page 13‑13.
{WARNING
For up to 10 seconds after the
vehicle is turned off and the
12‐volt battery is disconnected,
an airbag can still inflate during
improper service. You can be
injured if you are close to an
airbag when it inflates. Avoid
yellow connectors. They are
probably part of the airbag
system. Be sure to follow proper
service procedures, and make
sure the person performing work
for you is qualified to do so.
Adding Equipment to the
Airbag-Equipped Vehicle
Adding accessories that change the
vehicle's frame, bumper system,
height, front end, or side sheet
metal may keep the airbag system
from working properly.
The operation of the airbag system
can also be affected by changing or
moving any parts of the front seats,
safety belts, airbag sensing and
diagnostic module, steering wheel,
instrument panel, roof-rail airbag
modules, ceiling or pillar garnish
trim, overhead console, front
sensors, side impact sensors,
rollover sensor module, or airbag
wiring.
Your dealer and the service manual
have information about the location
of the airbag sensors, sensing and
diagnostic module, and airbag
wiring.
Page 120 of 454

Black plate (4,1)Chevrolet Volt Owner Manual - 2012
5-4 Instruments and Controls
A.Air Vents on page 8‑8.
B. Turn and Lane‐Change Lever. See Turn and Lane-Change
Signals on page 6‑4.
Exterior Lamp Controls on
page 6‑1.
Pedestrian Friendly Alert on
page 5‑6.
C. Instrument Cluster on page 5‑9.
Driver Information Center (DIC)
Display. See Driver Information
Center (DIC) on page 5‑45.
D. Windshield Wiper/Washer on
page 5‑6.
E. Heated Front Seats on page 3‑6
(If Equipped).
F. Center Stack Display on
page 5‑29.
G. Charging Status Indicator. See Charging Status Feedback on
page 9‑52. H. Light Sensor. See
Daytime
Running Lamps (DRL) on
page 6‑2.
I. Instrument Panel Storage on
page 4‑1.
J. Automatic Climate Control
System on page 8‑1.
K. Driver Information Center (DIC) Controls. See Driver Information
Center (DIC) on page 5‑45.
L. Instrument Panel Illumination
Control on page 6‑4.
M. Data Link Connector (DLC) (Out of View). See Malfunction
Indicator Lamp on page 5‑19.
N. Cruise Control on page 9‑40.
O. Steering Wheel Adjustment on
page 5‑5.
P. Horn on page 5‑6. Q.
Steering Wheel Controls on
page 5‑5 (If Equipped).
R. Leaf Button. See Center Stack
Display on page 5‑29.
S. DRIVE MODE Button. See Driver Selected Operating
Modes on page 9‑25.
T. Power Button on page 9‑18.
U. Shift Lever. See Electric Drive
Unit on page 9‑31.
V. Infotainment on page 7‑1.
Navigation System. See the
separate navigation system
manual.
W. Electric Parking Brake on
page 9‑34.
X. Power Door Locks on
page 2‑12.
Y. Hazard Warning Flashers on
page 6‑3.
Page 129 of 454
Black plate (13,1)Chevrolet Volt Owner Manual - 2012
Instruments and Controls 5-13
Instrument Cluster Display
Configurations
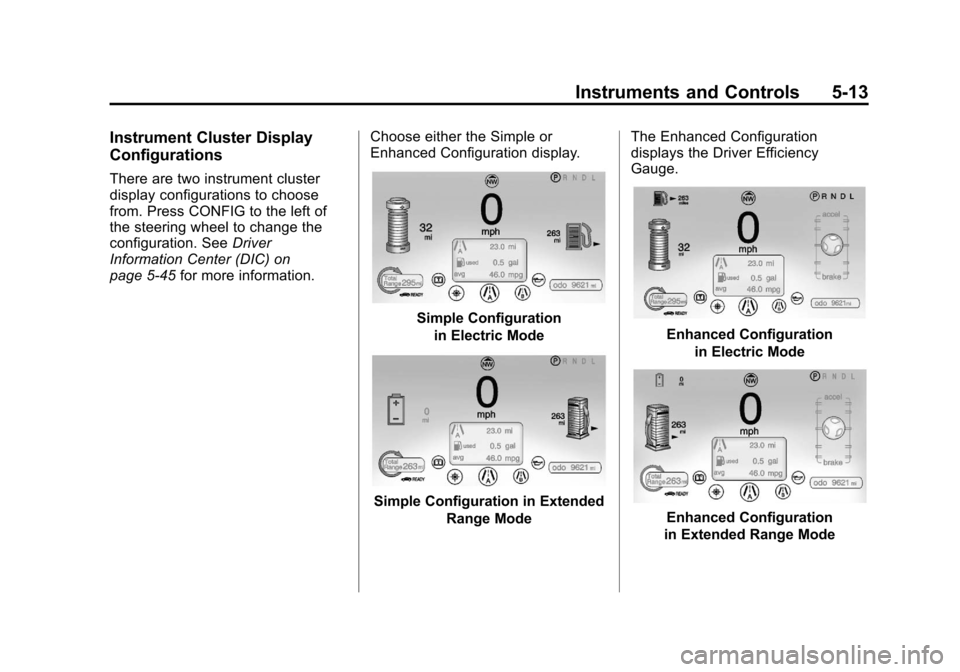
There are two instrument cluster
display configurations to choose
from. Press CONFIG to the left of
the steering wheel to change the
configuration. SeeDriver
Information Center (DIC) on
page 5‑45 for more information. Choose either the Simple or
Enhanced Configuration display.
Simple Configuration
in Electric Mode
Simple Configuration in Extended Range Mode The Enhanced Configuration
displays the Driver Efficiency
Gauge.
Enhanced Configuration
in Electric Mode
Enhanced Configuration
in Extended Range Mode
Page 190 of 454
Black plate (4,1)Chevrolet Volt Owner Manual - 2012
6-4 Lighting
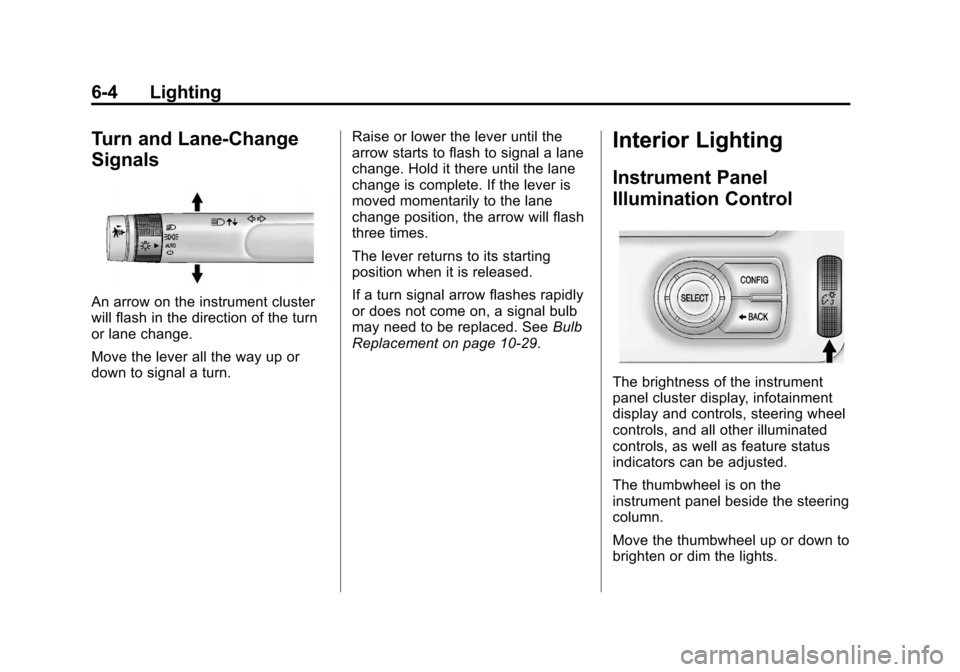
Turn and Lane-Change
Signals
An arrow on the instrument cluster
will flash in the direction of the turn
or lane change.
Move the lever all the way up or
down to signal a turn.Raise or lower the lever until the
arrow starts to flash to signal a lane
change. Hold it there until the lane
change is complete. If the lever is
moved momentarily to the lane
change position, the arrow will flash
three times.
The lever returns to its starting
position when it is released.
If a turn signal arrow flashes rapidly
or does not come on, a signal bulb
may need to be replaced. See
Bulb
Replacement on page 10‑29.
Interior Lighting
Instrument Panel
Illumination Control
The brightness of the instrument
panel cluster display, infotainment
display and controls, steering wheel
controls, and all other illuminated
controls, as well as feature status
indicators can be adjusted.
The thumbwheel is on the
instrument panel beside the steering
column.
Move the thumbwheel up or down to
brighten or dim the lights.
Page 200 of 454
Black plate (8,1)Chevrolet Volt Owner Manual - 2012
7-8 Infotainment System
Radio
AM-FM Radio
Playing the Radio
For vehicles equipped with the
MyLink or IntelliLink infotainment
system, see the separate MyLink/
IntelliLink Features and Functions
Guide for more information.
Audio Source
VOL/
O(Volume/Power):
1. Press to turn the radio on or off.
2. Turn to increase or decrease the volume of the active source
(i.e., current audio source, active
navigation voice guidance,
or traffic prompts).
The steering wheel controls can
also be used to adjust the volume.
See “Steering Wheel Controls” in
the vehicle owner manual for more
information. To access the radio main page,
press the SOURCE button on the
faceplate, the Now Playing screen
button, or one of the audio screen
buttons on the Home Page.
While on the audio main page,
press the Source button repeatedly
to display and cycle through the
available sources (AM, FM, and XM
(if equipped), CD, USB/iPod,
and AUX).Infotainment System Settings
Tone Settings
To access the tone settings, press
the Home Page Tone button or the
TONE button on the faceplate.
Use the tone settings to adjust the
following features:
.Setting the tone
.Adjusting the speakers
Setting the Tone
To adjust the tone:
.Treble: Press + or
−to change
the level.
.Middle (Midrange): Press +
or −to change the level.
.Bass: Press + or −to change
the level.
Adjusting the Speakers
To adjust the speaker balance:
.Press the left arrow on the
bottom for more sound from the
left speakers or the right arrow
on the bottom for more sound
from the right speakers. The
middle position balances the
sound between the left and right
speakers.
Page 220 of 454
Black plate (28,1)Chevrolet Volt Owner Manual - 2012
7-28 Infotainment System
Dual Tone Multi-Frequency
(DTMF) Tones
The in‐vehicle Bluetooth system can
send numbers during a call. This is
used when calling a menu‐driven
phone system.
1. Turn or press the TUNE/MENUknob and select Enter Number.
2. Enter the phone number.
Bluetooth (Voice
Recognition)
Using Voice Recognition
For vehicles equipped with the
MyLink or IntelliLink infotainment
system, see the separate MyLink/
IntelliLink Features and Functions
Guide for more information. To use voice recognition, press the
b/gbutton located on the steering
wheel. Use the commands below for
the various voice features. For
additional information, say “Help”
while you are in a voice
recognition menu.
Pairing
A Bluetooth‐enabled cell phone
must be paired to the Bluetooth
system and then connected to the
vehicle before it can be used. See
your cell phone manufacturer's user
guide for Bluetooth functions before
pairing the cell phone. If a Bluetooth
phone is not connected, calls will be
made using OnStar Hands‐Free
Calling, if available. See OnStar
Overview on page 14‑1 for more
information. Pairing Information
.A Bluetooth phone with MP3
capability cannot be paired to
the vehicle as a phone and an
MP3 player at the same time.
.Up to five cell phones can be
paired to the Bluetooth system.
.The pairing process is disabled
when the vehicle is moving.
.Pairing only needs to be
completed once, unless the
pairing information on the cell
phone changes or the cell phone
is deleted from the system.
.Only one paired cell phone can
be connected to the Bluetooth
system at a time.
.If multiple paired cell phones are
within range of the system, the
system connects to the first
available paired cell phone in the
order that they were first paired
to the system. To link to a
different paired phone, see
“Linking to a Different Phone”
later in this section.