tow CHEVROLET VOLT 2016 2.G Owner's Manual
[x] Cancel search | Manufacturer: CHEVROLET, Model Year: 2016, Model line: VOLT, Model: CHEVROLET VOLT 2016 2.GPages: 366, PDF Size: 5.4 MB
Page 171 of 366
Chevrolet VOLT Owner Manual (GMNA-Localizing-U.S/Canada/Mexico-
9159388) - 2016 - crc - 5/20/15
170 Driving and Operating
your vehicle. Consult this
manual to determine how
this reduces the available
cargo and luggage load
capacity of your vehicle.”
This vehicle is neither designed
nor intended to tow a trailer.
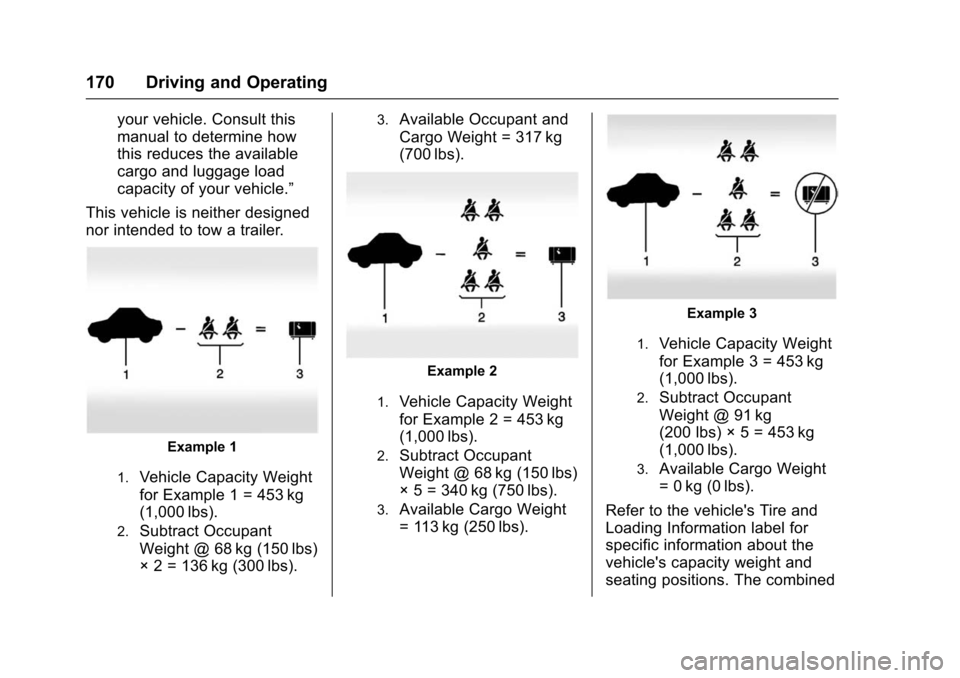
Example 1
1.Vehicle Capacity Weight
for Example 1 = 453 kg
(1,000 lbs).
2.Subtract Occupant
Weight @ 68 kg (150 lbs)
× 2 = 136 kg (300 lbs).
3.Available Occupant and
Cargo Weight = 317 kg
(700 lbs).
Example 2
1.Vehicle Capacity Weight
for Example 2 = 453 kg
(1,000 lbs).
2.Subtract Occupant
Weight @ 68 kg (150 lbs)
× 5 = 340 kg (750 lbs).
3.Available Cargo Weight
= 113 kg (250 lbs).
Example 3
1.Vehicle Capacity Weight
for Example 3 = 453 kg
(1,000 lbs).
2.Subtract Occupant
Weight @ 91 kg
(200 lbs) × 5 = 453 kg
(1,000 lbs).
3.Available Cargo Weight
= 0 kg (0 lbs).
Refer to the vehicle's Tire and
Loading Information label for
specific information about the
vehicle's capacity weight and
seating positions. The combined
Page 175 of 366
Chevrolet VOLT Owner Manual (GMNA-Localizing-U.S/Canada/Mexico-
9159388) - 2016 - crc - 5/20/15
174 Driving and Operating
Restarting Procedure
If the vehicle must be restarted
while it is still moving, move the shift
lever to N (Neutral) and press
POWER
Otwice without pressing
the brake pedal. The propulsion
system will not restart in any other
position.
Forced Engine On
Some vehicle conditions that force
the engine to run:
. There are cold ambient
temperatures.
. The hood is open or not
completely latched.
. The high voltage battery has a
low charge.
. The engine needs to run for
maintenance.
See Maintenance Modes 0180.
A chime will sound if the driver door
is opened while the vehicle is in ON/
RUN. Always press POWER
Oto
turn the vehicle off before exiting.
Stopping Procedure
For information on how to turn the
vehicle off, see Power Button0171.
Retained Accessory
Power (RAP)
The following features will operate
for up to 10 minutes or until the
driver door is opened:
.
Audio System
. Accessory Power Outlets
Power windows will operate for up
to 10 minutes or until any door is
opened.
Shifting Into Park
1. Hold the brake pedal down and set the parking brake. See
Electric Parking Brake 0185.
2. Move the shift lever into P (Park) by pushing the lever
all the way toward the front of
the vehicle.
3. Turn the vehicle off.
Leaving the Vehicle with the
Propulsion System On
{Warning
It can be dangerous to leave the
vehicle with the propulsion
system running. It could overheat
and catch fire.
It is dangerous to get out of the
vehicle if the shift lever is not fully
in P (Park) with the parking brake
firmly set. The vehicle can roll.
Do not leave the vehicle when the
propulsion system is running.
If you have left the propulsion
system running, the vehicle can
move suddenly. You or others
could be injured. To be sure the
vehicle will not move, even when
you are on fairly level ground,
always set the parking brake and
move the shift lever to P (Park).
See Shifting Into Park 0174.
If you have to leave the vehicle with
the propulsion system on, be sure
the vehicle is in P (Park) and the
Page 176 of 366
Chevrolet VOLT Owner Manual (GMNA-Localizing-U.S/Canada/Mexico-
9159388) - 2016 - crc - 5/20/15
Driving and Operating 175
parking brake is firmly set before
you leave it. After you have moved
the shift lever into P (Park), hold
down the regular brake pedal. See if
you can move the shift lever away
from P (Park) without first pulling it
toward you. If you can, it means that
the shift lever was not fully locked
into P (Park).
Torque Lock
Torque lock is when the weight of
the vehicle puts too much force on
the parking pawl in the electric drive
unit. This happens when parking on
a hill and shifting the electric drive
unit into P (Park) is not done
properly and then it is difficult to
shift out of P (Park). To prevent
torque lock, set the parking brake
and then shift into P (Park).
If torque lock does occur, your
vehicle may need to be pushed
uphill by another vehicle to relieve
the parking pawl pressure, so you
can shift out of P (Park).
Shifting out of Park
To shift out of P (Park), the vehicle
must be in ON/RUN, the brake
pedal must be applied, and the
charge cord must be unplugged.
The vehicle has an electronic shift
lock release system. The shift lock
release is designed to:
.Prevent the vehicle from turning
off unless the shift lever is in
P (Park).
. Prevent moving the shift lever
out of P (Park), unless the
vehicle is in ON/RUN, the brake
pedal is applied, and the charge
cord is unplugged.
Parking the vehicle in extreme cold
for several days without the charge
cord connected may cause the
electric drive unit to be locked in
P (Park) until the propulsion system
has warmed sufficiently.
The shift lock is always functional
except in the case of an uncharged
or low charged 12-volt battery (less
than 9 volts). If the vehicle has an uncharged
12-volt battery or a 12-volt battery
with low voltage, try charging or
jump starting the 12-volt battery.
See
Battery - North America 0245
or Jump Starting - North America
0 295.
If the shift lever cannot be moved
out of P (Park): 1. Apply and maintain the regular brakes.
2. Turn the vehicle on using POWER
O. See Power Button
0 171.
3. Let up on the shift lever and make sure the shift lever is
pushed all the way into
P (Park).
4. Press the shift lever button.
5. Move the shift lever into the desired gear.
If you still cannot move the shift
lever from P (Park), see your dealer
or a professional towing service.
Page 204 of 366
Chevrolet VOLT Owner Manual (GMNA-Localizing-U.S/Canada/Mexico-
9159388) - 2016 - crc - 5/20/15
Driving and Operating 203
vehicle. Attached objects may also
interfere with the detection of
vehicles. This is normal system
operation; the vehicle does not need
service.
LCA may not always alert the driver
to vehicles in the next lane over,
especially in wet conditions or when
driving on sharp curves. The system
does not need to be serviced. The
system may light up due to
guardrails, signs, trees, shrubs, and
other non-moving objects. This is
normal system operation; the
vehicle does not need service.
LCA may not operate when the LCA
sensors in the left or right corners of
the rear bumper are covered with
mud, dirt, snow, ice, or slush, or in
heavy rainstorms. For cleaning
instructions, see "Washing the
Vehicle" underExterior Care0304.
If the DIC still displays the system
unavailable message after cleaning
both sides of the vehicle toward the
rear corners of the vehicle, see your
dealer. If the LCA displays do not light up
when vehicles are in the side blind
zone or rapidly approaching this
zone and the system is clean, the
system may need service. Take the
vehicle to your dealer.
When LCA is disabled for any
reason other than the driver turning
it off, the Lane Change Alert On
option will not be available on the
personalization menu.
Radio Frequency Information
See
Radio Frequency Statement
0 341.
Lane Departure
Warning (LDW)
If equipped, LDW may help avoid
crashes due to unintentional lane
departures. It may provide a
warning if the vehicle is crossing a
detected lane marking without using
a turn signal in the lane departure
direction. Since this system is part
of the Lane Keep Assist (LKA)
system, read the entire LKA section
before using this feature.
Lane Keep Assist (LKA)
If equipped, LKA may help avoid
crashes due to unintentional lane
departures. It may assist by gently
turning the steering wheel if the
vehicle approaches a detected lane
marking without using a turn signal
in that direction. It may also provide
a Lane Departure Warning (LDW)
system alert as the lane marking is
crossed. The LKA system will not
assist or provide an LDW alert if it
detects that you are actively
steering. Override LKA by turning
the steering wheel. LKA uses a
camera to detect lane markings
between 60 km/h (37 mph) and
180 km/h (112 mph).
{Warning
The LKA system does not
continuously steer the vehicle.
It may not keep the vehicle in the
lane or give a Lane Departure
Warning (LDW) alert, even if a
lane marking is detected.
(Continued)
Page 224 of 366
Chevrolet VOLT Owner Manual (GMNA-Localizing-U.S/Canada/Mexico-
9159388) - 2016 - crc - 5/20/15
Driving and Operating 223
Filling a Portable Fuel
Container
{Warning
Filling a portable fuel container
while it is in the vehicle can cause
fuel vapors that can ignite either
by static electricity or other
means. You or others could be
badly burned and the vehicle
could be damaged. Always:. Use approved fuel
containers.
. Remove the container from
the vehicle, trunk, or pickup
bed before filling.
. Place the container on the
ground.
. Place the nozzle inside the
fill opening of the container
before dispensing fuel, and
keep it in contact with the fill
opening until filling is
complete.
(Continued)
Warning (Continued)
.Fill the container no more
than 95% full to allow for
expansion.
. Do not smoke, light
matches, or use lighters
while pumping fuel.
. Avoid using cell phones or
other electronic devices.
Trailer Towing
General Towing
Information
The vehicle is neither designed nor
intended to tow a trailer or another
vehicle.
For information on towing a disabled
vehicle, see Towing the Vehicle
0 300. For information on towing the
vehicle behind another vehicle such
as a motor home, see Recreational
Vehicle Towing 0302.
Page 227 of 366
Chevrolet VOLT Owner Manual (GMNA-Localizing-U.S/Canada/Mexico-
9159388) - 2016 - crc - 5/20/15
226 Vehicle Care
Tire Changing . . . . . . . . . . . . . . . . 289
Compact Spare Tire . . . . . . . . . . 294
Jump Starting
Jump Starting - NorthAmerica . . . . . . . . . . . . . . . . . . . . . 295
Towing the Vehicle
Towing the Vehicle . . . . . . . . . . . 300
Recreational VehicleTowing . . . . . . . . . . . . . . . . . . . . . . 302
Appearance Care
Exterior Care . . . . . . . . . . . . . . . . . 304
Interior Care . . . . . . . . . . . . . . . . . . 309
Floor Mats . . . . . . . . . . . . . . . . . . . . 312
General Information
For service and parts needs, visit
your dealer. You will receive
genuine GM parts and GM-trained
and supported service people.
Genuine GM parts have one of
these marks:
California Proposition
65 Warning
WARNING: Most motor vehicles,
including this one, contain and/or
emit chemicals known to the State
of California to cause cancer and
birth defects or other reproductive harm. Engine exhaust, many parts
and systems, many fluids, and
some component wear by-products
contain and/or emit these
chemicals.
See
Battery - North America 0245
and Jump Starting - North America
0 295.
California Perchlorate
Materials Requirements
Certain types of automotive
applications, such as airbag
initiators, safety belt pretensioners,
and lithium batteries contained in
Remote Keyless Entry transmitters,
may contain perchlorate materials.
Special handling may be necessary.
For additional information, see
www.dtsc.ca.gov/hazardouswaste/
perchlorate.
Accessories and
Modifications
Adding non-dealer accessories or
making modifications to the vehicle
can affect vehicle performance and
safety, including such things as
Page 234 of 366
Chevrolet VOLT Owner Manual (GMNA-Localizing-U.S/Canada/Mexico-
9159388) - 2016 - crc - 5/20/15
Vehicle Care 233
1. If the engine has been runningrecently, turn off the engine and
allow several minutes for the oil
to drain back into the oil pan.
Checking the oil level too soon
after engine shutoff will not
provide an accurate oil level
reading.
{Warning
The engine oil dipstick handle
may be hot; it could burn you.
Use a towel or glove to touch the
dipstick handle.
2. Pull out the dipstick and wipe it with a clean paper towel or
cloth, then push it back in all
the way. Remove it again,
keeping the tip down, and
check the level.
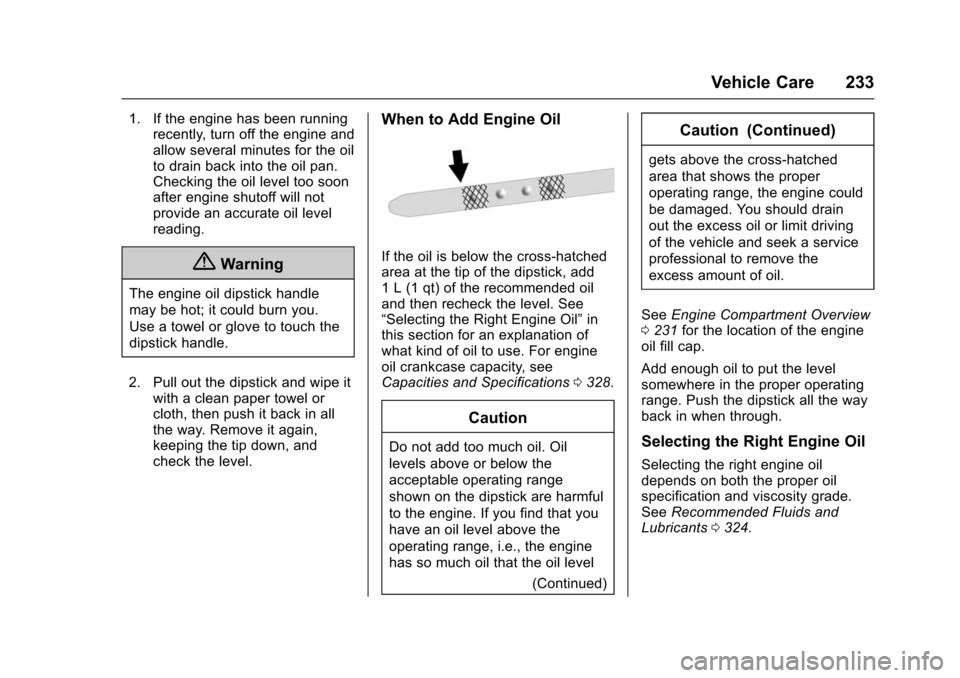
When to Add Engine Oil
If the oil is below the cross-hatched
area at the tip of the dipstick, add
1 L (1 qt) of the recommended oil
and then recheck the level. See
“Selecting the Right Engine Oil” in
this section for an explanation of
what kind of oil to use. For engine
oil crankcase capacity, see
Capacities and Specifications 0328.
Caution
Do not add too much oil. Oil
levels above or below the
acceptable operating range
shown on the dipstick are harmful
to the engine. If you find that you
have an oil level above the
operating range, i.e., the engine
has so much oil that the oil level
(Continued)
Caution (Continued)
gets above the cross-hatched
area that shows the proper
operating range, the engine could
be damaged. You should drain
out the excess oil or limit driving
of the vehicle and seek a service
professional to remove the
excess amount of oil.
See Engine Compartment Overview
0 231 for the location of the engine
oil fill cap.
Add enough oil to put the level
somewhere in the proper operating
range. Push the dipstick all the way
back in when through.
Selecting the Right Engine Oil
Selecting the right engine oil
depends on both the proper oil
specification and viscosity grade.
See Recommended Fluids and
Lubricants 0324.
Page 275 of 366
Chevrolet VOLT Owner Manual (GMNA-Localizing-U.S/Canada/Mexico-
9159388) - 2016 - crc - 5/20/15
274 Vehicle Care
.The tread or sidewall is
cracked, cut, or snagged
deep enough to show cord or
fabric.
.The tire has a bump, bulge,
or split.
.The tire has a puncture, cut,
or other damage that cannot
be repaired well because of
the size or location of the
damage.
Tire Rotation
Tires should be rotated every
12 000 km (7,500 mi). See
Maintenance Schedule0315.
Tires are rotated to achieve a
uniform wear for all tires. The
first rotation is the most
important.
Anytime unusual wear is
noticed, rotate the tires as soon
as possible, check for proper tire
inflation pressure, and check for
damaged tires or wheels. If the
unusual wear continues after the rotation, check the wheel
alignment. See
When It Is Time
for New Tires 0275 andWheel
Replacement 0279.
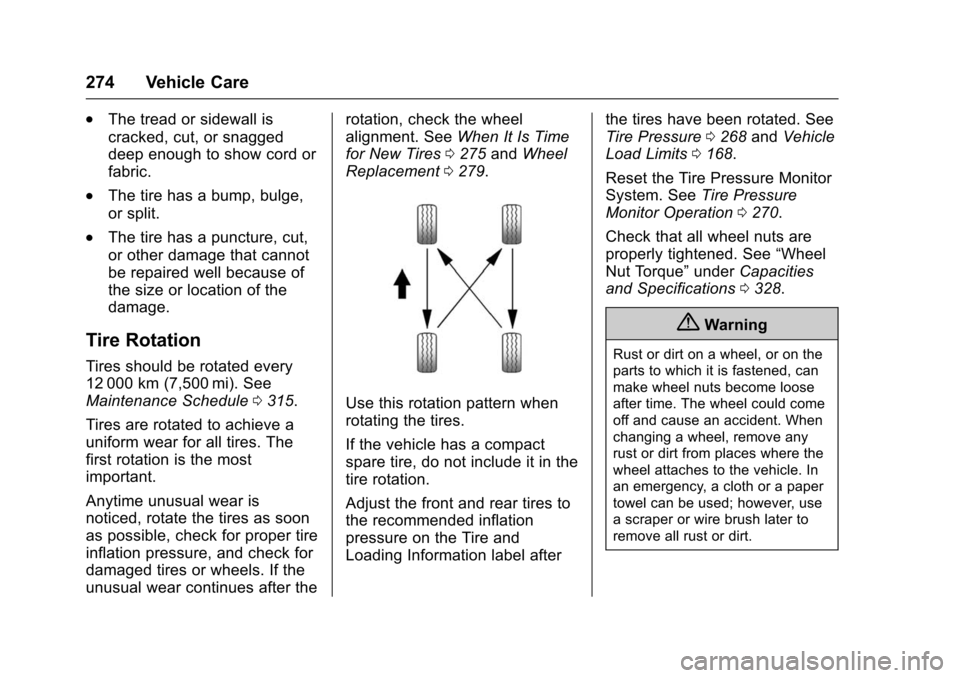
Use this rotation pattern when
rotating the tires.
If the vehicle has a compact
spare tire, do not include it in the
tire rotation.
Adjust the front and rear tires to
the recommended inflation
pressure on the Tire and
Loading Information label after the tires have been rotated. See
Tire Pressure
0268 and Vehicle
Load Limits 0168.
Reset the Tire Pressure Monitor
System. See Tire Pressure
Monitor Operation 0270.
Check that all wheel nuts are
properly tightened. See “Wheel
Nut Torque” underCapacities
and Specifications 0328.
{Warning
Rust or dirt on a wheel, or on the
parts to which it is fastened, can
make wheel nuts become loose
after time. The wheel could come
off and cause an accident. When
changing a wheel, remove any
rust or dirt from places where the
wheel attaches to the vehicle. In
an emergency, a cloth or a paper
towel can be used; however, use
a scraper or wire brush later to
remove all rust or dirt.
Page 282 of 366
Chevrolet VOLT Owner Manual (GMNA-Localizing-U.S/Canada/Mexico-
9159388) - 2016 - crc - 5/20/15
Vehicle Care 281
Warning (Continued)
Use another type of traction
device only if its manufacturer
recommends it for the vehicle's
tire size combination and road
conditions. Follow that
manufacturer's instructions. To
avoid vehicle damage, drive slow
and readjust or remove the
traction device if it contacts the
vehicle. Do not spin the wheels.
If traction devices are used, install
them on the front tires.
If a Tire Goes Flat
It is unusual for a tire to blow out
while driving, especially if the tires
are maintained properly. SeeTires
0 261. If air goes out of a tire, it is
much more likely to leak out slowly.
But if there is ever a blowout, here
are a few tips about what to expect
and what to do:
If a front tire fails, the flat tire
creates a drag that pulls the vehicle
toward that side. Take your foot off
the accelerator pedal and grip the steering wheel firmly. Steer to
maintain lane position, and then
gently brake to a stop, well off the
road, if possible.
A rear blowout, particularly on a
curve, acts much like a skid and
may require the same correction as
used in a skid. Stop pressing the
accelerator pedal and steer to
straighten the vehicle. It may be
very bumpy and noisy. Gently brake
to a stop, well off the road,
if possible.
{Warning
Driving on a flat tire will cause
permanent damage to the tire.
Re-inflating a tire after it has been
driven on while severely
underinflated or flat may cause a
blowout and a serious crash.
Never attempt to re-inflate a tire
that has been driven on while
severely underinflated or flat.
Have your dealer or an authorized
tire service center repair or
replace the flat tire as soon as
possible.
{Warning
Lifting a vehicle and getting under
it to do maintenance or repairs is
dangerous without the
appropriate safety equipment and
training. If a jack is provided with
the vehicle, it is designed only for
changing a flat tire. If it is used for
anything else, you or others could
be badly injured or killed if the
vehicle slips off the jack. If a jack
is provided with the vehicle, only
use it for changing a flat tire.
If a tire goes flat, avoid further tire
and wheel damage by driving slowly
to a level place, well off the road,
if possible. Turn on the hazard
warning flashers. See Hazard
Warning Flashers 0149.
{Warning
Changing a tire can be
dangerous. The vehicle can slip
off the jack and roll over or fall
(Continued)
Page 293 of 366
Chevrolet VOLT Owner Manual (GMNA-Localizing-U.S/Canada/Mexico-
9159388) - 2016 - crc - 5/20/15
292 Vehicle Care
Warning (Continued)
towel can be used; however, use
a scraper or wire brush later to
remove all rust or dirt.
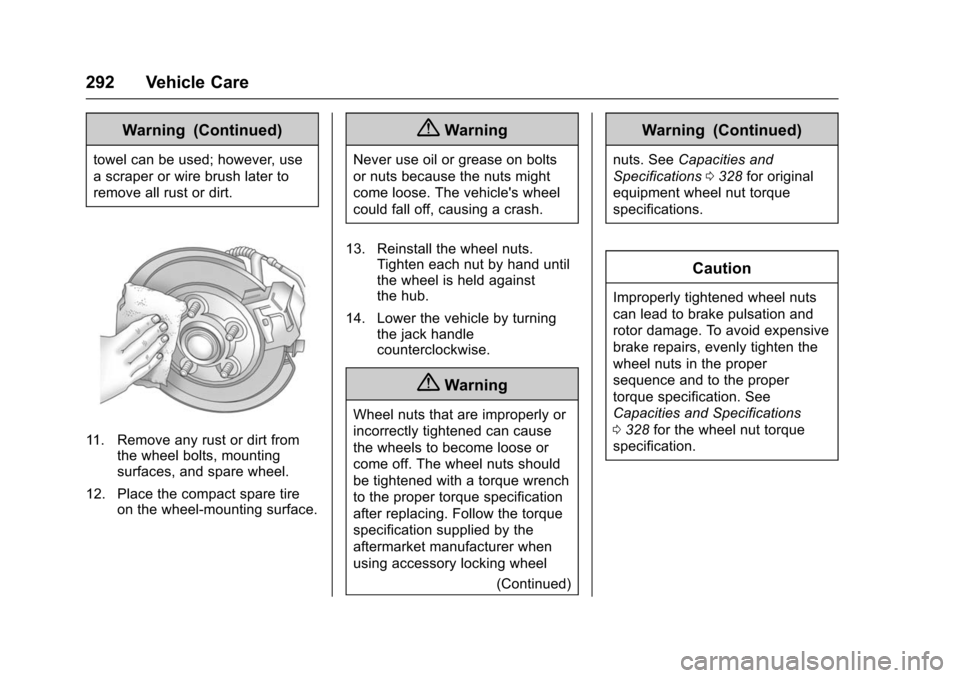
11. Remove any rust or dirt fromthe wheel bolts, mounting
surfaces, and spare wheel.
12. Place the compact spare tire on the wheel-mounting surface.
{Warning
Never use oil or grease on bolts
or nuts because the nuts might
come loose. The vehicle's wheel
could fall off, causing a crash.
13. Reinstall the wheel nuts. Tighten each nut by hand until
the wheel is held against
the hub.
14. Lower the vehicle by turning the jack handle
counterclockwise.
{Warning
Wheel nuts that are improperly or
incorrectly tightened can cause
the wheels to become loose or
come off. The wheel nuts should
be tightened with a torque wrench
to the proper torque specification
after replacing. Follow the torque
specification supplied by the
aftermarket manufacturer when
using accessory locking wheel
(Continued)
Warning (Continued)
nuts. SeeCapacities and
Specifications 0328 for original
equipment wheel nut torque
specifications.
Caution
Improperly tightened wheel nuts
can lead to brake pulsation and
rotor damage. To avoid expensive
brake repairs, evenly tighten the
wheel nuts in the proper
sequence and to the proper
torque specification. See
Capacities and Specifications
0 328 for the wheel nut torque
specification.