remote start CHEVROLET VOLT 2018 Owner's Guide
[x] Cancel search | Manufacturer: CHEVROLET, Model Year: 2018, Model line: VOLT, Model: CHEVROLET VOLT 2018Pages: 379, PDF Size: 5.65 MB
Page 158 of 379
Chevrolet VOLT Owner Manual (GMNA-Localizing-U.S./Canada/Mexico-
11349113) - 2018 - crc - 10/12/17
Climate Controls 157
The defogger only works when the
vehicle is on. The defogger will turn
off if the vehicle is turned off.
If equipped with heated outside
rearview mirrors, they turn on when
the rear window defogger button is
on and help to clear fog or frost from
the surface of the mirror. See
Heated Mirrors048.
Caution
Do not try to clear frost or other
material from the inside of the
front windshield and rear window
with a razor blade or anything
else that is sharp. This may
damage the rear window
defogger grid and affect the
radio's ability to pick up stations
clearly. The repairs would not be
covered by the vehicle warranty.
Remote Start : The climate control
system may be started by using the
Remote Keyless Entry (RKE)
transmitter. The climate control system will default to an appropriate
heating or cooling mode. See
Remote Start
038.
If equipped, the heated seats will
turn on if it is cold outside. The
heated seat indicator light may not
come on during a remote start.
If equipped, the heated steering
wheel will come on if it is cold
outside. The heated steering wheel
indicator light may not come on
during a remote start.
The rear window defogger turns on
if it is cold outside.
Compressor
The vehicle has an electric powered
air conditioning compressor. This
allows for continuous air
conditioning and/or high voltage
battery cooling operation, without
running the engine.
The compressor operating speed is
not tied to the engine speed, so
some noise may be heard from the
compressor, especially when air
conditioning use is high and the
engine has turned off. This is
normal.
Sensors
Solar Sensor
The solar sensor is on top of the
instrument panel, near the
windshield, where it monitors solar
intensity.
The climate control system uses the
sensor information to adjust the
temperature, fan speed,
recirculation, and air delivery mode
for best comfort.
Do not cover the sensor; otherwise
the automatic climate control system
may not work properly.
Humidity Sensor
The humidity sensor is near the
base of the inside rearview mirror.
The climate control system uses the
sensor information to adjust the
temperature and recirculation for
best comfort.
Page 172 of 379
Chevrolet VOLT Owner Manual (GMNA-Localizing-U.S./Canada/Mexico-
11349113) - 2018 - crc - 10/12/17
Driving and Operating 171
Warning (Continued)
. Secure loose items in the
vehicle.
.Do not leave a seat
folded down unless
needed.
Starting and
Operating
New Vehicle Break-In
The vehicle does not require a
break-in period. Vehicle break-in is
performed during manufacturing.
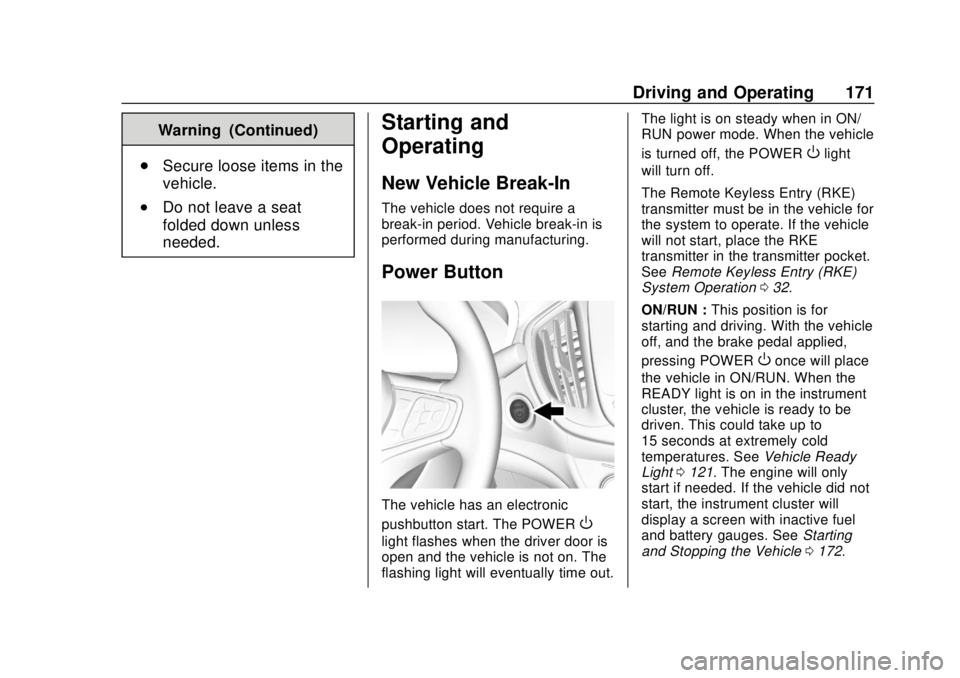
Power Button
The vehicle has an electronic
pushbutton start. The POWER
O
light flashes when the driver door is
open and the vehicle is not on. The
flashing light will eventually time out. The light is on steady when in ON/
RUN power mode. When the vehicle
is turned off, the POWER
Olight
will turn off.
The Remote Keyless Entry (RKE)
transmitter must be in the vehicle for
the system to operate. If the vehicle
will not start, place the RKE
transmitter in the transmitter pocket.
See Remote Keyless Entry (RKE)
System Operation 032.
ON/RUN : This position is for
starting and driving. With the vehicle
off, and the brake pedal applied,
pressing POWER
Oonce will place
the vehicle in ON/RUN. When the
READY light is on in the instrument
cluster, the vehicle is ready to be
driven. This could take up to
15 seconds at extremely cold
temperatures. See Vehicle Ready
Light 0121. The engine will only
start if needed. If the vehicle did not
start, the instrument cluster will
display a screen with inactive fuel
and battery gauges. See Starting
and Stopping the Vehicle 0172.
Page 174 of 379
Chevrolet VOLT Owner Manual (GMNA-Localizing-U.S./Canada/Mexico-
11349113) - 2018 - crc - 10/12/17
Driving and Operating 173
Caution
Do not try to shift to P (Park) if the
vehicle is moving or the electric
drive unit could be damaged.
Shift to P (Park) only when the
vehicle is stopped.
Caution
If you add electrical parts or
accessories, you could change
the way the vehicle operates. Any
resulting damage would not be
covered by the vehicle warranty.
SeeAdd-On Electrical Equipment
0 232.
The Remote Keyless Entry (RKE)
transmitter must be in the vehicle.
Press the brake pedal and press
and release POWER
O. If the RKE transmitter is not in the
vehicle or something is interfering
with the transmitter, a message
displays in the Driver Information
Center (DIC).
If the vehicle will not start due to a
low RKE transmitter battery, the
vehicle can still be driven. See
“Starting the Vehicle with a Low
Transmitter Battery”
inRemote
Keyless Entry (RKE) System
Operation 032.
A Welcome, Ready, and Good-bye
audio message will be heard in the
vehicle and animated on the
instrument cluster when opening the
driver door upon entry, when the
vehicle is ready to be driven, and
when the vehicle is turned off.
The instrument cluster displays an
active fuel and/or battery gauge,
along with an audio startup cue,
when the vehicle is ready to be
driven. This could take up to
15 seconds at extremely cold
temperatures. The engine will only
start if needed. If the vehicle did not
start, the instrument cluster will display a screen with inactive fuel
and battery gauges. See
Starting
and Stopping the Vehicle 0172.
Restarting Procedure
If the vehicle must be restarted
while it is still moving, move the shift
lever to N (Neutral) and press
POWER
Otwice without pressing
the brake pedal. The propulsion
system will not restart in any other
position.
Forced Engine On
Some vehicle conditions that force
the engine to run:
. There are cold ambient
temperatures.
. The hood is open or not
completely latched while the
vehicle is not in N (Neutral).
. The high voltage battery has a
low charge.
. The engine needs to run for
maintenance.
See Maintenance Modes 0180.
Page 216 of 379
Chevrolet VOLT Owner Manual (GMNA-Localizing-U.S./Canada/Mexico-
11349113) - 2018 - crc - 10/12/17
Driving and Operating 215
Delayed Charging
Override
To temporarily override a delayed
charge event, unplug the charge
cord from the charge port and then
plug it back in within five seconds.
A single audible beep will sound
and charging will begin immediately.
To cancel a temporary override,
unplug the charge cord, wait for
10 seconds, and then plug the
charge cord back in. A double
audible beep will sound and
charging will be delayed.
SeeProgrammable Charging 0123
for advanced charge scheduling
options.
Charging Status
Feedback
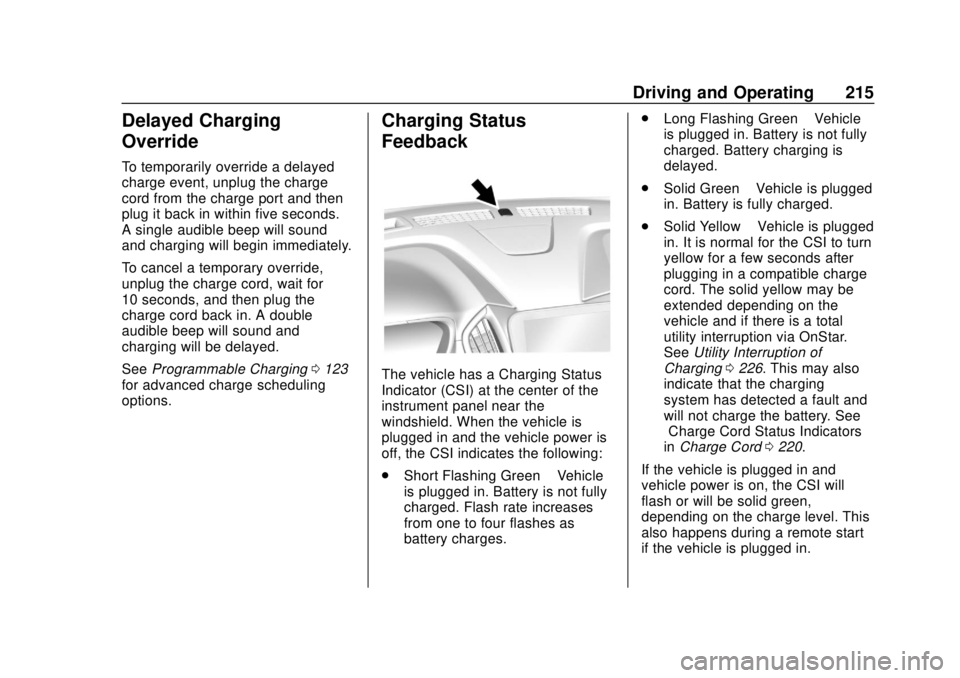
The vehicle has a Charging Status
Indicator (CSI) at the center of the
instrument panel near the
windshield. When the vehicle is
plugged in and the vehicle power is
off, the CSI indicates the following:
. Short Flashing Green –Vehicle
is plugged in. Battery is not fully
charged. Flash rate increases
from one to four flashes as
battery charges. .
Long Flashing Green –Vehicle
is plugged in. Battery is not fully
charged. Battery charging is
delayed.
. Solid Green –Vehicle is plugged
in. Battery is fully charged.
. Solid Yellow –Vehicle is plugged
in. It is normal for the CSI to turn
yellow for a few seconds after
plugging in a compatible charge
cord. The solid yellow may be
extended depending on the
vehicle and if there is a total
utility interruption via OnStar.
See Utility Interruption of
Charging 0226. This may also
indicate that the charging
system has detected a fault and
will not charge the battery. See
“Charge Cord Status Indicators”
in Charge Cord 0220.
If the vehicle is plugged in and
vehicle power is on, the CSI will
flash or will be solid green,
depending on the charge level. This
also happens during a remote start
if the vehicle is plugged in.
Page 241 of 379
Chevrolet VOLT Owner Manual (GMNA-Localizing-U.S./Canada/Mexico-
11349113) - 2018 - crc - 10/12/17
240 Vehicle Care
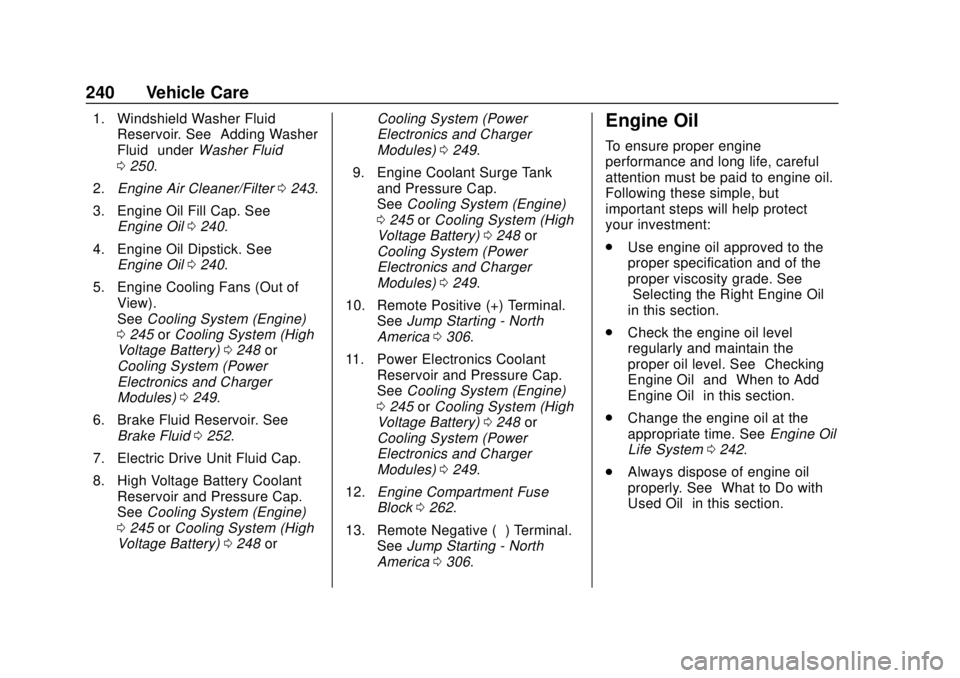
1. Windshield Washer FluidReservoir. See “Adding Washer
Fluid” under Washer Fluid
0 250.
2. Engine Air Cleaner/Filter 0243.
3. Engine Oil Fill Cap. See Engine Oil 0240.
4. Engine Oil Dipstick. See Engine Oil 0240.
5. Engine Cooling Fans (Out of View).
See Cooling System (Engine)
0 245 orCooling System (High
Voltage Battery) 0248 or
Cooling System (Power
Electronics and Charger
Modules) 0249.
6. Brake Fluid Reservoir. See Brake Fluid 0252.
7. Electric Drive Unit Fluid Cap.
8. High Voltage Battery Coolant Reservoir and Pressure Cap.
See Cooling System (Engine)
0 245 orCooling System (High
Voltage Battery) 0248 or Cooling System (Power
Electronics and Charger
Modules)
0249.
9. Engine Coolant Surge Tank and Pressure Cap.
See Cooling System (Engine)
0 245 orCooling System (High
Voltage Battery) 0248 or
Cooling System (Power
Electronics and Charger
Modules) 0249.
10. Remote Positive (+) Terminal. SeeJump Starting - North
America 0306.
11. Power Electronics Coolant Reservoir and Pressure Cap.
SeeCooling System (Engine)
0 245 orCooling System (High
Voltage Battery) 0248 or
Cooling System (Power
Electronics and Charger
Modules) 0249.
12. Engine Compartment Fuse
Block 0262.
13. Remote Negative (−) Terminal. SeeJump Starting - North
America 0306.Engine Oil
To ensure proper engine
performance and long life, careful
attention must be paid to engine oil.
Following these simple, but
important steps will help protect
your investment:
.
Use engine oil approved to the
proper specification and of the
proper viscosity grade. See
“Selecting the Right Engine Oil”
in this section.
. Check the engine oil level
regularly and maintain the
proper oil level. See “Checking
Engine Oil” and“When to Add
Engine Oil” in this section.
. Change the engine oil at the
appropriate time. See Engine Oil
Life System 0242.
. Always dispose of engine oil
properly. See “What to Do with
Used Oil” in this section.
Page 255 of 379
Chevrolet VOLT Owner Manual (GMNA-Localizing-U.S./Canada/Mexico-
11349113) - 2018 - crc - 10/12/17
254 Vehicle Care
Refer to the replacement number
shown on the original battery label
when a new 12-volt battery is
needed. The vehicle has an
Absorbed Glass Mat (AGM) 12-volt
battery. Installation of a standard
12-volt battery will result in reduced
12-volt battery life.
When using a 12-volt battery
charger on the 12-volt AGM battery,
some chargers have an AGM
battery setting on the charger.
If available, use the AGM setting on
the charger, to limit charge voltage
to 14.8 volts. Follow the charger
manufacturer's instructions.
{Warning
WARNING:Battery posts,
terminals, and related
accessories contain lead and lead
compounds, chemicals known to
the State of California to cause
cancer and birth defects or other
reproductive harm. Batteries also
contain other chemicals known to
(Continued)
Warning (Continued)
the State of California to cause
cancer.WASH HANDS AFTER
HANDLING. For more information
go to www.P65Warnings.ca.gov/
passenger-vehicle.
See California Proposition
65 Warning 0235 and the back
cover.
Vehicle Storage
{Warning
Batteries have acid that can burn
you and gas that can explode.
You can be badly hurt if you are
not careful. See Jump Starting -
North America 0306 for tips on
working around a battery without
getting hurt. Up to four weeks
.
Plug in the high voltage battery
charge cord if temperatures will
exceed 35 °C (95 °F) and keep
the 12-volt battery cables
connected.
Four weeks to 12 months
. Discharge the high voltage
battery until two or three bars
remain on the battery range
indicator (Battery symbol) on the
instrument cluster.
. Do not plug in the high voltage
battery charge cord.
. Remove the black negative (−)
cable from the 12-volt battery.
Attach a trickle charger to the
battery terminals or keep the
12-volt battery cables connected
and trickle charge from the
underhood remote positive (+)
and negative (−) terminals. See
Jump Starting - North America
0306 for the location of these
terminals.
Page 308 of 379
Chevrolet VOLT Owner Manual (GMNA-Localizing-U.S./Canada/Mexico-
11349113) - 2018 - crc - 10/12/17
Vehicle Care 307
Caution (Continued)
vehicle warranty. Trying to start
the vehicle by pushing or pulling it
will not work, and it could damage
the vehicle.
Jump Starting the Volt
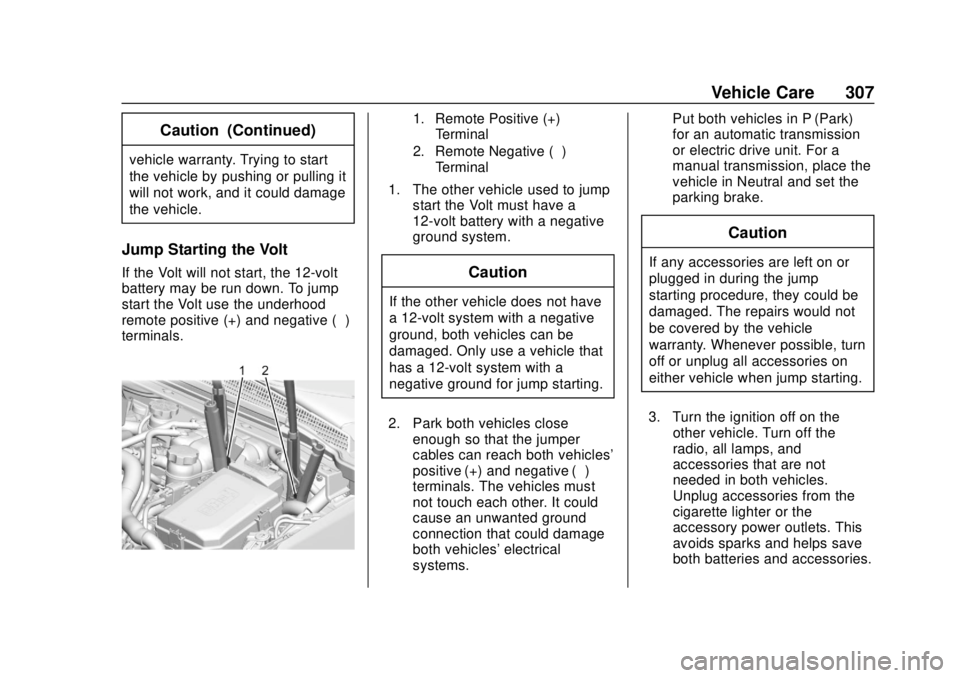
If the Volt will not start, the 12-volt
battery may be run down. To jump
start the Volt use the underhood
remote positive (+) and negative (−)
terminals.
1. Remote Positive (+)Terminal
2. Remote Negative (−) Terminal
1. The other vehicle used to jump start the Volt must have a
12-volt battery with a negative
ground system.
Caution
If the other vehicle does not have
a 12-volt system with a negative
ground, both vehicles can be
damaged. Only use a vehicle that
has a 12-volt system with a
negative ground for jump starting.
2. Park both vehicles close enough so that the jumper
cables can reach both vehicles'
positive (+) and negative (−)
terminals. The vehicles must
not touch each other. It could
cause an unwanted ground
connection that could damage
both vehicles' electrical
systems. Put both vehicles in P (Park)
for an automatic transmission
or electric drive unit. For a
manual transmission, place the
vehicle in Neutral and set the
parking brake.
Caution
If any accessories are left on or
plugged in during the jump
starting procedure, they could be
damaged. The repairs would not
be covered by the vehicle
warranty. Whenever possible, turn
off or unplug all accessories on
either vehicle when jump starting.
3. Turn the ignition off on the other vehicle. Turn off the
radio, all lamps, and
accessories that are not
needed in both vehicles.
Unplug accessories from the
cigarette lighter or the
accessory power outlets. This
avoids sparks and helps save
both batteries and accessories.
Page 309 of 379

Chevrolet VOLT Owner Manual (GMNA-Localizing-U.S./Canada/Mexico-
11349113) - 2018 - crc - 10/12/17
308 Vehicle Care
4. Locate the positive (+) andnegative (−) terminals on the
other vehicle.
5. Open the hood to locate the positive (+) and negative (−)
terminals on your Volt. Open
the access cover for the
remote positive (+) terminal (1).
The remote negative (−)
terminal (2) for the Volt is a
stud GND (−) on the driver side
of the engine compartment.
6. Check that the jumper cables do not have loose or missing
insulation or a shock could
result and the vehicles could
be damaged.
Before connecting the jumper
cables, here are some basic
things to know. Positive (+)
jumper cable goes to
positive (+) battery terminal or
a remote positive (+) terminal if
available. Negative (−) jumper
cable goes to negative (−)
battery terminal or a remote
negative (−) terminal if
available. Do not connect
positive (+) to negative (−) or there will be a short that may
damage the battery and other
parts of the vehicle.
Caution
If the jumper cables are
connected or removed in the
wrong order, electrical shorting
may occur and damage the
vehicle. The repairs would not be
covered by the vehicle warranty.
Always connect and remove the
jumper cables in the correct order,
making sure that the cables do
not touch each other or other
metal.
Connecting the Jumper Cables 1. Connect the red positive (+) jumper cable to the remote
positive (+) terminal (1) of your
Volt. Do not let the other end of
the cable touch metal.
2. Connect the other end of the red positive (+) jumper cable to
the positive (+) terminal of the
other vehicle. 3. Connect the black negative (−)
jumper cable to the
negative (−) battery terminal of
the other vehicle battery. Do
not let the other end touch
anything until the next step.
4. Connect the other end of the black negative (−) jumper cable
to the remote negative (−)
terminal (2) of your Volt.
5. Press POWER
Oto start. This
will wake up the electronics on
the Volt. After the instrument
cluster initializes, the Volt will
use power from the high
voltage battery to charge the
12-volt battery. The jumper
cables can then be
disconnected. If the Volt does
not start, call your dealer or
Roadside Assistance. See
Roadside Assistance Program
0 345.
Page 310 of 379
Chevrolet VOLT Owner Manual (GMNA-Localizing-U.S./Canada/Mexico-
11349113) - 2018 - crc - 10/12/17
Vehicle Care 309
Disconnecting the Jumper Cables1. Disconnect the black negative (−) jumper cable from
the Volt. Do not let the other
end of the cable touch anything
until after the next step.
2. Disconnect the black negative (−) jumper cable from
the other vehicle with the good
battery.
3. Disconnect the red positive (+) jumper cable from the other
vehicle. Do not let the other
end of the cable touch anything
until after the next step.
4. Disconnect the red positive (+) jumper cable from the Volt.
5. Return the positive (+) and negative (−) terminal covers to
their original positions.
After starting the disabled vehicle
and removing the jumper cables,
allow it to idle for several minutes.Jump Starting Another Vehicle
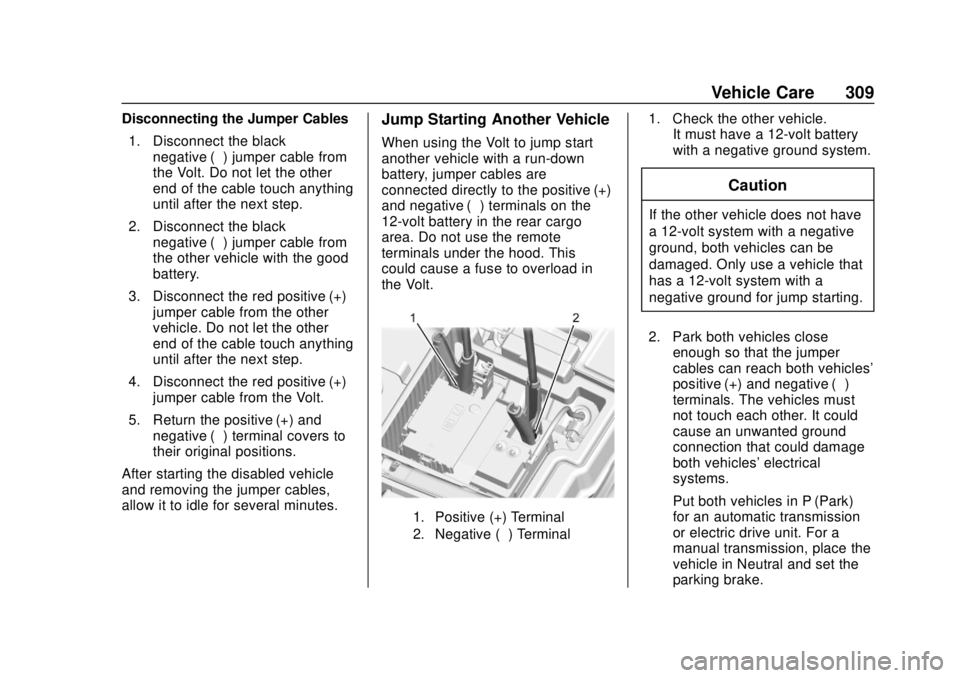
When using the Volt to jump start
another vehicle with a run-down
battery, jumper cables are
connected directly to the positive (+)
and negative (−) terminals on the
12-volt battery in the rear cargo
area. Do not use the remote
terminals under the hood. This
could cause a fuse to overload in
the Volt.
1. Positive (+) Terminal
2. Negative (−) Terminal
1. Check the other vehicle. It must have a 12-volt battery
with a negative ground system.
Caution
If the other vehicle does not have
a 12-volt system with a negative
ground, both vehicles can be
damaged. Only use a vehicle that
has a 12-volt system with a
negative ground for jump starting.
2. Park both vehicles close enough so that the jumper
cables can reach both vehicles'
positive (+) and negative (−)
terminals. The vehicles must
not touch each other. It could
cause an unwanted ground
connection that could damage
both vehicles' electrical
systems.
Put both vehicles in P (Park)
for an automatic transmission
or electric drive unit. For a
manual transmission, place the
vehicle in Neutral and set the
parking brake.
Page 311 of 379

Chevrolet VOLT Owner Manual (GMNA-Localizing-U.S./Canada/Mexico-
11349113) - 2018 - crc - 10/12/17
310 Vehicle Care
Caution
If any accessories are left on or
plugged in during the jump
starting procedure, they could be
damaged. The repairs would not
be covered by the vehicle
warranty. Whenever possible, turn
off or unplug all accessories on
either vehicle when jump starting.
3. Turn off both vehicles. Turn off the radio, all lamps, and
accessories that are not
needed in both vehicles.
Unplug accessories from the
cigarette lighter or the
accessory power outlets. This
avoids sparks and helps save
both batteries and accessories.
4. Locate the positive (+) and negative (−) terminals on the
vehicle with the run-down
battery.
5. Locate the positive (+) and negative (−) battery terminals
on the Volt. The 12-volt battery
is under the load floor in the rear cargo area. Open the
access covers for the
positive (+) terminal (1) and the
negative (−) terminal (2).
6. Check that the jumper cables do not have loose or missing
insulation or a shock could
result and the vehicles could
be damaged.
Before connecting the jumper
cables, here are some basic
things to know. Positive (+)
jumper cable goes to
positive (+) battery terminal or
a remote positive (+) terminal if
available. Negative (−) jumper
cable goes to remote
negative (−) terminal if
available, or a heavy,
unpainted metal engine part or
a solid engine ground on the
vehicle with the run-down
battery.
Do not connect positive (+) to
negative (−) or there will be a
short that may damage the
battery or other parts of the
vehicle. Do not connect the
negative (−) cable to the negative (−) terminal on the
run-down battery because this
can cause sparks.
Caution
If the jumper cables are
connected or removed in the
wrong order, electrical shorting
may occur and damage the
vehicle. The repairs would not be
covered by the vehicle warranty.
Always connect and remove the
jumper cables in the correct order,
making sure that the cables do
not touch each other or other
metal.
Connecting the Jumper Cables 1. Connect the red positive (+) jumper cable to the positive (+)
terminal of the other vehicle
with the run-down battery. Use
a remote positive (+) terminal if
available. Do not let the other
end touch metal.