check engine CHRYSLER 200 2014 1.G Owner's Manual
[x] Cancel search | Manufacturer: CHRYSLER, Model Year: 2014, Model line: 200, Model: CHRYSLER 200 2014 1.GPages: 516, PDF Size: 3.52 MB
Page 440 of 516
Cooling System
WARNING!
•When working near the radiator cooling fan,
disconnect the fan motor lead or turn the ignition
switch to the LOCK position. The fan is tempera-
ture controlled and can start at anytime the ignition
switch is in the ON position.
• You or others can be badly burned by hot engine
coolant (antifreeze) or steam from your radiator. If
you see or hear steam coming from under the hood,
do not open the hood until the radiator has had
time to cool. Never try to open a cooling system
pressure cap when the radiator is hot.
Coolant Checks
Check engine coolant (antifreeze) protection every 12
months (before the onset of freezing weather, where applicable). If the engine coolant (antifreeze) is dirty or
rusty in appearance, the system should be drained,
flushed, and refilled with fresh engine coolant (anti-
freeze). Check the front of the A/C condenser for any
accumulation of bugs, leaves, etc. If dirty, clean by gently
spraying water from a garden hose vertically down the
face of the condenser.
Check the coolant recovery bottle tubing for brittle rub-
ber, cracking, tears, cuts, and tightness of the connection
at the bottle and radiator. Inspect the entire system for
leaks.
Cooling System — Drain, Flush And Refill
If the engine coolant (antifreeze) is dirty or contains
visible sediment, have an authorized dealer clean and
flush with OAT coolant (antifreeze) (conforming to MS-
12106).
438 MAINTAINING YOUR VEHICLE
Page 444 of 516
WARNING!
•Do not open hot engine cooling system. Never add
engine coolant (antifreeze) when the engine is
overheated. Do not loosen or remove the cap to cool
an overheated engine. Heat causes pressure to
build up in the cooling system. To prevent scalding
or injury, do not remove the pressure cap while the
system is hot or under pressure.
• Do not use a pressure cap other than the one
specified for your vehicle. Personal injury or en-
gine damage may result.
Disposal Of Used Engine Coolant
Used ethylene glycol-based engine coolant (antifreeze) is
a regulated substance requiring proper disposal. Check
with your local authorities to determine the disposal
rules for your community. To prevent ingestion by ani-
mals or children, do not store ethylene glycol-based engine coolant in open containers or allow it to remain in
puddles on the ground. If ingested by a child or pet, seek
emergency assistance immediately. Clean up any ground
spills immediately.
Coolant Level
Four-Cylinder Engines —
the coolant bottle provides a
quick visual method for determining that the engine
coolant (antifreeze) level is adequate. With the engine
idling and warm to normal operating temperature, the
level of the engine coolant (antifreeze) in the bottle
should be between the “ADD” and “FULL” lines, shown
on the bottle.
Six-Cylinder Engines — the level of the engine coolant
(antifreeze) in the pressurized coolant bottle should be
between the “COLD” and “FULL” range on the bottle
when the engine is cold.
442 MAINTAINING YOUR VEHICLE
Page 445 of 516
The radiator normally remains completely full, so there is
no need to remove the radiator cap unless checking for
engine coolant (antifreeze) freeze point or replacing cool-
ant. Advise your service attendant of this. As long as the
engine operating temperature is satisfactory, the coolant
bottle need only be checked once a month. When addi-
tional engine coolant (antifreeze) is needed to maintain
the proper level, it should be added to the coolant bottle.
Do not overfill.
Points To Remember
NOTE:When the vehicle is stopped after a few miles/
kilometers of operation, you may observe vapor coming
from the front of the engine compartment. This is nor-
mally a result of moisture from rain, snow, or high
humidity accumulating on the radiator and being vapor-
ized when the thermostat opens, allowing hot engine
coolant (antifreeze) to enter the radiator. If an examination of your engine compartment shows no
evidence of radiator or hose leaks, the vehicle may be
safely driven. The vapor will soon dissipate.
•
Do not overfill the coolant expansion bottle.
•
Check the coolant freeze point in the radiator and in the
coolant expansion bottle. If engine coolant (antifreeze)
needs to be added, the contents of the coolant expansion
bottle must also be protected against freezing.
• If frequent engine coolant (antifreeze) additions are
required, the cooling system should be pressure tested
for leaks.
•
Maintain engine coolant (antifreeze) concentration at a
minimum of 50% OAT coolant (conforming to MS-12106)
and distilled water for proper corrosion protection of
your engine which contains aluminum components.
• Make sure that the coolant expansion bottle overflow
hoses are not kinked or obstructed.
7
MAINTAINING YOUR VEHICLE 443
Page 446 of 516
•Keep the front of the radiator clean. If your vehicle is
equipped with air conditioning, keep the front of the
condenser clean.
•
Do not change the thermostat for Summer or Winter
operation. If replacement is ever necessary, install ONLY
the correct type thermostat. Other designs may result in
unsatisfactory engine coolant (antifreeze) performance,
poor gas mileage, and increased emissions.
Brake System
In order to assure brake system performance, all brake
system components should be inspected periodically.
Refer to the “Maintenance Schedule” for the proper
maintenance intervals.
WARNING!
Riding the brakes can lead to brake failure and
possibly a collision. Driving with your foot resting or
riding on the brake pedal can result in abnormally
high brake temperatures, excessive lining wear, and
possible brake damage. You would not have your full
braking capacity in an emergency.
Master Cylinder — Brake Fluid Level Check
Check the fluid level in the master cylinder immediately if
the brake system warning light indicates system failure.
Check the fluid level in the master cylinder when per-
forming underhood services.
Clean the top of the master cylinder area before removing
the cap. If necessary, add fluid to bring the fluid level up to
the requirements described on the brake fluid reservoir.
444 MAINTAINING YOUR VEHICLE
Page 449 of 516
NOTE:No chemical flushes should be used in any
transmission; only the approved lubricant should be
used.
CAUTION!
Using a transmission fluid other than the manufac-
turer’s recommended fluid may cause deterioration
in transmission shift quality and/or torque converter
shudder, and will require more frequent fluid and
filter changes. Refer to “Fluids, Lubricants, and
Genuine Parts” in this section for fluid specifica-
tions.
Special Additives
The manufacturer strongly recommends against using
any special additives in the transmission. Automatic Transmission Fluid (ATF) is an engineered
product and its performance may be impaired by supple-
mental additives. Therefore, do not add any fluid addi-
tives to the transmission. The only exception to this
policy is the use of special dyes for diagnosing fluid
leaks. Avoid using transmission sealers as they may
adversely affect seals.
CAUTION!
Do not use chemical flushes in your transmission as
the chemicals can damage your transmission compo-
nents. Such damage is not covered by the New
Vehicle Limited Warranty.
Fluid Level Check — Four-Speed Transmission
Use the following procedure to check the transmission
fluid level properly:
1. Park the vehicle on level ground.
7
MAINTAINING YOUR VEHICLE 447
Page 450 of 516
2. Run the engine at normal idle speed for at least 60seconds, and leave the engine running for the rest of
this procedure.
3. Fully apply the parking brake, and press the brake pedal.
4. Place the shift lever momentarily into each gear posi- tion (allowing time for the transmission to fully en-
gage in each position), ending with the transmission in
PARK.
5. Wipe the area around the dipstick clean to prevent dirt from entering the transmission.
6.
Remove the dipstick and determine if the fluid is hot or
cold. Hot fluid is approximately 180° F (82° C), which is
the normal operating temperature after the vehicle is
driven at least 15 miles (24 km). Hot fluid cannot be held
comfortably between the fingertips. Cold fluid is at a
temperature of approximately 80° F (27° C).
7. Wipe the dipstick clean and reinsert it until seated. Then, remove the dipstick and note the fluid level on
both sides. The fluid level reading is only valid if there
is a solid coating of oil on both sides of the dipstick.
Note that the holes in the dipstick will be full of fluid
if the actual level is at or above the hole.
• If the fluid is hot, the fluid level should be in the
crosshatched area marked “HOT” (between the up-
per two holes in the dipstick).
• If the fluid is cold, the fluid level should be between
the lower two holes in the area marked “COLD.”
If the fluid level is low, add fluid through the dipstick
tube to bring it to the proper level. Do not overfill. After
adding any quantity of oil through the dipstick tube, wait
at least two minutes for the oil to fully drain into the
transmission before rechecking the fluid level.
8. Check for leaks. Release the parking brake.
448 MAINTAINING YOUR VEHICLE
Page 478 of 516
MAINTENANCE SCHEDULE
Your vehicle is equipped with an automatic oil change
indicator system. The oil change indicator system will
remind you that it is time to take your vehicle in for
scheduled maintenance.
Based on engine operation conditions, the oil change
indicator message will illuminate. This means that ser-
vice is required for your vehicle. Operating conditions
such as frequent short-trips, trailer tow, extremely hot or
cold ambient temperatures, and E85 fuel usage will
influence when the “Oil Change Required” message is
displayed. Severe Operating Conditions can cause the
change oil message to illuminate as early as 3,500 miles
(5,600 km) since last reset. Have your vehicle serviced as
soon as possible, within the next 500 miles (805 km).
Your authorized dealer will reset the oil change indicator
message after completing the scheduled oil change. If a
scheduled oil change is performed by someone otherthan your authorized dealer, the message can be reset by
referring to the steps described under “Electronic Vehicle
Information Center (EVIC)/Oil Change Required” in
“Understanding Your Instrument Panel” for further in-
formation.
NOTE:
Under no circumstances should oil change inter-
vals exceed 10,000 miles (16,000 km) or twelve months,
whichever comes first.
Severe Duty All Models
Change Engine Oil at 4000 miles (6,500 km) if the vehicle
is operated in a dusty and off road environment. This
type of vehicle use is considered Severe Duty.
Once A Month Or Before A Long Trip:
• Check engine oil level.
• Check windshield washer fluid level.
8
M
A I
N T
E
N
A
N
C E
S
C
H E
D
U L
E
S476 MAINTENANCE SCHEDULES
Page 479 of 516
•Check tire pressure and look for unusual wear or
damage. Rotate tires at the first sign of irregular wear,
even if it occurs before the oil indicator system turns
on.
• Check the fluid levels of the coolant reservoir, brake
master cylinder, power steering and transmission
(four-speed only) and fill as needed.
• Check function of all interior and exterior lights.
Required Maintenance Intervals
Refer to the maintenance schedules on the following
page for the required maintenance intervals.
At Every Oil Change Interval As Indicated By Oil Change Indicator System:
•Change oil and filter.
At Every Oil Change Interval As Indicated By Oil
Change Indicator System:
•Rotate the tires. Rotate at the first sign of irregu-
lar wear, even if it occurs before the oil indicator
system turns on.
• Inspect battery and clean and tighten terminals as
required.
• Inspect automatic transmission fluid if equipped
with dipstick.
• Inspect brake pads, shoes, rotors, drums, hoses
and park brake.
• Inspect engine cooling system protection and
hoses.
• Inspect exhaust system.
• Inspect engine air cleaner if using in dusty or
off-road conditions.
8
M
A I
N T
E
N
A
N
C E
S
C
H E
D
U L
E
SMAINTENANCE SCHEDULES 477
Page 497 of 516
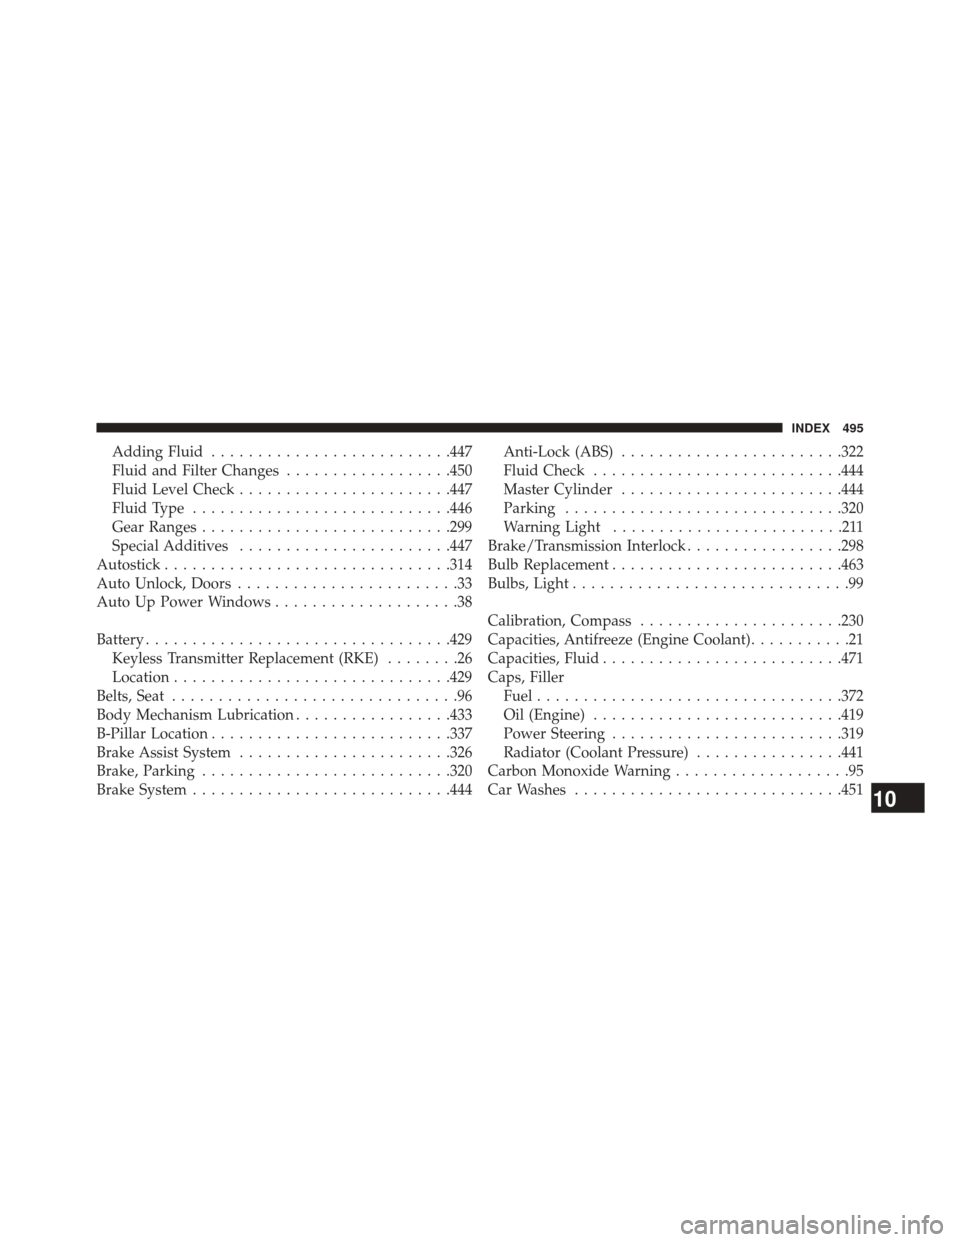
Adding Fluid......................... .447
Fluid and Filter Changes ..................450
Fluid Level Check ...................... .447
Fluid Type ........................... .446
Gear Ranges .......................... .299
Special Additives ...................... .447
Autostick .............................. .314
Auto Unlock, Doors ........................33
Auto Up Power Windows ....................38
Battery ................................ .429
Keyless Transmitter Replacement (RKE) ........26
Location ............................. .429
Belts, Seat ...............................96
Body Mechanism Lubrication .................433
B-Pillar Location ......................... .337
Brake Assist System ...................... .326
Brake, Parking .......................... .320
Brake System ........................... .444Anti-Lock (ABS)
....................... .322
Fluid Check .......................... .444
Master Cylinder ....................... .444
Parking ............................. .320
Warning Light .........................211
Brake/Transmission Interlock .................298
Bulb Replacement ........................ .463
Bulbs, Light ..............................99
Calibration, Compass ..................... .230
Capacities, Antifreeze (Engine Coolant) ...........21
Capacities, Fluid ......................... .471
Caps, Filler Fuel ................................ .372
Oil (Engine) .......................... .419
Power Steering ........................ .319
Radiator (Coolant Pressure) ................441
Carbon Monoxide Warning ...................95
Car Washes ............................ .451
10
INDEX 495
Page 498 of 516
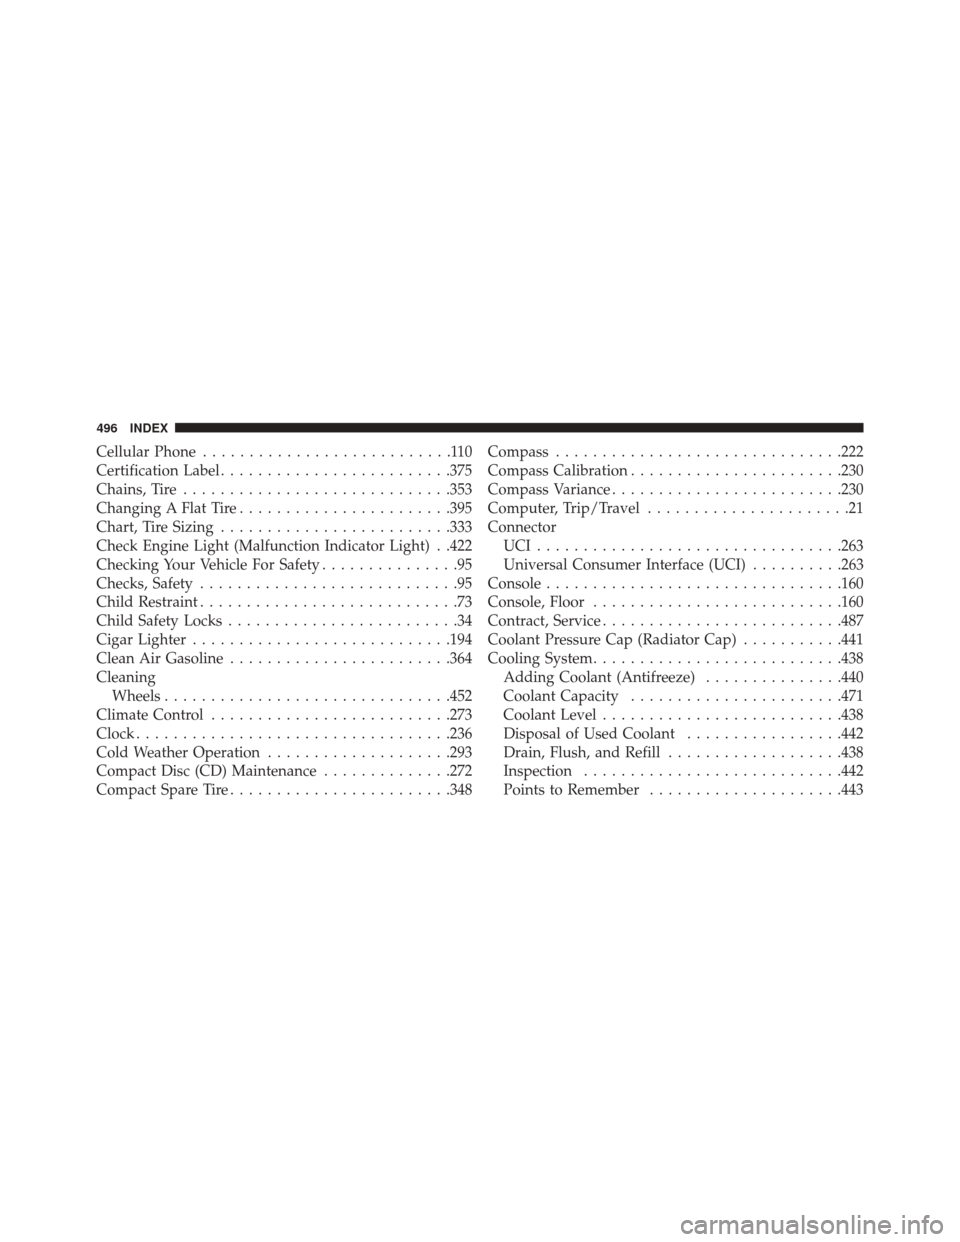
Cellular Phone...........................110
Certification Label ........................ .375
Chains, Tire ............................ .353
Changing A Flat Tire ...................... .395
Chart, Tire Sizing ........................ .333
Check Engine Light (Malfunction Indicator Light) . .422
Checking Your Vehicle For Safety ...............95
Checks, Safety ............................95
Child Restraint ............................73
Child Safety Locks .........................34
Cigar Lighter ........................... .194
Clean Air Gasoline ....................... .364
Cleaning Wheels .............................. .452
Climate Control ......................... .273
Clock ................................. .236
Cold Weather Operation ....................293
Compact Disc (CD) Maintenance ..............272
Compact Spare Tire ....................... .348Compass
.............................. .222
Compass Calibration ...................... .230
Compass Variance ........................ .230
Computer, Trip/Travel ......................21
Connector UCI................................ .263
Universal Consumer Interface (UCI) ..........263
Console ............................... .160
Console, Floor .......................... .160
Contract, Service ......................... .487
Coolant Pressure Cap (Radiator Cap) ...........441
Cooling System .......................... .438
Adding Coolant (Antifreeze) ...............440
Coolant Capacity ...................... .471
Coolant Level ......................... .438
Disposal of Used Coolant .................442
Drain, Flush, and Refill ...................438
Inspection ........................... .442
Points to Remember .....................443
496 INDEX