brake CHRYSLER 200 2015 2.G Owner's Manual
[x] Cancel search | Manufacturer: CHRYSLER, Model Year: 2015, Model line: 200, Model: CHRYSLER 200 2015 2.GPages: 220, PDF Size: 3.7 MB
Page 46 of 220
Far
The default status of FCW is the “Far” setting.
The far setting provides warnings for potential collisions more distant in front of the vehicle,
allowing the driver to have the most reaction time to avoid a collision.
This setting is designed to provide early warnings per NHTSA (National Highway Traffic Safety
Administration) recommendations.
More cautious drivers that do not mind frequent warnings may prefer this setting.
NOTE:
This setting gives you the most reaction time.
Near
Changing the FCW status to the “Near” setting, allows the system to warn you of a potential
frontal collision when you are much closer.
This setting provides less reaction time than the “Far” setting, which allows for a more dynamic
driving experience.
More dynamic or aggressive drivers that want to avoid frequent warnings may prefer this setting.
Off
Changing the FCW status to “Off ” prevents the system from warning you of a possible collision
with the vehicle in front of you.
Turning Active Braking ON Or OFF
The Active Braking feature has two settings and can be changed within the Uconnect® System
Screen:
•On
•Off
Changing the Active Braking status to “Off ” prevents the system from providing limited
autonomous braking, or additional brake support if the driver is not braking adequately in the
event of a potential frontal collision.
NOTE:
If FCW is set to “Off ”, “FCW OFF” will be displayed in the EVIC/DID.
Refer to the Owner's Manual on the DVD for further details.
WARNING!
Forward Collision Warning (FCW) is not intended to avoid a collision on its own, nor can
FCW detect every type of potential collision. The driver has the responsibility to avoid a
collision by controlling the vehicle via braking and steering. Failure to follow this warning could
lead to serious injury or death.
OPERATING YOUR VEHICLE
44
Page 53 of 220
NINE-SPEED AUTOMATIC TRANSMISSION
The transmission is controlled using a rotary electronic gear selector located on the center
console. The transmission gear range (PRNDL/S) is displayed both above the gear selector and
in the Electronic Vehicle Information Center (EVIC) or the Driver Information Display (DID).
To select a gear range, simply rotate the shifter
control.
NOTE:
You must press the brake pedal to shift the
transmission out of PARK or from NEUTRAL
into DRIVE or REVERSE (when stopped or
moving at low speeds).
Push down on the gear selector and then rotate
it, to access the L or S position.
Select the DRIVE range for normal driving.
Transmission Gear Selector
OPERATING YOUR VEHICLE
51
Page 54 of 220
WARNING!
• Never use the PARK position as a substitute for the parking brake. Always apply theparking brake fully when parked to guard against vehicle movement and possible injury or
damage.
• Your vehicle could move and injure you and others if it is not in PARK. Make sure the
transmission is in PARK before leaving the vehicle.
• It is dangerous to shift out of PARK or NEUTRAL if the engine speed is higher than idle
speed. If your foot is not firmly pressing the brake pedal, the vehicle could accelerate
quickly forward or in reverse. You could lose control of the vehicle and hit someone or
something. Only shift into gear when the engine is idling normally and your foot is firmly
pressing the brake pedal.
• Unintended movement of a vehicle could injure those in or near the vehicle. As with all
vehicles, you should never exit a vehicle while the engine is running. Before exiting a
vehicle, always apply the parking brake, shift the transmission into PARK, turn the engine
OFF, and remove the key fob. When the ignition is in the OFF position, the transmission
is locked in PARK, securing the vehicle against unwanted movement.
• When leaving the vehicle, always make sure the ignition is in the OFF position, remove the
key fob from the vehicle, and lock the vehicle.
• Never leave children alone in a vehicle, or with access to an unlocked vehicle. Allowing
children to be in a vehicle unattended is dangerous for a number of reasons. A child or
others could be seriously or fatally injured. Children should be warned not to touch the
parking brake, brake pedal or the transmission gear selector.
• Do not leave the key fob in or near the vehicle (or in a location accessible to children), and
do not leave the ignition in the ACC or ON/RUN position. A child could operate power
windows, other controls, or move the vehicle.
OPERATING YOUR VEHICLE
52
Page 56 of 220
STOP/START SYSTEM — 2.4L ENGINE
The Stop/Start function is developed to save fuel and reduce emissions. The system will stop the
engine automatically during a vehicle stop if the required conditions are met. Releasing the brake
pedal or pressing the accelerator pedal on an automatic transmission will start the engine.
Automatic Mode
The Stop/Start feature is enabled after every normal customer engine start. It will remain in
STOP/START NOT READY until you drive forward with a vehicle speed greater than 5 mph
(8 km/h). At that time, the system will go into STOP/START READY and if all other conditions
are met, can go into a STOP/START AUTOSTOP ACTIVE “Autostop” mode.
To Activate The Autostop Mode, The Following Must Occur:
• The system must be in STOP/START READY state. A STOP/START READY message willbe displayed in the Electronic Vehicle Information Center (EVIC) or Driver Information
Display (DID) within the Stop/Start section. Refer to “Electronic Vehicle Information Center
(EVIC)” or “Driver Information Display (DID)” in “Understanding Your Instrument Panel” in
your owners manual on the DVD for further information.
• The vehicle must be completely stopped.
• The shifter must be in DRIVE or NEUTRAL and the brake pedal depressed.
The engine will shut down, the tachometer will move to the zero position and the Stop/Start
telltale will illuminate indicating you are in Autostop. While in Autostop, the Climate Controls
system may automatically adjust airflow to maintain cabin comfort. Customer settings will be
maintained upon return to an engine running condition.
Refer to the “Stop/Start System” in the “Starting and Operating” section located in your owners
manual on the DVD for further information.
To Manually Turn Off The Stop/Start System
1. Press the STOP/START Off switch (located on the switch bank). The light on the switch will illuminate.
2. The “STOP/START OFF” message will ap- pear in Electronic Vehicle Information Cen-
ter (EVIC) or Driver Information Display
(DID). Refer to “Electronic Vehicle Infor-
mation Center (EVIC)” or “Driver Informa-
tion Display (DID)” in “Understanding Your
Instrument Panel” your owners manual on
the DVD for further information.
3. At the next vehicle stop (after turning off the STOP/START system) the engine will
not be stopped.
4. The STOP/START system will reset itself back to an ON condition every time the key is turned off and back on.
STOP/START OFF Switch
OPERATING YOUR VEHICLE
54
Page 57 of 220
To Manually Turn On The Stop/Start System
Press the STOP/START Off switch (located on the switch bank). The light on the switch will turn off.
For complete details on the Stop/Start System refer to the “Stop/Start System” in the “Starting
and Operating” section located in your owners manual on the DVD for further information.
ELECTRIC PARKING BRAKE (EPB)
Your vehicle is equipped with an Electric Parking Brake System (EPB) that offers simple
operation, and some additional features that make the parking brake more convenient and useful.
The parking brake switch is located in the center console.
To engage the parking brake manually, pull up
on the switch momentarily.
To release the parking brake manually, the igni-
tion switch must be in the ON/RUN position.
Push on the brake pedal, then push the parking
brake switch down momentarily.
The parking brake will disengage automatically
when the ignition switch in the RUN position,
the transmission is in DRIVE or REVERSE, the
driver seat belt is buckled, and an attempt is
made to drive away by pressing the accelerator
pedal.
NOTE:
• You may hear a slight whirring sound fromthe back of the vehicle while the parking brake engages or disengages.
• Once the parking brake is fully engaged, the BRAKE warning lamp in the instrument cluster and the LED indicator on the switch will illuminate. Once the parking brake is fully disengaged,
the BRAKE warning lamp in the instrument cluster and the LED indicator on the switch will
extinguish.
• If your foot is on the brake pedal while you are engaging or disengaging the parking brake, you may notice a small amount of brake pedal movement.
• The parking brake can be engaged even when the ignition switch is OFF, however, it can only be disengaged when the ignition switch is in the ON/RUN position.
• The EPB fault lamp will illuminate if the EPB switch is held for longer than 20 seconds in either the released or applied position. The light will extinguish upon releasing the switch.
• Refer to the Starting and Operating section of your vehicle’s Owner’s Manual on the DVD for further details.
Parking Brake Switch
OPERATING YOUR VEHICLE
55
Page 58 of 220
CAUTION!
If the Brake System Warning Light remains on with the parking brake released, a brake system
malfunction is indicated. Have the brake system serviced by an authorized dealer immediately.
WARNING!
• Never use the PARK position as a substitute for the parking brake. Always apply theparking brake fully when parked to guard against vehicle movement and possible injury or
damage.
• When leaving the vehicle, always make sure the ignition is in the OFF position, remove the
key fob from the vehicle, and lock your vehicle.
• Never leave children alone in a vehicle, or with access to an unlocked vehicle. Allowing
children to be in a vehicle unattended is dangerous for a number of reasons. A child or
others could be seriously or fatally injured. Children should be warned not to touch the
parking brake, brake pedal or the transmission gear selector.
• Do not leave the Key Fob in or near the vehicle, (or in a location accessible to children),
and do not leave the ignition in the ACC or ON/RUN position. A child could operate
power windows, other controls, or move the vehicle.
• Be sure the parking brake is fully disengaged before driving; failure to do so can lead to
brake failure and a collision.
• Always fully apply the parking brake when leaving your vehicle, or it may roll and cause
damage or injury. Also be certain to leave the transmission in PARK. Failure to do so may
allow the vehicle to roll and cause damage or injury.
• Driving the vehicle with the parking brake engaged, or repeated use of the parking brake
to slow the vehicle may cause serious damage to the brake system.
OPERATING YOUR VEHICLE
56
Page 60 of 220
ParkSense® Active Park Assist
The ParkSense® Active Park Assist system can be enabled and disabled with the ParkSense®
Active Park Assist switch, located on the switch panel below the Uconnect® display.
The ParkSense® Active Park Assist system is
intended to assist the driver during parallel and
perpendicular parking maneuvers by identify-
ing a proper parking space, providing audible/
visual instructions, and controlling the steering
wheel. The ParkSense® Active Park Assist sys-
tem is defined as “semi-automatic” since the
driver maintains control of the accelerator, shift
lever and brakes. Depending on the driver’s
parking maneuver selection, the ParkSense®
Active Park Assist system is capable of maneu-
vering a vehicle into a parallel or a perpendicu-
lar parking space on either side (i.e., driver side
or passenger side).
Refer to your Owner's Manual on the DVD for
further details.
CAUTION!
•ParkSense® is only a parking aid and it is unable to recognize every obstacle, including small
obstacles. Parking curbs might be temporarily detected or not detected at all. Obstacles
located above or below the sensors will not be detected when they are in close proximity.
• The vehicle must be driven slowly when using ParkSense® in order to be able to stop intime when an obstacle is detected. It is recommended that the driver looks over his/her
shoulder when using ParkSense®.
WARNING!
• Drivers must be careful when backing up even when using ParkSense®. Always checkcarefully behind your vehicle, look behind you, and be sure to check for pedestrians,
animals, other vehicles, obstructions, and blind spots before backing up. You are respon-
sible for safety and must continue to pay attention to your surroundings. Failure to do so
can result in serious injury or death.
•
Before using ParkSense®, it is strongly recommended that the ball mount and hitch ball
assembly is disconnected from the vehicle when the vehicle is not used for towing. Failure to do
so can result in injury or damage to vehicles or obstacles because the hitch ball will be much
closer to the obstacle than the rear fascia when the loudspeaker sounds the continuous tone.
Also, the sensors could detect the ball mount and hitch ball assembly, depending on its size and
shape, giving a false indication that an obstacle is behind the vehicle.
ParkSense® Active Park Assist Switch
OPERATING YOUR VEHICLE
58
Page 150 of 220
PROGRAMMABLE FEATURES
Uconnect® Customer Programmable Features
The Uconnect® system allows you to access Customer Programmable feature settings such as
Display, Clock, Safety/Assistance, Lights, Doors & Locks, Auto-On Comfort & Remote Start,
Engine Off Operation, Compass Settings, Audio, Trailer Brake, Phone/Bluetooth®, Suspension
and SiriusXM Setup and System Information through buttons on the touchscreen.
• Push the “Controls” button located near the bottom of the touchscreen, then push the“Settings” button on the touchscreen to access the Settings screen. When making a selection,
scroll up or down until the preferred setting is highlighted, then press and release the preferred
setting until a check-mark appears next to the setting, showing that setting has been selected.
The following feature settings are available:
• Display • Voice
• Units • Doors & Locks
• Safety/Assistance • Engine Off Options
• Auto-On Comfort & Remote Start • Audio
• Phone/Bluetooth® • SiriusXM Setup
• Lights • System Information
• Clock • Compass
Refer to “Uconnect Settings/Customer Programmable Features” found within “Understanding
Your Instrument Panel” located in your Owner's Manual on the DVD for further information.
UNIVERSAL GARAGE DOOR OPENER
(HomeLink®)
HomeLink® replaces up to three hand-held
transmitters that operate devices such as ga-
rage door openers, motorized gates, lighting or
home security systems. The HomeLink® unit is
powered by your vehicles 12 Volt battery.
The HomeLink® buttons that are located in the
overhead console or sunvisor designate the
three different HomeLink® channels.
The HomeLink® indicator is located above the
center button.
Homelink® Indicator
ELECTRONICS
148
Page 155 of 220
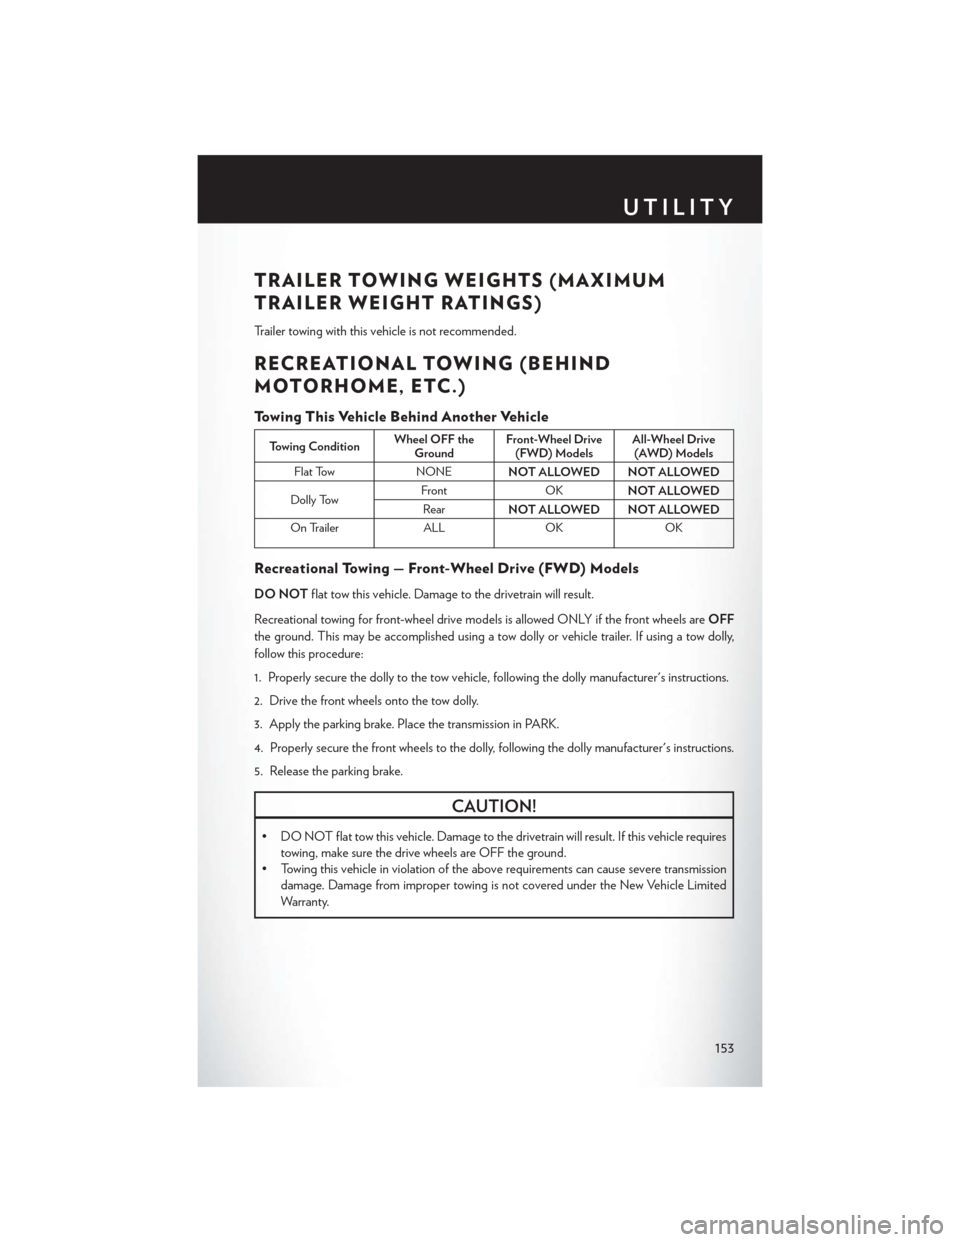
TRAILER TOWING WEIGHTS (MAXIMUM
TRAILER WEIGHT RATINGS)
Trailer towing with this vehicle is not recommended.
RECREATIONAL TOWING (BEHIND
MOTORHOME, ETC.)
Towing This Vehicle Behind Another Vehicle
Towing ConditionWheel OFF the
Ground Front-Wheel Drive
(FWD) Models All-Wheel Drive
(AWD) Models
Flat Tow NONE NOT ALLOWED NOT ALLOWED
Dolly Tow Front
OK
NOT ALLOWED
Rear NOT ALLOWED NOT ALLOWED
On Trailer ALLOKOK
Recreational Towing — Front-Wheel Drive (FWD) Models
DO NOTflat tow this vehicle. Damage to the drivetrain will result.
Recreational towing for front-wheel drive models is allowed ONLY if the front wheels are OFF
the ground. This may be accomplished using a tow dolly or vehicle trailer. If using a tow dolly,
follow this procedure:
1. Properly secure the dolly to the tow vehicle, following the dolly manufacturer's instructions.
2. Drive the front wheels onto the tow dolly.
3. Apply the parking brake. Place the transmission in PARK.
4. Properly secure the front wheels to the dolly, following the dolly manufacturer's instructions.
5. Release the parking brake.
CAUTION!
• DO NOT flat tow this vehicle. Damage to the drivetrain will result. If this vehicle requires towing, make sure the drive wheels are OFF the ground.
• Towing this vehicle in violation of the above requirements can cause severe transmission
damage. Damage from improper towing is not covered under the New Vehicle Limited
Warranty.
UTILITY
153
Page 157 of 220
ROADSIDE ASSISTANCE
Dial toll-free 1-800-521-2779 for U.S. Residents or 1-800-363-4869 for Canadian Residents.
• Provide your name, vehicle identification number, license plate number, and your location,including the telephone number from which you are calling.
• Briefly describe the nature of the problem and answer a few simple questions.
• You will be given the name of the service provider and an estimated time of arrival. If you feel you are in an “unsafe situation”, please let us know. With your consent, we will contact local
police or safety authorities.
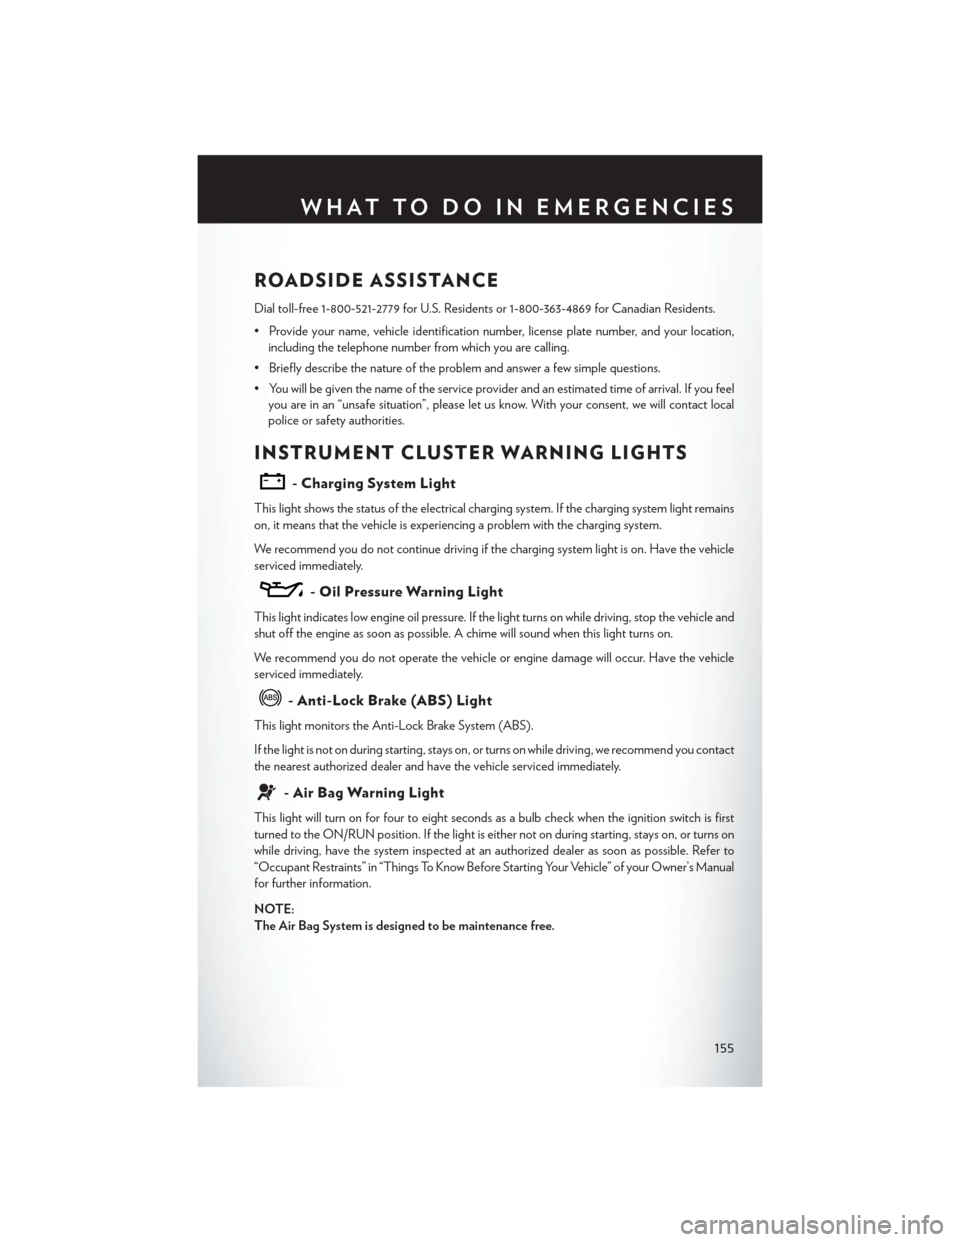
INSTRUMENT CLUSTER WARNING LIGHTS
- Charging System Light
This light shows the status of the electrical charging system. If the charging system light remains
on, it means that the vehicle is experiencing a problem with the charging system.
We recommend you do not continue driving if the charging system light is on. Have the vehicle
serviced immediately.
- Oil Pressure Warning Light
This light indicates low engine oil pressure. If the light turns on while driving, stop the vehicle and
shut off the engine as soon as possible. A chime will sound when this light turns on.
We recommend you do not operate the vehicle or engine damage will occur. Have the vehicle
serviced immediately.
- Anti-Lock Brake (ABS) Light
This light monitors the Anti-Lock Brake System (ABS).
If the light is not on during starting, stays on, or turns on while driving, we recommend you contact
the nearest authorized dealer and have the vehicle serviced immediately.
- Air Bag Warning Light
This light will turn on for four to eight seconds as a bulb check when the ignition switch is first
turned to the ON/RUN position. If the light is either not on during starting, stays on, or turns on
while driving, have the system inspected at an authorized dealer as soon as possible. Refer to
“Occupant Restraints” in “Things To Know Before Starting Your Vehicle” of your Owner’s Manual
for further information.
NOTE:
The Air Bag System is designed to be maintenance free.
WHAT TO DO IN EMERGENCIES
155