steering wheel CHRYSLER 300 2012 2.G Owner's Manual
[x] Cancel search | Manufacturer: CHRYSLER, Model Year: 2012, Model line: 300, Model: CHRYSLER 300 2012 2.GPages: 124, PDF Size: 3.67 MB
Page 52 of 124
Pairing a Phone
• To use the Uconnect™ Phone feature, you must first pair your bluetooth phone with theUconnect™ system.
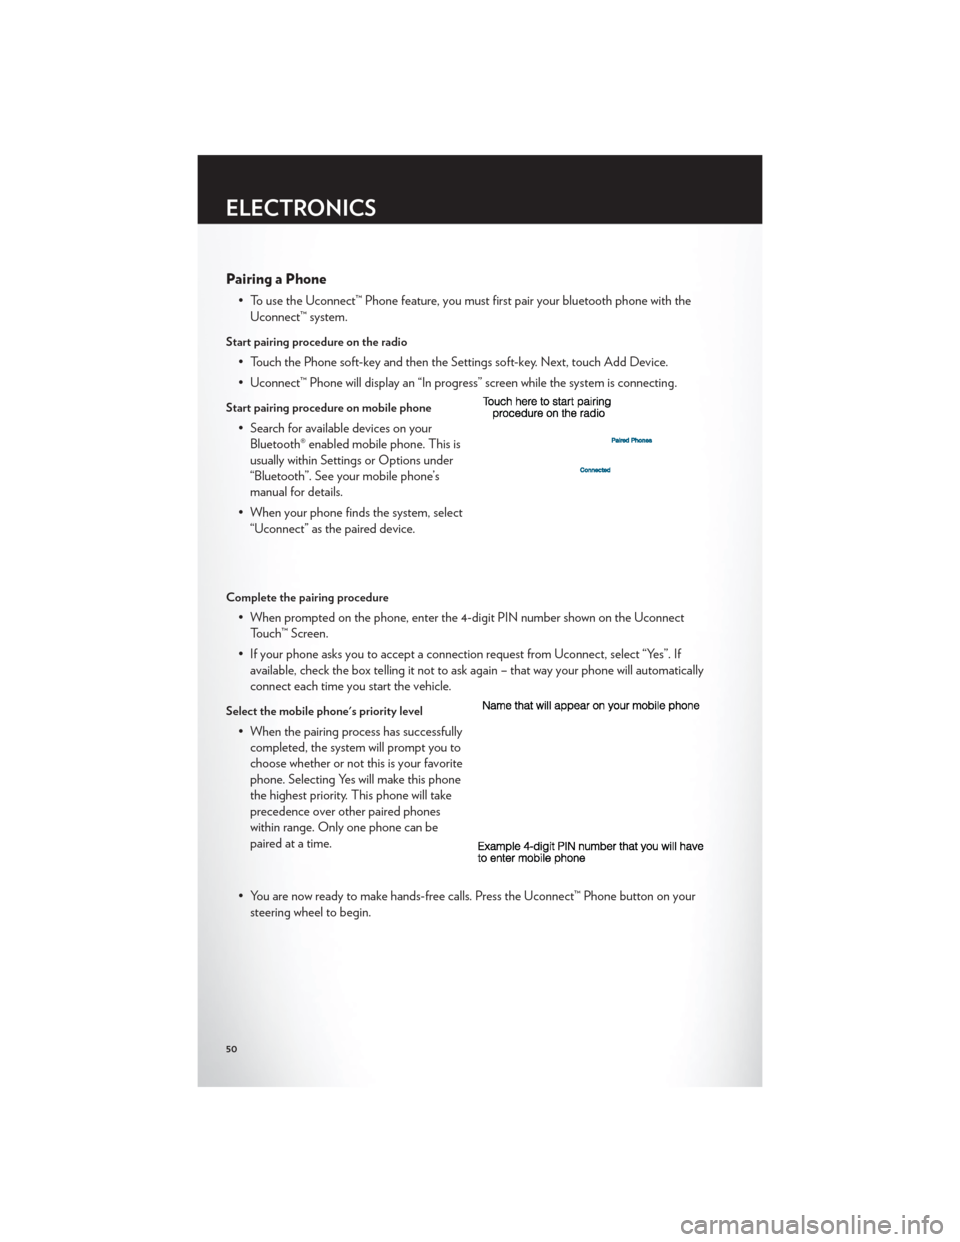
Start pairing procedure on the radio
• Touch the Phone soft-key and then the Settings soft-key. Next, touch Add Device.
• Uconnect™ Phone will display an “In progress” screen while the system is connecting.
Start pairing procedure on mobile phone
• Search for available devices on yourBluetooth® enabled mobile phone. This is
usually within Settings or Options under
“Bluetooth”. See your mobile phone’s
manual for details.
• When your phone finds the system, select “Uconnect” as the paired device.
Complete the pairing procedure
• When prompted on the phone, enter the 4-digit PIN number shown on the UconnectTouch™ Screen.
• If your phone asks you to accept a connection request from Uconnect, select “Yes”. If available, check the box telling it not to ask again – that way your phone will automatically
connect each time you start the vehicle.
Select the mobile phone's priority level
• When the pairing process has successfullycompleted, the system will prompt you to
choose whether or not this is your favorite
phone. Selecting Yes will make this phone
the highest priority. This phone will take
precedence over other paired phones
within range. Only one phone can be
paired at a time.
• You are now ready to make hands-free calls. Press the Uconnect™ Phone button on your steering wheel to begin.
ELECTRONICS
50
Page 54 of 124
Common Phone Commands
Common Phone Commands (Examples)
“Call John Smith”
“Call John Smith mobile”
“Dial 1 248 555 1212”
“Call Emergency”
“Call Towing Assistance”
“Redial”
Phonebook
• Uconnect Touch™ radios will automatically download your phonebook from your pairedphone, if this feature is supported by your phone. Entries are updated each time that the
phone is paired. If your phone book entries do not appear, check the settings on your
phone. Some phones require you to enable this feature manually.
• Your phonebook can be browsed on your radio screen, but editing can only be done on your phone. To browse, touch the Phone soft-key, then the Phonebook soft-key.
• Favorite phonebook entries can be saved as Favorites for quicker access. Favorites are shown at the top of your main phone screen.
Voice Recognition Tips
• Use longer names that are less easily mistaken for others. For examples, say “Call JohnDoe” instead of “Call John”.
• You can “chain” commands together for faster results. Say “Call John Doe, mobile”, for example.
• You can “barge in” while the system is talking to you, enabling you to enter your response without waiting. Just press the Voice Command button on the steering wheel to barge in.
Changing The Volume
• Start a dialogue by pressing the Phone button, then say a command for example -
"Help".
• Use the radio ON/OFF VOLUME rotary knob to adjust the volume to a comfortable level while the Uconnect™ system is speaking. Please note the volume setting for
Uconnect™ is different than the audio system.
NOTE:To access help, press the Uconnect™ Phonebutton on the steering wheel and
say "help." Touch the display or push either
orbutton and say "cancel" to cancel
the help session.
SMS (Text Messaging)
• Uconnect™ Phone can read or send new text messages on your mobile phone.
• Your mobile phone must support SMS over Bluetooth® in order to use this feature. If the Uconnect™ Phone determines your phone is not compatible with SMS messaging over
Bluetooth® the “Messaging” button will be greyed out and the feature will not be available
for use.
ELECTRONICS
52
Page 55 of 124
NOTE:
• For mobile phone compatibility and pairing instructions, please visitwww.UconnectPhone.com
• Uconnect™ Phone SMS is only available when the vehicle is not in moving.
WARNING!
• Any voice commanded system should be used only in safe driving conditions following local laws and phone use. All attention should be kept on the roadway ahead. Failure to
do so may result in a collision causing you and others to be severely injured or killed.
• In an emergency, to use Uconnect™ Phone, your mobile phone must be: • turned on,
• paired to Uconnect™ Phone,
• and have network coverage.
Uconnect™ Voice Command
• If the Uconnect™ Voice Commandbutton exists on your steering wheel, then
you have the Voice Command feature.
• The Voice Command feature lets you keep your hands on the steering wheel, and your eyes on the road.
• When you press the Voice Command button
located on the radio faceplate or
steering wheel, you will hear a beep. The beep is your signal to give a command. If you do
not know what commands to say, you can say "help" and the system will provide options
to you. If you ever wish to interrupt the system while it lists options, press the Voice
Command button
, listen for the BEEP, and say your command.
• You can “chain” commands together for faster results. Say “Call John Doe, mobile”, for example.
Changing The Volume
• Start a dialogue by pressing the Voice Command button, then say a command
(for example, “help”).
• Use the radio ON/OFF VOLUME rotary knob to adjust the volume to a comfortable level while the Voice Command system is speaking. The volume setting for Voice
Command is different than the audio system.
• Refer to the Understand The Features Of Your Vehicle section of your vehicle's Owner's Manual on the DVD for further details.
ELECTRONICS
53
Page 57 of 124
• The following chart lists the navigation voice commands that may be available.
Navigation Voice
Commands:“Where To?” (Main Menu
command)
“View Map” (Main Menu
command)
“Repeat guidance”
“Cancel Route”
“Detour” (During a Route
Guidance)
“Where Am I?”
“Find Address”
“Go Home”
“Find Place by Category”
“Find Place by Name”
“Find Recently Found”
“Find Favorite”
“Find City”
“Find Nearest Restaurant”
“Find Nearest Fuel” “Find Nearest Transit”
“Find Nearest Lodging”
“Find Nearest Shopping”
“Find Nearest Bank”
“Find Nearest Parking”
“Find Nearest Entertainment”
“Find Nearest Recreation”
“Find Nearest Attractions”
“Find Nearest Hospitals”
“Find Nearest Community”
“Find Nearest Auto Services”
“Find Nearest Airport”
“Find Nearest Police Stations”
“Find Nearest Fire Stations”
“Find Nearest Auto Dealers”
WARNING!
Any voice commanded system should be used only in safe driving conditions following
local laws and phone use. All attention should be kept on the roadway ahead. Failure to do
so may result in a collision causing you and others to be severely injured or killed.
ELECTRONIC VEHICLE INFORMATION CENTER
(EVIC)
• The EVIC features a driver interactive
display that is located in the instrument
cluster. Pressing the controls on the left
side of the steering wheel allows the driver
to select vehicle information and Personal
Settings. For additional information, refer
to Programmable Features in this guide.
• Press and release the UP
button to
scroll upward through the main menus
(Fuel Economy, Vehicle Info, Tire PSI,
Cruise, Messages, Trip Info, Vehicle Speed
and Turn Menu Off ) and sub menus.
• Press and release the DOWN
button to scroll downward through the main menus
and sub menus.
• Press and release the SELECT
button for access to main menus, sub menus or to
select a personal setting in the setup menu. Press and hold the SELECT button for two
seconds to reset features.
• Press the BACK button to scroll back to a previous menu or sub menu.
ELECTRONICS
55
Page 65 of 124
AUTOSTICK®
Steering Wheel Mounted Paddle Shifters Or Console Mounted Shifter
• AutoStick® is a driver-interactivetransmission feature that offers manual
gear shifting to provide you with more
control of the vehicle. AutoStick® allows
you to maximize engine braking, and
improve overall vehicle performance.
• This system can also provide you with more control during passing, city driving,
cold slippery conditions, mountain driving,
trailer towing, and many other situations.
Operation
• When the shift lever is in the DRIVE position, the transmission will operate automatically,shifting between the five available gears. To engage AutoStick®, simply move the shift
lever to the right or left (+/-) while in the DRIVE position, or press one of the steering
wheel mounted shift paddles (+/-). When AutoStick® is active, the current transmission
gear is displayed in the Electronic Vehicle Information Center (EVIC) portion of the
instrument cluster. In AutoStick® mode, the transmission will shift when manually selected
by the driver (using the shift lever, or the shift paddles), unless an engine lugging or
overspeed condition would result. It will remain in the selected gear until another upshift
or downshift is chosen, except as described below:
• The transmission will automatically downshift as the vehicle slows (to prevent engine lugging) and will display the current gear.
• The transmission will automatically downshift to first gear when coming to a stop.
• You can start out in first or second gear. Tapping (+) (at a stop) will allow starting in second gear. Starting out in second gear is helpful in snowy or icy conditions.
• The system will ignore attempts to upshift at too low of a vehicle speed.
• Transmission shifting will be more noticeable when AutoStick® is engaged. To disengage AutoStick® mode, hold the shift lever to the right or press and hold the (+) shift paddle
until “D” is once again displayed in the instrument cluster. You can shift in or out of the
AutoStick® mode at any time without taking your foot off the accelerator pedal.
• An “UPSHIFT” message will appear in the Electronic Vehicle Information Center (EVIC) portion of the instrument cluster when using AutoStick®, to alert the driver to
upshift to the next gear. The “UPSHIFT” message will appear when approaching the
maximum engine speed.
SRT8
63
Page 66 of 124

WARNING!
Do not downshift for additional engine braking on a slippery surface. The drive wheels
could lose their grip and the vehicle could skid, causing a collision or personal injury.
ELECTRONIC CONTROL DAMPING SYSTEM
• This vehicle may be equipped with an electronic controlled damping system. This systemreduces body roll and pitch in many driving situations including cornering, acceleration
and braking. There are three modes of operation:
Automatic (Auto) Mode
• This is the default position when vehicleignition is first turned on. This mode will
give a sporty, but comfortable ride. Within
this mode, the suspension will adapt to the
vehicle inputs, including vehicle speed,
steering inputs, braking, and acceleration.
• If AutoStick® is engaged while in “Auto” mode, the transmission will automatically
shift up if maximum engine speed is
reached.
• Heavily pressing the accelerator pedal may generate an automatic downshift for improved acceleration.
• This mode should be used for most driving situations.
SPORTSport Mode
• This mode is driver selectable when the vehicle is placed in SPORT mode (press
the CONTROLS button and then the
SPORT button on the display screen).
This mode will set suspension for
maximum performance handling and is
intended for spirited driving.
• When SPORT mode is enabled, a flag will light up in the instrument cluster.
NOTE:The SPORT setting will provide a firmer ride.
SRT8
64
Page 69 of 124

• Intake Air Temperature
• Oil Pressure
• Battery Voltage
Engine
• When selected, this screen displays miles per hour (mph), horsepower (hp), torque(ft/lb), oil pressure (psi) and gear selector values.
Handling
• When selected, this screen displays peak g-force, instantaneous g-force, steering and yawangles.
Options
• When selected, this screen allows you to choose a standard or custom display for yourSRT home page.
WARNING!
Measurement of vehicle statistics with the Performance Features is intended for
off-highway or off-road use only and should not be done on any public roadways. It is
recommended that these features be used in a controlled environment and within the limits
of the law. The capabilities of the vehicle as measured by the performance pages must
never be exploited in a reckless or dangerous manner, which can jeopardize the user’s safety
or the safety of others. Only a safe, attentive, and skillful driver can prevent accidents.
SUMMER/THREE-SEASON TIRES
• This vehicle may be equipped with wheels and tires to enhance traction in both wet anddry conditions.
• Summer tires are not intended to be driven in snow or on ice.
• Use summer tires only in sets of four.
NOTE:Summer tires will not contain the all season designation or mountain/snowflake
symbol on the sidewall of the tire.
WARNING!
Do not use summer tires in snow/ice conditions. You could lose control, resulting in severe
injury or death.
SRT8
67
Page 90 of 124

FREEING A STUCK VEHICLE
• If your vehicle becomes stuck in mud, sand or snow, it can often be moved by a rockingmotion. Turn your steering wheel right and left to clear the area around the front wheels.
Then, move the shift lever back and forth between REVERSE and DRIVE. Using minimal
accelerator pedal pressure to maintain the rocking motion, without spinning the wheels, is
most effective.
NOTE:If your vehicle is equipped with Electronic Stability Control (ESC) or Traction
Control
, turn the system off before attempting to “rock” the vehicle.
CAUTION!
• When “rocking” a stuck vehicle by moving between REVERSE and DRIVE, do not spin the wheels faster than 15 mph (24 km/h), or drivetrain damage may result.
• Revving the engine or spinning the wheels too fast may lead to transmission overheating and failure. It can also damage the tires. Do not spin the wheels above 30 mph (48 km/h)
while in gear (no transmission shifting occurring).
WARNING!
Fast spinning tires can be dangerous. Forces generated by excessive wheel speeds may
cause tire damage or failure. A tire could explode and injure someone. Do not spin your
vehicle's wheels faster than 30 mph (48 km/h) when you are stuck. Do not let anyone near
a spinning wheel, no matter what the speed.
WHAT TO DO IN EMERGENCIES
88
Page 106 of 124

FUSES
Integrated Power Module
• The Integrated Power Module (fuses) is located in the engine compartment on the righthand side near the Washer Fluid Reservoir. This module contains fuses and relays.
Cavity Cartridge Fuse Mini-Fuse Description
2 40 Amp Green — Radiator Fan #13 50 Amp Red — Power Steering #1
4 30 Amp Pink — Starter 5 40 Amp Green — Anti-Lock Brakes
9 — 20 Amp Yellow All-Wheel Drive Module – If Equipped
10 — 10 Amp Red Security 11 — 20 Amp Yellow Horns
12 — 10 Amp Red Air Conditioning Clutch
14 — 25 Amp Neutral Anti-Lock Brakes 15 — 25 Amp Neutral Transmission
18 50 Amp Red — Radiator Fan #2 19 50 Amp Red — Power Steering #2
20 30 Amp Pink — Wiper Motor
21 30 Amp Pink — Headlamp Washers
28 — 25 Amp Neutral Fuel Pump
29 — 15 Amp Blue Transmission Shifter
31 — 25 Amp Neutral Engine Module
MAINTAINING YOUR VEHICLE
104
Page 109 of 124

Cavity Cartridge Fuse Mini-Fuse Description2 60 Amp Yellow — Front PDC Feed #1
4 60 Amp Yellow — Front PDC Feed #2 5 30 Amp Pink — Sunroof
6 40 Amp Green — Exterior Lighting #1 7 40 Amp Green — Exterior Lighting #2
8 30 Amp Pink — Interior Lighting/Washer Pump 9 30 Amp Pink — Power Locks
10 30 Amp Pink — Driver Door 11 30 Amp Pink — Passenger Door
12 — 20 Amp Yellow Cigar Lighters (Selectable)
15 40 Amp Green — HVAC Blower
23 — 10 Amp Red Fuel Door/Diagnostic Port
24 — 15 Amp Blue Radio Screen 25 — 10 Amp Red Tire Pressure Monitor 27 — 25 Amp Neutral Amplifier 31 — 25 Amp Neutral Power Seats
32 — 15 Amp Blue HVAC Module/Cluster 33 — 15 Amp Blue Ignition Switch/Wireless Module
34 — 10 Amp Red Steering Column Module/Clock 35 — 10 Amp Red Battery Sensor 37 — 15 Amp Blue Radio
38 — 20 Amp Yellow Power Outlet
42 30 Amp Pink — Rear Defrost 43 — 25 Amp Neutral Rear Heated Seats/Steering Wheel
44 — 10 Amp Red Park Assist/Blind Spot/Camera 45 — 15 Amp Blue Cluster/Rearview Mirror/Compass
46 — 10 Amp Red Adaptive Cruise Control 47 — 10 Amp Red Adaptive Front Lighting
48 — 20 Amp Yellow Active Suspension 51 — 20 Amp Yellow Front Heated Seats
52 — 10 Amp Red Heated Cupholders/Rear Heated Seat Switches 53 — 10 Amp Red HVAC Module/In Car Temperature Sensor
58 — 10 Amp Red Airbag Module
64 — 25 Amp Neutral Rear Windows 65 — 10 Amp Red Airbag Module 67 — 15 Amp Blue Run Sense
68 — 15 Amp Blue Power Outlet Illumination/Rear Sunshade
MAINTAINING YOUR VEHICLE
107