steering wheel CHRYSLER 300 2015 2.G Owner's Manual
[x] Cancel search | Manufacturer: CHRYSLER, Model Year: 2015, Model line: 300, Model: CHRYSLER 300 2015 2.GPages: 180, PDF Size: 30.54 MB
Page 104 of 180
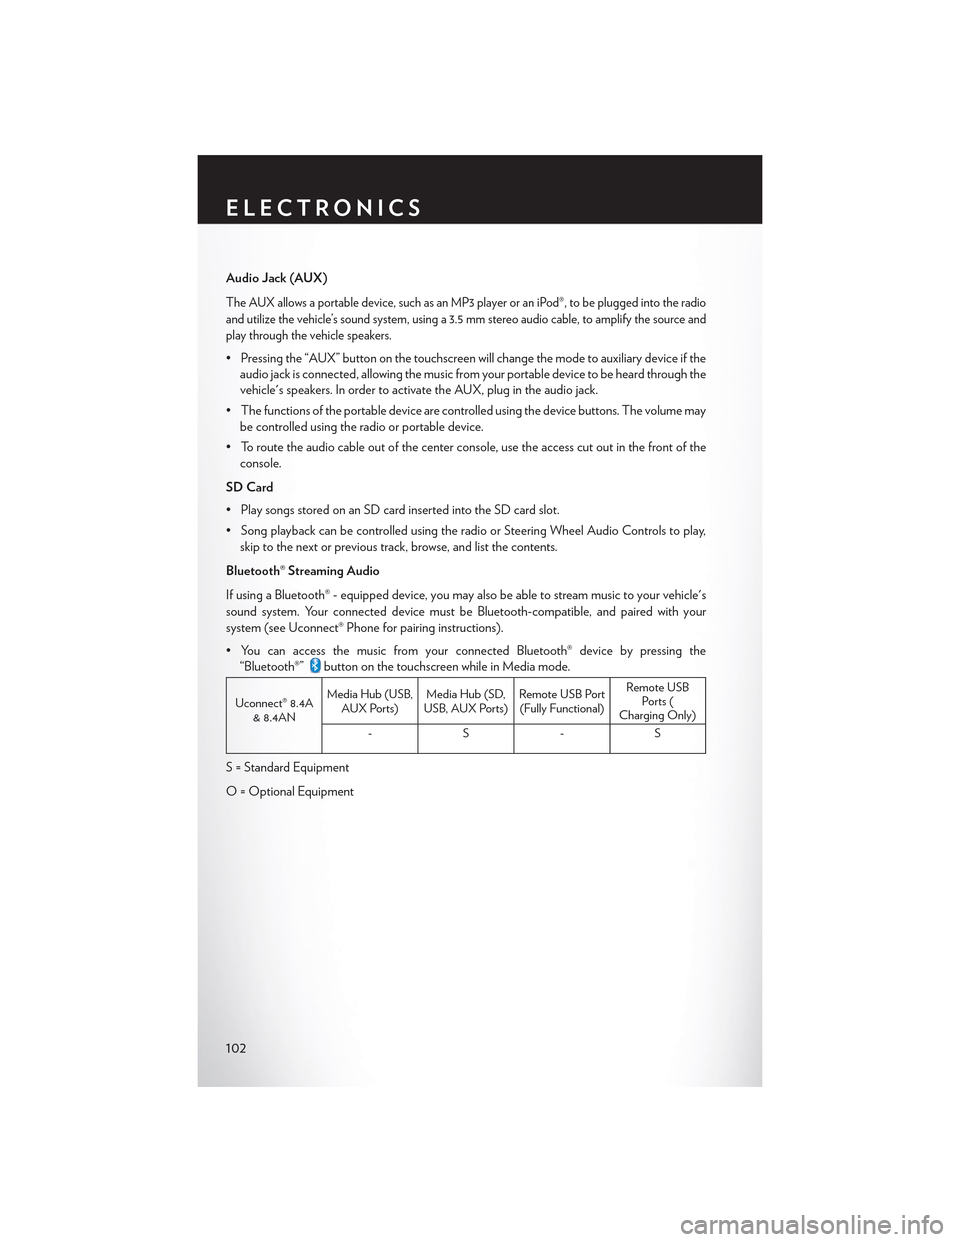
Audio Jack (AUX)
The AUX allows a portable device, such as an MP3 player or an iPod®, to be plugged into the radio
and utilize the vehicle’s sound system, using a 3.5 mm stereo audio cable, to amplify the source and
play through the vehicle speakers.
• Pressing the “AUX” button on the touchscreen will change the mode to auxiliary device if the
audio jack is connected, allowing the music from your portable device to be heard through the
vehicle's speakers. In order to activate the AUX, plug in the audio jack.
•Thefunctionsoftheportabledevicearecontrolledusingthedevicebuttons.Thevolumemay
be controlled using the radio or portable device.
• To route the audio cable out of the center console, use the access cut out in the front of the
console.
SD Card
• Play songs stored on an SD card inserted into the SD card slot.
•SongplaybackcanbecontrolledusingtheradioorSteeringWheelAudioControlstoplay,
skip to the next or previous track, browse, and list the contents.
Bluetooth® Streaming Audio
If using a Bluetooth® - equipped device, you may also be able to stream music to your vehicle's
sound system. Your connected device must be Bluetooth-compatible, and paired with your
system (see Uconnect® Phone for pairing instructions).
•YoucanaccessthemusicfromyourconnectedBluetooth®devicebypressingthe
“Bluetooth®”button on the touchscreen while in Media mode.
Uconnect® 8.4A& 8.4AN
Media Hub (USB,AUX Ports)Media Hub (SD,USB, AUX Ports)Remote USB Port(Fully Functional)
Remote USBPorts (Charging Only)
-S-S
S = Standard Equipment
O = Optional Equipment
ELECTRONICS
102
Page 111 of 180
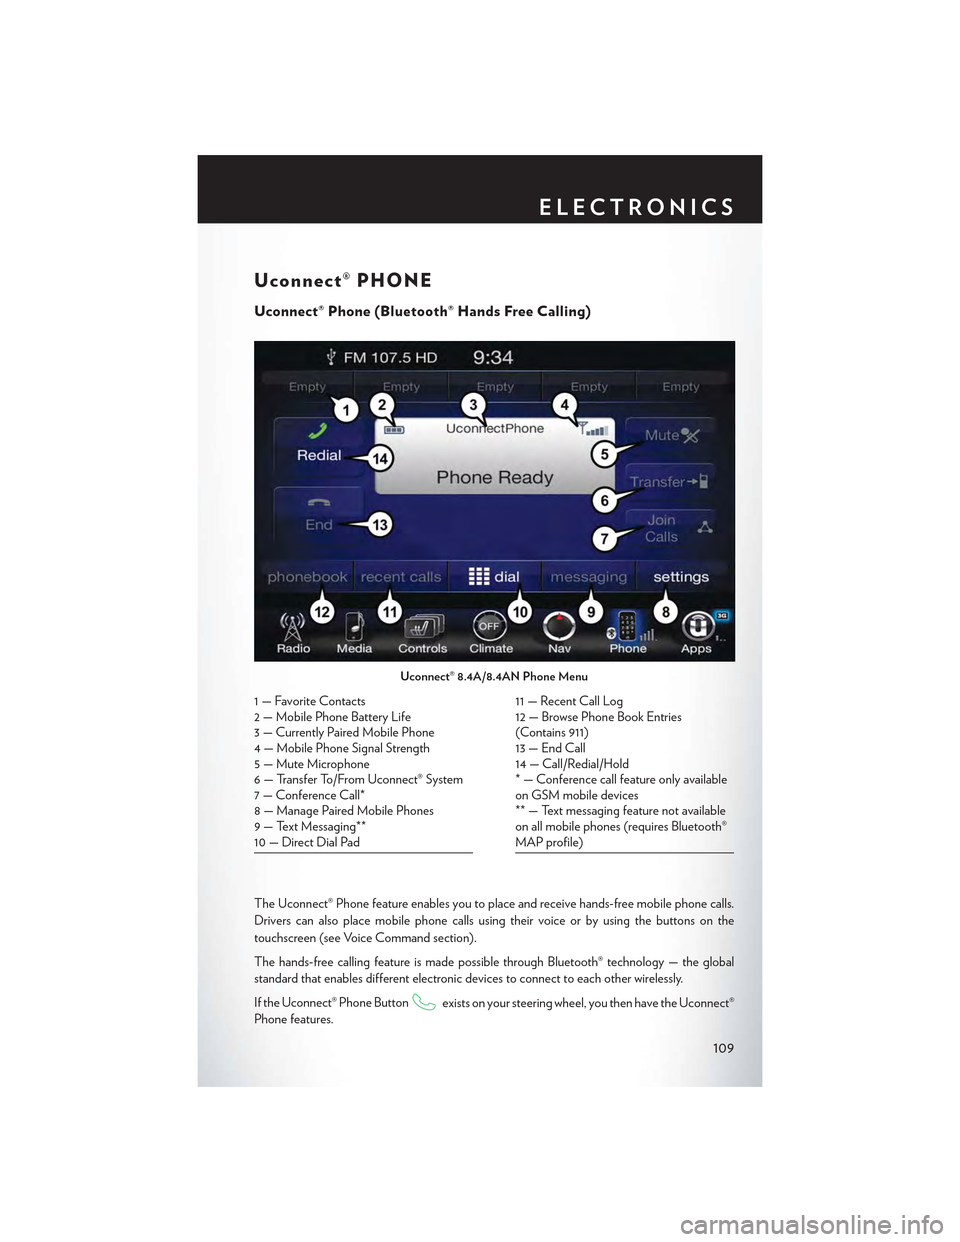
Uconnect® PHONE
Uconnect® Phone (Bluetooth® Hands Free Calling)
The Uconnect® Phone feature enables you to place and receive hands-free mobile phone calls.
Drivers can also place mobile phone calls using their voice or by using the buttons on the
touchscreen (see Voice Command section).
The hands-free calling feature is made possible through Bluetooth® technology — the global
standard that enables different electronic devices to connect to each other wirelessly.
If the Uconnect® Phone Buttonexists on your steering wheel, you then have the Uconnect®
Phone features.
Uconnect® 8.4A/8.4AN Phone Menu
1—FavoriteContacts2 — Mobile Phone Battery Life3—CurrentlyPairedMobilePhone4—MobilePhoneSignalStrength5—MuteMicrophone6—TransferTo/FromUconnect®System7 — Conference Call*8—ManagePairedMobilePhones9—TextMessaging**10 — Direct Dial Pad
11 — Recent Call Log12 — Browse Phone Book Entries(Contains 911)13 — End Call14 — Call/Redial/Hold* — Conference call feature only availableon GSM mobile devices** — Text messaging feature not availableon all mobile phones (requires Bluetooth®MAP profile)
ELECTRONICS
109
Page 115 of 180
Select The Android Mobile Phone's Priority Level
When the pairing process has successfully completed, the system will prompt you to choose
whether or not this is your favorite mobile phone. Selecting “Yes” will make this mobile phone the
highest priority. This mobile phone will take precedence over other paired mobile phones within
range and will connect to the Uconnect system automatically when entering the vehicle. Only
one mobile phone and/or one Bluetooth audio device can be connected to the Uconnect®
system at a time. If “No” is selected, simply select “Uconnect” from the mobile phone/audio
device Bluetooth screen, and the Uconnect system will reconnect to the Bluetooth device.
You are now ready to make hands-free calls. Press the Uconnect® “Phone” buttonon your
steering wheel to begin.
NOTE:
Refer to UconnectPhone.com website for additional information on mobile phone pairing and
for a list of compatible phones.
Common Phone Commands (Examples)
• “Call John Smith”
• “Call John Smith mobile”
• “Dial 1 248 555 1212”
• “Redial”
Mute (Or Unmute) Microphone During Call
•Duringacall,pressthe“Mute”buttononthePhonemainscreentomuteandunmutethecall.
Tr a n s f e r O n g o i n g C a l l B e t w e e n H a n d s e t A n d Ve h i c l e
• During an on-going call, press the “Transfer” button on the Phone main screen to transfer an
on-going call between handset and vehicle.
Phonebook
The Uconnect® system will automatically sync your phonebook from your paired phone, if this
feature is supported by your phone. Phonebook contacts are updated each time that the phone
is connected. If your phone book entries do not appear, check the settings on your phone. Some
phones require you to enable this feature manually.
•YourphonebookcanbebrowsedontheUconnect®systemtouchscreen,buteditingcanonly
be done on your phone. To browse, press the “Phone” button on the touchscreen, then the
“Phonebook” button on the touchscreen.
Favorite phonebook entries can be saved as Favorites for quicker access. Favorites are shown at
the top of the main phone screen.
ELECTRONICS
113
Page 116 of 180
Vo i c e C o m m a n d T i p s
•Speakingcompletenames(i.e;CallJohnDoevs.CallJohn)willresultingreatersystem
accuracy.
• You can “link” commands together for faster results. Say “Call John Doe, mobile,” for example.
•Ifyouarelisteningtoavailablevoicecommandoptions,youdonothavetolistentotheentire
list. When you hear the command that you need, push thebutton on the steering
wheel, wait for the beep and say your command.
Changing The Volume
• Start a dialogue by pushing the Phone button, then say a command for example -
"Help".
•UsetheradioVOLUME/MUTErotaryknobtoadjustthevolumetoacomfortablelevelwhile
the Uconnect® system is speaking. Please note the volume setting for Uconnect® is different
than the audio system.
NOTE:
To access help, push the Uconnect® Phone buttonon the steering wheel and say "help."
Press the display or press either the Phoneor VRbutton and say "cancel" to cancel
the help session.
Incoming Text Messages
After pairing your Uconnect® system with a Bluetooth® enabled mobile device with the Message
Access Profile (MAP), the Uconnect® system can announce a new incoming text message and
read it to you over the vehicle’s audio system.
NOTE:
Only incoming text messages received during the current ignition cycle can be viewed/read.
ELECTRONICS
114
Page 120 of 180
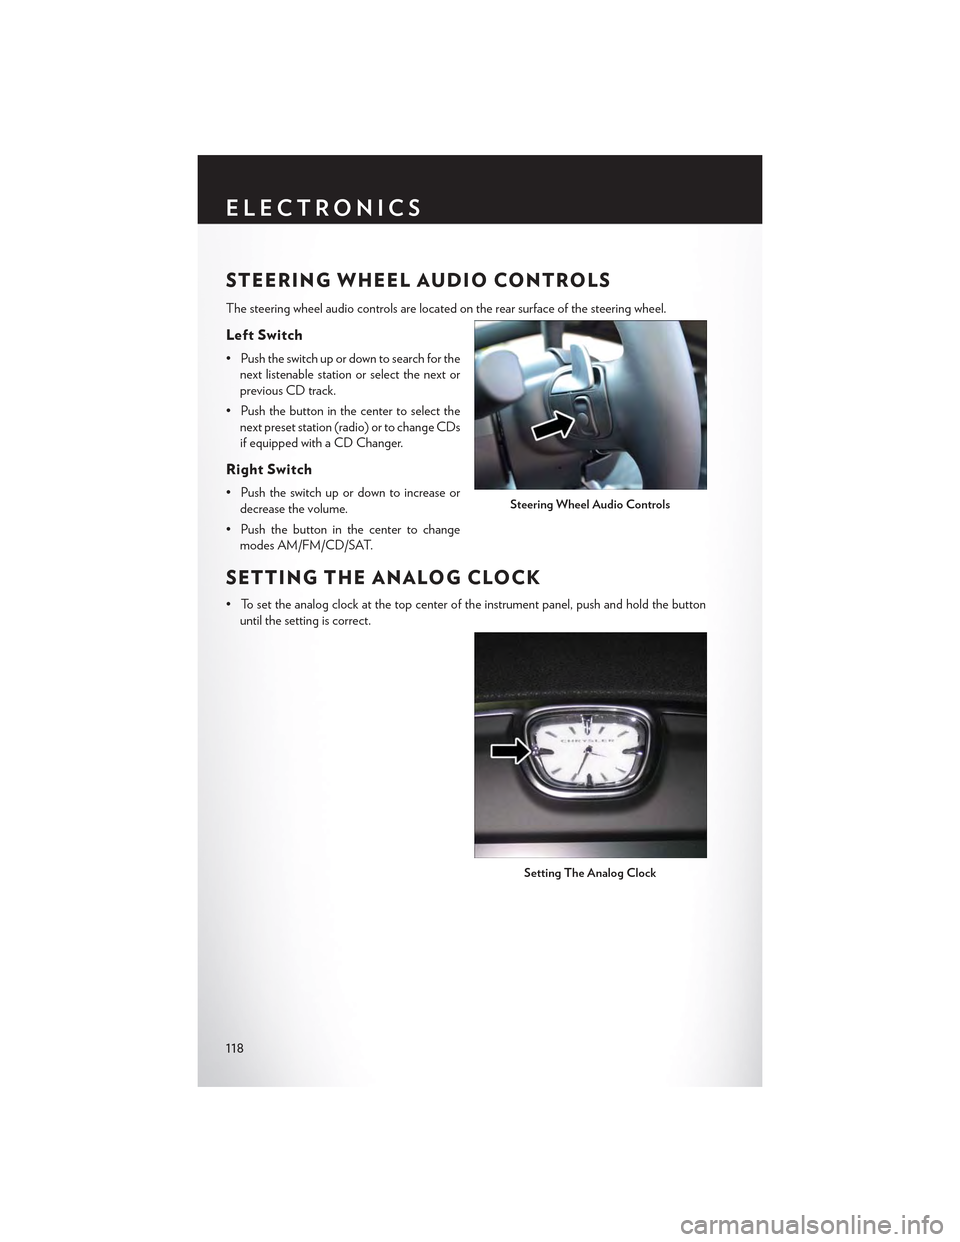
STEERING WHEEL AUDIO CONTROLS
The steering wheel audio controls are located on the rear surface of the steering wheel.
Left Switch
• Push the switch up or down to search for the
next listenable station or select the next or
previous CD track.
• Push the button in the center to select the
next preset station (radio) or to change CDs
if equipped with a CD Changer.
Right Switch
• Push the switch up or down to increase or
decrease the volume.
• Push the button in the center to change
modes AM/FM/CD/SAT.
SETTING THE ANALOG CLOCK
•Tosettheanalogclockatthetopcenteroftheinstrumentpanel,pushandholdthebutton
until the setting is correct.
Steering Wheel Audio Controls
Setting The Analog Clock
ELECTRONICS
118
Page 121 of 180
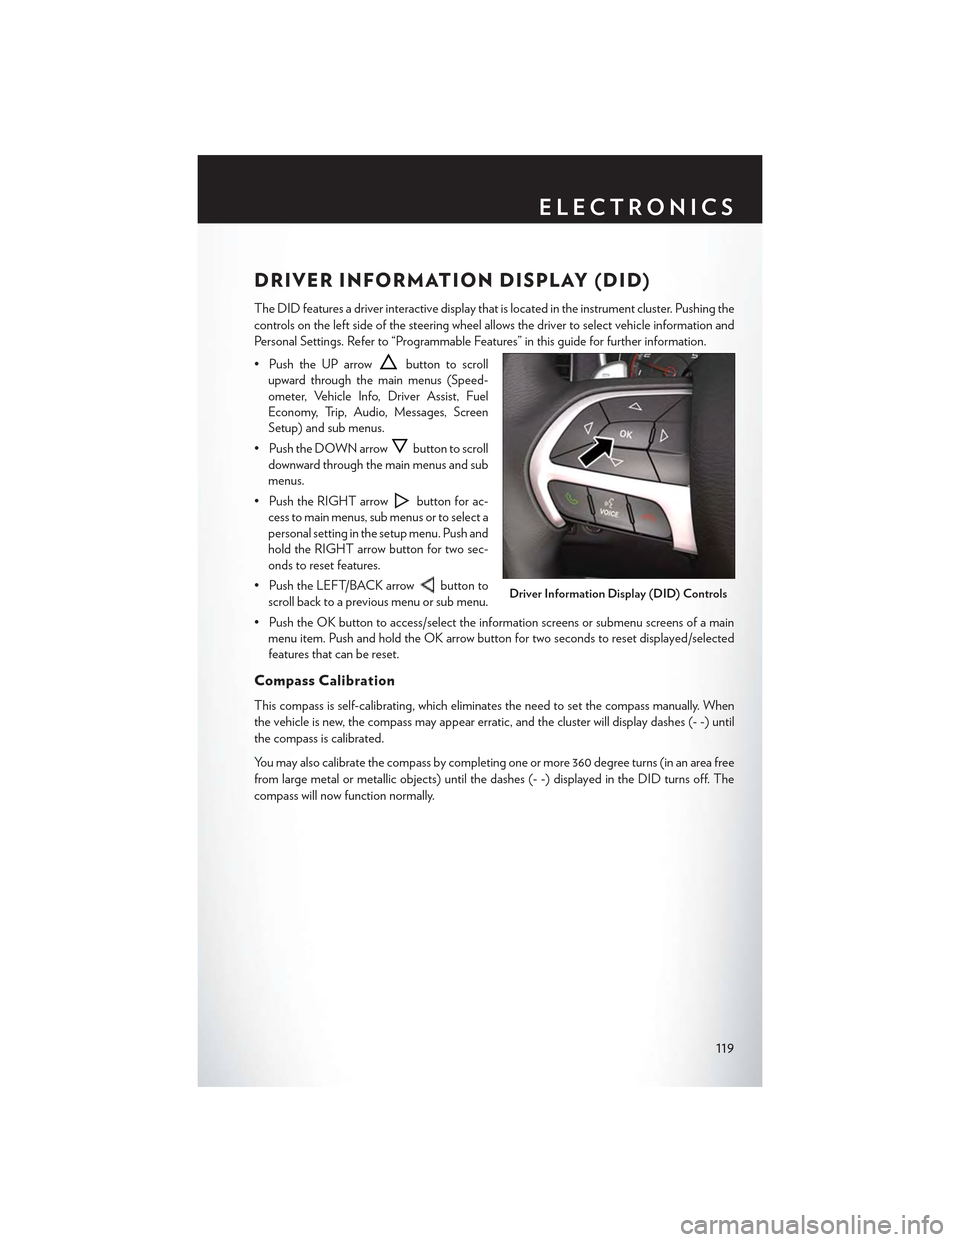
DRIVER INFORMATION DISPLAY (DID)
The DID features a driver interactive display that is located in the instrument cluster. Pushing the
controls on the left side of the steering wheel allows the driver to select vehicle information and
Personal Settings. Refer to “Programmable Features” in this guide for further information.
• Push the UP arrowbutton to scroll
upward through the main menus (Speed-
ometer, Vehicle Info, Driver Assist, Fuel
Economy, Trip, Audio, Messages, Screen
Setup) and sub menus.
• Push the DOWN arrowbutton to scroll
downward through the main menus and sub
menus.
• Push the RIGHT arrowbutton for ac-
cess to main menus, sub menus or to select a
personal setting in the setup menu. Push and
hold the RIGHT arrow button for two sec-
onds to reset features.
• Push the LEFT/BACK arrowbutton to
scroll back to a previous menu or sub menu.
• Push the OK button to access/select the information screens or submenu screens of a main
menu item. Push and hold the OK arrow button for two seconds to reset displayed/selected
features that can be reset.
Compass Calibration
This compass is self-calibrating, which eliminates the need to set the compass manually. When
the vehicle is new, the compass may appear erratic, and the cluster will display dashes (- -) until
the compass is calibrated.
Yo u m a y a l s o c a l i b r a t e t h e c o m p a s s b y c o m p l e t i n g o n e o r m o r e 3 6 0 d e g r e e t u r n s ( i n a n a r e a f r e e
from large metal or metallic objects) until the dashes (- -) displayed in the DID turns off. The
compass will now function normally.
Driver Information Display (DID) Controls
ELECTRONICS
119
Page 159 of 180

FUSES
Front Power Distribution Center (Fuses)
The Front Power Distribution Center is located in the engine compartment. This module
contains fuses and relays.
CAUTION!
•Wheninstallingthepowerdistributioncentercover,itisimportanttoensurethecoveris
properly positioned and fully latched. Failure to do so may allow water to get into the
power distribution center and possibly result in an electrical system failure.
• When replacing a blown fuse, it is important to use only a fuse having the correct
amperage rating. The use of a fuse with a rating other than indicated may result in a
dangerous electrical system overload. If a properly rated fuse continues to blow, it
indicates a problem in the circuit that must be corrected.
Cavity Cartridge Fuse Mini-FuseDescription
1––Fuse – Spare
2 40 Amp Green–Radiator Fan #1 – If Equipped
3 50 Amp Red–Power Steering #1 / Radiator Fan(6.2L Supercharged) – If Equipped
4 30 Amp Pink–Starter
5 40 Amp Green–Electronic Stability Control
6 30 Amp Pink–Electronic Stability Control
7––Fuse – Spare
8 20 Amp Blue–Police Ignition Run / ACC # 2
9–20 Amp Yellow All-Wheel Drive Module – If Equipped
10–10 Amp Red Security – If Equipped / Under hoodLamp – Police
11–20 Amp YellowHorns
12–10 Amp RedAir Conditioning Clutch
13––Fuse – Spare
14––Fuse – Spare
15–20 Amp YellowLeft HID – If Equipped
16–20 Amp Yellow Right HID – If Equipped
18 50 Amp Red–Radiator Fan #2 – If Equipped
19 50 Amp Red–Power Steering #2 / Radiator Fan(6.2L Supercharged)
20 30 Amp Pink–Wiper Motor
21 30 Amp Pink– Headlamp Washers – If Equipped / Po-lice Feed
MAINTAINING YOUR VEHICLE
157
Page 162 of 180
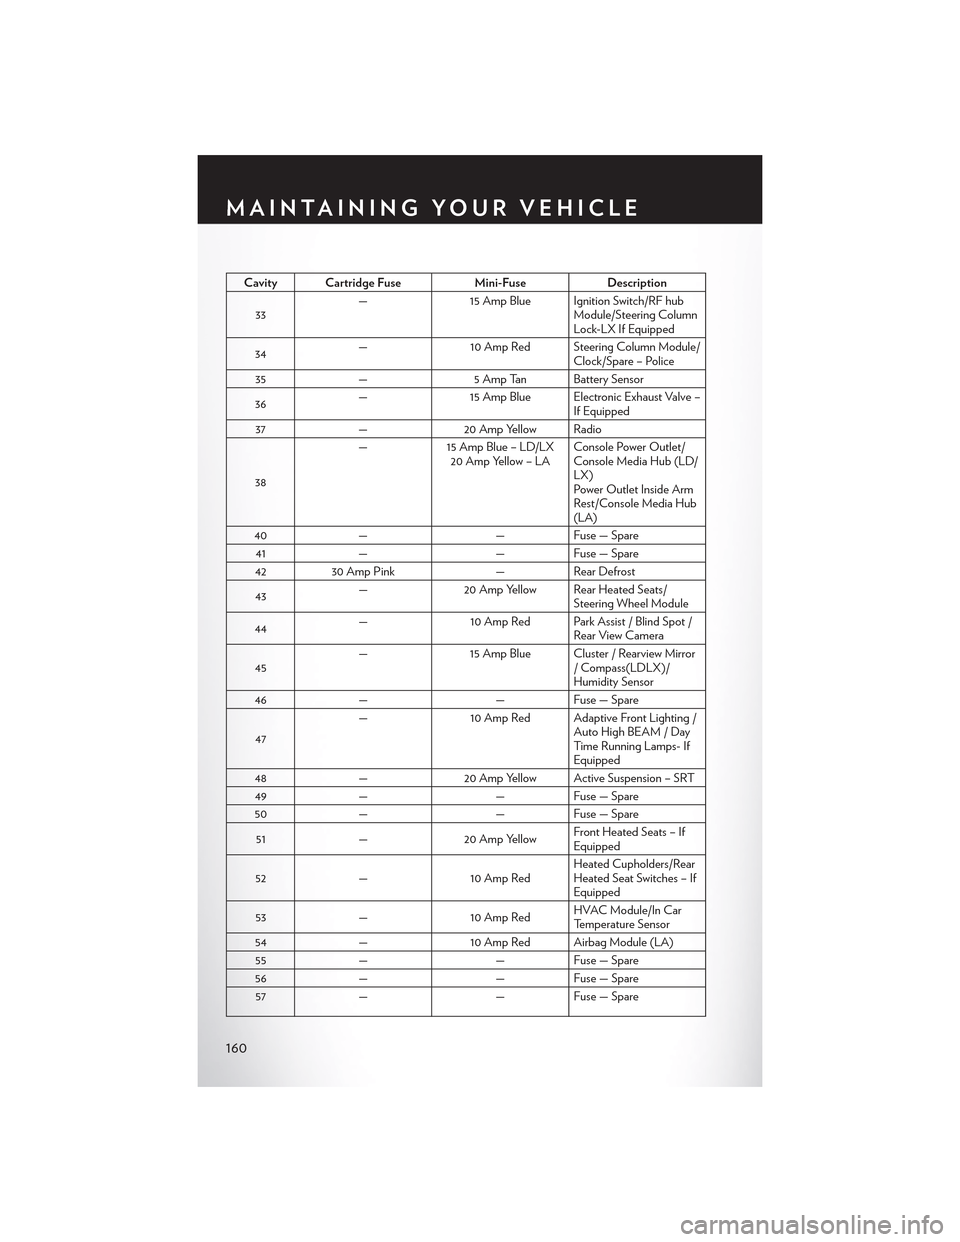
Cavity Cartridge FuseMini-FuseDescription
33—15 Amp Blue Ignition Switch/RF hubModule/Steering ColumnLock-LX If Equipped
34—10 Amp Red Steering Column Module/Clock/Spare – Police
35—5 Amp Tan Battery Sensor
36—15 Amp Blue Electronic Exhaust Valve –If Equipped
37—20 Amp Yellow Radio
38
—15 Amp Blue – LD/LX20 Amp Yellow – LAConsole Power Outlet/Console Media Hub (LD/LX)Power Outlet Inside ArmRest/Console Media Hub(LA)
40——Fuse — Spare
41——Fuse — Spare
4230 Amp Pink—Rear Defrost
43—20 Amp Yellow Rear Heated Seats/Steering Wheel Module
44—10 Amp Red Park Assist / Blind Spot /Rear View Camera
45—15 Amp Blue Cluster / Rearview Mirror/Compass(LDLX)/Humidity Sensor
46——Fuse — Spare
47
—10 Amp Red Adaptive Front Lighting /Auto High BEAM / DayTi m e R u n n i n g L a m p s- IfEquipped
48—20 Amp Yellow Active Suspension – SRT
49——Fuse — Spare
50——Fuse — Spare
51—20 Amp YellowFront Heated Seats – IfEquipped
52—10 Amp RedHeated Cupholders/RearHeated Seat Switches – IfEquipped
53—10 Amp RedHVAC Module/In CarTemperature Sensor
54—10 Amp Red Airbag Module (LA)
55——Fuse — Spare
56——Fuse — Spare
57——Fuse — Spare
MAINTAINING YOUR VEHICLE
160
Page 164 of 180

WARNING!
•Overloadingofyourtiresisdangerous.Overloadingcancausetirefailure,affectvehicle
handling, and increase your stopping distance. Use tires of the recommended load
capacity for your vehicle.Neveroverloadthem.
• Improperly inflated tires are dangerous and can cause collisions. Under-inflation increases
tire flexing and can result in over-heating and tire failure. Over-inflation reduces a tire’s
ability to cushion shock. Objects on the road and chuck holes can cause damage that
results in tire failure. Unequal tire pressures can cause steering problems. You could lose
control of your vehicle. Over-inflated or under-inflated tires can affect vehicle handling
and can fail suddenly, resulting in loss of vehicle control. Always drive with each tire inflated
to the recommended cold tire inflation pressure.
SPARE TIRES — IF EQUIPPED
NOTE:
For vehicles equipped with Tire Service Kit instead of a spare tire, please refer to “Tire Service Kit”
in “What To Do In Emergencies” on your DVD for further information.
CAUTION!
Because of the reduced ground clearance, do not take your vehicle through an automatic car
wash with a compact or limited-use temporary spare installed. Damage to the vehicle may
result.
Spare Tire Matching Original Equipped Tire And Wheel — If Equipped
Yo u r v e h i c l e m a y b e e q u i p p e d w i t h a s p a r e t i r e a n d w h e e l e q u i v a l e n t i n l o o k a n d f u n c t i o n t o t h e
original equipment tire and wheel found on the front or rear axle of your vehicle. This spare tire
may be used in the tire rotation for your vehicle. If your vehicle has this option, refer to an
authorized tire dealer for the recommended tire rotation pattern.
Compact Spare Tire — If Equipped
The compact spare is for temporary emergency use only. You can identify if your vehicle is
equipped with a compact spare by looking at the spare tire description on the Tire and Loading
Information Placard located on the driver’s side door opening or on the sidewall of the tire.
Compact spare tire descriptions begin with the letter “T” or “S” preceding the size designation.
Example: T145/80D18 103M.
T, S = Temporary Spare Tire
Since this tire has limited tread life, the original equipment tire should be repaired (or replaced)
and reinstalled on your vehicle at the first opportunity.
MAINTAINING YOUR VEHICLE
162
Page 176 of 180
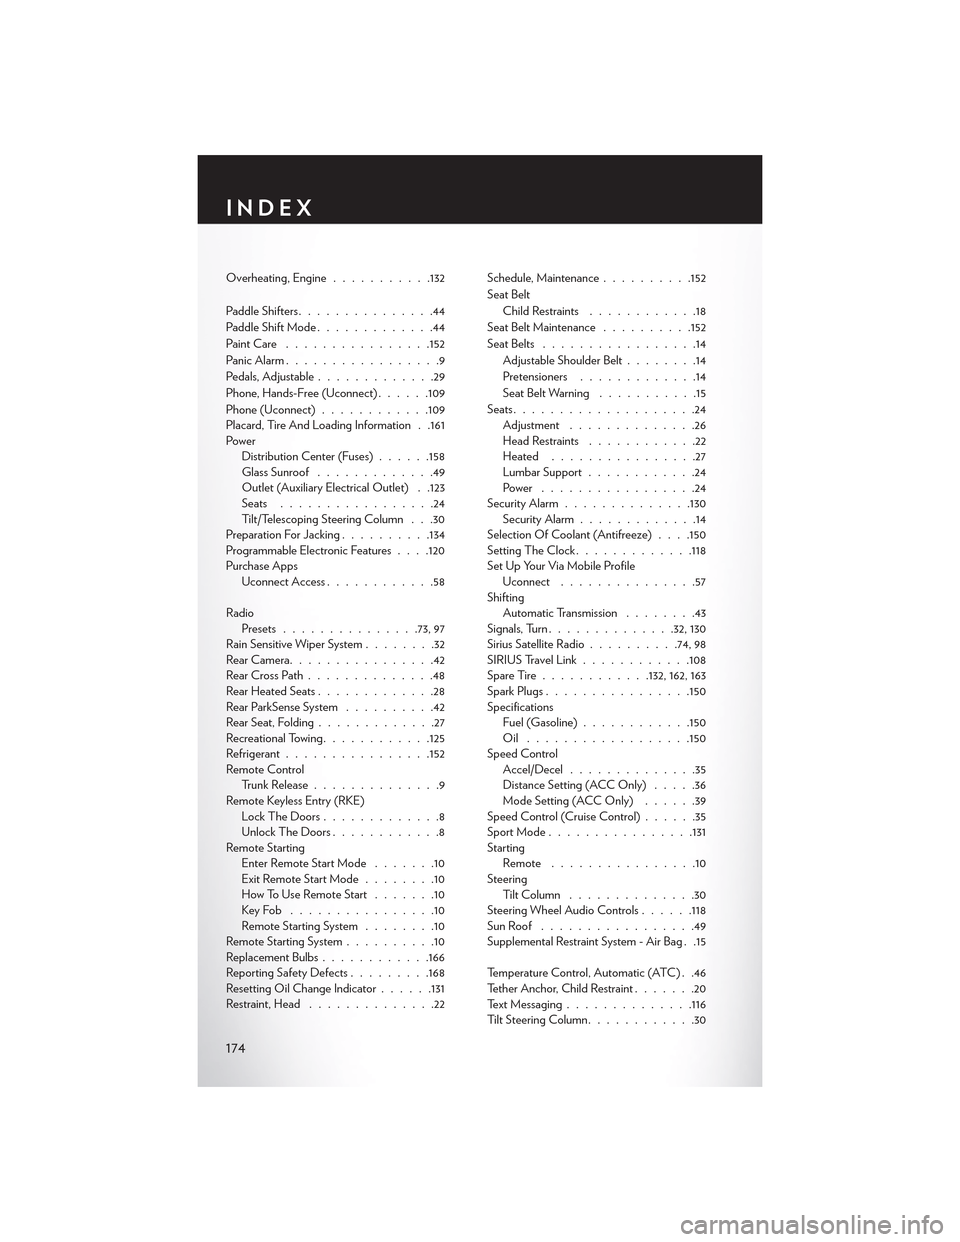
Overheating, Engine...........132
Paddle Shifters...............44
Paddle Shift Mode.............44
Paint Care................152
Panic Alarm.................9
Pedals, Adjustable.............29
Phone, Hands-Free (Uconnect)......109
Phone (Uconnect)............109Placard, Tire And Loading Information . .161PowerDistribution Center (Fuses)......158Glass Sunroof.............49Outlet (Auxiliary Electrical Outlet) . .123Seats.................24Tilt/Telescoping Steering Column . . .30Preparation For Jacking..........134Programmable Electronic Features . . . .120Purchase AppsUconnect Access............58
RadioPresets...............73, 97Rain Sensitive Wiper System........32Rear Camera. . . . . . . . . . . . . . . .42Rear Cross Path . . . . . . . . . . . . . .48Rear Heated Seats.............28Rear ParkSense System..........42Rear Seat, Folding.............27Recreational Towing............125Refrigerant................152Remote ControlTrunk Release..............9Remote Keyless Entry (RKE)Lock The Doors . . . . . . . . . . . . .8Unlock The Doors............8Remote StartingEnter Remote Start Mode.......10Exit Remote Start Mode........10How To Use Remote Start.......10Key Fob . . . . . . . . . . . . . . . .10Remote Starting System........10Remote Starting System..........10Replacement Bulbs............166Reporting Safety Defects.........168Resetting Oil Change Indicator......131Restraint, Head..............22
Schedule, Maintenance..........152
Seat Belt
Child Restraints............18
Seat Belt Maintenance..........152
Seat Belts.................14
Adjustable Shoulder Belt........14
Pretensioners.............14
Seat Belt Warning...........15
Seats....................24Adjustment..............26Head Restraints............22Heated................27Lumbar Support............24Power . . . . . . . . . . . . . . . . .24Security Alarm..............130Security Alarm.............14Selection Of Coolant (Antifreeze) . . . .150Setting The Clock.............118Set Up Your Via Mobile ProfileUconnect...............57ShiftingAutomatic Transmission........43Signals, Turn..............32, 130Sirius Satellite Radio..........74, 98SIRIUS Travel Link............108Spare Tire . . . . . . . . . . ..132, 162, 163Spark Plugs................150SpecificationsFuel (Gasoline)............150Oil . . . . . . . . . . . . . . . . ..150Speed ControlAccel/Decel..............35Distance Setting (ACC Only).....36Mode Setting (ACC Only)......39Speed Control (Cruise Control)......35Sport Mode . . . . . . . . . . . . . . ..131StartingRemote . . . . . . . . . . . . . . . .10SteeringTilt Column..............30Steering Wheel Audio Controls......118Sun Roof . . . . . . . . . . . . . . . . .49Supplemental Restraint System - Air Bag . .15
Temperature Control, Automatic (ATC) . .46Tether Anchor, Child Restraint.......20Text Messaging..............116Tilt Steering Column............30
INDEX
174