climate control CHRYSLER 300 2015 2.G User Guide
[x] Cancel search | Manufacturer: CHRYSLER, Model Year: 2015, Model line: 300, Model: CHRYSLER 300 2015 2.GPages: 180, PDF Size: 30.54 MB
Page 7 of 180
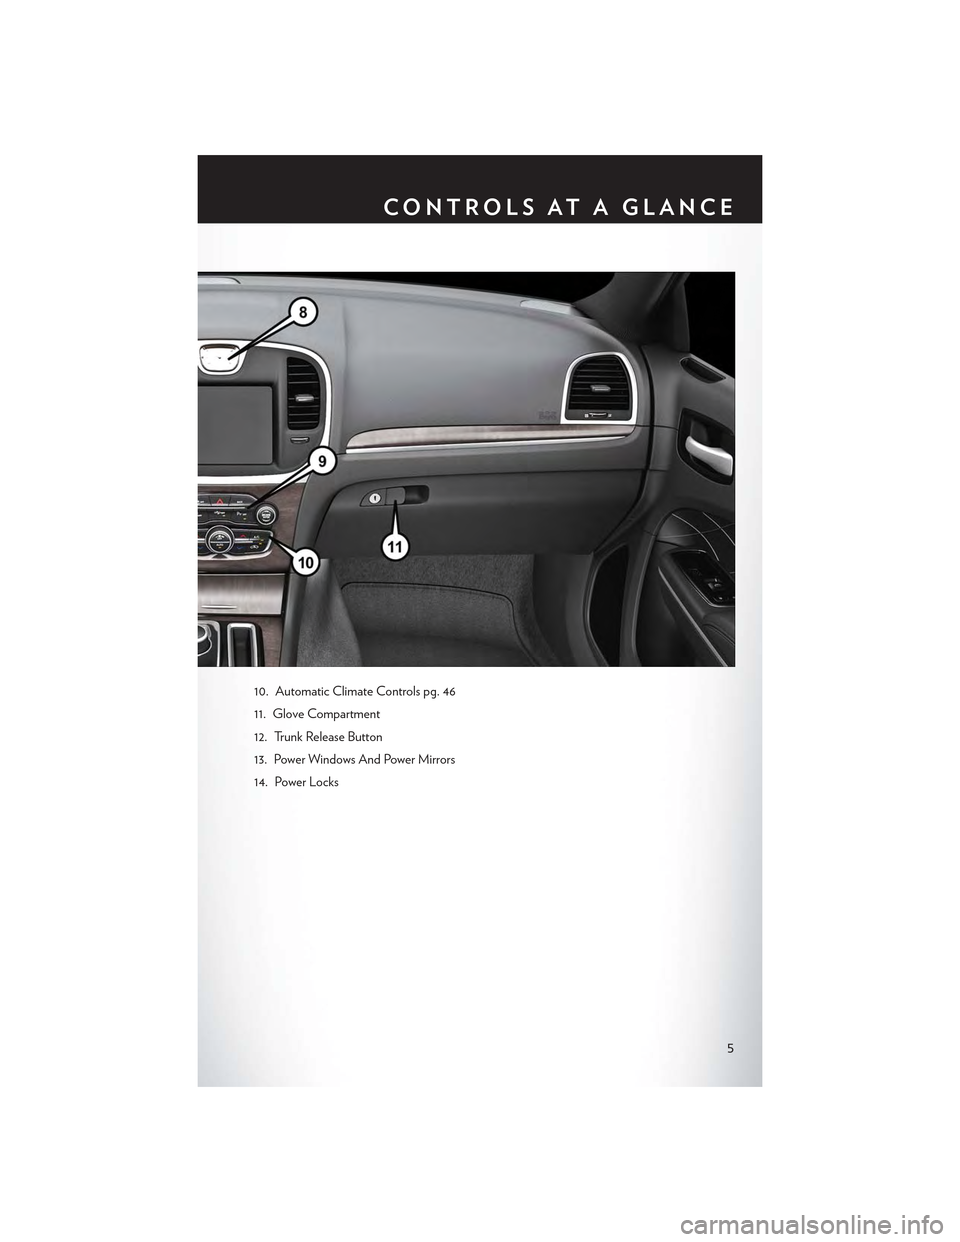
10. Automatic Climate Controls pg. 46
11. Glove Compartment
12. Trunk Release Button
13. Power Windows And Power Mirrors
14. Power Locks
CONTROLS AT A GLANCE
5
Page 29 of 180

REAR SEAT
Folding Rear Seatback
•Pullontheloops,locatedneartheoutertopoftheseatbacks,tofolddowneitherorboth
seatbacks. These loops can be tucked away when not in use.
•Whentheseatbackisraisedtotheupright
position, make sure it is latched by strongly
pulling on the top of the seatback above the
seat loop.
WARNING!
•Be certain that the seatback is securely locked into position. If the seatback is not securely locked
into position, the seat will not provide the proper stability for child seats and/or passengers. An
improperly latched seat could cause you and others to severely injured or killed.
•Thecargoareaintherearofthevehicle(withtherearseatbacksinthelocked-upor
folded-down position) should not be used as a play area by children when the vehicle is in
motion. They could be severely injured or killed in a collision. Children should be seated
and using the proper restraint system.
HEATED SEATS
Front Heated Seats
The front heated seats control buttons are located within the climate or controls screen of the
touchscreen.
• Press the heated seat buttononce to turn the HI setting On.
• Press the heated seat buttona second time to turn the LO setting On.
• Press the heated seat buttona third time to turn the heating elements Off.
If the HI-level setting is selected, the system will automatically switch to LO-level after approximately
60 minutes. The LO-level setting will turn Off automatically after approximately 45 minutes.
NOTE:
On models that are equipped with remote start, this feature can be programmed to come on
during a remote start through the Uconnect® system. Refer to “Uconnect® Settings” in “Under-
standing Your Instrument Panel” in the Owner's Manual on the DVD.
Rear Seat Loop
GETTING STARTED
27
Page 48 of 180

AUTOMATIC TEMPERATURE CONTROLS (ATC )
Uconnect® 8.4 Automatic Climate Controls
1 — MAX A/C Button2 — A/C Button3 — Air Recirculation Button4 — AUTO Button5 — FRONT Defroster Button6 — REAR Defroster Button7 — Passenger Temperature Up8 — Passenger Temperature Down
9 — SYNC Button10 — Blower Speed Up11 — Mode Control Buttons12 — Blower Speed Down13 — OFF Button14 — Driver Temperature Down15 — Driver Temperature Up
OPERATING YOUR VEHICLE
46
Page 49 of 180
Automatic Operation
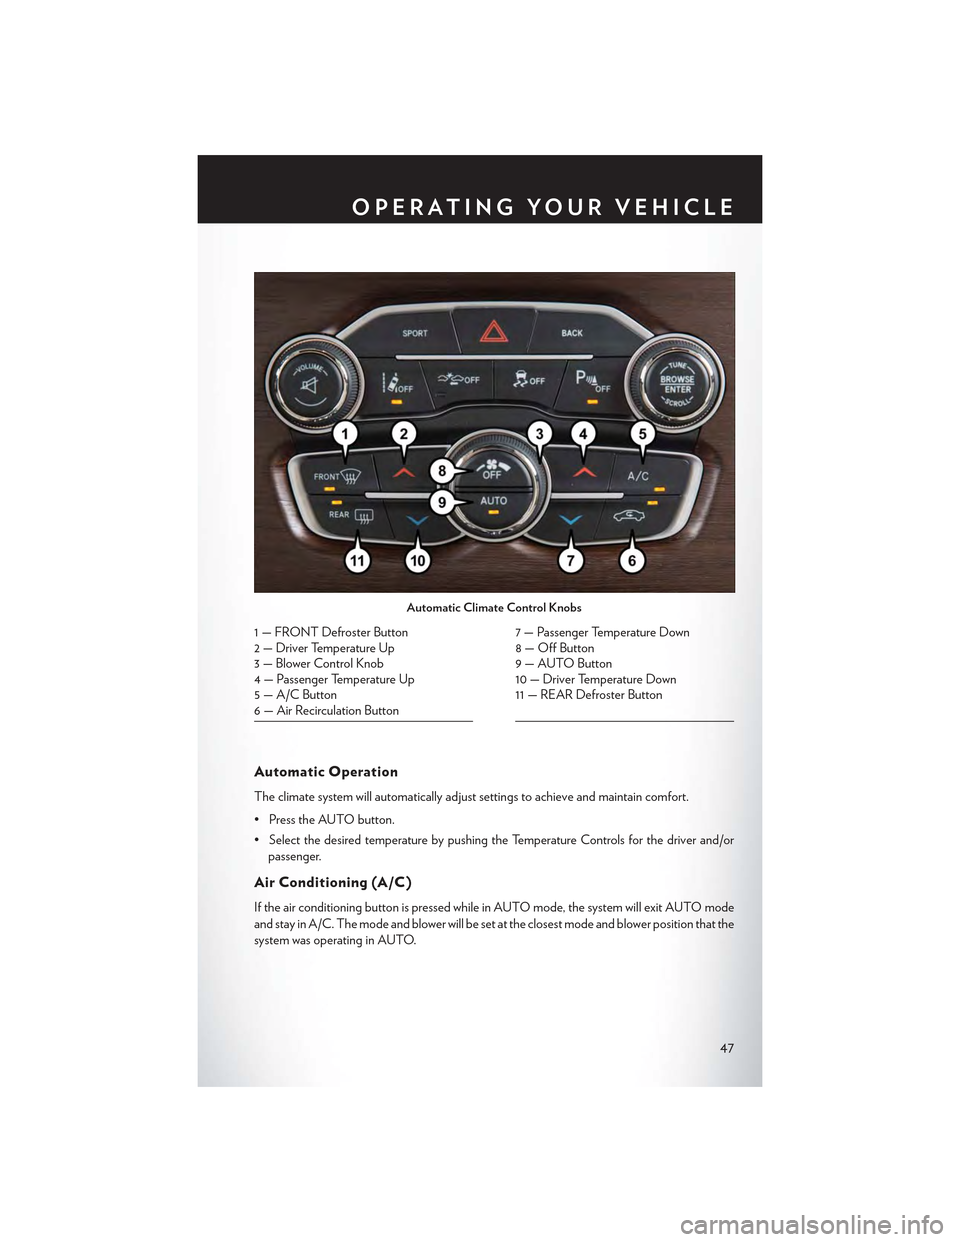
The climate system will automatically adjust settings to achieve and maintain comfort.
• Press the AUTO button.
•SelectthedesiredtemperaturebypushingtheTemperatureControlsforthedriverand/or
passenger.
Air Conditioning (A/C)
If the air conditioning button is pressed while in AUTO mode, the system will exit AUTO mode
and stay in A/C. The mode and blower will be set at the closest mode and blower position that the
system was operating in AUTO.
Automatic Climate Control Knobs
1 — FRONT Defroster Button2—DriverTemperatureUp3 — Blower Control Knob4 — Passenger Temperature Up5 — A/C Button6 — Air Recirculation Button
7 — Passenger Temperature Down8 — Off Button9 — AUTO Button10 — Driver Temperature Down11 — REAR Defroster Button
OPERATING YOUR VEHICLE
47
Page 73 of 180
Uconnect® 8.4A
Uconnect® 8.4A — If Equipped
At A Glance
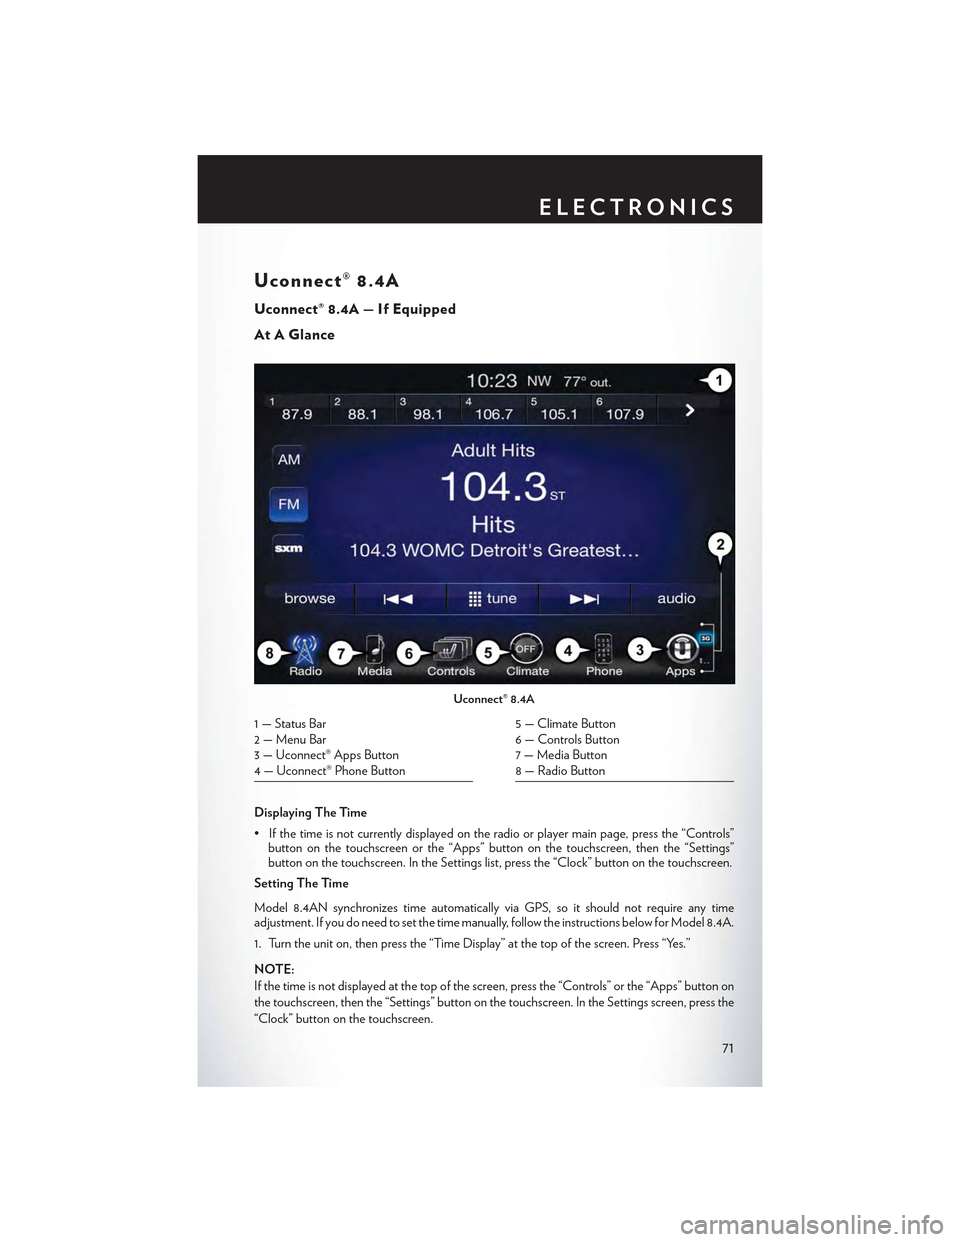
Displaying The Time
•Ifthetimeisnotcurrentlydisplayedontheradioorplayermainpage,pressthe“Controls”button on the touchscreen or the “Apps” button on the touchscreen, then the “Settings”button on the touchscreen. In the Settings list, press the “Clock” button on the touchscreen.
Setting The Time
Model 8.4AN synchronizes time automatically via GPS, so it should not require any timeadjustment. If you do need to set the time manually, follow the instructions below for Model 8.4A.
1. Turn the unit on, then press the “Time Display” at the top of the screen. Press “Yes.”
NOTE:
If the time is not displayed at the top of the screen, press the “Controls” or the “Apps” button on
the touchscreen, then the “Settings” button on the touchscreen. In the Settings screen, press the
“Clock” button on the touchscreen.
Uconnect® 8.4A
1 — Status Bar2 — Menu Bar3 — Uconnect® Apps Button4 — Uconnect® Phone Button
5 — Climate Button6 — Controls Button7 — Media Button8 — Radio Button
ELECTRONICS
71
Page 85 of 180
Get Started
1. Visit UconnectPhone.com for mobile device and feature compatibility and to find phone
pairing instructions.
2. Reduce background noise. Wind and passenger conversations are examples of noise that may
impact recognition.
3. Speak clearly at a normal pace and volume while facing straight ahead. The microphone is
positioned on the rearview mirror and aimed at the driver.
4. Each time you give a Voice Command, you must first push either the VR or Phone button,
wait untilafterthe beep, then say your Voice Command.
5. You can interrupt the help message or system prompts by pushing the VR or Phone button
and saying a Voice Command from current category.
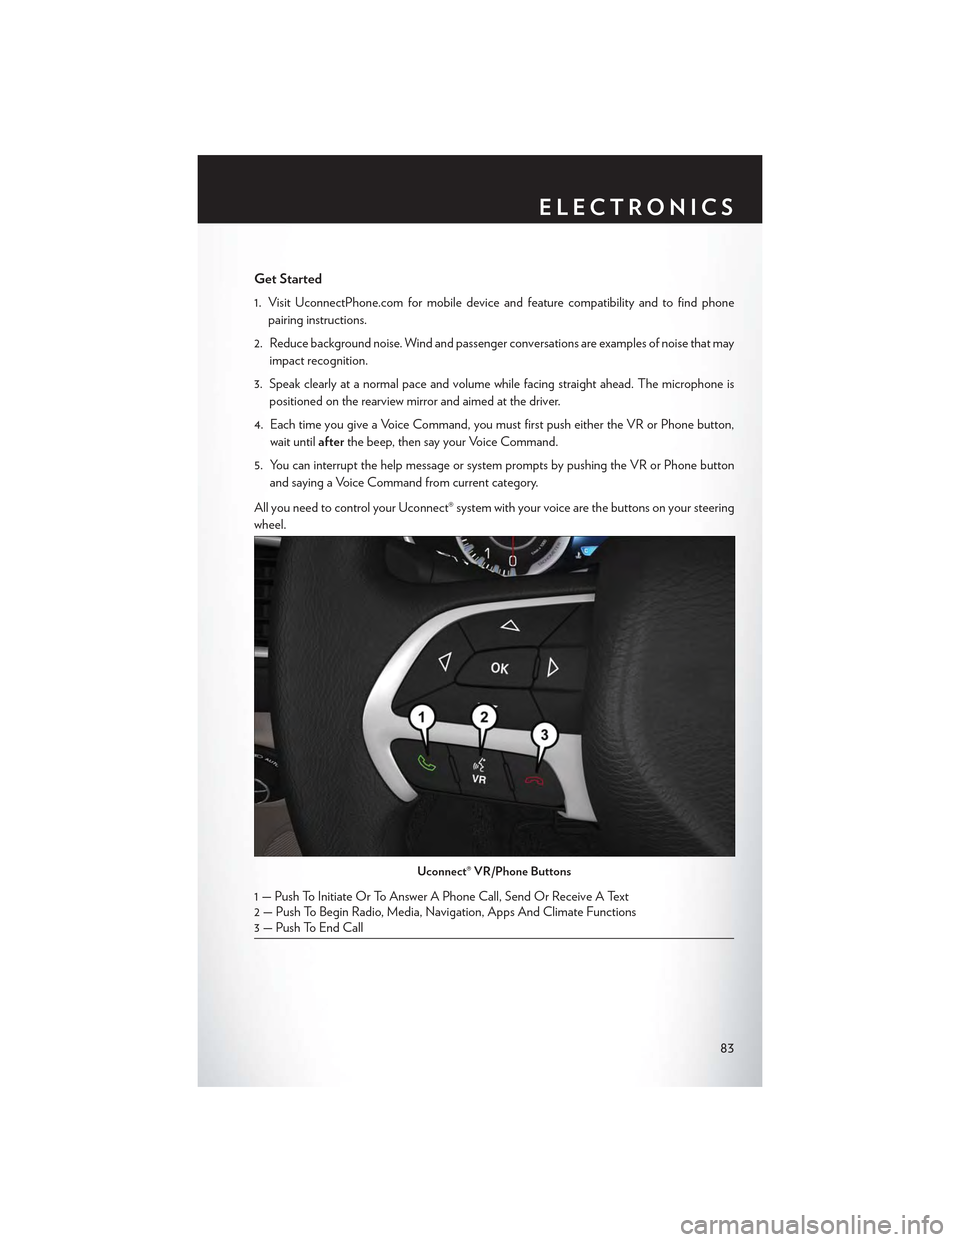
All you need to control your Uconnect® system with your voice are the buttons on your steering
wheel.
Uconnect® VR/Phone Buttons
1—PushToInitiateOrToAnswerAPhoneCall,SendOrReceiveAText2—PushToBeginRadio,Media,Navigation,AppsAndClimateFunctions3 — Push To End Call
ELECTRONICS
83
Page 90 of 180
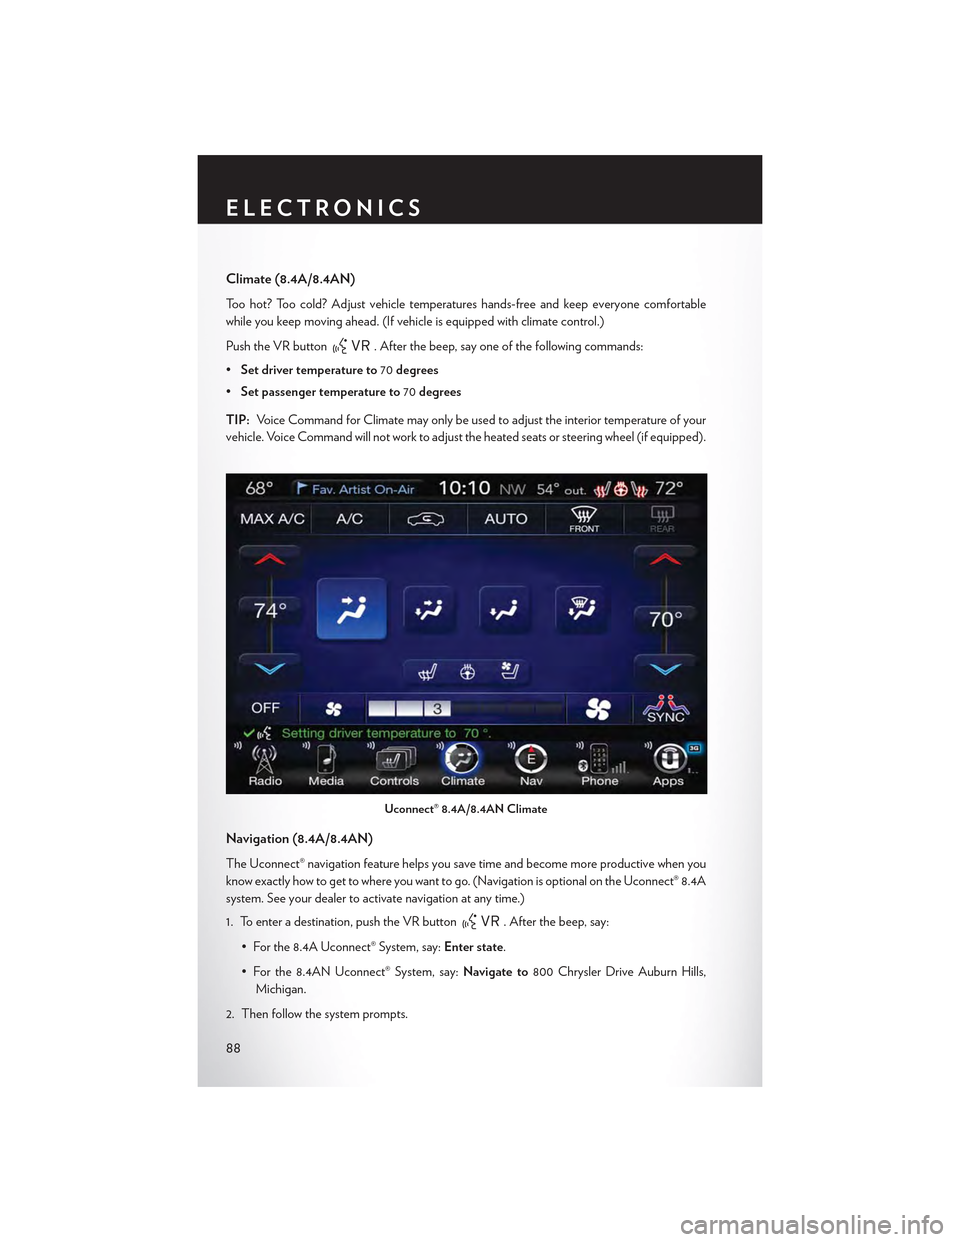
Climate (8.4A/8.4AN)
To o h o t ? To o c o l d ? A d j u s t v e h i c l e t e m p e r a t u r e s h a n d s - f r e e a n d k e e p e v e r y o n e c o m f o r t a b l e
while you keep moving ahead. (If vehicle is equipped with climate control.)
Push the VR button. After the beep, say one of the following commands:
•Set driver temperature to70degrees
•Set passenger temperature to70degrees
TIP:Voice Command for Climate may only be used to adjust the interior temperature of your
vehicle. Voice Command will not work to adjust the heated seats or steering wheel (if equipped).
Navigation (8.4A/8.4AN)
The Uconnect® navigation feature helps you save time and become more productive when you
know exactly how to get to where you want to go. (Navigation is optional on the Uconnect® 8.4A
system. See your dealer to activate navigation at any time.)
1. To enter a destination, push the VR button. After the beep, say:
•Forthe8.4AUconnect®System,say:Enter state.
•Forthe8.4ANUconnect®System,say:Navigate to800 Chrysler Drive Auburn Hills,
Michigan.
2. Then follow the system prompts.
Uconnect® 8.4A/8.4AN Climate
ELECTRONICS
88
Page 96 of 180
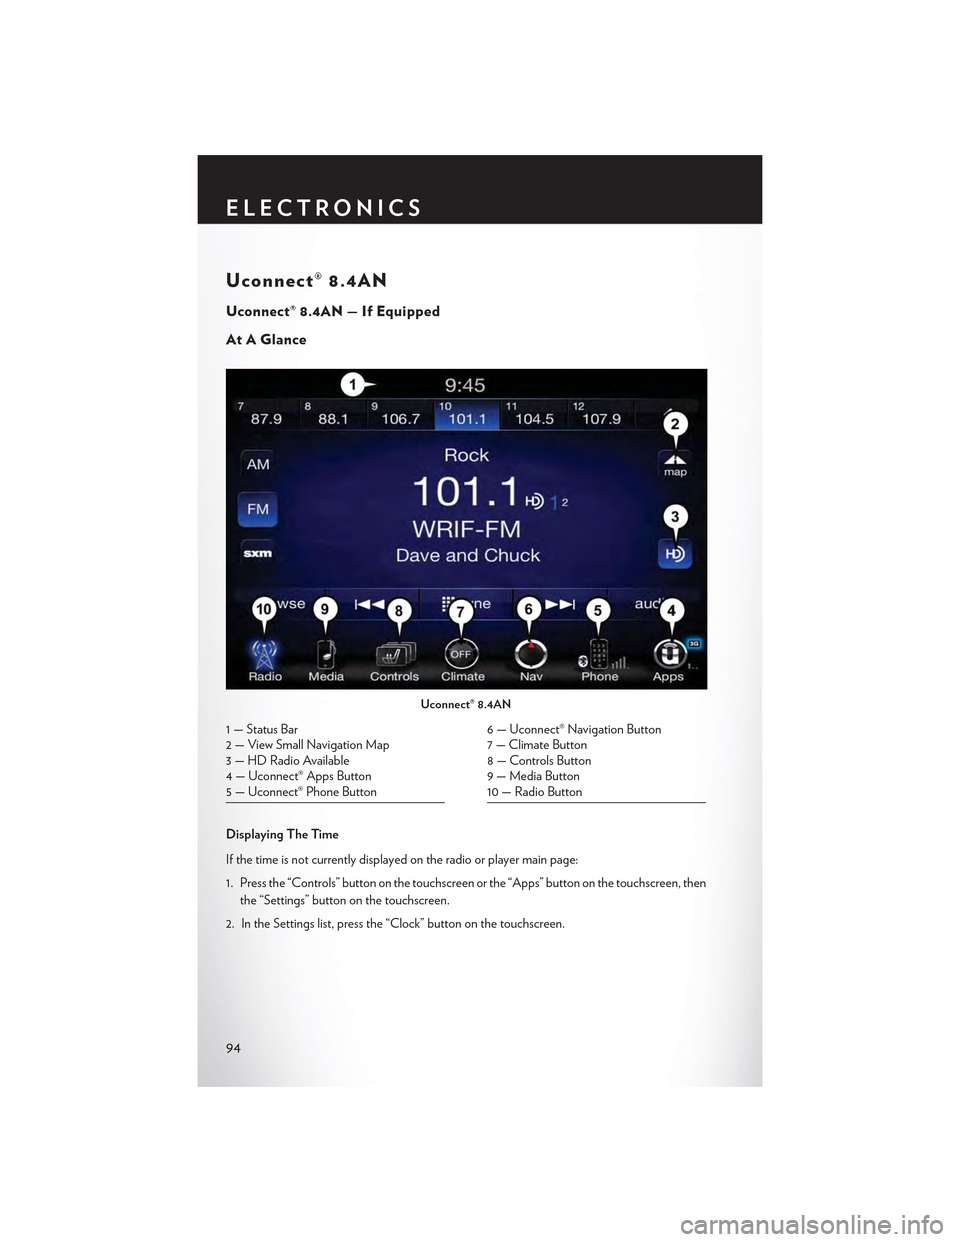
Uconnect® 8.4AN
Uconnect® 8.4AN — If Equipped
At A Glance
Displaying The Time
If the time is not currently displayed on the radio or player main page:
1. Press the “Controls” button on the touchscreen or the “Apps” button on the touchscreen, then
the “Settings” button on the touchscreen.
2. In the Settings list, press the “Clock” button on the touchscreen.
Uconnect® 8.4AN
1 — Status Bar2—ViewSmallNavigationMap3 — HD Radio Available4 — Uconnect® Apps Button5 — Uconnect® Phone Button
6 — Uconnect® Navigation Button7 — Climate Button8 — Controls Button9 — Media Button10 — Radio Button
ELECTRONICS
94
Page 173 of 180
Access
Uconnect...............55
Access, Uconnect.............55
Adaptive Cruise Control (ACC) (Cruise
Control)................37
Adding Engine Coolant (Antifreeze) . . .152
Adding Washer Fluid...........152
Adjustable Pedals.............29Air BagAdvanced Front Air Bag........15Advance Front Air Bag.........15Air Bags . . . . . . . . . . . . . . . .15Air Bag Warning Light.........15Driver Knee Air Bag . . . . . . . . . .17Front Air Bag . . . . . . . . . . . . .15Passenger Knee Air Bag........17Rollover . . . . . . . . . . . . . . . .15Side Impacts..............15Air Bag Light . . . . . . . . . . . . . ..129Air Bag, Side . . . . . . . . . . . . . . . .15Air Cleaner, Engine (Engine Air CleanerFilter).................152Air Conditioner Maintenance.......152Air Conditioning............46, 47Air Conditioning Refrigerant.......152Air Conditioning System.........152AlarmVehicle Security Alarm.........14Alarm (Security Alarm)........14, 130Antifreeze (Engine Coolant).....150, 152Disposal................152Anti-Lock Warning Light.........129APPUconnect Access............57Appearance Care.............152Arming System (Security Alarm)......14Assistance Towing.............126Automatic Headlights...........33Automatic High Beams..........34Automatic Oil Change Indicator.....131Automatic Temperature Control (ATC) . .46Automatic Transmission..........43Adding Fluid.............151Fluid Type..............151Axle Fluid.................151Axle Lubrication..............151
Back-Up Camera . . . . . . . . . . . . .42
Battery..................152
Blind Spot Monitoring...........48
Body Mechanism Lubrication.......152
Brake Fluid................151
Brakes. . . . . . . . . . . . . . . . . ..152
BrakeSystem...............152
Fluid Check..............151
Master Cylinder...........152Warning Light............128Break-In Recommendations, New Vehicle. .31Bulb Replacement............166Bulbs, Light................166
Calibration, Compass...........119Capacities, Fluid.............150Caps, FillerOil (Engine).............152Car Washes................152Changing A Flat Tire...........132Charging System Light..........129Child Restraint...............18Child RestraintsCar Seat................18Child Restraints............18Child Tether Anchorage Locations . . .21Lower Anchors And Tethers ForChildren................18CleaningWheels................152Windshield Wiper Blades.......152Climate Control..............46Clock . . . . . . . . . . . . . . . . . ..118Cluster Warning/Indicator LightsAnti-Lock Brake (ABS) Light.....129Brake Warning Light..........128Charging System Light........129Electronic Throttle Control (ETC) Indica-tor Light...............129Engine Temperature Warning Light . .127Front Fog Light Indicator.......130High Beam Indicator.........130Oil Pressure Warning Light......129Ti re Pre s s u re M o n i t o r i n g S y s t e m ( T P M S )Light.................126Turn Signal Indicator.........130Vehicle Security Light.........130Clutch . . . . . . . . . . . . . . . . ..152Clutch Fluid................152
INDEX
171