washer fluid CHRYSLER 300 2020 Owners Manual
[x] Cancel search | Manufacturer: CHRYSLER, Model Year: 2020, Model line: 300, Model: CHRYSLER 300 2020Pages: 328, PDF Size: 14.28 MB
Page 7 of 328
5
Service The ParkSense Park Assist
System ........................................................ 182 Cleaning The ParkSense System ..............182
ParkSense System Usage Precautions ....182
LANESENSE — IF EQUIPPED ........................... 183
LaneSense Operation ................................183Turning LaneSense On Or Off ...................184LaneSense Warning Message ..................184
Changing LaneSense Status .....................186
PARKVIEW REAR BACK UP CAMERA ............. 186
REFUELING THE VEHICLE ................................. 188
Emergency Fuel Filler Door Release.........189
VEHICLE LOADING ............................................ 190
Vehicle Certification Label ........................ 190Gross Vehicle Weight Rating (GVWR) .......190
Gross Axle Weight Rating (GAWR) ........... 190Overloading ................................................190
Loading ......................................................190
TRAILER TOWING .............................................. 191
Common Towing Definitions .....................191Trailer Hitch Classification ........................ 193Trailer Towing Weights (Maximum Trailer
Weight Ratings) .........................................194 Trailer And Tongue Weight .......................194
Towing Requirements ................................195Towing Tips ................................................197 RECREATIONAL TOWING
(BEHIND MOTORHOME, ETC.) .......................... 198
DRIVING TIPS ...................................................... 198
Driving On Slippery Surfaces .................... 198
Driving Through Water .............................. 199
IN CASE OF EMERGENCY
HAZARD WARNING FLASHERS .......................201
ASSIST AND SOS MIRROR —
IF EQUIPPED ....................................................... 201General Information .................................. 205
BULB REPLACEMENT ........................................ 206
Replacement Bulbs ................................... 206
Replacing Exterior Bulbs ........................... 207
FUSES ..................................................................209
General Information .................................. 210Underhood Fuses ...................................... 210
Rear Interior Fuses .................................... 213
JACKING AND TIRE CHANGING ........................217
Jack Location/Spare Tire Stowage ........... 218
Preparations For Jacking .......................... 218Jacking And Changing A Tire .................... 219
Road Tire Installation ................................ 222
JUMP STARTING ................................................ 222
Preparations For Jump Start ..................... 222Jump Starting Procedure .......................... 223 REFUELING IN EMERGENCY –
IF EQUIPPED ...................................................... 224
IF YOUR ENGINE OVERHEATS ......................... 225
MANUAL PARK RELEASE ................................ 225
FREEING A STUCK VEHICLE ............................. 227
TOWING A DISABLED VEHICLE ........................ 228 All Wheel Drive (AWD) Models .................. 229Rear-Wheel Drive (RWD) Models ............. 229
ENHANCED ACCIDENT RESPONSE
SYSTEM (EARS) ................................................. 230
EVENT DATA RECORDER (EDR) ....................... 230
SERVICING AND MAINTENANCE
SCHEDULED SERVICING .................................. 231
Maintenance Plan ..................................... 232
ENGINE COMPARTMENT .................................. 236
3.6L Engine ............................................... 236
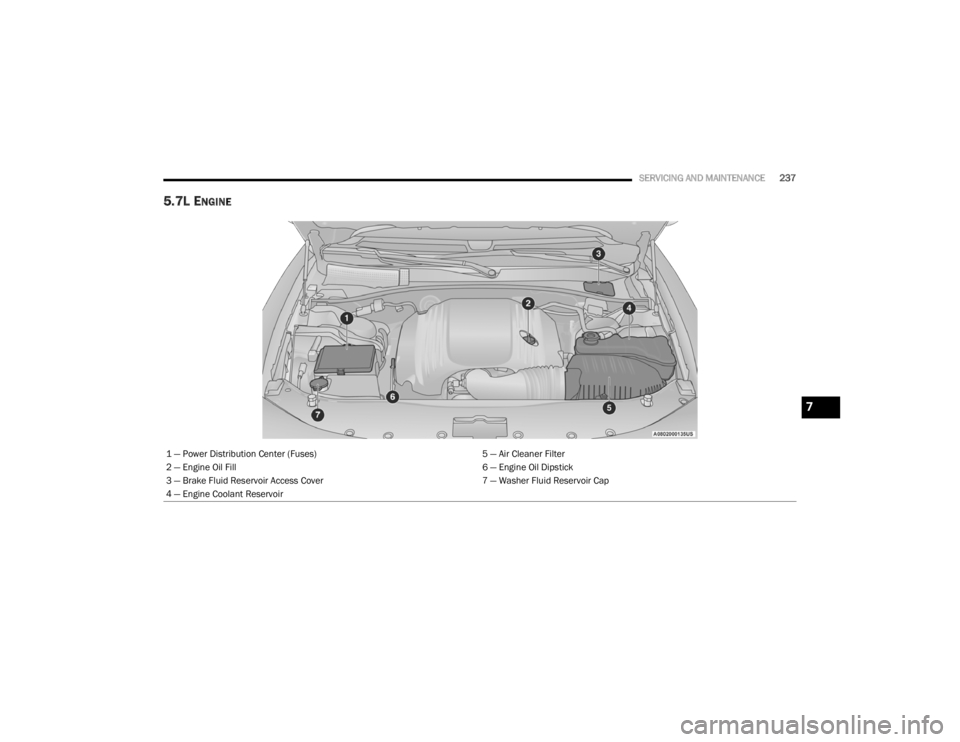
5.7L Engine ............................................... 237
Checking Oil Level .................................... 238Adding Washer Fluid ................................. 238Maintenance-Free Battery ....................... 238Pressure Washing...................................... 239
20_LX_OM_EN_USC_t.book Page 5
Page 51 of 328

GETTING TO KNOW YOUR VEHICLE49
Intermittent Wiper System
Use the intermittent wiper when weather
conditions make a single wiping cycle with a
variable pause between cycles desirable.
Rotate the end of the multifunction lever to the
first detent position, and then turn the end of
the lever to select the desired delay interval.
There are four delay settings, which allow you to
regulate the wipe interval from a minimum of
one cycle every second to a maximum of
approximately 18 seconds between cycles when the vehicle speed is over 10 mph
(16 km/h). The delay intervals will double in
duration when the vehicle speed is 10 mph
(16 km/h) or less.
Windshield Washers
To use the washer, push the multifunction lever
inward (toward the steering column) and hold it
for as long as washer spray is desired.
If you activate the washer while the windshield
wiper control is in the delay range, the wipers
will operate for two wipe cycles after releasing
the lever and then resume the intermittent
interval previously selected.
If you activate the washer while the windshield
wiper is turned off, the wipers will operate for
three wipe cycles and then turn off.
Mist Feature
Rotate the end of the lever downward to the
MIST position to activate a single wipe cycle to
clear off road mist or spray from a passing
vehicle. The wipers will continue to operate until
you release the multifunction lever.
NOTE:
The mist feature does not activate the washer
pump; therefore, no washer fluid will be sprayed
on the windshield. The wash function must be
used in order to spray the windshield with
washer fluid.
RAIN SENSING WIPERS — IF EQUIPPED
This feature senses rain or snowfall on the
windshield and automatically activates the
wipers for the driver. The feature is especially
useful for road splash or over spray from the
windshield washers of the vehicle ahead.
Rotate the end of the multifunction lever to one
of four settings to activate this feature.
The sensitivity of the system can be adjusted
with the multifunction lever. Wiper delay
position 1 is the least sensitive, and wiper delay
position 4 is the most sensitive. Setting 3
should be used for normal rain conditions.
Settings 1 and 2 can be used if the driver
In cold weather, always turn off the wiper
switch and allow the wipers to return to the
park position before turning off the engine.
If the wiper switch is left on and the wipers
freeze to the windshield, damage to the
wiper motor may occur when the vehicle is
restarted.
Always remove any buildup of snow that
prevents the windshield wiper blades from
returning to the off position. If the wind
-
shield wiper control is turned off and the
blades cannot return to the off position,
damage to the wiper motor may occur.
CAUTION! (Continued)
WARNING!
Sudden loss of visibility through the
windshield could lead to a collision. You might
not see other vehicles or other obstacles. To
avoid sudden icing of the windshield during
freezing weather, warm the windshield with
the defroster before and during windshield
washer use.
2
20_LX_OM_EN_USC_t.book Page 49
Page 91 of 328
GETTING TO KNOW YOUR INSTRUMENT PANEL89
Electronic Stability Control (ESC) OFF
Warning Light — If Equipped
This warning light indicates the
Electronic Stability Control (ESC) is
off.
Each time the ignition is turned to ON/RUN or
ACC/ON/RUN, the ESC system will be on, even
if it was turned off previously.
Low Washer Fluid Warning Light — If
Equipped
This warning light will illuminate when
the windshield washer fluid is low.
Refer to “Engine Compartment” in “Servicing
And Maintenance” for further information.
Tire Pressure Monitoring System (TPMS)
Warning Light
The warning light switches on and a
message is displayed to indicate that
the tire pressure is lower than the
recommended value and/or that slow
pressure loss is occurring. In these cases,
optimal tire duration and fuel consumption may
not be guaranteed. Should one or more tires be in the condition
mentioned above, the display will show the
indications corresponding to each tire.
Each tire, including the spare (if provided),
should be checked monthly when cold and
inflated to the inflation pressure recommended
by the vehicle manufacturer on the vehicle
placard or tire inflation pressure label. If your
vehicle has tires of a different size than the size
indicated on the vehicle placard or tire inflation
pressure label, you should determine the
proper tire inflation pressure for those tires.
As an added safety feature, your vehicle has
been equipped with a Tire Pressure Monitoring
System (TPMS) that illuminates a low tire
pressure warning light when one or more of your
tires is significantly under-inflated. Accordingly,
when the low tire pressure warning light illuminates, you should stop and check your
tires as soon as possible, and inflate them to
the proper pressure. Driving on a significantly
under-inflated tire causes the tire to overheat
and can lead to tire failure. Under-inflation also
reduces fuel efficiency and tire tread life, and
may affect the vehicle’s handling and stopping
ability.
Please note that the TPMS is not a substitute for
proper tire maintenance, and it is the driver’s
responsibility to maintain correct tire pressure,
even if under-inflation has not reached the level
to trigger illumination of the TPMS low tire
pressure warning light.
Your vehicle has also been equipped with a
TPMS malfunction indicator to indicate when
the system is not operating properly. The TPMS
malfunction indicator is combined with the low
tire pressure warning light. When the system
detects a malfunction, the warning light will
flash for approximately one minute and then
remain continuously illuminated. This sequence
will continue upon subsequent vehicle start-ups
as long as the malfunction exists. When the
malfunction indicator is illuminated, the system
may not be able to detect or signal low tire
pressure as intended. TPMS malfunctions may
CAUTION!
Do not continue driving with one or more flat
tires as handling may be compromised. Stop
the vehicle, avoiding sharp braking and
steering. If a tire puncture occurs, repair
immediately using the dedicated tire repair
kit and contact an authorized dealer as soon
as possible.
3
20_LX_OM_EN_USC_t.book Page 89
Page 233 of 328
231
SERVICING AND MAINTENANCE
SCHEDULED SERVICING
This vehicle is equipped with an automatic oil
change indicator system. The oil change
indicator system will remind you that it is time to
take your vehicle in for scheduled maintenance.
Based on engine operation conditions, the oil
change indicator message will illuminate. This
means that service is required for the vehicle.
Operating conditions such as frequent
short-trips, trailer tow, and extremely hot or cold
ambient temperatures will influence when the
“Change Oil” or “Oil Change Required” message
is displayed. Severe Operating Conditions can
cause the change oil message to illuminate as
early as 3,500 miles (5,600 km) since last
reset. Have your vehicle serviced as soon as
possible, within the next 500 miles (805 km).
The “Oil Change Required” message will be
displayed in the instrument cluster and a single
chime will sound, indicating that an oil change
is necessary.An authorized dealer will reset the oil change
indicator message after completing the
scheduled oil change. If a scheduled oil change
is performed by someone other than an
authorized dealer, the message can be reset by
referring to “Instrument Cluster Display” in
“Getting To Know Your Instrument Panel” for
further information.
NOTE:
Under no circumstances should oil change
intervals exceed 10,000 miles (16,000 km),
12 months or 350 hours of engine run time,
whichever comes first. The 350 hours of engine
run or idle time is generally only a concern for
fleet customers.
Severe Duty All Models
Change Engine Oil at 4,000 miles (6,500 km) or
350 hours of engine run time if the vehicle is
operated in a dusty and off-road environment,
or is operated predominantly at idle or only very
low engine RPM. This type of vehicle use is
considered Severe Duty.Once A Month Or Before A Long Trip:Check engine oil level.
Check windshield washer fluid level.
Check tire pressure and look for unusual
wear or damage. Rotate tires at the first sign
of irregular wear, even if it occurs before your
next scheduled service.
Check the fluid levels of the coolant reservoir,
brake master cylinder, and power steering (if
equipped) and fill as needed.
Check function of all interior and exterior
lights.
7
20_LX_OM_EN_USC_t.book Page 231
Page 238 of 328
236SERVICING AND MAINTENANCE
ENGINE COMPARTMENT
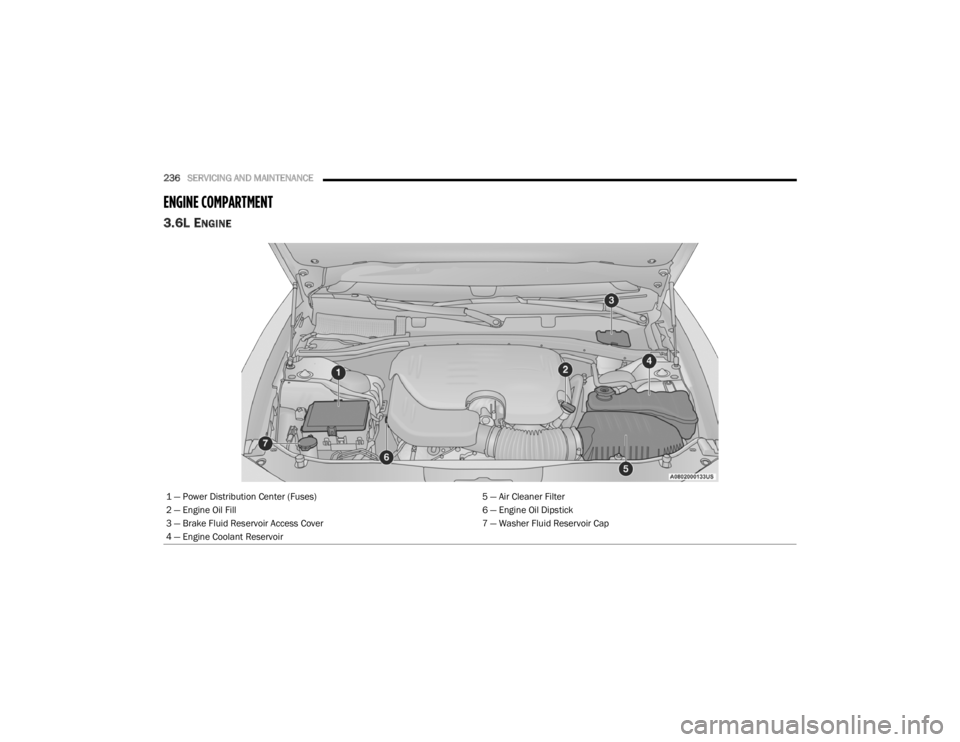
3.6L ENGINE
1 — Power Distribution Center (Fuses) 5 — Air Cleaner Filter
2 — Engine Oil Fill 6 — Engine Oil Dipstick
3 — Brake Fluid Reservoir Access Cover 7 — Washer Fluid Reservoir Cap
4 — Engine Coolant Reservoir
20_LX_OM_EN_USC_t.book Page 236
Page 239 of 328
SERVICING AND MAINTENANCE237
5.7L ENGINE
1 — Power Distribution Center (Fuses) 5 — Air Cleaner Filter
2 — Engine Oil Fill 6 — Engine Oil Dipstick
3 — Brake Fluid Reservoir Access Cover 7 — Washer Fluid Reservoir Cap
4 — Engine Coolant Reservoir
7
20_LX_OM_EN_USC_t.book Page 237
Page 240 of 328
238SERVICING AND MAINTENANCE
CHECKING OIL LEVEL
To ensure proper engine lubrication, the engine
oil must be maintained at the correct level.
Check the oil level at regular intervals, such as
every month. The best time to check the engine
oil level is about five minutes after a fully
warmed up engine is shut off.
Checking the oil while the vehicle is on level
ground will improve the accuracy of the oil level
readings.
There are three possible dipstick types:
Crosshatched zone.
Crosshatched zone marked SAFE.
Crosshatched zone marked with MIN at the
low end of the range and MAX at the high end
of the range.
NOTE:
Always maintain the oil level within the cross -
hatch markings on the dipstick.
Adding 1 quart (1.0 liters) of oil when the reading
is at the low end of the dipstick range will raise
the oil level to the high end of the range marking.
ADDING WASHER FLUID
The windshield washer fluid reservoir is located
in the front of the engine compartment. Be sure
to check the fluid level at regular intervals. Fill
the reservoir with windshield washer solvent
(not radiator antifreeze) and operate the system
for a few seconds to flush out the residual
water.
When refilling the washer fluid reservoir, apply
some washer fluid to a cloth or towel and wipe
the wiper blades clean. This will help blade
performance.
To prevent freeze-up of your windshield washer
system in cold weather, select a solution or
mixture that meets or exceeds the temperature
range of your climate. This rating information
can be found on most washer fluid containers. The fluid reservoir will hold nearly 1 gallon
(4 liters) of washer fluid when the message
“Low Washer Fluid” appears in the instrument
cluster.
MAINTENANCE-FREE BATTERY
Your vehicle is equipped with a
maintenance-free battery. You will never have
to add water, nor is periodic maintenance
required.
NOTE:
The battery is stored under an access cover in
the trunk. Remote battery terminals are located
in the engine compartment for jump starting.
Refer to “Jump Starting Procedures” in “In Case
Of Emergency” for further information.
CAUTION!
Overfilling or underfilling the crankcase will
cause aeration or loss of oil pressure. This
could damage your engine.
WARNING!
Commercially available windshield washer
solvents are flammable. They could ignite and
burn you. Care must be exercised when filling
or working around the washer solution.
20_LX_OM_EN_USC_t.book Page 238
Page 241 of 328
SERVICING AND MAINTENANCE239
PRESSURE WASHING
DEALER SERVICE
An authorized dealer has the qualified service
personnel, special tools, and equipment to
perform all service operations in an expert
manner. Service Manuals are available which
include detailed service information for your
vehicle. Refer to these Service Manuals before
attempting any procedure yourself.
NOTE:
Intentional tampering with emissions control
systems may void your warranty and could
result in civil penalties being assessed against
you.
WARNING!
Battery fluid is a corrosive acid solution and
can burn or even blind you. Do not allow
battery fluid to contact your eyes, skin, or
clothing. Do not lean over a battery when
attaching clamps. If acid splashes in eyes
or on skin, flush the area immediately with
large amounts of water. Refer to “Jump
Starting Procedure” in “In Case Of Emer -
gency” for further information.
Battery gas is flammable and explosive.
Keep flame or sparks away from the
battery. Do not use a booster battery or any
other booster source with an output greater
than 12 Volts. Do not allow cable clamps to
touch each other.
Battery posts, terminals, and related acces -
sories contain lead and lead compounds.
Wash hands after handling.
The battery in this vehicle has a vent hose
that should not be disconnected and
should only be replaced with a battery of
the same type (vented).
CAUTION!
It is essential when replacing the cables on
the battery that the positive cable is
attached to the positive post and the nega -
tive cable is attached to the negative post.
Battery posts are marked positive (+) and
negative (-) and are identified on the battery
case. Cable clamps should be tight on the
terminal posts and free of corrosion.
If a “fast charger” is used while the battery
is in the vehicle, disconnect both vehicle
battery cables before connecting the
charger to the battery. Do not use a “fast
charger” to provide starting voltage.
CAUTION!
Cleaning the engine compartment with a high
pressure washer is not recommended.
Precautions have been taken to safeguard all
parts and connections however, the
pressures generated by these machines is
such that complete protection against water
ingress cannot be guaranteed.
WARNING!
You can be badly injured working on or
around a motor vehicle. Only do service work
for which you have the knowledge and the
proper equipment. If you have any doubt
about your ability to perform a service job,
take your vehicle to a competent mechanic.7
20_LX_OM_EN_USC_t.book Page 239
Page 246 of 328
244SERVICING AND MAINTENANCE
When inspecting accessory drive belts, small
cracks that run across ribbed surface of belt
from rib to rib, are considered normal. These
are not a reason to replace belt. However,
cracks running along a rib (not across) are not
normal. Any belt with cracks running along a rib
must be replaced. Also have the belt replaced if
it has excessive wear, frayed cords or severe
glazing.
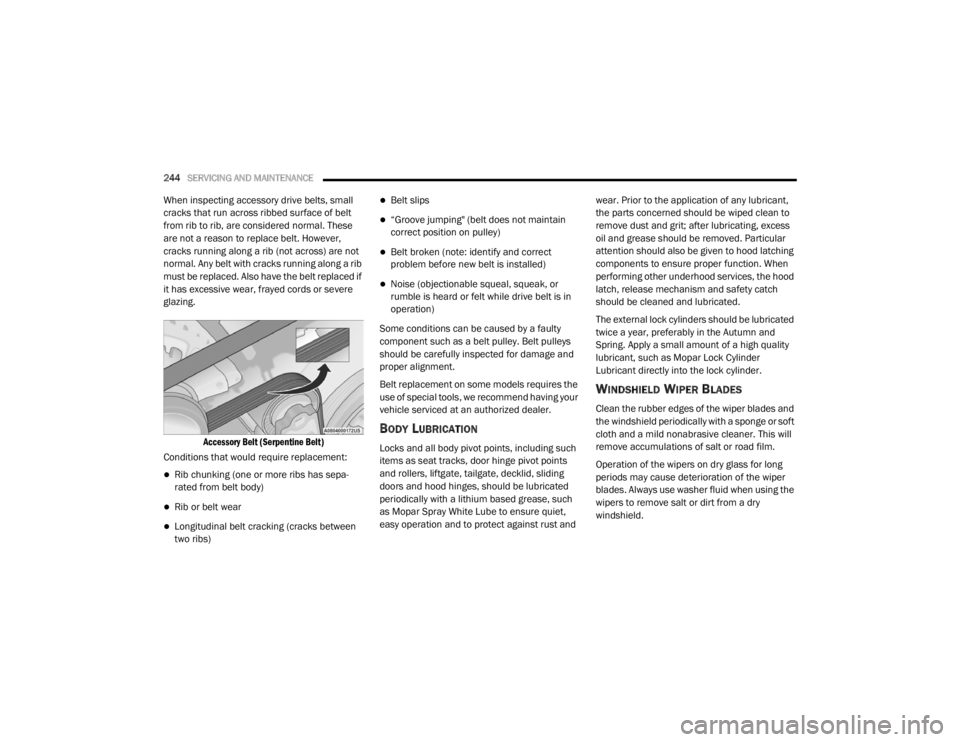
Accessory Belt (Serpentine Belt)
Conditions that would require replacement:
Rib chunking (one or more ribs has sepa -
rated from belt body)
Rib or belt wear
Longitudinal belt cracking (cracks between
two ribs)
Belt slips
“Groove jumping" (belt does not maintain
correct position on pulley)
Belt broken (note: identify and correct
problem before new belt is installed)
Noise (objectionable squeal, squeak, or
rumble is heard or felt while drive belt is in
operation)
Some conditions can be caused by a faulty
component such as a belt pulley. Belt pulleys
should be carefully inspected for damage and
proper alignment.
Belt replacement on some models requires the
use of special tools, we recommend having your
vehicle serviced at an authorized dealer.
BODY LUBRICATION
Locks and all body pivot points, including such
items as seat tracks, door hinge pivot points
and rollers, liftgate, tailgate, decklid, sliding
doors and hood hinges, should be lubricated
periodically with a lithium based grease, such
as Mopar Spray White Lube to ensure quiet,
easy operation and to protect against rust and wear. Prior to the application of any lubricant,
the parts concerned should be wiped clean to
remove dust and grit; after lubricating, excess
oil and grease should be removed. Particular
attention should also be given to hood latching
components to ensure proper function. When
performing other underhood services, the hood
latch, release mechanism and safety catch
should be cleaned and lubricated.
The external lock cylinders should be lubricated
twice a year, preferably in the Autumn and
Spring. Apply a small amount of a high quality
lubricant, such as Mopar Lock Cylinder
Lubricant directly into the lock cylinder.
WINDSHIELD WIPER BLADES
Clean the rubber edges of the wiper blades and
the windshield periodically with a sponge or soft
cloth and a mild nonabrasive cleaner. This will
remove accumulations of salt or road film.
Operation of the wipers on dry glass for long
periods may cause deterioration of the wiper
blades. Always use washer fluid when using the
wipers to remove salt or dirt from a dry
windshield.
20_LX_OM_EN_USC_t.book Page 244
Page 320 of 328

318 Floor Console
................................................... 71Fluid Capacities............................................. 280Fluid Leaks.................................................... 145Fluid Level Checks Brake........................................................ 251Cooling System.......................................... 247Engine Oil.................................................. 238Transfer Case............................................ 253Fluid, Brake......................................... 281, 283Fluids And Lubricants.................................... 281Fog Lights........................................................ 45Fold-Flat Seats................................................. 30Folding Rear Seats.......................................... 30Forward Collision Warning............................. 106Four-Way Hazard Flasher............................... 201Freeing A Stuck Vehicle................................. 227Fuel............................................................... 276Additives................................................... 277Clean Air.................................................... 277Ethanol...................................................... 277Gasoline.................................................... 276Gauge.......................................................... 90Materials Added........................................ 277Methanol................................................... 277Octane Rating................................. 276, 281Requirements........................................... 276Specifications............................................ 281Tank Capacity............................................ 280Fuses............................................................. 209
G
Garage Door Opener (HomeLink)..................... 66Gasoline, Clean Air........................................ 277Gasoline, Reformulated................................ 277GaugesFuel............................................................. 90Gear Ranges................................................. 155Glass Cleaning.............................................. 274Gross Axle Weight Rating..................... 190, 191Gross Vehicle Weight Rating................ 190, 191GVWR............................................................ 190
H
HazardDriving Through Flowing, Rising, Or Shallow Standing Water
.................................... 199Hazard Warning Flashers.............................. 201Head Restraints........................................ 35, 36Head Rests............................................... 35, 36Headlights.................................................... 207Automatic.................................................... 44Cleaning................................................... 272High Beam/Low Beam Select Switch.......... 43Lights On Reminder..................................... 45On With Wipers............................................ 44Passing........................................................ 44Switch.......................................................... 42Time Delay................................................... 45Washers................................................... 238
Heated Mirrors.................................................41Heater, Engine Block..................................... 149High Beam/Low Beam Select (Dimmer)
Switch..............................................................43Hill Start Assist.............................................. 100HitchesTrailer Towing........................................... 193Holder, Coin.....................................................71HomeLink (Garage Door Opener).....................66Hood Prop........................................................61Hood Release...................................................61
I
Ignition.............................................................16Switch..........................................................16In Vehicle HelpVehicle User Guide......................................10Inside Rearview Mirror........................... 39, 201Instrument Cluster....................................76, 77Descriptions.................................................92Display.................................................. 78, 80Instrument Panel Lens Cleaning................... 274Interior Appearance Care.............................. 273Interior Lights...................................................46Intermittent Wipers (Delay Wipers)..................49Introduction....................................................... 8
20_LX_OM_EN_USC_t.book Page 318