engine CHRYSLER 300 2021 User Guide
[x] Cancel search | Manufacturer: CHRYSLER, Model Year: 2021, Model line: 300, Model: CHRYSLER 300 2021Pages: 268, PDF Size: 15.24 MB
Page 19 of 268
GETTING TO KNOW YOUR VEHICLE 17
For security, power window operation is
disabled when the vehicle is in the Remote Start
mode.
Remote Start can only be used twice. The igni -
tion must be placed in the ON/RUN position
b e
fore the Remote Start sequence can be
repeated for a third cycle.
All of the following conditions must be met before
t h
e engine will remote start:
Gear selector in PARK
Doors closed
Hood closed
Trunk closed
Hazard switch off
Brake switch inactive (brake pedal not pressed)
Battery at an acceptable charge level
PANIC button not pushed
System not disabled from previous Remote
Start event
Vehicle Security Light is flashing
Ignition in OFF position
Fuel level meets minimum requirement
Vehicle Security system is not signaling an intru -
sion
Malfunction Indicator Light is not illuminated
TO EXIT REMOTE START MODE
To drive the vehicle after starting the Remote Start
system, either push and release the unlock button
on the key fob to unlock the doors, or unlock the
vehicle using Keyless Enter ‘n Go™ — Passive Entry
via the door handles, and disarm the Vehicle
Security system (if equipped). Then, prior to the
end of the 15 minute cycle, push and release the
S T
ART/STOP ignition button.
The Remote Start system will turn the engine off
wi
th another push and release of the Remote Start
button on the key fob, or if the engine is allowed to
run for the entire 15 minute cycle. Once the
i g
nition is placed in the ON/RUN position, the
climate controls will resume the previously set
operations (temperature, blower control, etc.).
NOTE:
To avoid unintentional shutdowns, the system
will disable for two seconds after receiving a
valid Remote Start request.
For vehicles equipped with the Keyless Enter ‘n
Go™ — Passive Entry feature, the message
“Remote Start Active — Push Start Button” will
display in the instrument cluster display until
you push the START/STOP ignition button.
REMOTE START FRONT DEFROST
A
CTIVATION — IF EQUIPPED
When Remote Start is active, and the outside
ambient temperature is 40°F (4.5°C) or below, the
system will automatically activate front defrost for
15 minutes or less. The time is dependent on the
a m
bient temperature. Once the timer expires, the
system will automatically adjust the settings
depending on ambient conditions. See “Remote
Start Comfort Systems — If Equipped” in the next
section for detailed operation.
REMOTE START COMFORT SYSTEMS —
I
F EQUIPPED
When Remote Start is activated, the front and rear
defrost will automatically turn on in cold weather.
The heated steering wheel and driver heated seat
feature will turn on if selected in the comfort menu
screen within Uconnect Settings
Ú page 122.
WARNING!
Do not start or run an engine in a closed
garage or confined area. Exhaust gas contains
Carbon Monoxide (CO) which is odorless and
colorless. Carbon Monoxide is poisonous and
can cause serious injury or death when
inhaled.
Keep key fobs away from children. Operation
of the Remote Start system, windows, door
locks or other controls could cause serious
injury or death.
2
Page 26 of 268
24 GETTING TO KNOW YOUR VEHICLE
POWER TILT/TELESCOPING STEERING
C
OLUMN — IF EQUIPPED
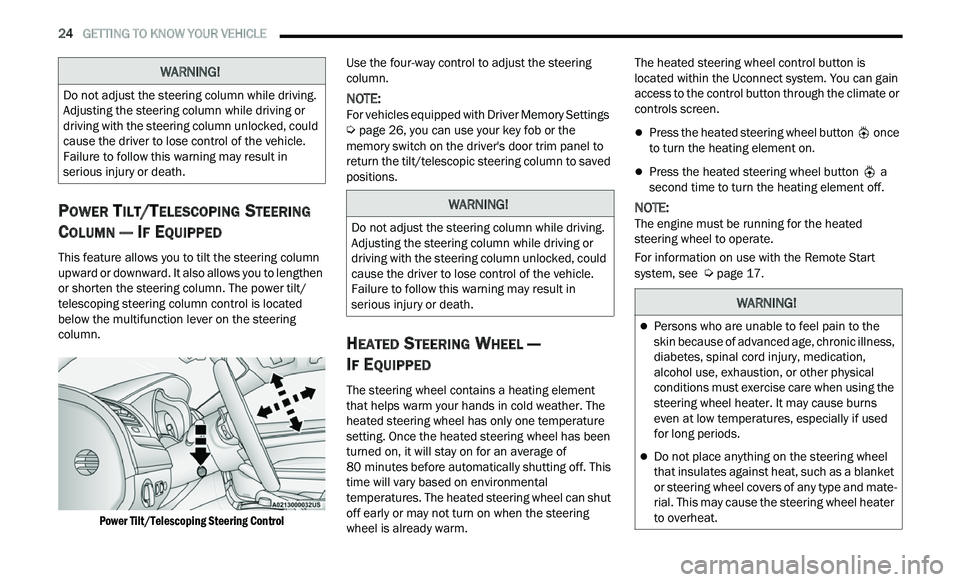
This feature allows you to tilt the steering column
upward or downward. It also allows you to lengthen
or shorten the steering column. The power tilt/
telescoping steering column control is located
below the multifunction lever on the steering
column.
Power Tilt/Telescoping Steering Control
Use the four-way control to adjust the steering
c
ol
umn.
NOTE:
For vehicles equipped with Driver Memory Settings
Ú page 26, you can use your key fob or the
memory switch on the driver's door trim panel to
r e
turn the tilt/telescopic steering column to saved
positions.
HEATED STEERING WHEEL —
I
F EQUIPPED
The steering wheel contains a heating element
that helps warm your hands in cold weather. The
heated steering wheel has only one temperature
setting. Once the heated steering wheel has been
turned on, it will stay on for an average of
80 minutes before automatically shutting off. This
t i
me will vary based on environmental
temperatures. The heated steering wheel can shut
off early or may not turn on when the steering
wheel is already warm. The heated steering wheel control button is
l
oc
ated within the Uconnect system. You can gain
access to the control button through the climate or
controls screen.
Press the heated steering wheel button once
to turn the heating element on.
Press the heated steering wheel button a
second time to turn the heating element off.
NOTE:
The engine must be running for the heated
s t
eering wheel to operate.
For information on use with the Remote Start
sy
stem, see Ú page 17.
WARNING!
Do not adjust the steering column while driving.
Adjusting the steering column while driving or
driving with the steering column unlocked, could
cause the driver to lose control of the vehicle.
Failure to follow this warning may result in
serious injury or death.
WARNING!
Do not adjust the steering column while driving.
Adjusting the steering column while driving or
driving with the steering column unlocked, could
cause the driver to lose control of the vehicle.
Failure to follow this warning may result in
serious injury or death.
WARNING!
Persons who are unable to feel pain to the
skin because of advanced age, chronic illness,
diabetes, spinal cord injury, medication,
alcohol use, exhaustion, or other physical
conditions must exercise care when using the
steering wheel heater. It may cause burns
even at low temperatures, especially if used
for long periods.
Do not place anything on the steering wheel
that insulates against heat, such as a blanket
or steering wheel covers of any type and mate
-
rial. This may cause the steering wheel heater
t o
overheat.
Page 28 of 268
26 GETTING TO KNOW YOUR VEHICLE
Uconnect System Support:
US residents visit www.DriveUconnect.com or
call: 1-877-855-8400 (24 hours a day 7 days a
w e
ek)
Canadian residents visit www.DriveUconnect.ca
or call: 1-800-465-2001 (English) or
1 -
800-387-9983 (French)
SiriusXM Guardian™ services support:
US residents visit www.driveuconnect.com/
sirius-xm-guardian or call: 1-844-796-4827
Canadian residents visit https://www.driveuco-
nnect.ca/en/sirius-xm-guardian or call:
1-877-324-9091
DRIVER MEMORY SETTINGS — IF EQUIPPED
This feature allows the driver to save up to two
different memory profiles for easy recall through a
memory switch. Each memory profile saves
desired position settings for the following features:
Driver seat
Easy Entry/Exit seat operation (if equipped)
Side mirrors
Power tilt and telescopic steering column (if
equipped)
A set of desired radio station presets
NOTE:
Your vehicle is equipped with two key fobs, each
can be linked to either memory position 1 or 2.
Be sure to program the radio presets prior to
programming the memory settings.
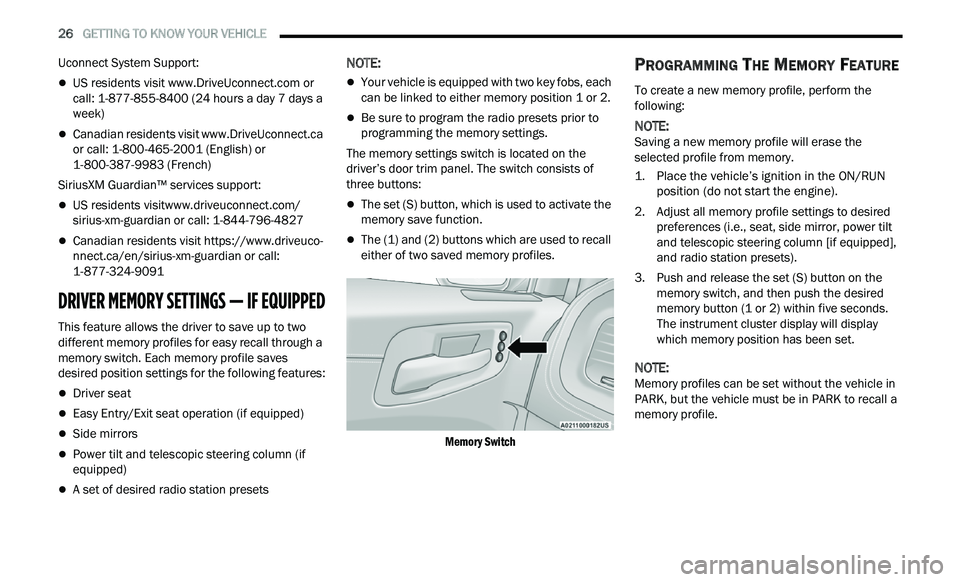
The memory settings switch is located on the
dr
iver’s door trim panel. The switch consists of
three buttons:
The set (S) button, which is used to activate the
memory save function.
The (1) and (2) buttons which are used to recall
either of two saved memory profiles.
Memory Switch
PROGRAMMING THE MEMORY FEATURE
To create a new memory profile, perform the
following:
NOTE:
Saving a new memory profile will erase the
s e
lected profile from memory.
1. Place the vehicle’s ignition in the ON/RUN p
osition (do not start the engine).
2. Adjust all memory profile settings to desired p
references (i.e., seat, side mirror, power tilt
and telescopic steering column [if equipped],
and radio station presets).
3. Push and release the set (S) button on the m
emory switch, and then push the desired
memory button (1 or 2) within five seconds.
The instrument cluster display will display
which memory position has been set.
NOTE:
Memory profiles can be set without the vehicle in
P A
RK, but the vehicle must be in PARK to recall a
memory profile.
Page 32 of 268
30 GETTING TO KNOW YOUR VEHICLE
Easy Entry/Exit Seat — If Equipped
This feature provides automatic driver seat
positioning to enhance driver mobility when
entering and exiting the vehicle.
The distance the driver seat moves depends on
wh
ere you have the driver seat positioned when
you place the vehicle’s ignition in the OFF position.
When you place the vehicle’s ignition in the OFF
position, the driver seat will move about
2.4 inches (60 mm) rearward if the driver seat
pos
ition is greater than or equal to 2.7 inches
( 6
7.7 mm) forward of the rear stop. The seat will
r e
turn to its previously set position when you
place the vehicle’s ignition in the ACC or RUN
position.
The Easy Entry/Easy Exit feature is disabled
when the driver seat position is less than 0.9 of
an inch (22.7 mm) forward of the rear stop. At
th
is position, there is no benefit to the driver by
moving the seat for Easy Exit or Easy Entry.
When enabled in Uconnect Settings, Easy Entry
a n
d Easy Exit positions are stored in each memory
setting profile
Ú page 26.
NOTE:
The Easy Entry/Exit feature is enabled or disabled
t h
rough the programmable features in the
Uconnect system
Ú page 122.
HEATED SEATS — IF EQUIPPED
On some models, the front and rear seats may be
equipped with heaters located in the seat cushions
and seatbacks.
Front Heated Seats
The front heated seat control buttons are located
within the climate or controls screen of the
touchscreen.
You can choose from HI, LO, or OFF heat settings.
Th
e indicator arrows in touchscreen buttons
indicate the level of heat in use. Two indicator arrows will illuminate for HI, and one for LO.
Turning the heating elements off will return the
user to the radio screen.
Press the heated seat button
once to turn
the HI setting on.
Press the heated seat button a second time
to turn the LO setting on.
Press the heated seat button a third time to
turn the heating elements off.
If the HI-level setting is selected, the system will
a u
tomatically switch to LO-level after
approximately 60 minutes of continuous
ope
ration. At that time, the display will change
from HI to LO, indicating the change. The LO-level
setting will turn off automatically after
approximately 45 minutes.
NOTE:
Once a heat setting is selected, heat will be felt
within two to five minutes.
The engine must be running for the heated
seats to operate.
For information on use with the Remote Start
sy
stem, see Ú page 17.
WARNING!
Persons who are unable to feel pain to the
skin because of advanced age, chronic illness,
diabetes, spinal cord injury, medication,
alcohol use, exhaustion or other physical
condition must exercise care when using the
seat heater. It may cause burns even at low
temperatures, especially if used for long
periods of time.
Do not place anything on the seat or seatback
that insulates against heat, such as a blanket
or cushion. This may cause the seat heater to
overheat. Sitting in a seat that has been over
-
heated could cause serious burns due to the
i n
creased surface temperature of the seat.
Page 33 of 268
GETTING TO KNOW YOUR VEHICLE 31
Rear Heated Seats — If Equipped
On some models, the two rear outboard seats may
be equipped with heated seats. There are two
heated seat switches that allow the rear
passengers to operate the seats independently.
The heated seat switches for each heater are
located on the rear of the center console. You can choose from HI, LO, or OFF heat settings.
A
m
ber indicator lights in each switch indicate the
level of heat in use. Two indicator lights will
illuminate for HI, one for LO and none for OFF.
Push the heated seat button once to turn the
HI setting on.
Push the heated seat button a second time
to turn the LO setting on.
Push the heated seat button a third time to
turn the heating elements off.
When the HI-level setting is selected, the heater
w i
ll provide a boosted heat level during the first
four minutes of operation. Then, the heat output
will drop to the normal HI-level. If the HI-level
setting is selected, the system will automatically
switch to LO-level after approximately 60 minutes
of
continuous operation. At that time, the number
of indicator lights changes from two to one,
indicating the change. The LO-level setting will turn
off automatically after approximately 45 minutes.
NOTE:
Once a heat setting is selected, heat will be felt
within two to five minutes.
The engine must be running for the heated
seats to operate.
FRONT VENTILATED SEATS —
I
F EQUIPPED
The ventilated seats are equipped with fans that
can be controlled through the climate and control
screen in the Uconnect system. The fans operate
at two speeds, HI and LO.
Press the ventilated seat button once to
choose HI.
Press the ventilated seat button a second
time to choose LO.
Press the ventilated seat button a third time
to turn the ventilated seat off.
WARNING!
Persons who are unable to feel pain to the
skin because of advanced age, chronic illness,
diabetes, spinal cord injury, medication,
alcohol use, exhaustion or other physical
condition must exercise care when using the
seat heater. It may cause burns even at low
temperatures, especially if used for long
periods of time.
Do not place anything on the seat or seatback
that insulates against heat, such as a blanket
or cushion. This may cause the seat heater to
overheat. Sitting in a seat that has been over -
heated could cause serious burns due to the
i n
creased surface temperature of the seat.
WARNING!
Persons who are unable to feel pain to the skin
because of advanced age, chronic illness,
diabetes, spinal cord injury, medication, alcohol
use, exhaustion or other physical condition
must exercise care when using the seat heater.
It may cause burns even at low temperatures,
especially if used for long periods of time.
Do not place anything on the seat or seatback
that insulates against heat, such as a blanket or
cushion. This may cause the seat heater to
overheat. Sitting in a seat that has been over -
heated could cause serious burns due to the
i n
creased surface temperature of the seat.
2
Page 34 of 268
32 GETTING TO KNOW YOUR VEHICLE
(Continued)
NOTE:
The engine must be running for the ventilated
s e
ats to operate.
For information on use with the Remote Start
sy
stem, see Ú page 17.
HEAD RESTRAINTS
Head restraints are designed to reduce the risk of
injury by restricting head movement in the event of
a rear impact. Head restraints should be adjusted
so that the top of the head restraint is located
above the top of your ear.
NOTE:
Do not reverse the head restraints (making the
r e
ar of the head restraint face forward) in an
attempt to gain additional clearance to the back of
your head.
Reactive Head Restraints — Front Seats
The front driver and passenger seats are equipped
with Reactive Head Restraints (RHR). In the event
of a rear impact, the RHR will automatically extend
forward minimizing the gap between the back of
the occupant’s head and the RHR.
The RHR will automatically return to their normal
p os
ition following a rear impact. If the RHR do not
return to their normal position, see an authorized
dealer immediately.
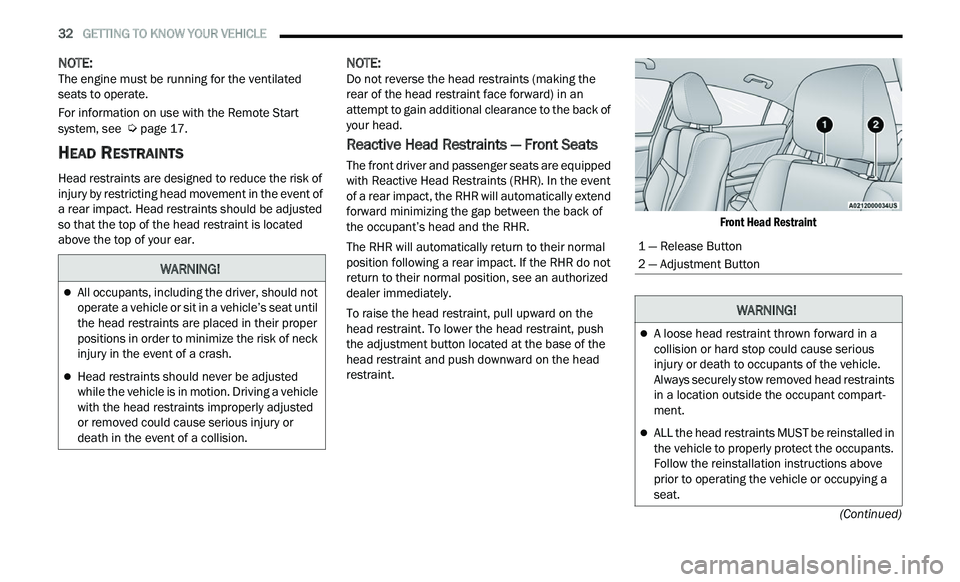
To raise the head restraint, pull upward on the
he
ad restraint. To lower the head restraint, push
the adjustment button located at the base of the
head restraint and push downward on the head
restraint.
Front Head Restraint
WARNING!
All occupants, including the driver, should not
operate a vehicle or sit in a vehicle’s seat until
the head restraints are placed in their proper
positions in order to minimize the risk of neck
injury in the event of a crash.
Head restraints should never be adjusted
while the vehicle is in motion. Driving a vehicle
with the head restraints improperly adjusted
or removed could cause serious injury or
death in the event of a collision.
1 — Release Button
2 — Adjustment Button
WARNING!
A loose head restraint thrown forward in a
collision or hard stop could cause serious
injury or death to occupants of the vehicle.
Always securely stow removed head restraints
in a location outside the occupant compart
-
ment.
ALL the head restraints MUST be reinstalled in
the vehicle to properly protect the occupants.
Follow the reinstallation instructions above
prior to operating the vehicle or occupying a
seat.
Page 41 of 268
GETTING TO KNOW YOUR VEHICLE 39
NOTE:
Canadian radio frequency laws require transmitter
s i
gnals to time-out (or quit) after several seconds
of transmission, which may not be long enough for
HomeLink® to pick up the signal during
programming. Similar to this Canadian law, some
U.S. gate operators are designed to time-out in the
same manner. The procedure may need to be
performed multiple times to successfully pair the
device to your HomeLink® buttons.
REPROGRAMMING A SINGLE
H
OMELINK® BUTTON
To reprogram a single HomeLink® button that has
been previously trained, without erasing all the
channels, follow the procedure below. Be sure to
determine whether the new device you want to
program the HomeLink® button to has a rolling
code or non-rolling code.
1. Place the ignition in the ON/RUN position,
w
ithout starting the engine.
2. Push and hold the desired HomeLink® button u
ntil the HomeLink® Indicator light begins to
flash after 20 seconds. Do not release the
button.
3. Without releasing the button ,
proceed with
Step 2 in “Programming HomeLink® To A
G a
rage Door Opener” and follow all remaining
steps.
CANADIAN/GATE OPERATOR
P
ROGRAMMING
For programming transmitters in Canada/United
States that require the transmitter signals to
“time-out” after several seconds of transmission.
Canadian Radio Frequency (RF) laws require
t r
ansmitter signals to time-out (or quit) after
several seconds of transmission – which may not
be long enough for HomeLink® to pick up the
signal during programming. Similar to this
Canadian law, some US gate operators are
designed to time-out in the same manner.
It may be helpful to unplug the device during the
c y
cling process to prevent possible overheating of
the garage door or gate motor.
1. P lace the ignition in the ON/RUN position.
2
. P lace the hand-held transmitter 1 to 3
inches
(3
to 8 cm) away from the HomeLink® button
you wish to program while keeping the
HomeLink® indicator light in view.
3. Continue to press and hold the HomeLink® bu
tton, while you press and release (cycle) your
hand-held transmitter every two seconds until
HomeLink® has successfully accepted the
frequency signal. The indicator light will flash
slowly and then rapidly when fully trained.
4. Watch for the HomeLink® indicator to change f
lash rates. When it changes, it is programmed. It may take up to 30 seconds or
longer in rare cases. The garage door may
open and close while you are programming.
5. P ress and hold the programmed HomeLink®
b
utton and observe the indicator light.
NOTE:
If the indicator light stays on constantly,
programming is complete and the garage
door/device should activate when the
HomeLink® button is pressed.
To program the two remaining HomeLink®
buttons, repeat each step for each remaining
button. DO NOT erase the channels.
If you unplugged the garage door opener/device
f or
programming, plug it back in at this time.
Reprogramming A Single HomeLink® Button
(C
anadian/Gate Operator)
To reprogram a channel that has been previously
tr
ained, follow these steps:
1. Place the ignition in the ON/RUN position.
2
. P ress and hold the desired HomeLink® button
u
ntil the indicator light begins to flash after 20
seconds. Do not release the button.
3. W ithout releasing the button, proceed with
“
Canadian/Gate Operator Programming”
step 2 and follow all remaining steps
Ú page 254.
2
Page 43 of 268
GETTING TO KNOW YOUR VEHICLE 41
DAYTIME RUNNING LIGHTS (DRLS)
The Daytime Running Lights will turn on when the
engine is started and will remain on unless the
headlights are turned to the on position, the
parking brake is applied, or the ignition is placed in
the OFF position.
NOTE:
For vehicles sold in Canada, the Daytime
Running Lights will automatically deactivate
when the front fog lights are turned on.
If allowed by law in the country in which the
vehicle was purchased, the Daytime Running
Lights can be turned on and off using the
Uconnect system
Ú page 122.
On some vehicles, the Daytime Running Lights
may deactivate or reduce intensity on one side
of the vehicle (when a turn signal is activated on
that side), or on both sides of the vehicle (when
the hazard warning lights are activated).
HIGH/LOW BEAM SWITCH
Push the multifunction lever toward the instrument
panel to switch the headlights to high beams.
Pulling the multifunction lever back will turn the
low beams on.
AUTOMATIC HIGH BEAM — IF EQUIPPED
The Automatic High Beam Headlamp Control
system provides increased forward lighting at night
by automating high beam control through the use
of a digital camera mounted on the inside rearview
mirror. This camera detects vehicle specific light
and automatically switches from high beams to low
beams until the approaching vehicle is out of view.
NOTE:
The Automatic High Beam Headlamp Control
can be turned on or off by selecting or dese
-
lecting “Auto High Beam” within Uconnect
Se
ttings Ú page 122, as well as turning the
headlight switch to the AUTO position.
Broken, muddy, or obstructed headlights and
taillights of vehicles in the field of view will
cause headlights to remain on longer (closer to
the vehicle). Also, dirt, film, and other obstruc -
tions on the windshield or camera lens will
c a
use the system to function improperly.
If the windshield or Automatic High Beam Head -
lamp Control mirror is replaced, the mirror must
b e
re-aimed to ensure proper performance. See
a local authorized dealer.
FLASH-TO-PASS
You can signal another vehicle with your headlights
by lightly pulling the multifunction lever toward you. This will cause the high beam headlights to turn on,
and remain on, until the lever is released.
AUTOMATIC HEADLIGHTS
This system automatically turns the headlights on
or off according to ambient light levels. To turn the
system on, rotate the headlight switch
counterclockwise to the AUTO position. When the
system is on, the headlight time delay feature is
also on. This means the headlights will stay on for
up to 90 seconds after placing the ignition in the
OFF position. The headlight time delay can be
programmed 0/30/60/90 seconds within
Uconnect Settings
Ú page 122.
To turn the automatic system off, move the
h e
adlight switch out of the AUTO position.
NOTE:
The engine must be running before the headlights
w i
ll come on in the automatic mode.
PARKING LIGHTS
To turn on the parking lights and instrument panel
lights, rotate the headlight switch clockwise. To
turn off the parking lights, rotate the headlight
switch back to the O (off) position.
NOTE:
For vehicles sold in Canada, rotate the headlight
s w
itch to the AUTO position to turn off the parking
lights.
2
Page 44 of 268
42 GETTING TO KNOW YOUR VEHICLE
HEADLIGHTS ON WITH WIPERS
If your vehicle is equipped with Automatic
Headlights, it also has this customer-
programmable feature. When your headlights are
in the automatic mode and the engine is running,
they will automatically turn on when the wiper
system is on. This feature is programmable
through the Uconnect system
Ú page 122.
NOTE:
When your headlights come on during the daytime,
t h
e instrument panel lights will automatically dim
to the lower nighttime intensity.
ADAPTIVE BI-XENON HIGH INTENSITY
D
ISCHARGE HEADLIGHTS —
I
F EQUIPPED
This system automatically swivels the headlight
beam pattern horizontally to provide increased
illumination in the direction the vehicle is being
steered.
NOTE:
Each time the Adaptive Headlight system is
turned on, the headlights will initialize by
performing a brief sequence of rotations.
The Adaptive Headlight system is active only
when the vehicle is moving forward. The Adaptive Headlight system can be turned on or
of
f
using the Uconnect system Ú page 122.
HEADLIGHT TIME DELAY
To assist when exiting the vehicle, the headlight
delay feature will leave the headlights on for up to
90 seconds. This delay is initiated when the
ignition is placed in the OFF position while the
headlight switch is on, and then the headlight
switch is cycled off within 45 seconds. Headlight
delay can be cancelled by either turning the
headlight switch on then off, or by placing the
ignition in the ON position.
NOTE:
This feature can be programmed through the
Uconnect system Ú page 122.
If you turn the headlights off before the ignition,
they will turn off in the normal manner.
LIGHTS-ON REMINDER
If the headlights or parking lights are on after the
ignition is placed in the OFF position, a chime will
sound to alert the driver when the driver's door is
opened.
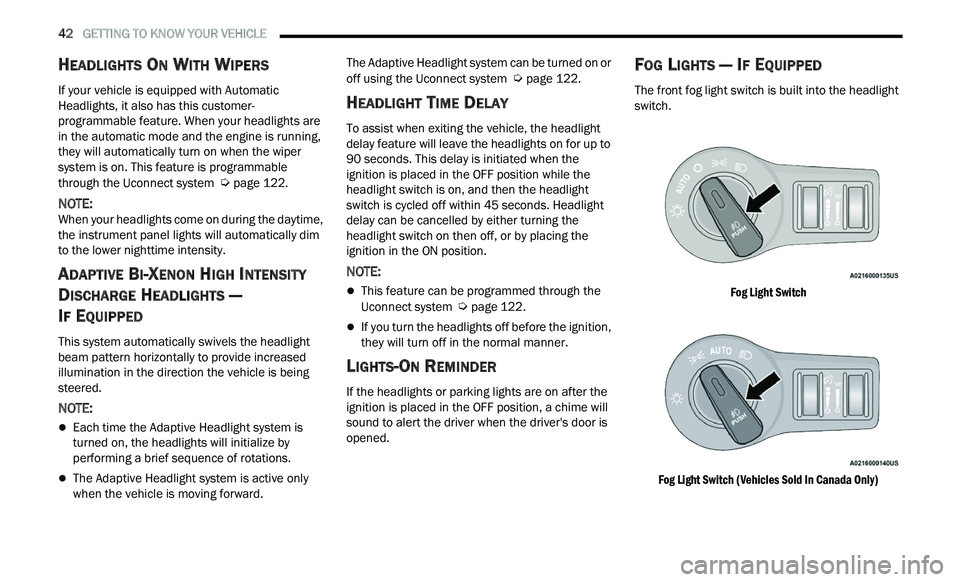
FOG LIGHTS — IF EQUIPPED
The front fog light switch is built into the headlight
switch.
Fog Light Switch
Fog Light Switch (Vehicles Sold In Canada Only)
Page 48 of 268
46 GETTING TO KNOW YOUR VEHICLE
If the end of the lever is pushed while the wipers
are in the off position, the wipers will operate for
three wipe cycles and then turn off.
Mist
Rotate the end of the lever downward to the MIST
pos
ition and release for a single wiping cycle. The
wipers will continue to operate until you release
the multifunction lever.
NOTE:
The Mist feature does not activate the washer
p u
mp; therefore, no washer fluid will be sprayed on
the windshield. The wash function must be used in
order to spray the windshield with washer fluid.
For information on wiper care and replacement,
se
e Ú page 206.
RAIN SENSING WIPERS — IF EQUIPPED
This feature senses rain or snowfall on the
windshield and automatically activates the wipers.
Rotate the end of the multifunction lever to one of
four detent positions to activate this feature.
The sensitivity of the system can be adjusted with
th
e multifunction lever. Wiper delay position one is
the least sensitive, and wiper delay detent position
four is the most sensitive.
Wiper delay position three should be used for
nor
mal rain conditions.
NOTE:
The Rain Sensing feature will not operate when
the wiper switch is in the low or high-speed posi -
tion.
The Rain Sensing feature may not function prop -
erly when ice, or dried salt water is present on
t h
e windshield.
Use of Rain-X or products containing wax or sili-
cone may reduce Rain Sensing performance.
The Rain Sensing feature can be turned on and
off using the Uconnect system Ú page 122.
WARNING!
Sudden loss of visibility through the windshield
could lead to a collision. You might not see other
vehicles or other obstacles. To avoid sudden
icing of the windshield during freezing weather,
warm the windshield with the defroster before
and during windshield washer use.
CAUTION!
Turn the windshield wipers off when driving
through an automatic car wash. Damage to
the windshield wipers may result if the wiper
control is left in any position other than off.
In cold weather, always turn off the wiper
switch and allow the wipers to return to the
park position before turning off the engine. If
the wiper switch is left on and the wipers
freeze to the windshield, damage to the wiper
motor may occur when the vehicle is
restarted.
Always remove any buildup of snow that
prevents the windshield wiper blades from
returning to the off position. If the windshield
wiper control is turned off and the blades
cannot return to the off position, damage to
the wiper motor may occur.