engine CHRYSLER 300 2021 Workshop Manual
[x] Cancel search | Manufacturer: CHRYSLER, Model Year: 2021, Model line: 300, Model: CHRYSLER 300 2021Pages: 268, PDF Size: 15.24 MB
Page 118 of 268
116 STARTING AND OPERATING
(Continued)
TRAILER TOWING WEIGHTS (MAXIMUM TRAILER WEIGHT RATINGS)
NOTE:
The trailer tongue weight must be considered as
p a
rt of the combined weight of occupants and
cargo, and it should never exceed the weight refer -
enced on the “Tire and Loading Information”
p l
acard Ú page 225.
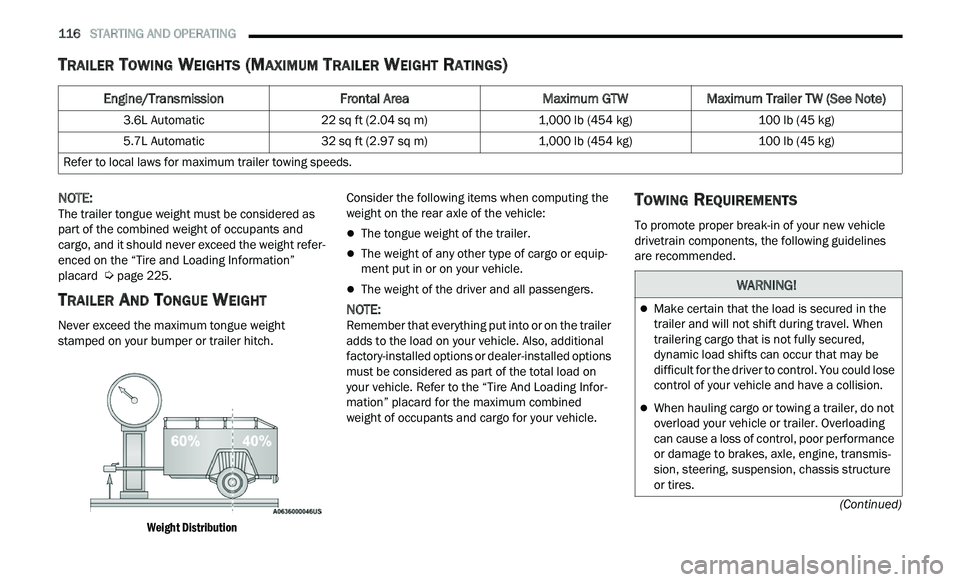
TRAILER AND TONGUE WEIGHT
Never exceed the maximum tongue weight
stamped on your bumper or trailer hitch.
Weight Distribution
Consider the following items when computing the
w
e
ight on the rear axle of the vehicle:
The tongue weight of the trailer.
The weight of any other type of cargo or equip -
ment put in or on your vehicle.
The weight of the driver and all passengers.
NOTE:
Remember that everything put into or on the trailer
a d
ds to the load on your vehicle. Also, additional
factory-installed options or dealer-installed options
must be considered as part of the total load on
your vehicle. Refer to the “Tire And Loading Infor -
mation” placard for the maximum combined
w e
ight of occupants and cargo for your vehicle.
TOWING REQUIREMENTS
To promote proper break-in of your new vehicle
drivetrain components, the following guidelines
are recommended.
Engine/Transmission Frontal AreaMaximum GTWMaximum Trailer TW (See Note)
3.6L Automatic 22 sq ft (2.04 sq m) 1,000 lb (454 kg) 100 lb (45 kg)
5.7L Automatic 32 sq ft (2.97 sq m) 1,000 lb (454 kg) 100 lb (45 kg)
Refer to local laws for maximum trailer towing speeds.
WARNING!
Make certain that the load is secured in the
trailer and will not shift during travel. When
trailering cargo that is not fully secured,
dynamic load shifts can occur that may be
difficult for the driver to control. You could lose
control of your vehicle and have a collision.
When hauling cargo or towing a trailer, do not
overload your vehicle or trailer. Overloading
can cause a loss of control, poor performance
or damage to brakes, axle, engine, transmis -
sion, steering, suspension, chassis structure
or
tires.
Page 119 of 268
STARTING AND OPERATING 117
(Continued)
Perform the maintenance listed in the “Scheduled
Servicing” Ú page 195.When towing a trailer,
never exceed the GAWR or GCWR ratings.
Towing Requirements — Tires
Do not attempt to tow a trailer while using a
compact spare tire.
Do not drive more than 50 mph (80 km/h) when
tow
ing while using a full size spare tire.
Proper tire inflation pressures are essential to
the safe and satisfactory operation of your
vehicle.
Check the trailer tires for proper tire inflation
pressures before trailer usage.
Check for signs of tire wear or visible tire
damage before towing a trailer.
For the proper tire replacement procedures.
Replacing tires with a higher load carrying
capacity will not increase the vehicle's GVWR
and GAWR limits.
For further information Ú page 225.
Towing Requirements — Trailer Brakes
Do not interconnect the hydraulic brake system
or vacuum system of your vehicle with that of
the trailer. This could cause inadequate braking
and possible personal injury.
An electronically actuated trailer brake
controller is required when towing a trailer with
electronically actuated brakes. When towing a
trailer equipped with a hydraulic surge actuated
brake system, an electronic brake controller is
not required.
Trailer brakes are recommended for trailers
over 1,000 lb (453 kg) and required for trailers
in excess of 2,000 lb (907 kg).
Safety chains must always be used between
your vehicle and trailer. Always connect the
chains to the hook retainers of the vehicle
hitch. Cross the chains under the trailer
tongue and allow enough slack for turning
corners.
Vehicles with trailers should not be parked on
a grade. When parking, apply the parking
brake on the tow vehicle. Put the tow vehicle
transmission in PARK. Always, block or
"chock" the trailer wheels.
GCWR must not be exceeded.
Total weight must be distributed between the
tow vehicle and the trailer such that the
following four ratings are not exceeded :
Max loading as defined on the “Tire and
Loading Information” placard.
GTW
GAWR
Tongue weight rating for the trailer hitch
utilized.
WARNING!
CAUTION!
Do not tow a trailer at all during the first
500
miles (805 km) the new vehicle is driven.
T h
e engine, axle or other parts could be
damaged.
Then, during the first 500 miles (805 km) that
a
trailer is towed, do not drive over 50 mph
( 8
0 km/h) and do not make starts at full
t h
rottle. This helps the engine and other parts
of the vehicle wear in at the heavier loads.
WARNING!
Do not connect trailer brakes to your vehicle's
hydraulic brake lines. It can overload your
brake system and cause it to fail. You might
not have brakes when you need them and
could have an accident.
4
Page 121 of 268
STARTING AND OPERATING 119
Automatic Transmission
Select the DRIVE range when towing. The
transmission controls include a drive strategy to
avoid frequent shifting when towing. However, if
frequent shifting does occur while in DRIVE, you
can use the AutoStick shift control (if equipped) to
manually select a lower gear.
NOTE:
Using a lower gear while operating the vehicle
u n
der heavy loading conditions will improve perfor -
mance and extend transmission life by reducing
e x
cessive shifting and heat buildup. This action will
also provide better engine braking.
Cruise Control — If Equipped
Do not use on hilly terrain or with heavy loads.
When using the Cruise Control, if you experience
speed drops greater than 10 mph (16 km/h),
d i
sengage until you can get back to cruising
speed.
Use Cruise Control in flat terrain and with light
loads to maximize fuel efficiency.
AutoStick — If Equipped
When using the AutoStick shift control, select
the highest gear that allows for adequate perfor -
mance and avoids frequent downshifts. For
e x
ample, choose “5” if the desired speed can be
maintained. Choose “4” or “3” if needed to
maintain the desired speed.
To prevent excess heat generation, avoid
continuous driving at high RPM. Reduce vehicle
speed as necessary to avoid extended driving at
high RPM. Return to a higher gear or vehicle
speed when grade and road conditions allow.
RECREATIONAL TOWING (BEHIND
MOTORHOME)
Recreational towing (with all four wheels on the
ground, or using a tow dolly) is NOT ALLOWED. The
only acceptable method for towing this vehicle
(behind another vehicle) is on a vehicle trailer with
all four wheels OFF the ground.
DRIVING TIPS
DRIVING ON SLIPPERY SURFACES
Information in this section will aid in safe
controlled launches in adverse conditions.
Acceleration
Rapid acceleration on snow covered, wet, or other
slippery surfaces may cause the driving wheels to
pull erratically to the right or left. This phenomenon
occurs when there is a difference in the surface
traction under the rear (driving) wheels.
Traction
When driving on wet or slushy roads, it is possible
for a wedge of water to build up between the tire
and road surface. This is known as hydroplaning
and may cause partial or complete loss of vehicle
control and stopping ability. To reduce this
possibility, the following precautions should be
observed:
Slow down during rainstorms or when the roads
are slushy.
Slow down if the road has standing water or
puddles.
CAUTION!
Towing this vehicle in violation of the above
requirements can cause severe transmission
and/or transfer case damage. Damage from
improper towing is not covered under the New
Vehicle Limited Warranty.
WARNING!
Rapid acceleration on slippery surfaces is
dangerous. Unequal traction can cause sudden
pulling of the front wheels. You could lose
control of the vehicle and possibly have a
collision. Accelerate slowly and carefully
whenever there is likely to be poor traction (ice,
snow, wet, mud, loose sand, etc.).
4
Page 122 of 268
120 STARTING AND OPERATING
(Continued)
Replace tires when tread wear indicators first
become visible.
Keep tires properly inflated.
Maintain sufficient distance between your
vehicle and the vehicle in front of you to avoid a
collision in a sudden stop.
Your vehicle may be equipped with a Limited Slip
D i
fferential (LSD) that reduces, but does not
eliminate, the amount of wheel slip across a given
axle for improved handling.
DRIVING THROUGH WATER
Driving through water more than a few inches/
centimeters deep will require extra caution to
ensure safety and prevent damage to your vehicle.
Flowing/Rising Water Shallow Standing Water
Although your vehicle is capable of driving through
shallow standing water, consider the following
Warnings and Cautions before doing so.
WARNING!
Do not drive on or across a road or path where
water is flowing and/or rising (as in storm
run-off). Flowing water can wear away the road
or path's surface and cause your vehicle to sink
into deeper water. Furthermore, flowing and/or
rising water can carry your vehicle away swiftly.
Failure to follow this warning may result in
injuries that are serious or fatal to you, your
passengers, and others around you.
WARNING!
Driving through standing water limits your
vehicle’s traction capabilities. Do not exceed
5
mph (8 km/h) when driving through
st
anding water.
Driving through standing water limits your
vehicle’s braking capabilities, which increases
stopping distances. Therefore, after driving
through standing water, drive slowly and
lightly press on the brake pedal several times
to dry the brakes.
Failure to follow these warnings may result in
injuries that are serious or fatal to you, your
passengers, and others around you.
CAUTION!
Always check the depth of the standing water
before driving through it. Never drive through
standing water that is deeper than the bottom
of the tire rims mounted on the vehicle.
Determine the condition of the road or the
path that is under water and if there are any
obstacles in the way before driving through
the standing water.
Do not exceed 5 mph (8 km/h) when driving
th
rough standing water. This will minimize
wave effects.
Driving through standing water may cause
damage to your vehicle’s drivetrain compo -
nents. Always inspect your vehicle’s fluids
( i
.e., engine oil, transmission, axle, etc.) for
signs of contamination (i.e., fluid that is milky
or foamy in appearance) after driving through
standing water. Do not continue to operate
the vehicle if any fluid appears contaminated,
as this may result in further damage. Such
damage is not covered by the New Vehicle
Limited Warranty.
Getting water inside your vehicle’s engine can
cause it to lock up and stall out, and cause
serious internal damage to the engine. Such
damage is not covered by the New Vehicle
Limited Warranty.
CAUTION!
Page 133 of 268
MULTIMEDIA 131
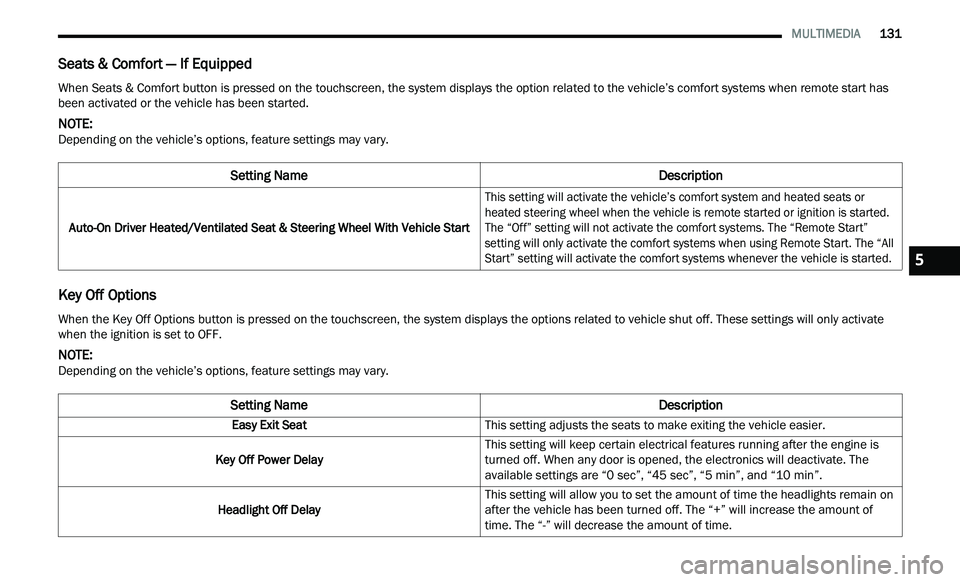
Seats & Comfort — If Equipped
Key Off Options
When Seats & Comfort button is pressed on the touchscreen, the system displays the option related to the vehicle’s comfort systems when remote start has
been activated or the vehicle has been started.
NOTE:
Depending on the vehicle’s options, feature settings may vary.
Setting Name Description
Auto-On Driver Heated/Ventilated Seat & Steering Wheel With Vehicle Start
This setting will activate the vehicle’s comfort system and heated seats or
he
ated steering wheel when the vehicle is remote started or ignition is started.
The “Off” setting will not activate the comfort systems. The “Remote Start”
setting will only activate the comfort systems when using Remote Start. The “All
Start” setting will activate the comfort systems whenever the vehicle is started.
When the Key Off Options button is pressed on the touchscreen, the system displays the options related to vehicle shut off. These settings will only activate
when the ignition is set to OFF.
NOTE:
Depending on the vehicle’s options, feature settings may vary.
Setting Name Description
Easy Exit SeatThis setting adjusts the seats to make exiting the vehicle easier.
Key Off Power Delay This setting will keep certain electrical features running after the engine is
tu
rned off. When any door is opened, the electronics will deactivate. The
available settings are “0 sec”, “45 sec”, “5 min”, and “10 min”.
Headlight Off Delay This setting will allow you to set the amount of time the headlights remain on
af
ter the vehicle has been turned off. The “+” will increase the amount of
time. The “-” will decrease the amount of time.
5
Page 140 of 268
138 SAFETY
Brake Warning Light does not come on when the
ignition is placed in the ON/RUN mode, have the
light repaired as soon as possible.
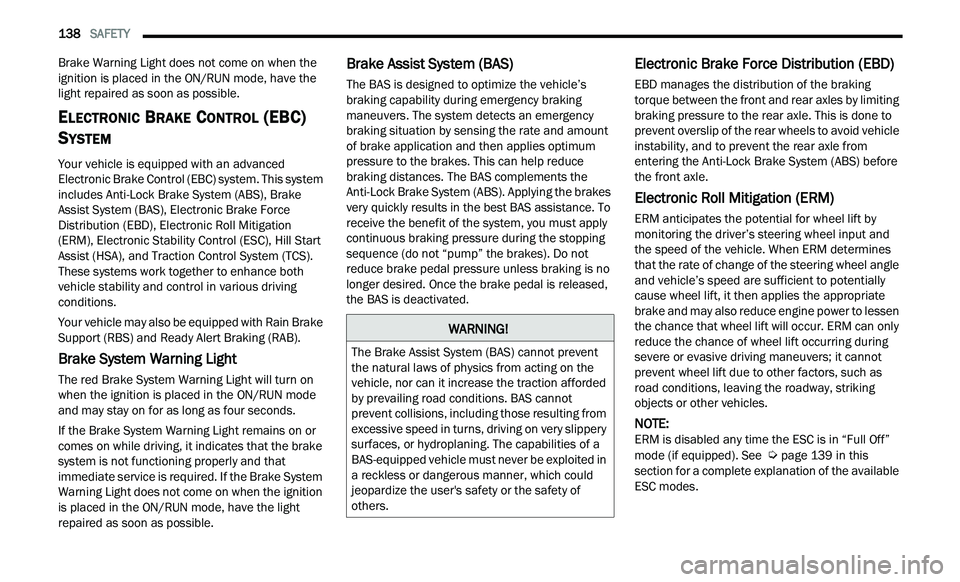
ELECTRONIC BRAKE CONTROL (EBC)
S
YSTEM
Your vehicle is equipped with an advanced
Electronic Brake Control (EBC) system. This system
includes Anti-Lock Brake System (ABS), Brake
Assist System (BAS), Electronic Brake Force
Distribution (EBD), Electronic Roll Mitigation
(ERM), Electronic Stability Control (ESC), Hill Start
Assist (HSA), and Traction Control System (TCS).
These systems work together to enhance both
vehicle stability and control in various driving
conditions.
Your vehicle may also be equipped with Rain Brake
S u
pport (RBS) and Ready Alert Braking (RAB).
Brake System Warning Light
The red Brake System Warning Light will turn on
when the ignition is placed in the ON/RUN mode
and may stay on for as long as four seconds.
If the Brake System Warning Light remains on or
com
es on while driving, it indicates that the brake
system is not functioning properly and that
immediate service is required. If the Brake System
Warning Light does not come on when the ignition
is placed in the ON/RUN mode, have the light
repaired as soon as possible.
Brake Assist System (BAS)
The BAS is designed to optimize the vehicle’s
braking capability during emergency braking
maneuvers. The system detects an emergency
braking situation by sensing the rate and amount
of brake application and then applies optimum
pressure to the brakes. This can help reduce
braking distances. The BAS complements the
Anti-Lock Brake System (ABS). Applying the brakes
very quickly results in the best BAS assistance. To
receive the benefit of the system, you must apply
continuous braking pressure during the stopping
sequence (do not “pump” the brakes). Do not
reduce brake pedal pressure unless braking is no
longer desired. Once the brake pedal is released,
the BAS is deactivated.
Electronic Brake Force Distribution (EBD)
EBD manages the distribution of the braking
torque between the front and rear axles by limiting
braking pressure to the rear axle. This is done to
prevent overslip of the rear wheels to avoid vehicle
instability, and to prevent the rear axle from
entering the Anti-Lock Brake System (ABS) before
the front axle.
Electronic Roll Mitigation (ERM)
ERM anticipates the potential for wheel lift by
monitoring the driver’s steering wheel input and
the speed of the vehicle. When ERM determines
that the rate of change of the steering wheel angle
and vehicle’s speed are sufficient to potentially
cause wheel lift, it then applies the appropriate
brake and may also reduce engine power to lessen
the chance that wheel lift will occur. ERM can only
reduce the chance of wheel lift occurring during
severe or evasive driving maneuvers; it cannot
prevent wheel lift due to other factors, such as
road conditions, leaving the roadway, striking
objects or other vehicles.
NOTE:
ERM is disabled any time the ESC is in “Full Off”
m od
e (if equipped). See Ú page 139 in this
section for a complete explanation of the available
E S
C modes.
WARNING!
The Brake Assist System (BAS) cannot prevent
the natural laws of physics from acting on the
vehicle, nor can it increase the traction afforded
by prevailing road conditions. BAS cannot
prevent collisions, including those resulting from
excessive speed in turns, driving on very slippery
surfaces, or hydroplaning. The capabilities of a
BAS-equipped vehicle must never be exploited in
a reckless or dangerous manner, which could
jeopardize the user's safety or the safety of
others.
Page 141 of 268
SAFETY 139
(Continued)
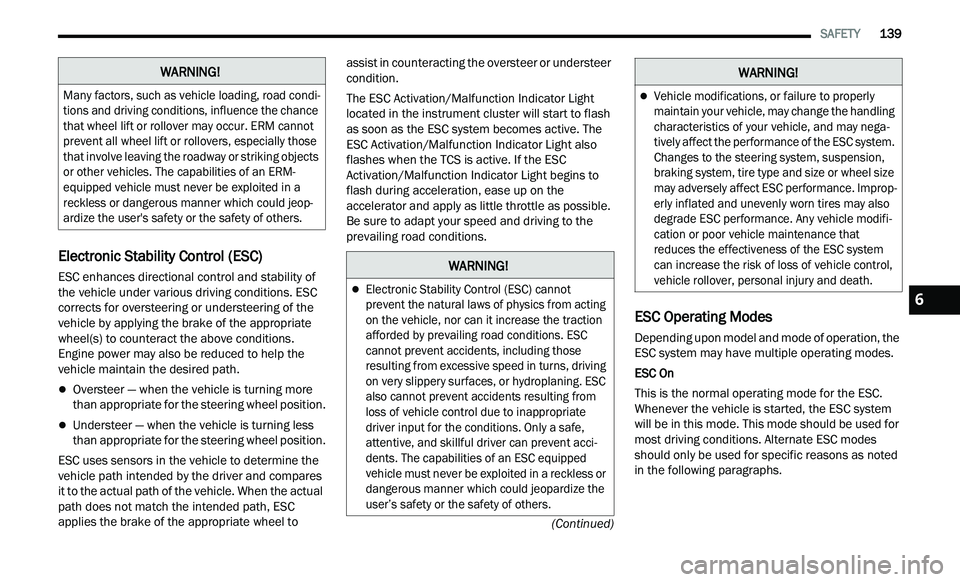
Electronic Stability Control (ESC)
ESC enhances directional control and stability of
the vehicle under various driving conditions. ESC
corrects for oversteering or understeering of the
vehicle by applying the brake of the appropriate
wheel(s) to counteract the above conditions.
Engine power may also be reduced to help the
vehicle maintain the desired path.
Oversteer — when the vehicle is turning more
than appropriate for the steering wheel position.
Understeer — when the vehicle is turning less
than appropriate for the steering wheel position.
ESC uses sensors in the vehicle to determine the
ve
hicle path intended by the driver and compares
it to the actual path of the vehicle. When the actual
path does not match the intended path, ESC
applies the brake of the appropriate wheel to assist in counteracting the oversteer or understeer
condition.
The ESC Activation/Malfunction Indicator Light
l
oc
ated in the instrument cluster will start to flash
as soon as the ESC system becomes active. The
ESC Activation/Malfunction Indicator Light also
flashes when the TCS is active. If the ESC
Activation/Malfunction Indicator Light begins to
flash during acceleration, ease up on the
accelerator and apply as little throttle as possible.
Be sure to adapt your speed and driving to the
prevailing road conditions.
ESC Operating Modes
Depending upon model and mode of operation, the
ESC system may have multiple operating modes.
ESC On
This is the normal operating mode for the ESC.
W h
enever the vehicle is started, the ESC system
will be in this mode. This mode should be used for
most driving conditions. Alternate ESC modes
should only be used for specific reasons as noted
in the following paragraphs.
WARNING!
Many factors, such as vehicle loading, road condi -
tions and driving conditions, influence the chance
t h
at wheel lift or rollover may occur. ERM cannot
prevent all wheel lift or rollovers, especially those
that involve leaving the roadway or striking objects
or other vehicles. The capabilities of an ERM-
equipped vehicle must never be exploited in a
reckless or dangerous manner which could jeop -
ardize the user's safety or the safety of others.
WARNING!
Electronic Stability Control (ESC) cannot
prevent the natural laws of physics from acting
on the vehicle, nor can it increase the traction
afforded by prevailing road conditions. ESC
cannot prevent accidents, including those
resulting from excessive speed in turns, driving
on very slippery surfaces, or hydroplaning. ESC
also cannot prevent accidents resulting from
loss of vehicle control due to inappropriate
driver input for the conditions. Only a safe,
attentive, and skillful driver can prevent acci -
dents. The capabilities of an ESC equipped
v e
hicle must never be exploited in a reckless or
dangerous manner which could jeopardize the
user’s safety or the safety of others.
Vehicle modifications, or failure to properly
maintain your vehicle, may change the handling
characteristics of your vehicle, and may nega -
tively affect the performance of the ESC system.
C h
anges to the steering system, suspension,
braking system, tire type and size or wheel size
may adversely affect ESC performance. Improp -
erly inflated and unevenly worn tires may also
d e
grade ESC performance. Any vehicle modifi-
cation or poor vehicle maintenance that
r e
duces the effectiveness of the ESC system
can increase the risk of loss of vehicle control,
vehicle rollover, personal injury and death.
WARNING!
6
Page 142 of 268
140 SAFETY
(Continued)
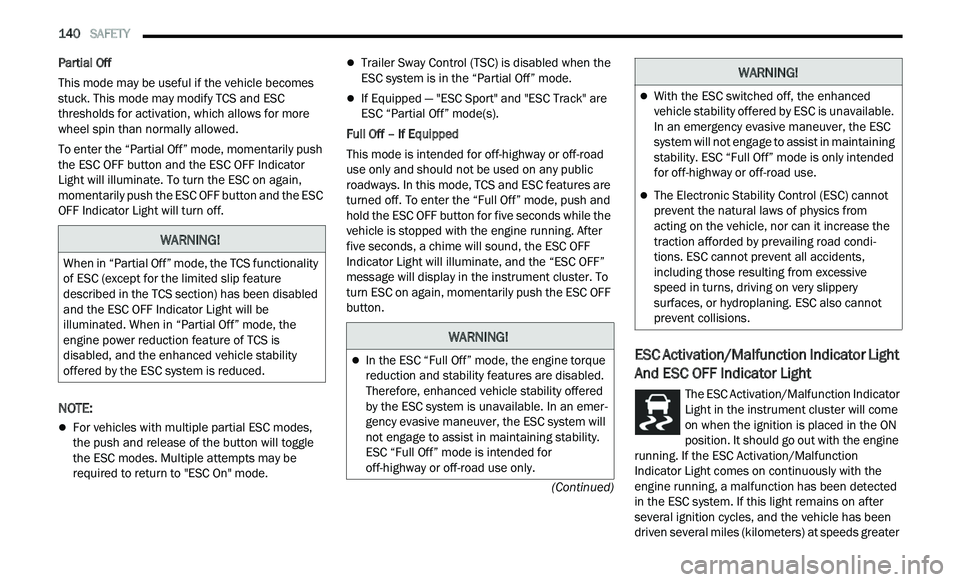
Partial Off
This mode may be useful if the vehicle becomes
st
uck. This mode may modify TCS and ESC
thresholds for activation, which allows for more
wheel spin than normally allowed.
To enter the “Partial Off” mode, momentarily push
th
e ESC OFF button and the ESC OFF Indicator
Light will illuminate. To turn the ESC on again,
momentarily push the ESC OFF button and the ESC
OFF Indicator Light will turn off.
NOTE:
For vehicles with multiple partial ESC modes,
the push and release of the button will toggle
the ESC modes. Multiple attempts may be
required to return to "ESC On" mode.
Trailer Sway Control (TSC) is disabled when the
ESC system is in the “Partial Off” mode.
If Equipped — "ESC Sport" and "ESC Track" are
ESC “Partial Off” mode(s).
Full Off – If Equipped
This mode is intended for off-highway or off-road
u s
e only and should not be used on any public
roadways. In this mode, TCS and ESC features are
turned off. To enter the “Full Off” mode, push and
hold the ESC OFF button for five seconds while the
vehicle is stopped with the engine running. After
five seconds, a chime will sound, the ESC OFF
Indicator Light will illuminate, and the “ESC OFF”
message will display in the instrument cluster. To
turn ESC on again, momentarily push the ESC OFF
button.
ESC Activation/Malfunction Indicator Light
And ESC OFF Indicator Light
The ESC Activation/Malfunction Indicator
Light in the instrument cluster will come
o n
when the ignition is placed in the ON
position. It should go out with the engine
running. If the ESC Activation/Malfunction
Indicator Light comes on continuously with the
engine running, a malfunction has been detected
in the ESC system. If this light remains on after
several ignition cycles, and the vehicle has been
driven several miles (kilometers) at speeds greater
WARNING!
When in “Partial Off” mode, the TCS functionality
of ESC (except for the limited slip feature
described in the TCS section) has been disabled
and the ESC OFF Indicator Light will be
illuminated. When in “Partial Off” mode, the
engine power reduction feature of TCS is
disabled, and the enhanced vehicle stability
offered by the ESC system is reduced.
WARNING!
In the ESC “Full Off” mode, the engine torque
reduction and stability features are disabled.
Therefore, enhanced vehicle stability offered
by the ESC system is unavailable. In an emer -
gency evasive maneuver, the ESC system will
n ot
engage to assist in maintaining stability.
ESC “Full Off” mode is intended for
off-highway or off-road use only.
With the ESC switched off, the enhanced
vehicle stability offered by ESC is unavailable.
In an emergency evasive maneuver, the ESC
system will not engage to assist in maintaining
stability. ESC “Full Off” mode is only intended
for off-highway or off-road use.
The Electronic Stability Control (ESC) cannot
prevent the natural laws of physics from
acting on the vehicle, nor can it increase the
traction afforded by prevailing road condi -
tions. ESC cannot prevent all accidents,
i n
cluding those resulting from excessive
speed in turns, driving on very slippery
surfaces, or hydroplaning. ESC also cannot
prevent collisions.
WARNING!
Page 144 of 268
142 SAFETY
Towing With HSA
HSA will also provide assistance to mitigate roll
back while towing a trailer.
Rain Brake Support (RBS)
RBS may improve braking performance in wet
conditions. It will periodically apply a small amount
of brake pressure to remove any water buildup on
the front brake rotors. It functions when the windshield wipers are in LO or HI speed. When RBS
is active, there is no notification to the driver and
no driver interaction is required.
Ready Alert Braking (RAB)
RAB may reduce the time required to reach full
braking during emergency braking situations. It
anticipates when an emergency braking situation
may occur by monitoring how fast the throttle is
released by the driver. The Electronic Brake
Controller (EBC) will prepare the brake system for
a panic stop.
Traction Control System (TCS)
TCS monitors the amount of wheel spin of each of
the driven wheels. If wheel spin is detected, the
TCS may apply brake pressure to the spinning
wheel(s) and/or reduce engine power to provide
enhanced acceleration and stability. A feature of
the TCS, Brake Limited Differential (BLD) functions
similarly to a limited slip differential and controls
the wheel spin across a driven axle. If one wheel on
a driven axle is spinning faster than the other, the
system will apply the brake of the spinning wheel.
This will allow more engine torque to be applied to
the wheel that is not spinning. BLD may remain
enabled even if TCS and Electronic Stability Control
(ESC) are in reduced modes.
AUXILIARY DRIVING SYSTEMS
BLIND SPOT MONITORING (BSM) —
I
F EQUIPPED
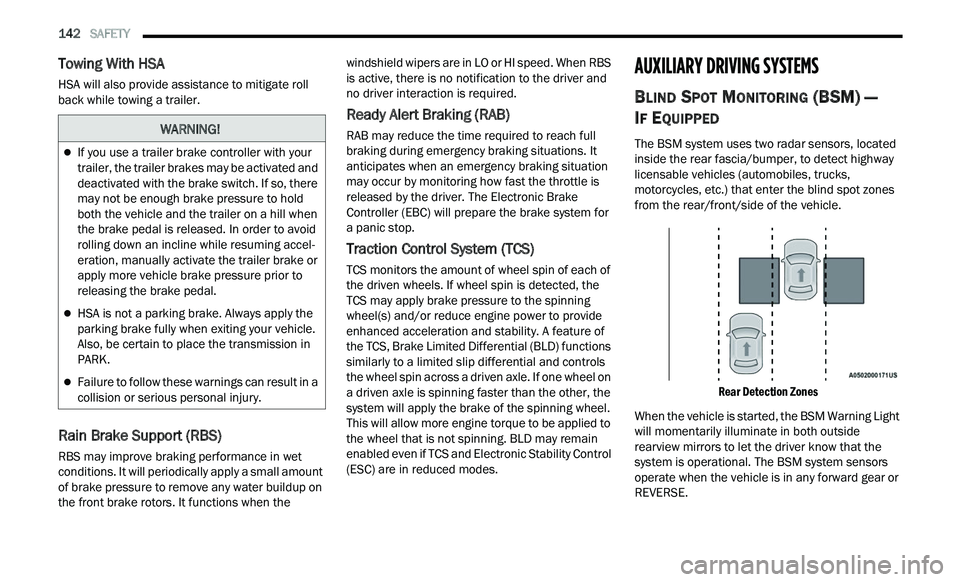
The BSM system uses two radar sensors, located
inside the rear fascia/bumper, to detect highway
licensable vehicles (automobiles, trucks,
motorcycles, etc.) that enter the blind spot zones
from the rear/front/side of the vehicle.
Rear Detection Zones
When the vehicle is started, the BSM Warning Light
wi
ll momentarily illuminate in both outside
rearview mirrors to let the driver know that the
system is operational. The BSM system sensors
operate when the vehicle is in any forward gear or
REVERSE.
WARNING!
If you use a trailer brake controller with your
trailer, the trailer brakes may be activated and
deactivated with the brake switch. If so, there
may not be enough brake pressure to hold
both the vehicle and the trailer on a hill when
the brake pedal is released. In order to avoid
rolling down an incline while resuming accel -
eration, manually activate the trailer brake or
a p
ply more vehicle brake pressure prior to
releasing the brake pedal.
HSA is not a parking brake. Always apply the
parking brake fully when exiting your vehicle.
Also, be certain to place the transmission in
PARK.
Failure to follow these warnings can result in a
collision or serious personal injury.
Page 161 of 268
SAFETY 159
The ORC contains a backup power supply system
that may deploy the air bag system even if the
battery loses power or it becomes disconnected
prior to deployment.
The ORC turns on the Air Bag Warning Light in the
in
strument panel for approximately four to eight
seconds for a self-check when the ignition switch is
first in the ON/RUN position. After the self-check,
the Air Bag Warning Light will turn off. If the ORC
detects a malfunction in any part of the system, it
turns on the Air Bag Warning Light, either
momentarily or continuously. A single chime will
sound to alert you if the light comes on again after
initial startup.
The ORC also includes diagnostics that will
i l
luminate the instrument panel Air Bag Warning
Light if a malfunction is detected that could affect
the air bag system. The diagnostics also record the
nature of the malfunction. While the air bag system
is designed to be maintenance free, if any of the
following occurs, have an authorized dealer
service the air bag system immediately.
The Air Bag Warning Light does not come on
during the four to eight seconds when the igni -
tion switch is first in the ON/RUN position.
The Air Bag Warning Light remains on after the
four to eight-second interval.
The Air Bag Warning Light comes on intermit -
tently or remains on while driving.
NOTE:
If the speedometer, tachometer, or any engine
r e
lated gauges are not working, the Occupant
Restraint Controller (ORC) may also be disabled. In
this condition the air bags may not be ready to
inflate for your protection. Have an authorized
dealer service the air bag system immediately.
Redundant Air Bag Warning Light
If a fault with the Air Bag Warning Light is
detected, which could affect the
S u
pplemental Restraint System (SRS),
the Redundant Air Bag Warning Light will
illuminate on the instrument panel. The
Redundant Air Bag Warning Light will stay on until
the fault is cleared. In addition, a single chime will
sound to alert you that the Redundant Air Bag
Warning Light has come on and a fault has been
detected. If the Redundant Air Bag Warning Light comes on intermittently or remains on while driving
have an authorized dealer service the vehicle
immediately
Ú page 71.
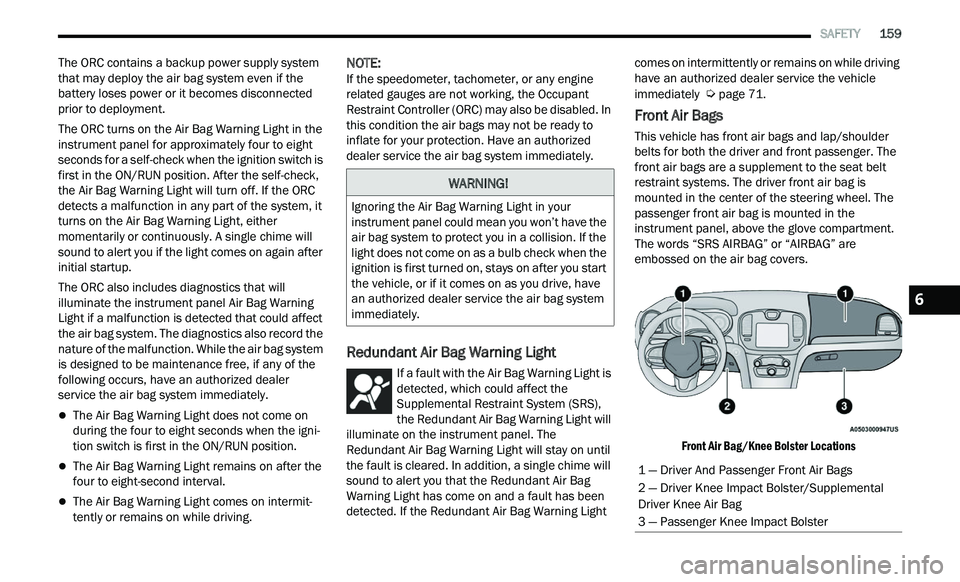
Front Air Bags
This vehicle has front air bags and lap/shoulder
belts for both the driver and front passenger. The
front air bags are a supplement to the seat belt
restraint systems. The driver front air bag is
mounted in the center of the steering wheel. The
passenger front air bag is mounted in the
instrument panel, above the glove compartment.
The words “SRS AIRBAG” or “AIRBAG” are
embossed on the air bag covers.
Front Air Bag/Knee Bolster Locations
WARNING!
Ignoring the Air Bag Warning Light in your
instrument panel could mean you won’t have the
air bag system to protect you in a collision. If the
light does not come on as a bulb check when the
ignition is first turned on, stays on after you start
the vehicle, or if it comes on as you drive, have
an authorized dealer service the air bag system
immediately.
1 — Driver And Passenger Front Air Bags
2 — Driver Knee Impact Bolster/Supplemental
Driver Knee Air Bag
3 — Passenger Knee Impact Bolster
6