oil level CHRYSLER 300 SRT 2014 2.G Owners Manual
[x] Cancel search | Manufacturer: CHRYSLER, Model Year: 2014, Model line: 300 SRT, Model: CHRYSLER 300 SRT 2014 2.GPages: 590, PDF Size: 4.08 MB
Page 102 of 590
While cruising, brief full-throttle acceleration within the
limits of local traffic laws contributes to a good break-in.
However, wide-open throttle acceleration in low gear can
be detrimental and should be avoided.
The engine oil is a high performance synthetic lubricant,
the transmission fluid and axle lubricant installed at the
factory is high-quality and energy-conserving. Oil, fluid,
and lubricant changes should be consistent with antici-
pated climate and conditions under which vehicle opera-
tions will occur. For the recommended viscosity and
quality grades, refer to “Maintenance Procedures” in
“Maintaining Your Vehicle”.
CAUTION!
Never use Non-Detergent Oil or Straight Mineral Oil
in the engine or damage may result.NOTE:
A new engine may consume some oil during its
first few thousand miles (kilometers) of operation. This
should be considered a normal part of the break-in and
not interpreted as an indication of difficulty. Please check
your oil level with the engine oil indicator often during
the break in period. Add oil as required.
SAFETY TIPS
Transporting Passengers
NEVER TRANSPORT PASSENGERS IN THE CARGO
AREA.
WARNING!
• Do not leave children or animals inside parked
vehicles in hot weather. Interior heat build-up may
cause serious injury or death.
(Continued)
100 THINGS TO KNOW BEFORE STARTING YOUR VEHICLE
Page 321 of 590
EVIC Red Telltales
This area will show reconfigurable red telltales. These
telltales include:
•Door Ajar
This telltale turns on when one or more doors
are ajar. The telltale will show which doors are
ajar.
• Trunk Ajar
This light will turn on to indicate that the trunk
lid is ajar.
• Oil Pressure Warning Telltale
This telltale indicates low engine oil pressure. If
the light turns on while driving, stop the vehicle and shut
off the engine as soon as possible. A chime will sound for
four minutes when this light turns on. Do not operate the vehicle until the cause is corrected.
This light does not show how much oil is in the engine.
The engine oil level must be checked under the hood.
•
Charging System Telltale
This telltale shows the status of the electrical
charging system. If the telltale stays on or comes
on while driving, turn off some of the vehicle’s non-
essential electrical devices or increase engine speed (if at
idle). If the charging system telltale remains on, it means
that the vehicle is experiencing a problem with the
charging system. Obtain SERVICE IMMEDIATELY. See
an authorized dealer.
If jump starting is required, refer to “Jump Starting
Procedures” in “What To Do In Emergencies”.
4
UNDERSTANDING YOUR INSTRUMENT PANEL 319
Page 489 of 590
MAINTENANCE PROCEDURES
The pages that follow contain therequiredmaintenance
services determined by the engineers who designed your
vehicle.
Besides those maintenance items specified in the fixed
“Maintenance Schedule”, there are other components
which may require servicing or replacement in the future.
CAUTION!
• Failure to properly maintain your vehicle or per-
form repairs and service when necessary could
result in more costly repairs, damage to other
components or negatively impact vehicle perfor-
mance. Immediately have potential malfunctions
examined by an authorized dealer or qualified
repair center.
(Continued)
CAUTION! (Continued)
•Your vehicle has been built with improved fluids
that protect the performance and durability of your
vehicle and also allow extended maintenance inter-
vals. Do not use chemical flushes in these compo-
nents as the chemicals can damage your engine,
transmission, power steering or air conditioning.
Such damage is not covered by the New Vehicle
Limited Warranty. If a flush is needed because of
component malfunction, use only the specified
fluid for the flushing procedure.
Engine Oil
Checking Oil Level
To assure proper engine lubrication, the engine oil must
be maintained at the correct level. Check the oil level at
7
MAINTAINING YOUR VEHICLE 487
Page 490 of 590
regular intervals, such as every fuel stop. The best time to
check the engine oil level is about five minutes after a
fully warmed engine is shut off.
Checking the oil while the vehicle is on level ground will
improve the accuracy of the oil level readings. Maintain
the oil level in the “SAFE” range. Adding 1.0 qt (1.0 L) of
oil when the reading is at the bottom of the “SAFE” range
will result in an oil level at the top of the “SAFE” range
on these engines.
CAUTION!
Overfilling or underfilling will cause oil aeration or
loss of oil pressure. This could damage your engine.
Change Engine Oil
The oil change indicator system will remind you that it is
time to take your vehicle in for scheduled maintenance.
Refer to “Maintenance Schedule” for further information.NOTE: Under no circumstances should oil change in-
tervals exceed 6,000 miles (10 000 km) or six months,
whichever occurs first.
Engine Oil Selection
For best performance and maximum protection under all
types of operating conditions, the manufacturer only
recommends full synthetic engine oils that meet the
American Petroleum Institute (API) categories of SN.
The manufacturer recommends the use of a full synthetic
SAE 0W-40 engine oil or equivalent meeting the require-
ments of Chrysler Material Standard MS-12633.
CAUTION!
Do not use chemical flushes in your engine oil as the
chemicals can damage your engine. Such damage is
not covered by the New Vehicle Limited Warranty.
488 MAINTAINING YOUR VEHICLE
Page 498 of 590
Windshield Wiper Blades
Clean the rubber edges of the wiper blades and the
windshield periodically with a sponge or soft cloth and a
mild nonabrasive cleaner. This will remove accumula-
tions of salt or road film.
Operation of the wipers on dry glass for long periods
may cause deterioration of the wiper blades. Always use
washer fluid when using the wipers to remove salt or dirt
from a dry windshield.
Avoid using the wiper blades to remove frost or ice from
the windshield. Keep the blade rubber out of contact with
petroleum products such as engine oil, gasoline, etc.
NOTE:Life expectancy of wiper blades varies depend-
ing on geographical area and frequency of use. Poor
performance of blades may be present with chattering,
marks, water lines or wet spots. If any of these conditions
are present, clean the wiper blades or replace as neces-
sary.
Adding Washer Fluid
The windshield washer fluid reservoir is located in the
front of the engine compartment. Be sure to check the
fluid level at regular intervals. Fill the reservoir with
windshield washer solvent (not radiator antifreeze) and
operate the system for a few seconds to flush out the
residual water.
When refilling the washer fluid reservoir, apply some
washer fluid to a cloth or towel and wipe the wiper
blades clean. This will help blade performance.
To prevent freeze-up of your windshield washer system in
cold weather, select a solution or mixture that meets or
exceeds the temperature range of your climate. This rating
information can be found on most washer fluid containers.
The fluid reservoir will hold nearly 1 gal (4 L) of washer
fluid when the message “Low Washer Fluid” appears in
the Electronic Vehicle Information Center (EVIC) (if
equipped).
496 MAINTAINING YOUR VEHICLE
Page 510 of 590
WARNING!(Continued)
•To avoid contamination from foreign matter or
moisture, use only new brake fluid or fluid that has
been in a tightly closed container. Keep the master
cylinder reservoir cap secured at all times. Brake
fluid in a open container absorbs moisture from the
air resulting in a lower boiling point. This may
cause it to boil unexpectedly during hard or pro-
longed braking, resulting in sudden brake failure.
This could result in a collision.
• Overfilling the brake fluid reservoir can result in
spilling brake fluid on hot engine parts, causing
the brake fluid to catch fire. Brake fluid can also
damage painted and vinyl surfaces, care should be
taken to avoid its contact with these surfaces.
(Continued)
WARNING! (Continued)
•Do not allow petroleum based fluid to contaminate
the brake fluid. Brake seal components could be
damaged, causing partial or complete brake failure.
This could result in a collision.
Use only brake fluid that has been in a tightly closed
container to avoid contamination from foreign matter or
moisture.
Automatic Transmission
Selection Of Lubricant
It is important to use the proper transmission fluid to
ensure optimum transmission performance and life. Use
only the manufacturer ’s specified transmission fluid.
Refer to “Fluids, Lubricants, and Genuine Parts” in this
section for fluid specifications. It is important to maintain
the transmission fluid at the correct level using the
508 MAINTAINING YOUR VEHICLE
Page 512 of 590
transmission filler tube is capped and no dipstick is
provided. Your authorized dealer can check your trans-
mission fluid level using a special service dipstick.
If you notice fluid leakage or transmission malfunction,
visit your authorized dealer immediately to have the
transmission fluid level checked. Operating the vehicle
with an improper fluid level can cause severe transmis-
sion damage.
CAUTION!
If a transmission fluid leak occurs, visit your autho-
rized dealer immediately. Severe transmission dam-
age may occur. Your authorized dealer has the proper
tools to adjust the fluid level accurately.
Fluid And Filter Changes
Refer to the “Maintenance Schedule” for the proper
maintenance intervals.In addition, change the fluid and filter if the fluid
becomes contaminated (with water, etc.), or if the trans-
mission is disassembled for any reason.
Rear Axle
For normal service, periodic fluid level checks are not
required. When the vehicle is serviced for other reasons
the exterior surfaces of the axle assembly should be
inspected. If gear oil leakage is suspected inspect the
fluid level. Refer to “Fluids, Lubricants, and Genuine
Parts” in “Maintaining Your Vehicle” for further informa-
tion.
Fluid Level Check
Check the fluid level by removing the fill plug on the
axle. The fluid level should be at the bottom of the fill
hole. Add fluid, if necessary, to maintain the proper level.
Refer to “Fluids, Lubricants, and Genuine Parts” in
“Maintaining Your Vehicle” for further information.
510 MAINTAINING YOUR VEHICLE
Page 536 of 590
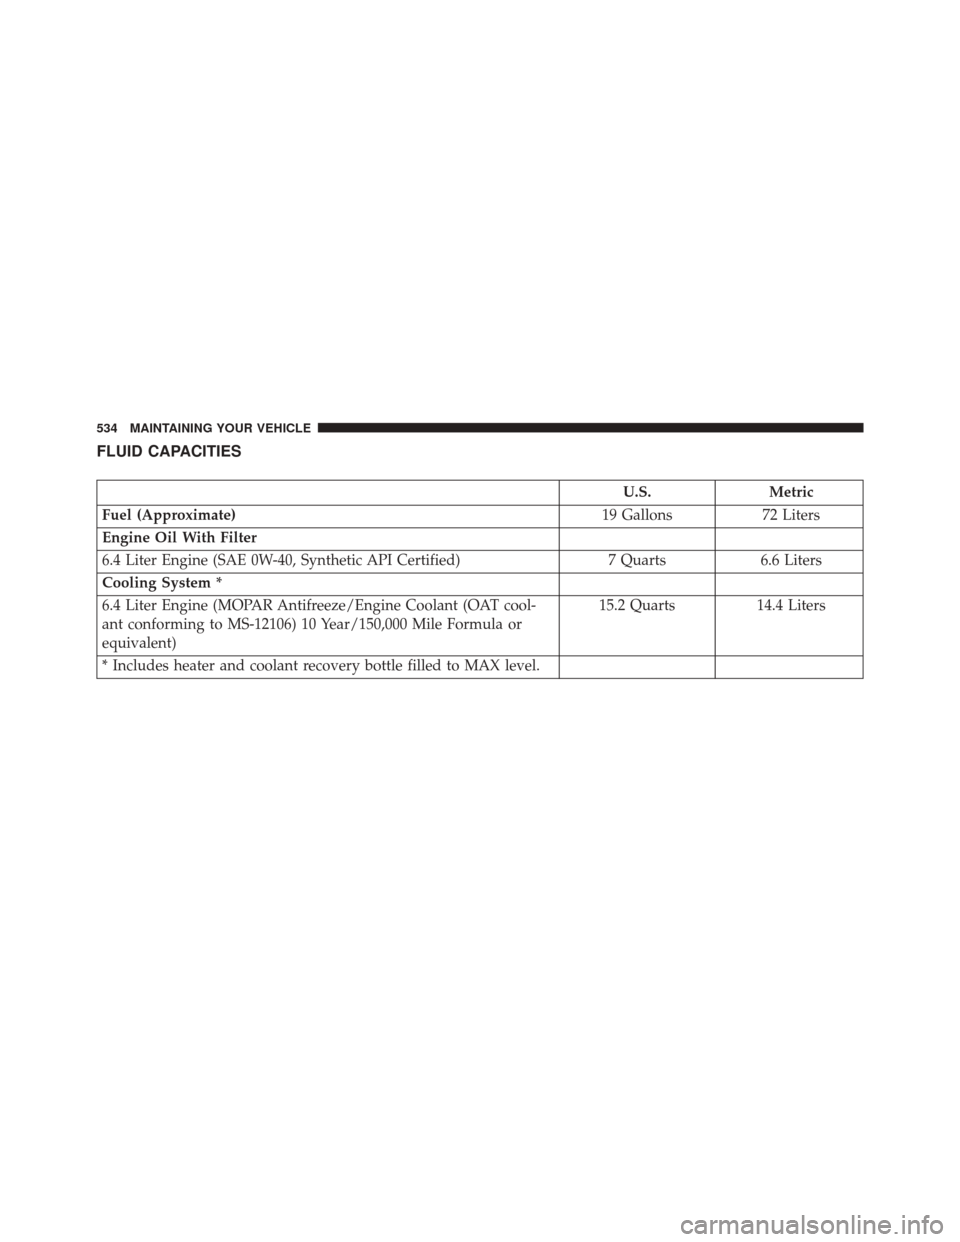
FLUID CAPACITIES
U.S.Metric
Fuel (Approximate) 19 Gallons72 Liters
Engine Oil With Filter
6.4 Liter Engine (SAE 0W-40, Synthetic API Certified) 7 Quarts6.6 Liters
Cooling System *
6.4 Liter Engine (MOPAR Antifreeze/Engine Coolant (OAT cool-
ant conforming to MS-12106) 10 Year/150,000 Mile Formula or
equivalent) 15.2 Quarts
14.4 Liters
* Includes heater and coolant recovery bottle filled to MAX level.
534 MAINTAINING YOUR VEHICLE
Page 541 of 590
Your authorized dealer will reset the oil change indicator
message after completing the scheduled oil change. If a
scheduled oil change is performed by someone other
than your authorized dealer, the message can be reset by
referring to the steps described under “Electronic Vehicle
Information Center (EVIC)” in “Understanding Your
Instrument Panel” for further information.
At Each Stop For Fuel
•Check the engine oil level. Refer to “Maintenance
Procedures/Engine Oil” in “Maintaining Your Ve-
hicle” for further information.
• Check the windshield washer solvent and add if
required.
Once A Month
•
Check tire pressure and look for unusual wear or damage.
• Inspect the battery, and clean and tighten the terminals
as required. •
Check the fluid levels of the coolant reservoir, brake
master cylinder, and power steering, and add as
needed.
• Check all lights and other electrical items for correct
operation.
At Each Oil Change
• Change the engine oil filter.
• Inspect the brake hoses and lines.
CAUTION!
Failure to perform the required maintenance items
may result in damage to the vehicle.
Required Maintenance Intervals
Refer to the Maintenance Schedules on the following
pages for the required maintenance intervals.
8
M
A I
N T
E
N
A
N
C E
S
C
H E
D
U L
E
SMAINTENANCE SCHEDULES 539
Page 569 of 590
Automatic Oil Change Indicator...............323
Automatic Temperature Control (ATC) ..........362
Automatic Transmission ....................379
Adding Fluid ......................... .510
Fluid and Filter Changes ..................510
Fluid Change ......................... .510
Fluid Level Check ...................... .508
Fluid Type ........................... .536
Special Additives ...................... .509
Auto Unlock, Doors ........................32
Auto Up Power Windows ....................40
Axle Fluid ............................. .536
Axle Lubrication (Axle Fluid) .................536
Battery ................................ .490
Keyless Transmitter Replacement (RKE) ........24
Location ............................. .490
Remote Battery Replacement ................24
Transmitter Battery Replacement .............24Belts, Seat
...............................49
Bluetooth® Connecting To A Particular Mobile Phone Or Audio
Device After Pairing .....................136
Connect Or Disconnect Link Between the
Uconnect® Phone And Mobile Phone .........152
Body Mechanism Lubrication .................495
B-Pillar Location ......................... .418
Brake Assist System ...................... .403
Brake Control System, Electronic ..............402
Brake Fluid ............................ .536
Brake, Parking .......................... .397
Brake System ........................... .506
Anti-Lock (ABS) ....................... .400
Fluid Check .......................... .506
Master Cylinder ....................... .506
Parking ............................. .397
Warning Light ........................ .309
Brake/Transmission Interlock .................379
10
INDEX 567