key CHRYSLER ASPEN 2008 2.G Owner's Manual
[x] Cancel search | Manufacturer: CHRYSLER, Model Year: 2008, Model line: ASPEN, Model: CHRYSLER ASPEN 2008 2.GPages: 479, PDF Size: 4.3 MB
Page 32 of 479
Automatic Door Locks
If this feature is enabled, your door locks will lock
automatically when the vehicle's speed exceeds 15 mph
(24 km/h).
Automatic Door Lock Programming
This feature is enabled when your vehicle is shipped
from the assembly plant and can be disabled by follow-
ing these procedures:
²For vehicles equipped with the Electronic Vehicle
Information Center (EVIC), refer to ªPersonal Settings
(Customer Programmable Features)º under ªOver-
head Console with Electronic Vehicle Information
Center (EVIC) ± If Equippedº in Section 3.
²For vehicles not equipped with the EVIC:
1. Enter your vehicle and close all doors.2. Fasten your seat belt. Fastening the seat belt will
cancel any chiming that may confuse you during this
programming procedure.
3. Place the key into the ignition.
4. Within 10 seconds, cycle the key from the LOCK
position to the ON position a minimum of four times,
ending in the LOCK position(do not start the engine).
5. Within 30 seconds, press the driver's door lock switch
in the LOCK direction.
6. A single chime will be heard to indicate the feature has
been disabled.
7. To reactivate this feature, repeat the above steps.
8. If a chime is not heard, the program mode was
canceled before the feature could be disabled. If neces-
sary, repeat the above procedure.
THINGS TO KNOW BEFORE STARTING YOUR VEHICLE 31
2
Page 33 of 479
Auto Unlock On Exit Ð If Equipped
This feature unlocks all of the doors of the vehicle when
any door is opened (excluding the liftgate). This will
occur only after the vehicle has been shifted into the
PARK position after the vehicle has been driven (shifted
out of PARK and all doors closed).
This feature will not operate if there is any manual
operation of the power door locks (LOCK or UNLOCK).
Auto Unlock On Exit Programming Ð If Equipped
Customer programming sequence to enable or disable
the Auto Unlock feature:
²For vehicles equipped with the Electronic Vehicle
Information Center (EVIC), refer to ªPersonal Settings
(Customer Programmable Features)º under ªOver-
head Console with Electronic Vehicle Information
Center (EVIC) ± If Equippedº in Section 3.
²For vehicles not equipped with the EVIC, performing
the following procedure:
1. Enter your vehicle and close all doors.
2. Fasten your seat belt. Fastening the seat belt will
cancel any chimes that may be confusing during this
programming procedure.
3. Insert the key into the ignition.
4. Within 15 seconds, cycle the key from the LOCK
position to the ON position a minimum of four times,
ending in the LOCK position(do not start the engine).
5. Within 30 seconds, press the driver's door lock switch
in the UNLOCK direction.
6. A single chime will sound to indicate the feature has
been changed.
7. Repeat the above steps to alternate the availability of
this feature.
32 THINGS TO KNOW BEFORE STARTING YOUR VEHICLE
Page 36 of 479
windows will operate only when the ignition switch is
turned to the ON position and for 10 minutes after the
ignition is turned OFF or the driver's door is opened.
This feature can be turned off by your authorized dealer.
NOTE:The Power Accessory Delay feature will allow
the power windows to operate for 10 minutes after the
ignition it turned OFF.
WARNING!
Never leave children alone in a vehicle. Leaving
unattended children in a vehicle is dangerous for a
number of reasons. A child or others could be seri-
ously or fatally injured. Don't leave the keys in the
ignition. A child could operate power windows,
other controls, or move the vehicle.
Auto Down
The driver's and front passenger window switch has an
Auto Down feature. Push the window switch past the
first detent, release, and the window will go down
automatically. To cancel the Auto Down movement,
operate the switch in either the up or down direction and
release the switch.
Auto Up Feature with Anti-Pinch Protection
(Driver's and Front Passenger Door Only)
Lift the window switch to the second detent, release, and
the window will go up automatically.
To stop the window from going all the way up during the
Auto Up operation, push down on the switch briefly.
To close the window part way, lift the window switch to
the first detent and release when you want the window to
stop.
THINGS TO KNOW BEFORE STARTING YOUR VEHICLE 35
2
Page 38 of 479

LIFTGATE
The liftgate can be unlocked using the Remote Keyless
Entry (RKE) Transmitter or by activating the power door
lock switches located on the front doors.
NOTE:When the engine is running from a remote start
(if equipped), the vehicle must first be unlocked bypressing the remote transmitter UNLOCK button prior to
activating the power liftgate; otherwise, the engine will
stop automatically.
Once unlocked, the liftgate can be opened or closed. To
open the liftgate, pull the exterior handle and open the
liftgate with one fluid motion.
Window Lockout Switch
Power Liftgate Button
THINGS TO KNOW BEFORE STARTING YOUR VEHICLE 37
2
Page 49 of 479

How To Use The Automatic Locking Mode
1. Buckle the combination lap/shoulder belt.
2. Grasp the shoulder portion and pull downward until
the entire belt is extracted.
3. Allow the belt to retract. As the belt retracts, you will
hear a clicking sound. This indicates the safety belt is
now in the automatic locking mode.
How To Disengage The Automatic Locking Mode
Disconnect the combination lap/shoulder belt and allow
it to retract completely to disengage the automatic lock-
ing mode and activate the vehicle sensitive (emergency)
locking mode.
Rear 60/40 Seat Third Row Center Three Point
Belt Ð If Equipped
The center three point seat belt for the third row rear seat
may be disconnected to allow the 60% seatback to easily
fold down. The keyed buckle latch plate (small latch plate
at the end of the belt) can be detached from the keyed
seat belt buckle (buckle without a red release button)
located on the left inboard side of the third row bench
seat. Insert the ignition key into the center white slot on
the keyed buckle. The small latchplate can be removed
when the key is pressed into the buckle. Allow the
retractor to take up the surplus webbing, and insert the
latch plates into the slots in the headliner for storage
while the 60% seatback is folded down.
48 THINGS TO KNOW BEFORE STARTING YOUR VEHICLE
Page 50 of 479

WARNING!
²If the small (keyed buckle) latch plate and keyed
buckle are not properly connected when the seat
belt is used by an occupant, the seat belt will not
be able to provide the proper restraint and will
increase the risk of injury in a collision.
²When reattaching the small (keyed buckle) latch
plate and keyed buckle, ensure the seat belt web-
bing is not twisted. If the webbing is twisted,
follow the preceeding procedure to detach the
small latch plate from the keyed buckle, untwist
the webbing, and reattach the small latch plate and
keyed buckle.
Third Row Center Seat Belt
THINGS TO KNOW BEFORE STARTING YOUR VEHICLE 49
2
Page 51 of 479
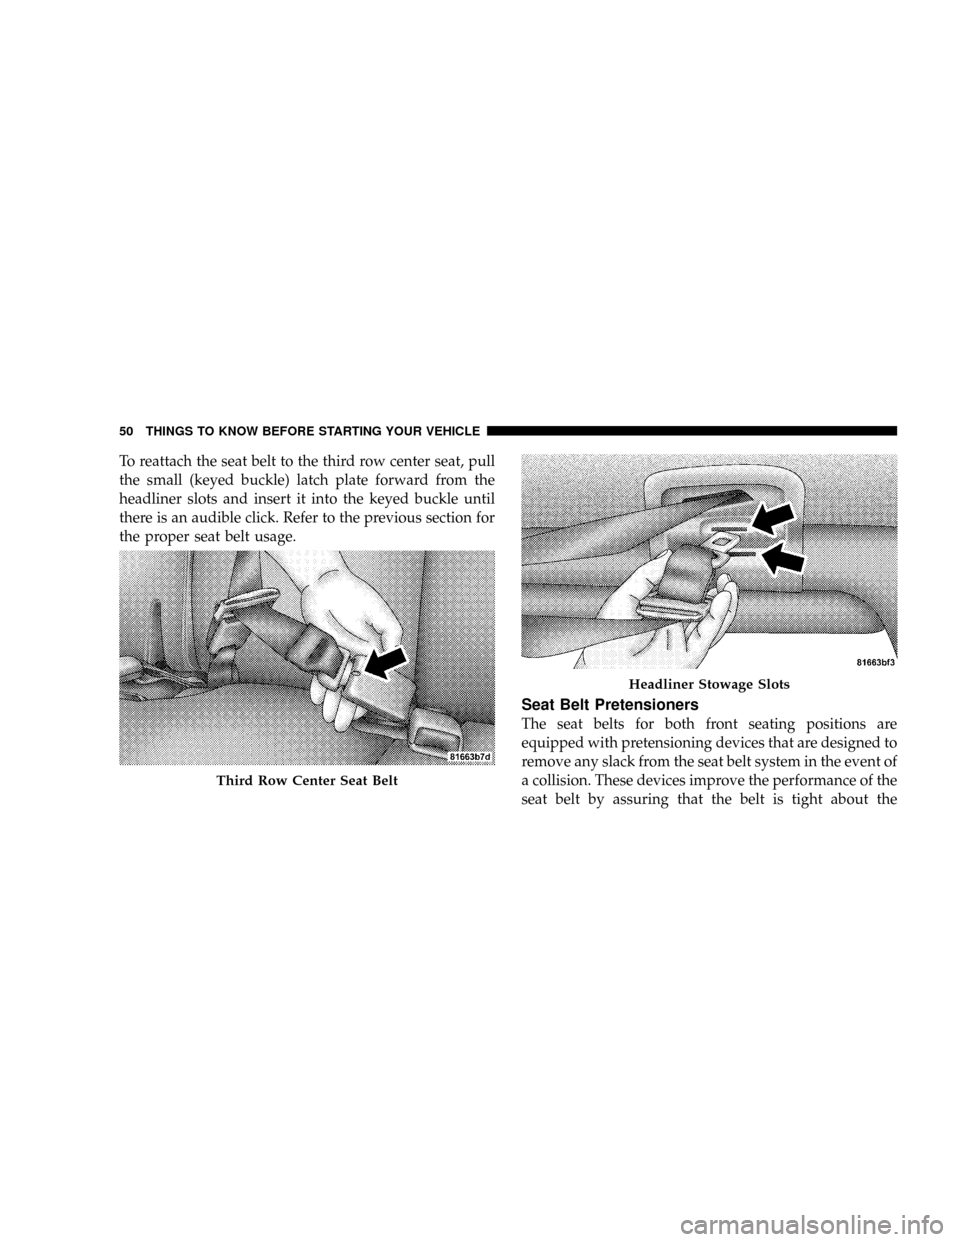
To reattach the seat belt to the third row center seat, pull
the small (keyed buckle) latch plate forward from the
headliner slots and insert it into the keyed buckle until
there is an audible click. Refer to the previous section for
the proper seat belt usage.
Seat Belt Pretensioners
The seat belts for both front seating positions are
equipped with pretensioning devices that are designed to
remove any slack from the seat belt system in the event of
a collision. These devices improve the performance of the
seat belt by assuring that the belt is tight about the
Third Row Center Seat Belt
Headliner Stowage Slots
50 THINGS TO KNOW BEFORE STARTING YOUR VEHICLE
Page 58 of 479
Airbag System Components
The airbag system consists of the following:
²Occupant Restraint Controller
²Side Remote Acceleration Sensors
²Airbag Warning Light
²Driver Airbag
²Passenger Airbag
²Window Bags above Side Windows
²Steering Wheel and Column
²Instrument Panel
²Interconnecting Wiring
²Knee Impact Bolsters
²Front Acceleration Sensors
²Driver and Front Passenger Seat Belt Pretensioners
How the Airbag System Works
²
TheOccupant Restraint Controller (ORC)determines
if a frontal collision is severe enough to require the
airbags to inflate. The front airbag inflators are de-
signed to provide different rates of airbag inflation
from direction provided by the ORC. The ORC will
detect a roll over when equipped with side airbags.
The ORC also monitors the readiness of the electronic
parts of the system whenever the ignition switch is in
the START or RUN positions. These include all of the
items listed above except the steering wheel and
column, and knee bolsters. If the key is in the OFF
position, in the ACC position, or not in the ignition,
the airbags are not ªonº and will not inflate.
During a moderate-to-severe rear impact the ORC may
deploy the seat belt pretensioners alone.
THINGS TO KNOW BEFORE STARTING YOUR VEHICLE 57
2
Page 81 of 479
NGeneral Information...................115
mVoice Recognition System (VR) Ð If Equipped . . 115
NVoice Recognition System (VR) Operation....115
NCommands..........................116
NVoice Training........................119
mSeats................................120
NFront Seat Manual Seat Adjustment........120
NFront Seat Manual Seat Recliners..........121
NManual Lumbar Support Adjustment Ð If
Equipped...........................122
NAdjustable Head Restraints Ð All Seating
Positions...........................122
N8-Way Driver's Power Seat Ð If Equipped . . . 123N4-Way Passenger's Power Seat Ð
If Equipped.........................124
NHeated Seats Ð If Equipped.............124
NSecond Row Bucket Seats Ð Fold And
Tumble............................127
NSecond Row 40/20/40 Seat Ð Fold And
Tumble............................129
NThird Row Seat Bench Ð If Equipped.......133
NThird Row 60/40 Folding Ð If Equipped....135
mDriver Memory System Ð If Equipped.......137
NSetting Memory Positions And Linking Remote
Keyless Entry Transmitter To Memory.......138
NMemory Position Recall.................139
NTo Disable A Transmitter Linked To Memory . . 140
80 UNDERSTANDING THE FEATURES OF YOUR VEHICLE
Page 100 of 479

Three-Way Calling
To initiate three-way calling, press the ªVoice Recogni-
tionº button while a call is in progress, and make a
second phone call, as described under9Making a Second
Call While Current Call in Progress.9After the second call
has established, press and hold the PHONE button until
you hear a double beep, indicating that the two calls have
been joined into one conference call.
Call Termination
To end a call in progress, momentarily press the PHONE
button. Only the active call(s) will be terminated and if
there is a call on hold, it will become the new active call.
If the active call is terminated by the far end, a call on
hold may not become active automatically. This is cell
phone-dependent. To bring the call back from hold, press
and hold the PHONE button until you hear a single beep.
Redial
²
Press the PHONE button to begin.
²After the9Ready9prompt and the following beep, say
9Redial.9
²The UConnecttsystem will call the last number that
was dialed from your cellular phone.
NOTE:This may not be the last number dialed from the
UConnecttsystem.
Call Continuation
Call continuation is the progression of a phone call on the
UConnecttsystem after the vehicle ignition key has been
switched to OFF. Call continuation functionality avail-
able on the vehicle can be any one of three types:
²After the ignition key is switched to OFF, a call can
continue on the UConnecttsystem either until the call
ends, or until the vehicle battery condition dictates
cessation of the call on the UConnecttsystem and
transfer of the call to the mobile phone.
UNDERSTANDING THE FEATURES OF YOUR VEHICLE 99
3