relay CHRYSLER CARAVAN 2003 Service Manual
[x] Cancel search | Manufacturer: CHRYSLER, Model Year: 2003, Model line: CARAVAN, Model: CHRYSLER CARAVAN 2003Pages: 2177, PDF Size: 59.81 MB
Page 2029 of 2177
(9) Reinstall the right quarter trim panel and
right D-pillar trim panel onto the quarter inner
panel. (Refer to 23 - BODY/INTERIOR/QUARTER
TRIM PANEL - INSTALLATION).
(10) Reconnect the battery negative cable.
(11) Perform the heater-A/C control calibration
procedure. (Refer to 24 - HEATING & AIR CONDI-
TIONING/CONTROLS - FRONT/A/C-HEATER CON-
TROL - STANDARD PROCEDURE - HEATER-A/C
CONTROL CALIBRATION).
BLOWER MOTOR RELAY
DESCRIPTION
TERMINAL LEGEND
NUMBER IDENTIFICATION
30 COMMON FEED
85 COIL GROUND
86 COIL BATTERY
87 NORMALLY OPEN
87A NORMALLY CLOSED
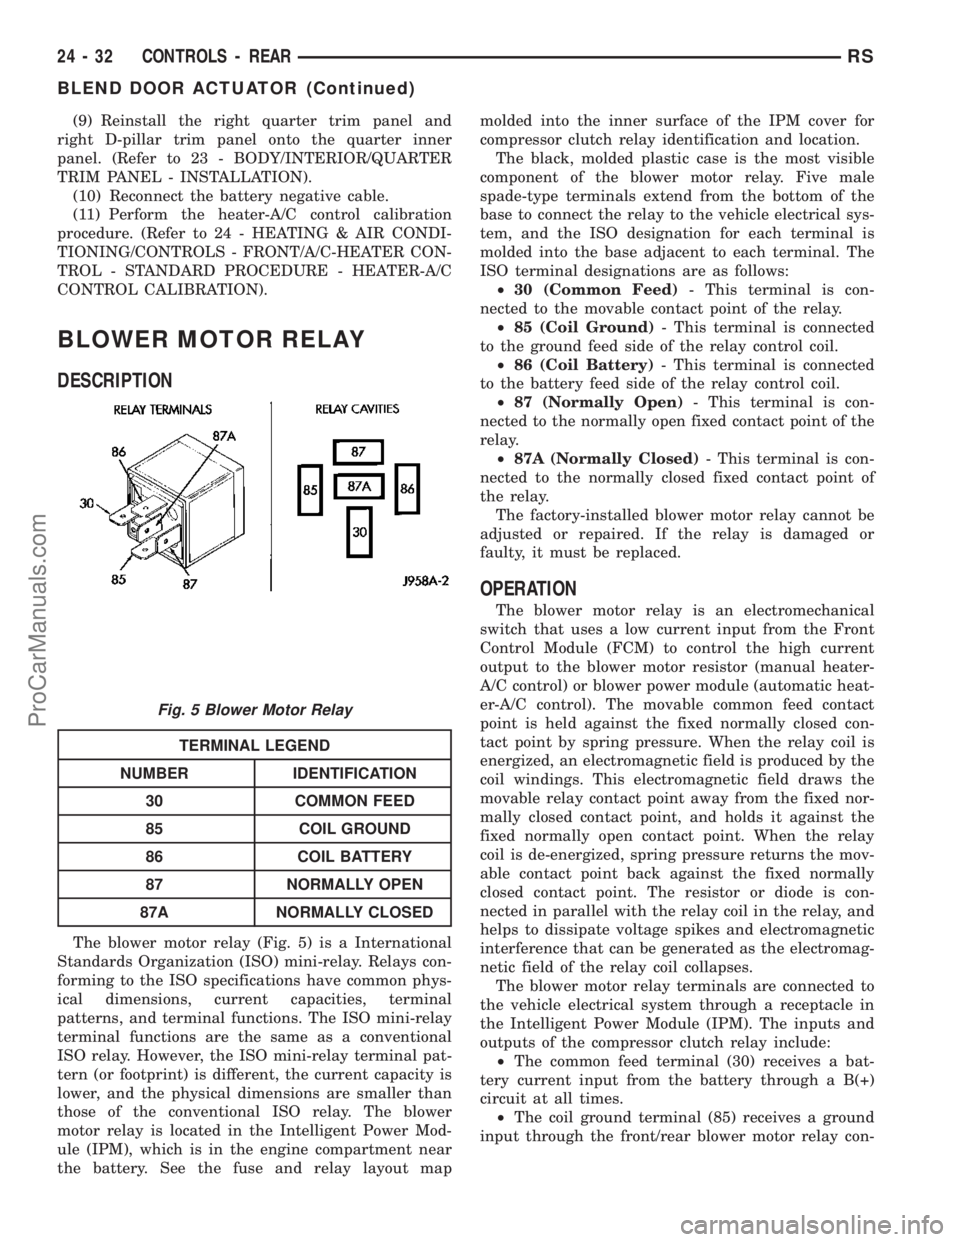
The blower motor relay (Fig. 5) is a International
Standards Organization (ISO) mini-relay. Relays con-
forming to the ISO specifications have common phys-
ical dimensions, current capacities, terminal
patterns, and terminal functions. The ISO mini-relay
terminal functions are the same as a conventional
ISO relay. However, the ISO mini-relay terminal pat-
tern (or footprint) is different, the current capacity is
lower, and the physical dimensions are smaller than
those of the conventional ISO relay. The blower
motor relay is located in the Intelligent Power Mod-
ule (IPM), which is in the engine compartment near
the battery. See the fuse and relay layout mapmolded into the inner surface of the IPM cover for
compressor clutch relay identification and location.
The black, molded plastic case is the most visible
component of the blower motor relay. Five male
spade-type terminals extend from the bottom of the
base to connect the relay to the vehicle electrical sys-
tem, and the ISO designation for each terminal is
molded into the base adjacent to each terminal. The
ISO terminal designations are as follows:
²30 (Common Feed)- This terminal is con-
nected to the movable contact point of the relay.
²85 (Coil Ground)- This terminal is connected
to the ground feed side of the relay control coil.
²86 (Coil Battery)- This terminal is connected
to the battery feed side of the relay control coil.
²87 (Normally Open)- This terminal is con-
nected to the normally open fixed contact point of the
relay.
²87A (Normally Closed)- This terminal is con-
nected to the normally closed fixed contact point of
the relay.
The factory-installed blower motor relay cannot be
adjusted or repaired. If the relay is damaged or
faulty, it must be replaced.
OPERATION
The blower motor relay is an electromechanical
switch that uses a low current input from the Front
Control Module (FCM) to control the high current
output to the blower motor resistor (manual heater-
A/C control) or blower power module (automatic heat-
er-A/C control). The movable common feed contact
point is held against the fixed normally closed con-
tact point by spring pressure. When the relay coil is
energized, an electromagnetic field is produced by the
coil windings. This electromagnetic field draws the
movable relay contact point away from the fixed nor-
mally closed contact point, and holds it against the
fixed normally open contact point. When the relay
coil is de-energized, spring pressure returns the mov-
able contact point back against the fixed normally
closed contact point. The resistor or diode is con-
nected in parallel with the relay coil in the relay, and
helps to dissipate voltage spikes and electromagnetic
interference that can be generated as the electromag-
netic field of the relay coil collapses.
The blower motor relay terminals are connected to
the vehicle electrical system through a receptacle in
the Intelligent Power Module (IPM). The inputs and
outputs of the compressor clutch relay include:
²The common feed terminal (30) receives a bat-
tery current input from the battery through a B(+)
circuit at all times.
²The coil ground terminal (85) receives a ground
input through the front/rear blower motor relay con-
Fig. 5 Blower Motor Relay
24 - 32 CONTROLS - REARRS
BLEND DOOR ACTUATOR (Continued)
ProCarManuals.com
Page 2030 of 2177
trol circuit only when the FCM electronically pulls
the control circuit to ground.
²The coil battery terminal (86) receives a battery
current input from the battery through a B(+) circuit
at all times.
²The normally open terminal (87) provides a bat-
tery current output to the blower motor resistor
(manual heater-A/C control) or blower power module
(automatic heater-A/C control) through a fuse in the
IPM on the fused rear blower motor relay output cir-
cuit only when the blower motor relay coil is ener-
gized.
²The normally closed terminal (87A) is not con-
nected to any circuit in this application, but provides
a battery current output only when the blower motor
relay coil is de-energized.
Refer to the appropriate wiring information. The
wiring information includes wiring diagrams, proper
wire and connector repair procedures, further details
on wire harness routing and retention, as well as
pin-out and location views for the various wire har-
ness connectors, splices, and grounds.
DIAGNOSIS AND TESTING - BLOWER MOTOR
RELAY
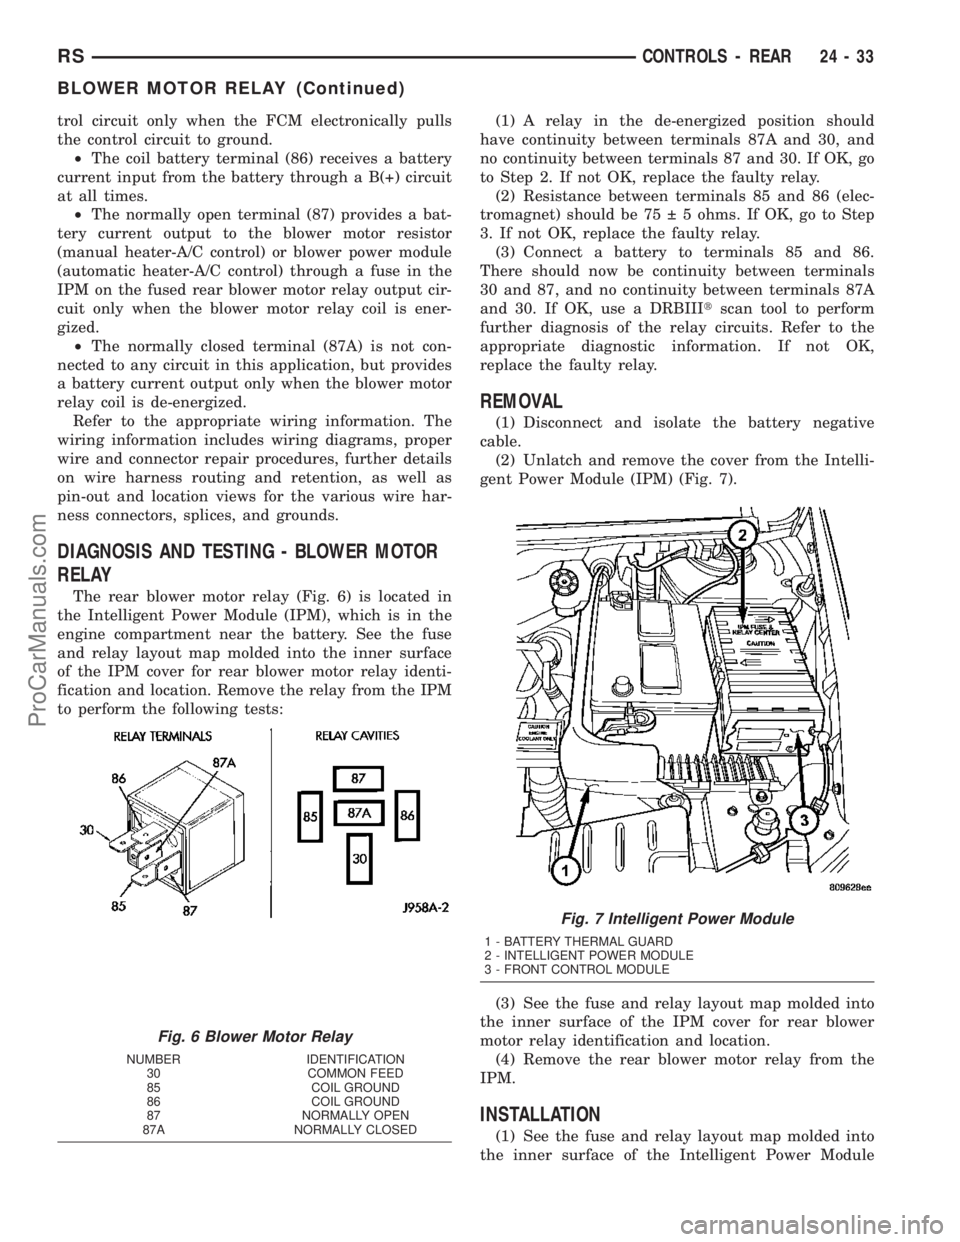
The rear blower motor relay (Fig. 6) is located in
the Intelligent Power Module (IPM), which is in the
engine compartment near the battery. See the fuse
and relay layout map molded into the inner surface
of the IPM cover for rear blower motor relay identi-
fication and location. Remove the relay from the IPM
to perform the following tests:(1) A relay in the de-energized position should
have continuity between terminals 87A and 30, and
no continuity between terminals 87 and 30. If OK, go
to Step 2. If not OK, replace the faulty relay.
(2) Resistance between terminals 85 and 86 (elec-
tromagnet) should be 75 5 ohms. If OK, go to Step
3. If not OK, replace the faulty relay.
(3) Connect a battery to terminals 85 and 86.
There should now be continuity between terminals
30 and 87, and no continuity between terminals 87A
and 30. If OK, use a DRBIIItscan tool to perform
further diagnosis of the relay circuits. Refer to the
appropriate diagnostic information. If not OK,
replace the faulty relay.
REMOVAL
(1) Disconnect and isolate the battery negative
cable.
(2) Unlatch and remove the cover from the Intelli-
gent Power Module (IPM) (Fig. 7).
(3) See the fuse and relay layout map molded into
the inner surface of the IPM cover for rear blower
motor relay identification and location.
(4) Remove the rear blower motor relay from the
IPM.
INSTALLATION
(1) See the fuse and relay layout map molded into
the inner surface of the Intelligent Power Module
Fig. 6 Blower Motor Relay
NUMBER IDENTIFICATION
30 COMMON FEED
85 COIL GROUND
86 COIL GROUND
87 NORMALLY OPEN
87A NORMALLY CLOSED
Fig. 7 Intelligent Power Module
1 - BATTERY THERMAL GUARD
2 - INTELLIGENT POWER MODULE
3 - FRONT CONTROL MODULE
RSCONTROLS - REAR24-33
BLOWER MOTOR RELAY (Continued)
ProCarManuals.com
Page 2031 of 2177
(IPM) cover for rear blower motor relay identification
and location.
(2) Position the rear blower motor relay to the
proper receptacle in the IPM.
(3) Align the rear blower motor relay terminals
with the terminal cavities in the IPM relay recepta-
cle.
(4) Push down firmly on the rear blower motor
relay until the terminals are fully seated in the ter-
minal cavities in the IPM receptacle.
(5) Install and latch the cover onto the IPM.
(6) Reconnect the battery negative cable.
BLOWER MOTOR RESISTOR
DESCRIPTION
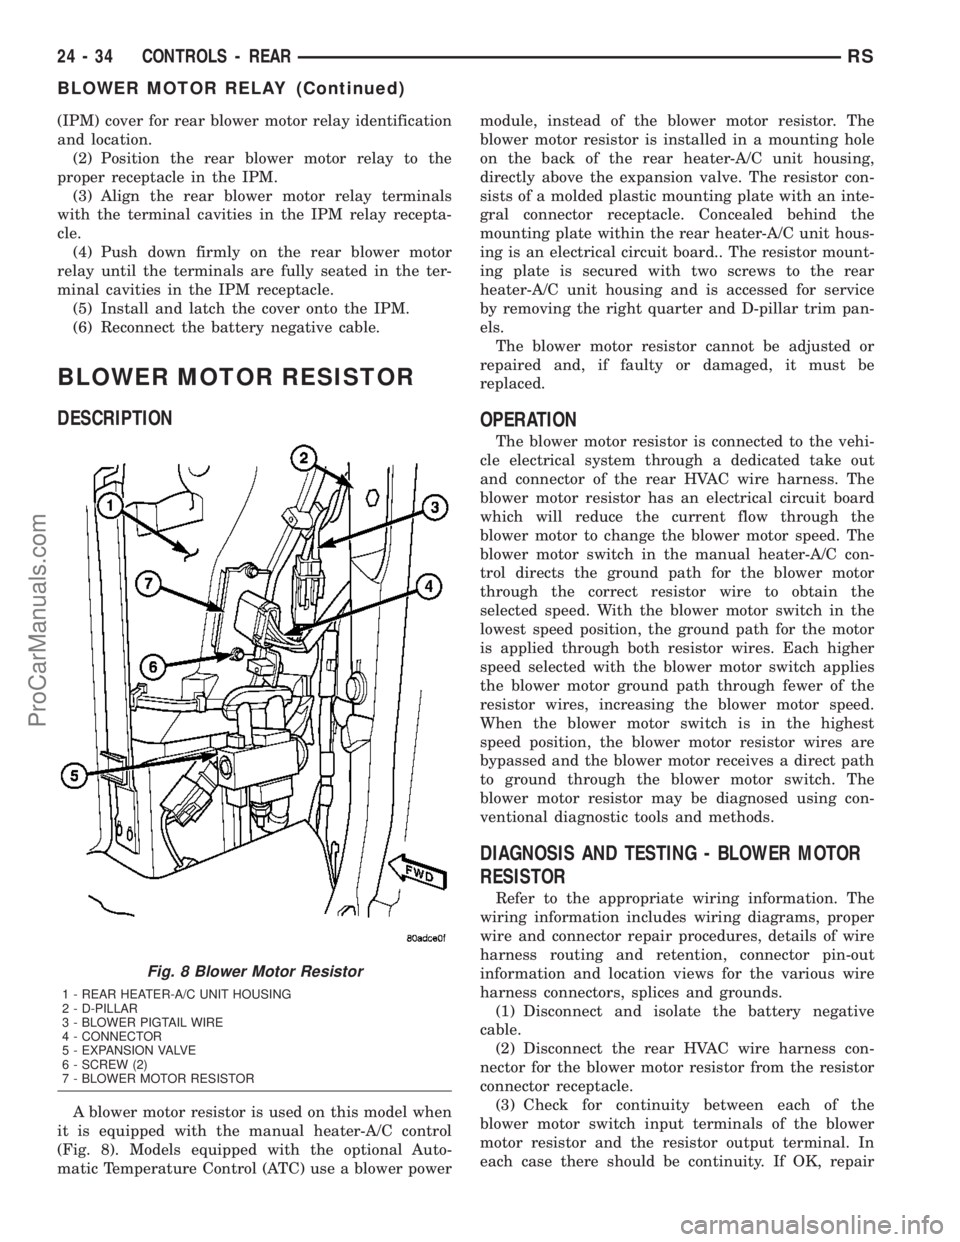
A blower motor resistor is used on this model when
it is equipped with the manual heater-A/C control
(Fig. 8). Models equipped with the optional Auto-
matic Temperature Control (ATC) use a blower powermodule, instead of the blower motor resistor. The
blower motor resistor is installed in a mounting hole
on the back of the rear heater-A/C unit housing,
directly above the expansion valve. The resistor con-
sists of a molded plastic mounting plate with an inte-
gral connector receptacle. Concealed behind the
mounting plate within the rear heater-A/C unit hous-
ing is an electrical circuit board.. The resistor mount-
ing plate is secured with two screws to the rear
heater-A/C unit housing and is accessed for service
by removing the right quarter and D-pillar trim pan-
els.
The blower motor resistor cannot be adjusted or
repaired and, if faulty or damaged, it must be
replaced.
OPERATION
The blower motor resistor is connected to the vehi-
cle electrical system through a dedicated take out
and connector of the rear HVAC wire harness. The
blower motor resistor has an electrical circuit board
which will reduce the current flow through the
blower motor to change the blower motor speed. The
blower motor switch in the manual heater-A/C con-
trol directs the ground path for the blower motor
through the correct resistor wire to obtain the
selected speed. With the blower motor switch in the
lowest speed position, the ground path for the motor
is applied through both resistor wires. Each higher
speed selected with the blower motor switch applies
the blower motor ground path through fewer of the
resistor wires, increasing the blower motor speed.
When the blower motor switch is in the highest
speed position, the blower motor resistor wires are
bypassed and the blower motor receives a direct path
to ground through the blower motor switch. The
blower motor resistor may be diagnosed using con-
ventional diagnostic tools and methods.
DIAGNOSIS AND TESTING - BLOWER MOTOR
RESISTOR
Refer to the appropriate wiring information. The
wiring information includes wiring diagrams, proper
wire and connector repair procedures, details of wire
harness routing and retention, connector pin-out
information and location views for the various wire
harness connectors, splices and grounds.
(1) Disconnect and isolate the battery negative
cable.
(2) Disconnect the rear HVAC wire harness con-
nector for the blower motor resistor from the resistor
connector receptacle.
(3) Check for continuity between each of the
blower motor switch input terminals of the blower
motor resistor and the resistor output terminal. In
each case there should be continuity. If OK, repair
Fig. 8 Blower Motor Resistor
1 - REAR HEATER-A/C UNIT HOUSING
2 - D-PILLAR
3 - BLOWER PIGTAIL WIRE
4 - CONNECTOR
5 - EXPANSION VALVE
6 - SCREW (2)
7 - BLOWER MOTOR RESISTOR
24 - 34 CONTROLS - REARRS
BLOWER MOTOR RELAY (Continued)
ProCarManuals.com
Page 2034 of 2177
(7) Install and tighten the screw that secures the
back of the rear heater-A/C unit housing to the right
D-pillar. Tighten the screw to 11 N´m (97 in. lbs.).
(8) Install and tighten the two screws that secure
the top of the quarter trim panel attaching bracket to
the quarter inner panel. Tighten the screws to 1.7
N´m (15 in. lbs.).
(9) Reinstall the right quarter trim panel and
right D-pillar trim panel onto the quarter inner
panel. (Refer to 23 - BODY/INTERIOR/QUARTER
TRIM PANEL - INSTALLATION).
(10) Reconnect the battery negative cable.
(11) Perform the heater-A/C control calibration
procedure. (Refer to 24 - HEATING & AIR CONDI-
TIONING/CONTROLS - FRONT/A/C-HEATER CON-
TROL - STANDARD PROCEDURE - HEATER-A/C
CONTROL CALIBRATION).
POWER MODULE
DESCRIPTION
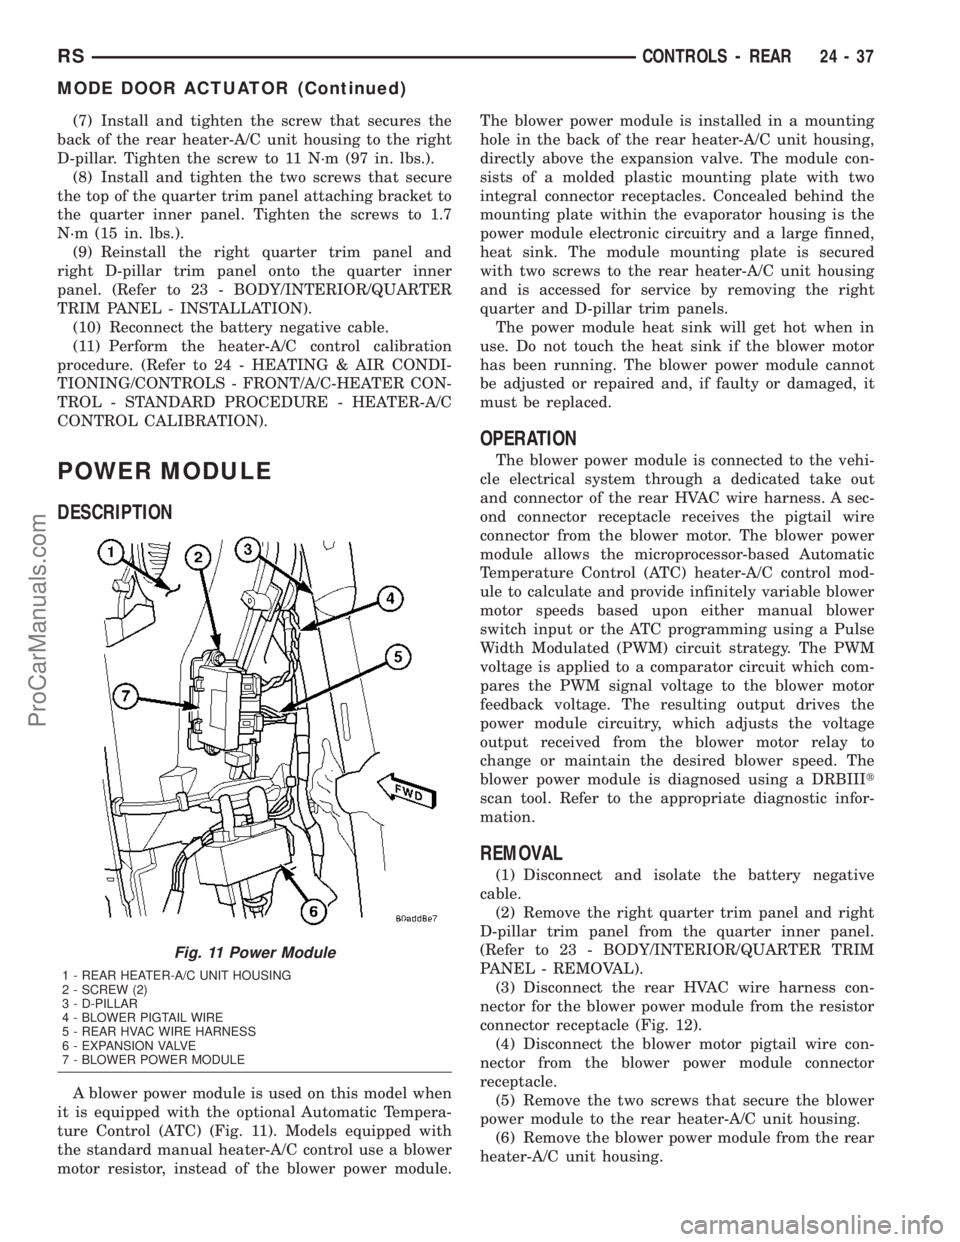
A blower power module is used on this model when
it is equipped with the optional Automatic Tempera-
ture Control (ATC) (Fig. 11). Models equipped with
the standard manual heater-A/C control use a blower
motor resistor, instead of the blower power module.The blower power module is installed in a mounting
hole in the back of the rear heater-A/C unit housing,
directly above the expansion valve. The module con-
sists of a molded plastic mounting plate with two
integral connector receptacles. Concealed behind the
mounting plate within the evaporator housing is the
power module electronic circuitry and a large finned,
heat sink. The module mounting plate is secured
with two screws to the rear heater-A/C unit housing
and is accessed for service by removing the right
quarter and D-pillar trim panels.
The power module heat sink will get hot when in
use. Do not touch the heat sink if the blower motor
has been running. The blower power module cannot
be adjusted or repaired and, if faulty or damaged, it
must be replaced.
OPERATION
The blower power module is connected to the vehi-
cle electrical system through a dedicated take out
and connector of the rear HVAC wire harness. A sec-
ond connector receptacle receives the pigtail wire
connector from the blower motor. The blower power
module allows the microprocessor-based Automatic
Temperature Control (ATC) heater-A/C control mod-
ule to calculate and provide infinitely variable blower
motor speeds based upon either manual blower
switch input or the ATC programming using a Pulse
Width Modulated (PWM) circuit strategy. The PWM
voltage is applied to a comparator circuit which com-
pares the PWM signal voltage to the blower motor
feedback voltage. The resulting output drives the
power module circuitry, which adjusts the voltage
output received from the blower motor relay to
change or maintain the desired blower speed. The
blower power module is diagnosed using a DRBIIIt
scan tool. Refer to the appropriate diagnostic infor-
mation.
REMOVAL
(1) Disconnect and isolate the battery negative
cable.
(2) Remove the right quarter trim panel and right
D-pillar trim panel from the quarter inner panel.
(Refer to 23 - BODY/INTERIOR/QUARTER TRIM
PANEL - REMOVAL).
(3) Disconnect the rear HVAC wire harness con-
nector for the blower power module from the resistor
connector receptacle (Fig. 12).
(4) Disconnect the blower motor pigtail wire con-
nector from the blower power module connector
receptacle.
(5) Remove the two screws that secure the blower
power module to the rear heater-A/C unit housing.
(6) Remove the blower power module from the rear
heater-A/C unit housing.
Fig. 11 Power Module
1 - REAR HEATER-A/C UNIT HOUSING
2 - SCREW (2)
3 - D-PILLAR
4 - BLOWER PIGTAIL WIRE
5 - REAR HVAC WIRE HARNESS
6 - EXPANSION VALVE
7 - BLOWER POWER MODULE
RSCONTROLS - REAR24-37
MODE DOOR ACTUATOR (Continued)
ProCarManuals.com
Page 2040 of 2177
BLOWER MOTOR
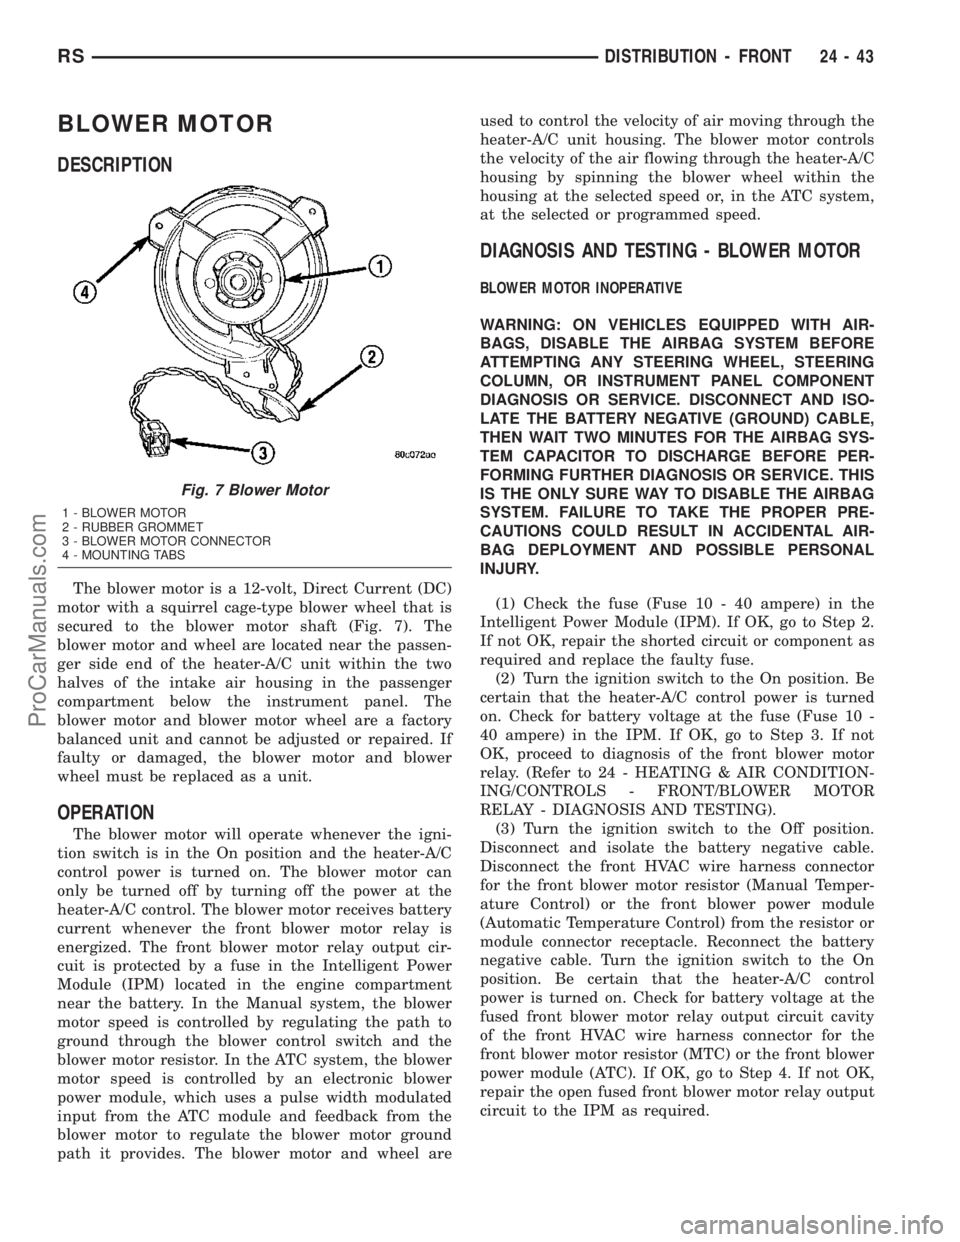
DESCRIPTION
The blower motor is a 12-volt, Direct Current (DC)
motor with a squirrel cage-type blower wheel that is
secured to the blower motor shaft (Fig. 7). The
blower motor and wheel are located near the passen-
ger side end of the heater-A/C unit within the two
halves of the intake air housing in the passenger
compartment below the instrument panel. The
blower motor and blower motor wheel are a factory
balanced unit and cannot be adjusted or repaired. If
faulty or damaged, the blower motor and blower
wheel must be replaced as a unit.
OPERATION
The blower motor will operate whenever the igni-
tion switch is in the On position and the heater-A/C
control power is turned on. The blower motor can
only be turned off by turning off the power at the
heater-A/C control. The blower motor receives battery
current whenever the front blower motor relay is
energized. The front blower motor relay output cir-
cuit is protected by a fuse in the Intelligent Power
Module (IPM) located in the engine compartment
near the battery. In the Manual system, the blower
motor speed is controlled by regulating the path to
ground through the blower control switch and the
blower motor resistor. In the ATC system, the blower
motor speed is controlled by an electronic blower
power module, which uses a pulse width modulated
input from the ATC module and feedback from the
blower motor to regulate the blower motor ground
path it provides. The blower motor and wheel areused to control the velocity of air moving through the
heater-A/C unit housing. The blower motor controls
the velocity of the air flowing through the heater-A/C
housing by spinning the blower wheel within the
housing at the selected speed or, in the ATC system,
at the selected or programmed speed.
DIAGNOSIS AND TESTING - BLOWER MOTOR
BLOWER MOTOR INOPERATIVE
WARNING: ON VEHICLES EQUIPPED WITH AIR-
BAGS, DISABLE THE AIRBAG SYSTEM BEFORE
ATTEMPTING ANY STEERING WHEEL, STEERING
COLUMN, OR INSTRUMENT PANEL COMPONENT
DIAGNOSIS OR SERVICE. DISCONNECT AND ISO-
LATE THE BATTERY NEGATIVE (GROUND) CABLE,
THEN WAIT TWO MINUTES FOR THE AIRBAG SYS-
TEM CAPACITOR TO DISCHARGE BEFORE PER-
FORMING FURTHER DIAGNOSIS OR SERVICE. THIS
IS THE ONLY SURE WAY TO DISABLE THE AIRBAG
SYSTEM. FAILURE TO TAKE THE PROPER PRE-
CAUTIONS COULD RESULT IN ACCIDENTAL AIR-
BAG DEPLOYMENT AND POSSIBLE PERSONAL
INJURY.
(1) Check the fuse (Fuse 10 - 40 ampere) in the
Intelligent Power Module (IPM). If OK, go to Step 2.
If not OK, repair the shorted circuit or component as
required and replace the faulty fuse.
(2) Turn the ignition switch to the On position. Be
certain that the heater-A/C control power is turned
on. Check for battery voltage at the fuse (Fuse 10 -
40 ampere) in the IPM. If OK, go to Step 3. If not
OK, proceed to diagnosis of the front blower motor
relay. (Refer to 24 - HEATING & AIR CONDITION-
ING/CONTROLS - FRONT/BLOWER MOTOR
RELAY - DIAGNOSIS AND TESTING).
(3) Turn the ignition switch to the Off position.
Disconnect and isolate the battery negative cable.
Disconnect the front HVAC wire harness connector
for the front blower motor resistor (Manual Temper-
ature Control) or the front blower power module
(Automatic Temperature Control) from the resistor or
module connector receptacle. Reconnect the battery
negative cable. Turn the ignition switch to the On
position. Be certain that the heater-A/C control
power is turned on. Check for battery voltage at the
fused front blower motor relay output circuit cavity
of the front HVAC wire harness connector for the
front blower motor resistor (MTC) or the front blower
power module (ATC). If OK, go to Step 4. If not OK,
repair the open fused front blower motor relay output
circuit to the IPM as required.
Fig. 7 Blower Motor
1 - BLOWER MOTOR
2 - RUBBER GROMMET
3 - BLOWER MOTOR CONNECTOR
4 - MOUNTING TABS
RSDISTRIBUTION - FRONT24-43
ProCarManuals.com
Page 2051 of 2177
OPERATION
The rear blower motor will operate whenever the
ignition switch is in the On position, the heater-A/C
control power is turned on, and the rear heater-A/C
system control switch on the front heater-A/C control
is not in the Off position. The blower motor can only
be turned off by turning off the rear system at the
front heater-A/C control. The blower motor receives
battery current whenever the rear blower motor
relay is energized. The rear blower motor relay out-
put circuit is protected by a fuse in the Intelligent
Power Module (IPM) located in the engine compart-
ment near the battery. In the MTC system, the
blower motor speed is controlled by regulating the
path to ground through the blower control switch and
the blower motor resistor. In the ATC system, the
blower motor speed is controlled by an electronic
blower power module, which uses a pulse width mod-
ulated input from the ATC module and feedback from
the blower motor to regulate the blower motor
ground path it provides. The blower motor and wheel
are used to control the velocity of air moving through
the rear heater-A/C unit housing. The blower motor
controls the velocity of the air flowing through the
rear heater-A/C housing by spinning the blower
wheel within the housing at the selected speed or, in
the ATC system, at the selected or programmed
speed.
DIAGNOSIS AND TESTING - BLOWER MOTOR
BLOWER MOTOR INOPERATIVE
(1) Check the fuse (Fuse 12 - 25 ampere) in the
Intelligent Power Module (IPM). If OK, go to Step 2.
If not OK, repair the shorted circuit or component as
required and replace the faulty fuse.
(2) Turn the ignition switch to the On position. Be
certain that the rear heater-A/C control power is
turned on. Check for battery voltage at the fuse
(Fuse 12 - 25 ampere) in the IPM. If OK, go to Step
3. If not OK, proceed to diagnosis of the rear blower
motor relay. (Refer to 24 - HEATING & AIR CONDI-
TIONING/CONTROLS - REAR/BLOWER MOTOR
RELAY - DIAGNOSIS AND TESTING).(3) Turn the ignition switch to the Off position.
Disconnect and isolate the battery negative cable.
Disconnect the rear HVAC wire harness connector for
the rear blower motor resistor (Manual Temperature
Control) or the rear blower power module (Automatic
Temperature Control) from the resistor or module
connector receptacle. Reconnect the battery negative
cable. Turn the ignition switch to the On position. Be
certain that the rear heater-A/C control power is
turned on. Check for battery voltage at the fused
rear blower motor relay output circuit cavity of the
rear HVAC wire harness connector for the rear
blower motor resistor (MTC) or the rear blower
power module (ATC). If OK, go to Step 4. If not OK,
repair the open fused front blower motor relay output
circuit to the IPM as required.
(4) Turn the ignition switch to the Off position.
Disconnect and isolate the battery negative cable.
Disconnect the rear blower motor pigtail wire connec-
tor from the take out and connector of the rear
HVAC wire harness (MTC) or the connector recepta-
cle of the rear blower power module (ATC). Use
jumper wires to connect a battery and ground feeds
to the blower motor pigtail wire connector. The
blower motor should operate. If OK with MTC, pro-
ceed to diagnosis of the rear blower motor resistor.
(Refer to 24 - HEATING & AIR CONDITIONING/
CONTROLS - REAR/BLOWER MOTOR RESISTOR -
DIAGNOSIS AND TESTING). If OK with ATC, use a
DRBIII scan tool to diagnose the rear blower power
module. Refer to the appropriate diagnostic informa-
tion. If not OK with MTC or ATC, replace the faulty
rear blower motor.
BLOWER MOTOR NOISE OR VIBRATION
Refer to the Blower Motor Noise/Vibration Diagno-
sis chart (Fig. 4).
24 - 54 DISTRIBUTION - REARRS
BLOWER MOTOR (Continued)
ProCarManuals.com
Page 2115 of 2177
OPERATIONÐThe Oxygen Sensor Heater Moni-
tor begins after the ignition has been turned OFF.
The PCM sends a 5 volt bias to the oxygen sensor
every 1.6 seconds. The PCM keeps it biased for 35
ms each time. As the sensor cools down, the resis-
tance increases and the PCM reads the increase in
voltage. Once voltage has increased to a predeter-
mined amount, higher than when the test started,
the oxygen sensor is cool enough to test heater oper-
ation.
When the oxygen sensor is cool enough, the PCM
energizes the ASD relay. Voltage to the O2 sensor
begins to increase the temperature. As the sensor
temperature increases, the internal resistance
decreases. The PCM continues biasing the 5 volt sig-
nal to the sensor. Each time the signal is biased, the
PCM reads a voltage decrease. When the PCM
detects a voltage decrease of a predetermined value
for several biased pulses, the test passes.
The heater elements are tested each time the
engine is turned OFF if all the enabling conditions
are met. If the monitor fails, the PCM stores a
maturing fault and a Freeze Frame is entered. If two
consecutive tests fail, a DTC is stored. Because the
ignition is OFF, the MIL is illuminated at the begin-
ning of the next key cycle.
Enabling ConditionsÐThe following conditions
must be met for the PCM to run the oxygen sensor
heater test:
²Engine run time of at least 3 minutes
²Engine run time at a predetermined speed
and throttle opening.
²Key OFF power down
²Battery voltage of at least 10 volts
²Sufficient Oxygen Sensor cool down
Pending ConditionsÐThere are not conditions or
situations that prompt conflict or suspension of test-
ing. The oxygen sensor heater test is not run pending
resolution of MIL illumination due to oxygen sensor
failure.
SuspendÐThere are no conditions which exist for
suspending the Heater Monitor.
CATALYST MONITOR
To comply with clean air regulations, vehicles are
equipped with catalytic converters. These converters
reduce the emission of hydrocarbons, oxides of nitro-
gen and carbon monoxide.
Normal vehicle miles or engine misfire can cause a
catalyst to decay. A meltdown of the ceramic core can
cause a reduction of the exhaust passage. This can
increase vehicle emissions and deteriorate engine
performance, driveability and fuel economy.
The catalyst monitor uses dual oxygen sensors
(O2S's) to monitor the efficiency of the converter. The
dual O2S strategy is based on the fact that as a cat-alyst deteriorates, its oxygen storage capacity and its
efficiency are both reduced. By monitoring the oxy-
gen storage capacity of a catalyst, its efficiency can
be indirectly calculated. The upstream O2S is used to
detect the amount of oxygen in the exhaust gas
before the gas enters the catalytic converter. The
PCM calculates the A/F mixture from the output of
the O2S. A low voltage indicates high oxygen content
(lean mixture). A high voltage indicates a low content
of oxygen (rich mixture).
When the upstream O2S detects a lean condition,
there is an abundance of oxygen in the exhaust gas.
A functioning converter would store this oxygen so it
can use it for the oxidation of HC and CO. As the
converter absorbs the oxygen, there will be a lack of
oxygen downstream of the converter. The output of
the downstream O2S will indicate limited activity in
this condition.
As the converter loses the ability to store oxygen,
the condition can be detected from the behavior of
the downstream O2S. When the efficiency drops, no
chemical reaction takes place. This means the con-
centration of oxygen will be the same downstream as
upstream. The output voltage of the downstream
O2S copies the voltage of the upstream sensor. The
only difference is a time lag (seen by the PCM)
between the switching of the O2S's.
To monitor the system, the number of lean-to-rich
switches of upstream and downstream O2S's is
counted. The ratio of downstream switches to
upstream switches is used to determine whether the
catalyst is operating properly. An effective catalyst
will have fewer downstream switches than it has
upstream switches i.e., a ratio closer to zero. For a
totally ineffective catalyst, this ratio will be one-to-
one, indicating that no oxidation occurs in the device.
The system must be monitored so that when cata-
lyst efficiency deteriorates and exhaust emissions
increase to over the legal limit, the MIL (check
engine lamp) will be illuminated.
Monitor OperationÐTo monitor catalyst effi-
ciency, the PCM expands the rich and lean switch
points of the heated oxygen sensor. With extended
switch points, the air/fuel mixture runs richer and
leaner to overburden the catalytic converter. Once
the test is started, the air/fuel mixture runs rich and
lean and the O2 switches are counted. A switch is
counted when an oxygen sensor signal goes from
below the lean threshold to above the rich threshold.
The number of Rear O2 sensor switches is divided by
the number of Front O2 sensor switches to determine
the switching ratio.
The test runs for 20 seconds. As catalyst efficiency
deteriorated over the life of the vehicle, the switch
rate at the downstream sensor approaches that of the
upstream sensor. If at any point during the test
25 - 4 EMISSIONS CONTROLRS
EMISSIONS CONTROL (Continued)
ProCarManuals.com
Page 2140 of 2177
ABS FASTENER TORQUE,
SPECIFICATIONS......................5-79
ABSORBER - DESCRIPTION, SHOCK.......2-36
ABSORBER - INSTALLATION, SHOCK......2-38
ABSORBER - OPERATION, SHOCK........2-36
ABSORBER - REMOVAL, SHOCK..........2-36
ABSORBER (UPPER BUSHING) -
ASSEMBLY, SHOCK....................2-37
ABSORBER (UPPER BUSHING) -
DISASSEMBLY, SHOCK.................2-36
A/C COMPRESSOR - DESCRIPTION......24-63
A/C COMPRESSOR - OPERATION........24-63
A/C COOL DOWN TEST - DIAGNOSIS
AND TESTING........................24-4
A/C DISTRIBUTION DUCT -
INSTALLATION.......................24-53
A/C DISTRIBUTION DUCT - REMOVAL....24-53
A/C HEATER CONTROL - INSTALLATION....24-9
A/C HEATER CONTROL - REMOVAL.......24-9
A/C PERFORMANCE TEST - DIAGNOSIS
AND TESTING........................24-5
A/C PLUMBING - CAUTION.............24-61
A/C PLUMBING - WARNING............24-61
A/C PRESSURE TRANSDUCER -
DESCRIPTION.......................24-10
A/C PRESSURE TRANSDUCER -
DIAGNOSIS AND TESTING.............24-10
A/C PRESSURE TRANSDUCER -
INSTALLATION.......................24-11
A/C PRESSURE TRANSDUCER -
OPERATION.........................24-10
A/C PRESSURE TRANSDUCER -
REMOVAL..........................24-10
ACCELERATOR PEDAL - INSTALLATION . . . 14-24
ACCELERATOR PEDAL - REMOVAL.......14-23
ACCESSORY DRIVE BELT - DIAGNOSIS
AND TESTING.........................7-7
ACCESSORY DRIVE BELT TENSION,
SPECIFICATIONS.......................7-5
ACCESSORY RELAY - DESCRIPTION . . . 8W-97-2
ACCESSORY RELAY - DIAGNOSIS &
TESTING.........................8W-97-2
ACCESSORY RELAY - OPERATION.....8W-97-2
ACCUMULATOR - DESCRIPTION........21-188
ACCUMULATOR - OPERATION..........21-189
A/C-HEATER CONTROL - INSTALLATION . . . 24-29
A/C-HEATER CONTROL - REMOVAL......24-29
ACTUATOR - DESCRIPTION, BLEND
DOOR........................24-11,24-30
ACTUATOR - DESCRIPTION, ENGAGE.....8N-10
ACTUATOR - DESCRIPTION, LATCH......8N-14
ACTUATOR - DESCRIPTION, MODE
DOOR.............................24-24
ACTUATOR - DESCRIPTION,
RECIRCULATION DOOR................24-27
ACTUATOR - INSTALLATION, BLEND
DOOR........................24-12,24-31
ACTUATOR - INSTALLATION, ENGAGE....8N-11
ACTUATOR - INSTALLATION, LATCH.....8N-14
ACTUATOR - INSTALLATION, MODE
DOOR........................24-25,24-36
ACTUATOR - INSTALLATION,
RECIRCULATION DOOR................24-28
ACTUATOR - OPERATION, BLEND DOOR . . 24-11,
24-30
ACTUATOR - OPERATION, ENGAGE......8N-11
ACTUATOR - OPERATION, LATCH........8N-14
ACTUATOR - OPERATION, MODE DOOR . . . 24-24
ACTUATOR - OPERATION,
RECIRCULATION DOOR................24-27
ACTUATOR - REMOVAL, BLEND DOOR . . . 24-12,
24-31
ACTUATOR - REMOVAL, ENGAGE........8N-11
ACTUATOR - REMOVAL, LATCH.........8N-14
ACTUATOR - REMOVAL, MODE DOOR....24-25,
24-36
ACTUATOR - REMOVAL, RECIRCULATION
DOOR.............................24-27
ADAPTER - INSTALLATION, FRONT DISC
BRAKE CALIPER......................5-31
ADAPTER - INSTALLATION, OIL FILTER
. . . 9-139
ADAPTER - REMOVAL, FRONT DISC
BRAKE CALIPER
......................5-31
ADAPTER - REMOVAL, OIL FILTER
.......9-139
ADAPTIVE MEMORIES, OPERATION -
FUEL CORRECTION OR
................14-20
ADDING ADDITIONAL COOLANT -
STANDARD PROCEDURE
.................7-5ADDITIONAL COOLANT - STANDARD
PROCEDURE, ADDING...................7-5
ADHESIVE ATTACHED - INSTALLATION,
EXTERIOR NAME PLATES..............23-50
ADHESIVE ATTACHED - REMOVAL,
EXTERIOR NAME PLATES..............23-50
ADHESIVE LOCATIONS -
SPECIFICATIONS, STRUCTURAL........23-153
ADJUSTER-BORC-PILLAR -
INSTALLATION, SEAT BELT HEIGHT......8O-12
ADJUSTER-BORC-PILLAR -
REMOVAL, SEAT BELT HEIGHT..........8O-12
ADJUSTER - DIAGNOSIS AND TESTING,
DRUM BRAKE AUTOMATIC..............5-13
ADJUSTER - INSTALLATION, FRONT
SEAT TRACK MANUAL................23-94
ADJUSTER - INSTALLATION, FRONT
SEAT TRACK POWER.................23-94
ADJUSTER - REMOVAL, FRONT SEAT
TRACK MANUAL.....................23-94
ADJUSTER - REMOVAL, FRONT SEAT
TRACK POWER......................23-94
ADJUSTER KNOB - INSTALLATION, SEAT
BELT HEIGHT.......................8O-13
ADJUSTER KNOB - REMOVAL, SEAT
BELT HEIGHT.......................8O-13
ADJUSTER NOISE DIAGNOSIS -
DIAGNOSIS AND TESTING, HYDRAULIC
LASH...............................9-34
ADJUSTER TENSION RELEASE -
STANDARD PROCEDURE, PARKING
BRAKE AUTOMATIC....................5-58
ADJUSTER TENSION RESET -
STANDARD PROCEDURE, PARKING
BRAKE AUTOMATIC.....................5-59
ADJUSTERS - INSTALLATION,
HYDRAULIC LASH.....................9-34
ADJUSTERS - REMOVAL, HYDRAULIC
LASH...............................9-34
AERATION - DIAGNOSIS AND TESTING,
COOLING SYSTEM.....................7-3
AFTER AN AIRBAG DEPLOYMENT -
STANDARD PROCEDURE, SERVICE.......8O-3
AIR CLEANER ELEMENT - INSTALLATION . . 9-24,
9-98
AIR CLEANER ELEMENT - REMOVAL . . 9-24,9-98
AIR CLEANER HOUSING - INSTALLATION . . 9-24,
9-99
AIR CLEANER HOUSING - REMOVAL . . 9-24,9-99
AIR CONDITIONING LINES -
INSTALLATION, REAR................24-105
AIR CONDITIONING LINES - REMOVAL,
REAR.............................24-104
AIR CONTROL MOTOR - DESCRIPTION,
IDLE...............................14-28
AIR CONTROL MOTOR - INSTALLATION,
IDLE...............................14-29
AIR CONTROL MOTOR - OPERATION,
IDLE...............................14-28
AIR CONTROL MOTOR - REMOVAL, IDLE . . 14-29
AIR EXHAUSTER - DESCRIPTION, REAR
QUARTER PANEL/FENDER..............23-56
AIR EXHAUSTER - INSTALLATION, REAR
QUARTER PANEL/FENDER..............23-57
AIR EXHAUSTER - REMOVAL, REAR
QUARTER PANEL/FENDER..............23-56
AIR FILTER - DESCRIPTION............24-39
AIR FILTER - INSTALLATION............24-40
AIR FILTER - REMOVAL...............24-39
AIR GAP - STANDARD PROCEDURE,
COMPRESSOR CLUTCH...............24-17
AIR GAP, SPECIFICATIONS - WHEEL
SPEED SENSOR.......................5-79
AIR INTAKE PIPE - INSTALLATION......24-113
AIR INTAKE PIPE - REMOVAL..........24-112
AIR OUTLETS - DESCRIPTION.....24-40,24-52
AIR OUTLETS - INSTALLATION..........24-52
AIR OUTLETS - REMOVAL.............24-52
AIR PRESSURE TESTS - DIAGNOSIS
AND TESTING, CLUTCH...............21-122
AIR TEMPERATURE SENSOR -
DESCRIPTION, INLET.................14-29
AIR TEMPERATURE SENSOR -
OPERATION, INLET
...................14-29
AIRBAG - DESCRIPTION, DRIVER
........8O-5
AIRBAG - DESCRIPTION, PASSENGER
.....8O-7
AIRBAG - DESCRIPTION, SEAT
..........8O-10
AIRBAG - INSTALLATION, DRIVER
........8O-6AIRBAG - INSTALLATION, PASSENGER....8O-9
AIRBAG - OPERATION, DRIVER..........8O-5
AIRBAG - OPERATION, PASSENGER.......8O-8
AIRBAG - OPERATION, SEAT...........8O-11
AIRBAG - REMOVAL, DRIVER............8O-5
AIRBAG - REMOVAL, PASSENGER........8O-8
AIRBAG CONTROL MODULE -
DESCRIPTION, SIDE IMPACT...........8O-17
AIRBAG CONTROL MODULE -
INSTALLATION, SIDE IMPACT...........8O-17
AIRBAG CONTROL MODULE -
OPERATION, SIDE IMPACT.............8O-17
AIRBAG CONTROL MODULE - REMOVAL,
SIDE IMPACT.......................8O-17
AIRBAG DEPLOYMENT - STANDARD
PROCEDURE, SERVICE AFTER AN........8O-3
AIRBAG SYSTEM - DIAGNOSIS AND
TESTING............................8O-2
AIRBAG TRIM COVER - INSTALLATION,
DRIVER.............................8O-7
AIRBAG TRIM COVER - REMOVAL,
DRIVER.............................8O-6
AIRBAGS - STANDARD PROCEDURE,
HANDLING..........................8O-3
AJAR SWITCH - EXPORT -
INSTALLATION, HOOD.................8Q-3
AJAR SWITCH - EXPORT - REMOVAL,
HOOD..............................8Q-3
ALIGNMENT - DESCRIPTION, WHEEL......2-46
ALIGNMENT - EXPORT - STANDARD
PROCEDURE, FRONT FOG LAMP UNIT.....8L-9
ALIGNMENT - EXPORT - STANDARD
PROCEDURE, HEADLAMP UNIT.........8L-17
ALIGNMENT - STANDARD PROCEDURE,
FRONT FOG LAMP UNIT................8L-9
ALIGNMENT - STANDARD PROCEDURE,
FRONT WIPER ARM...................8R-8
ALIGNMENT - STANDARD PROCEDURE,
HEADLAMP UNIT.....................8L-17
ALIGNMENT - STANDARD PROCEDURE,
WHEEL.............................2-51
ALIGNMENT, SPECIFICATIONS - WHEEL....2-55
ALUMINUM WHEEL CARE - CLEANING . . . 22-18
AMBIENT TEMP SENSOR - DESCRIPTION . 8M-11
AMBIENT TEMP SENSOR - OPERATION . . 8M-11
AMBIENT TEMPERATURE SENSOR -
DIAGNOSIS AND TESTING.............8M-12
AMBIENT TEMPERATURE SENSOR
CIRCUIT - DIAGNOSIS AND TESTING....8M-12
AN AIRBAG DEPLOYMENT - STANDARD
PROCEDURE, SERVICE AFTER...........8O-3
ANTENNA - EXPORT - DESCRIPTION,
QUARTER GLASS INTEGRAL............8A-9
ANTENNA - EXPORT - DIAGNOSIS AND
TESTING, QUARTER GLASS INTEGRAL....8A-9
ANTENNA - EXPORT - OPERATION,
QUARTER GLASS INTEGRAL............8A-9
ANTENNA BODY AND CABLE -
DESCRIPTION........................8A-4
ANTENNA BODY AND CABLE -
DIAGNOSIS AND TESTING..............8A-4
ANTENNA BODY AND CABLE -
INSTALLATION.......................8A-6
ANTENNA BODY AND CABLE -
OPERATION..........................8A-4
ANTENNA BODY AND CABLE - REMOVAL . . 8A-5
ANTENNA CABLE - INSTALLATION,
INSTRUMENT PANEL..................8A-9
ANTENNA CABLE - REMOVAL,
INSTRUMENT PANEL..................8A-8
ANTENNA MODULE - EXPORT -
DESCRIPTION........................8A-6
ANTENNA MODULE - EXPORT -
DIAGNOSIS AND TESTING..............8A-7
ANTENNA MODULE - EXPORT -
INSTALLATION.......................8A-7
ANTENNA MODULE - EXPORT -
OPERATION..........................8A-6
ANTENNA MODULE - EXPORT -
REMOVAL
...........................8A-7
ANTILOCK BRAKE - DESCRIPTION,
CONTROLLER
........................8E-5
ANTILOCK BRAKE - INSTALLATION,
CONTROLLER
........................8E-6
ANTILOCK BRAKE - OPERATION,
CONTROLLER
........................8E-5
ANTILOCK BRAKE - REMOVAL,
CONTROLLER
........................8E-6
RSINDEX1
Description Group-Page Description Group-Page Description Group-Page
ProCarManuals.com
Page 2141 of 2177
ANTILOCK BRAKE SYSTEM -
DESCRIPTION........................5-75
ANTILOCK BRAKE SYSTEM - OPERATION . . 5-76
ANTILOCK BRAKE SYSTEM BLEEDING -
STANDARD PROCEDURE................5-78
ANTILOCK BRAKE SYSTEM (EXPORT) -
DESCRIPTION........................5-75
A-PILLAR LOWER EXTENSION TRIM -
INSTALLATION.......................23-73
A-PILLAR LOWER EXTENSION TRIM -
REMOVAL..........................23-73
A-PILLAR TRIM - INSTALLATION........23-73
A-PILLAR TRIM - REMOVAL............23-73
A-PILLAR-HEADER, OR B-PILLAR -
INSTALLATION.......................23-17
A-PILLAR-HEADER, OR B-PILLAR -
REMOVAL..........................23-17
APPLIQUE - INSTALLATION.............23-14
APPLIQUE - REMOVAL................23-14
ARM - DESCRIPTION, LOWER CONTROL . . . 2-12
ARM - INSPECTION, LOWER CONTROL....2-14
ARM - INSTALLATION, LOWER CONTROL . . 2-15
ARM - INSTALLATION, REAR WIPER.....8R-14
ARM - INSTALLATION, TORQUE..........3-44
ARM - OPERATION, LOWER CONTROL.....2-12
ARM - REMOVAL, LOWER CONTROL......2-12
ARM - REMOVAL, REAR WIPER.........8R-14
ARM - REMOVAL, TORQUE..............3-44
ARM ALIGNMENT - STANDARD
PROCEDURE, FRONT WIPER............8R-8
ARM (REAR BUSHING - HYDRO) -
ASSEMBLY, LOWER CONTROL...........2-14
ARM (REAR BUSHING - HYDRO) -
DISASSEMBLY, LOWER CONTROL........2-14
ARM (REAR BUSHING - STANDARD) -
ASSEMBLY, LOWER CONTROL...........2-14
ARM (REAR BUSHING - STANDARD) -
DISASSEMBLY, LOWER CONTROL........2-13
ARMREST - INSTALLATION.............23-90
ARMREST - REMOVAL................23-90
ARMS - DESCRIPTION, ROCKER........9-109
ARMS - INSPECTION, ROCKER...........9-35
ARMS - INSTALLATION, FRONT WIPER....8R-9
ARMS - INSTALLATION, ROCKER.........9-35
ARMS - OPERATION, ROCKER..........9-109
ARMS - REMOVAL, FRONT WIPER........8R-9
ARMS - REMOVAL, ROCKER.............9-34
ARMS AND SHAFT - ASSEMBLY,
ROCKER............................9-109
ARMS AND SHAFT - DISASSEMBLY,
ROCKER............................9-109
ARMS AND SHAFT - INSTALLATION,
ROCKER............................9-110
ARMS AND SHAFT - REMOVAL, ROCKER . . 9-109
ASSIST HANDLE - INSTALLATION........23-73
ASSIST HANDLE - REMOVAL...........23-73
ASSIST STRAP - INSTALLATION, FRONT
SEATBACK..........................23-91
ASSIST STRAP - REMOVAL, FRONT
SEATBACK..........................23-91
ATC - OPERATION, THREE ZONE.........24-3
ATC - OPERATION, TWO ZONE.........24-106
ATTACHED - INSTALLATION, EXTERIOR
NAME PLATES - ADHESIVE.............23-50
ATTACHED - INSTALLATION, EXTERIOR
NAME PLATES - TAPE.................23-50
ATTACHED - REMOVAL, EXTERIOR NAME
PLATES - ADHESIVE..................23-50
ATTACHED - REMOVAL, EXTERIOR NAME
PLATES - TAPE ......................23-50
AUDIO - DIAGNOSIS AND TESTING.......8A-2
AUDIO/VIDEO - DESCRIPTION...........8A-1
AUDIO/VIDEO - OPERATION.............8A-2
AUTO SHUT DOWN RELAY -
DESCRIPTION.........................8I-3
AUTO SHUT DOWN RELAY - OPERATION . . . 8I-3
AUTOMATIC ADJUSTER - DIAGNOSIS
AND TESTING, DRUM BRAKE
............5-13
AUTOMATIC ADJUSTER TENSION
RELEASE - STANDARD PROCEDURE,
PARKING BRAKE
......................5-58
AUTOMATIC ADJUSTER TENSION RESET
- STANDARD PROCEDURE, PARKING
BRAKE
..............................5-59
AUTOMATIC DAY / NIGHT MIRROR -
DESCRIPTION
.......................8N-47
AUTOMATIC DAY / NIGHT MIRROR -
DIAGNOSIS AND TESTING
.............8N-47AUTOMATIC DAY / NIGHT MIRROR -
OPERATION.........................8N-47
AUTOMATIC TEMPERATURE CONTROL -
DESCRIPTION........................24-2
AUTOMATIC TRANSAXLE -
DESCRIPTION, 41TE.................21-117
AUTOMATIC TRANSAXLE - OPERATION,
41TE.............................21-119
AUTOMATIC TRANSAXLE, SPECIAL
TOOLS - 41TE......................21-183
AUTOSTICK SWITCH - DESCRIPTION....21-189
AUTOSTICK SWITCH - OPERATION......21-189
AWD - INSTALLATION..............2-39,2-44
AWD - INSTALLATION, REAR WHEEL
SPEED SENSOR.......................5-80
AWD - REMOVAL.................2-38,2-44
AWD - REMOVAL, REAR WHEEL SPEED
SENSOR............................5-80
AWD AND HEAVY DUTY - INSTALLATION . . . 2-35
AWD AND HEAVY DUTY - REMOVAL......2-35
AXLE SEALS - INSTALLATION...........21-61
AXLE SEALS - REMOVAL..............21-61
B OR C-PILLAR - INSTALLATION, SEAT
BELT HEIGHT ADJUSTER..............8O-12
B OR C-PILLAR - REMOVAL, SEAT BELT
HEIGHT ADJUSTER...................8O-12
BACK - INSTALLATION, BENCH SEAT....23-101
BACK - QUAD BUCKET - INSTALLATION,
BUCKET SEAT.......................23-97
BACK - QUAD BUCKET - REMOVAL,
BUCKET SEAT.........................23-97
BACK - REMOVAL, BENCH SEAT........23-101
BACK COVER - INSTALLATION, BENCH
SEAT .............................23-102
BACK COVER - REMOVAL, BENCH SEAT . . 23-102
BACK HINGE - REMOVAL, BENCH SEAT . . 23-100
BACK HINGE COVERS - QUAD BUCKET,
50/50 SPLIT, BENCH - INSTALLATION,
SEAT .............................23-100
BACK HINGE COVERS - QUAD BUCKET,
50/50 SPLIT, BENCH - REMOVAL, SEAT . . 23-100
BACKING PLATE - INSTALLATION,
STEERING COLUMN COVER............23-69
BACKING PLATE - REMOVAL, STEERING
COLUMN COVER.....................23-69
BACK-UP LAMP SWITCH -
INSTALLATION.......................21-62
BACK-UP LAMP SWITCH - REMOVAL.....21-62
BAG RETAINER - INSTALLATION,
PLASTIC GROCERY..................23-103
BAG RETAINER - REMOVAL, PLASTIC
GROCERY.........................23-103
BALANCE - STANDARD PROCEDURE,
TIRE AND WHEEL.....................22-5
BALANCE SHAFTS AND CARRIER
ASSEMBLY - DESCRIPTION.............9-69
BALANCE SHAFTS AND CARRIER
ASSEMBLY - INSTALLATION.............9-72
BALANCE SHAFTS AND CARRIER
ASSEMBLY - OPERATION...............9-69
BALANCE SHAFTS AND CARRIER
ASSEMBLY - REMOVAL.................9-69
BALL BEARING - INSTALLATION, END
COVER.............................21-10
BALL BEARING - REMOVAL, END COVER . . . 21-9
BALL JOINT - DESCRIPTION, LOWER......2-10
BALL JOINT - DIAGNOSIS AND TESTING,
LOWER.............................2-10
BALL JOINT - OPERATION, LOWER.......2-10
BALL JOINT SEAL BOOT - INSTALLATION . . 2-11
BALL JOINT SEAL BOOT - REMOVAL......2-11
BAR - DESCRIPTION, STABILIZER....2-16,2-43
BAR - DESCRIPTION, TRACK............2-44
BAR - INSPECTION, STABILIZER..........2-17
BAR - INSTALLATION, STABILIZER........2-17
BAR - INSTALLATION, TRACK............2-45
BAR - OPERATION, STABILIZER......2-16,2-44
BAR - OPERATION, TRACK..............2-44
BAR - REMOVAL, STABILIZER...........2-17
BAR - REMOVAL, TRACK...............2-44
BAR CUSHION - INSTALLATION,
STABILIZER
...........................2-4
BAR CUSHION - REMOVAL, STABILIZER
....2-4
BASE BRAKE BLEEDING - STANDARD
PROCEDURE
..........................5-7
BASE BRAKE SYSTEM - DIAGNOSIS AND
TESTING
.............................5-4
BASE BRAKE SYSTEM, SPECIAL TOOLS
....5-10BASE BRAKES - DESCRIPTION............5-3
BASE BRAKES - OPERATION..............5-3
BASE BRAKES (EXPORT) - DESCRIPTION . . . 5-3
BASE COAT/CLEARCOAT FINISH -
DESCRIPTION.......................23-84
BATTERY - DESCRIPTION...............8F-7
BATTERY - DIAGNOSIS AND TESTING.....8F-9
BATTERY - OPERATION.................8F-9
BATTERY - REMOVAL.................8F-15
BATTERY CABLE - DIAGNOSIS AND
TESTING...........................8F-16
BATTERY CABLES - DESCRIPTION.......8F-16
BATTERY CABLES - INSTALLATION.......8F-18
BATTERY CABLES - OPERATION.........8F-16
BATTERY CABLES - REMOVAL..........8F-18
BATTERY CHARGING - STANDARD
PROCEDURE, CONVENTIONAL..........8F-11
BATTERY CHARGING - STANDARD
PROCEDURE, SPIRAL PLATE............8F-10
BATTERY ELECTROLYTE LEVEL -
STANDARD PROCEDURE, CHECKING.....8F-14
BATTERY HOLDDOWN - DESCRIPTION....8F-15
BATTERY HOLDDOWN - INSTALLATION . . . 8F-16
BATTERY HOLDDOWN - OPERATION.....8F-15
BATTERY HOLDDOWN - REMOVAL.......8F-16
BATTERY REPLACEMENT - STANDARD
PROCEDURE........................8N-42
BATTERY, SPECIFICATIONS.............8N-43
BATTERY SYSTEM - CLEANING...........8F-5
BATTERY SYSTEM - DESCRIPTION........8F-1
BATTERY SYSTEM - DIAGNOSIS AND
TESTING............................8F-2
BATTERY SYSTEM - INSPECTION.........8F-5
BATTERY SYSTEM - OPERATION.........8F-2
BATTERY SYSTEM - SPECIFICATIONS......8F-6
BATTERY SYSTEM SPECIAL TOOLS,
SPECIAL TOOLS......................8F-7
BATTERY TEMPERATURE SENSOR -
DESCRIPTION.......................8F-23
BATTERY TEMPERATURE SENSOR -
OPERATION.........................8F-23
BATTERY TEMPERATURE SENSOR -
REMOVAL..........................8F-23
BATTERY TEMPERATURE SENSOR -
SPECIFICATIONS.....................8F-22
BATTERY TRAY - DESCRIPTION.........8F-18
BATTERY TRAY - INSTALLATION.........8F-19
BATTERY TRAY - OPERATION...........8F-19
BATTERY TRAY - REMOVAL............8F-19
BEARING - DESCRIPTION, HUB.......2-30,2-5
BEARING - DIAGNOSIS AND TESTING,
HUB.............................2-30,2-5
BEARING - INSTALLATION, CLUTCH
RELEASE LEVER.......................6-7
BEARING - INSTALLATION, END COVER
BALL..............................21-10
BEARING - INSTALLATION, HUB.......2-32,2-5
BEARING - OPERATION, HUB.........2-30,2-5
BEARING - REMOVAL, CLUTCH RELEASE
LEVER...............................6-6
BEARING - REMOVAL, END COVER BALL . . . 21-9
BEARING - REMOVAL, HUB..........2-31,2-5
BEARING CLEARANCE - STANDARD
PROCEDURE, MEASURING
CONNECTING ROD...................9-120
BEARING CLEARANCE USING
PLASTIGAGE - STANDARD
PROCEDURE, MEASURING..........9-12,9-84
BEARING FITTING - STANDARD
PROCEDURE, MAIN...................9-123
BEARING PRELOAD - ADJUSTMENT,
DIFFERENTIAL......................21-199
BEARINGS - INSTALLATION,
CRANKSHAFT MAIN..................9-124
BEARINGS - REMOVAL, CRANKSHAFT
MAIN..............................9-124
BEARINGS (IN BLOCK) - DESCRIPTION,
CAMSHAFT.........................9-115
BEARINGS (IN BLOCK) - INSPECTION,
CAMSHAFT.........................9-115
BEARINGS (IN BLOCK) - INSTALLATION,
CAMSHAFT
.........................9-115
BEARINGS (IN BLOCK) - OPERATION,
CAMSHAFT
.........................9-115
BEARINGS (IN BLOCK) - REMOVAL,
CAMSHAFT
.........................9-115
BELLCRANK - INSTALLATION
...........23-34
BELLCRANK - REMOVAL
...............23-34
2 INDEXRS
Description Group-Page Description Group-Page Description Group-Page
ProCarManuals.com
Page 2142 of 2177
BELT - DIAGNOSIS AND TESTING,
ACCESSORY DRIVE.....................7-7
BELT - INSTALLATION, TIMING...........9-65
BELT - REMOVAL, TIMING..............9-63
BELT & RETRACTOR - FIRST ROW -
OUTBOARD - INSTALLATION, SEAT......8O-13
BELT & RETRACTOR - FIRST ROW -
OUTBOARD - REMOVAL, SEAT..........8O-13
BELT & RETRACTOR - OUTBOARD -
FRONT - INSTALLATION, SEAT..........8O-13
BELT & RETRACTOR - OUTBOARD -
FRONT - REMOVAL, SEAT..............8O-13
BELT & RETRACTOR - SECOND ROW -
LEFT OUTBOARD - INSTALLATION,
SEAT ..............................8O-16
BELT & RETRACTOR - SECOND ROW -
LEFT OUTBOARD - REMOVAL, SEAT.....8O-16
BELT & RETRACTOR - SECOND ROW -
RIGHT OUTBOARD - INSTALLATION,
SEAT ..............................8O-14
BELT & RETRACTOR - SECOND ROW -
RIGHT OUTBOARD - REMOVAL, SEAT....8O-14
BELT & RETRACTOR - SECOND ROW -
RIGHT OUTBOARD WITH REAR HVAC -
LWB - INSTALLATION, SEAT............8O-15
BELT & RETRACTOR - SECOND ROW -
RIGHT OUTBOARD WITH REAR HVAC -
LWB - REMOVAL, SEAT...............8O-15
BELT BUCKLE - FIRST ROW - BENCH -
INSTALLATION, SEAT.................8O-12
BELT BUCKLE - FIRST ROW - BENCH -
REMOVAL, SEAT.....................8O-12
BELT BUCKLE - FIRST ROW INBOARD -
QUAD BUCKET - INSTALLATION, SEAT....8O-11
BELT BUCKLE - FIRST ROW INBOARD -
QUAD BUCKET - REMOVAL, SEAT.......8O-11
BELT BUCKLE - FRONT INBOARD -
INSTALLATION, SEAT.................8O-11
BELT BUCKLE - FRONT INBOARD -
REMOVAL, SEAT.....................8O-11
BELT BUCKLE - SECOND ROW - THREE
PASSENGER BENCH - INSTALLATION,
SEAT ..............................8O-14
BELT BUCKLE - SECOND ROW - THREE
PASSENGER BENCH - REMOVAL, SEAT . . . 8O-14
BELT BUCKLE - SECOND ROW INBOARD
- 50/50 BENCH - INSTALLATION, SEAT . . . 8O-12
BELT BUCKLE - SECOND ROW INBOARD
- 50/50 BENCH - REMOVAL, SEAT.......8O-12
BELT COVER(S) - INSTALLATION,
TIMING.............................9-62
BELT COVER(S) - REMOVAL, TIMING......9-61
BELT HEIGHT ADJUSTER-BOR
C-PILLAR - INSTALLATION, SEAT........8O-12
BELT HEIGHT ADJUSTER-BOR
C-PILLAR - REMOVAL, SEAT...........8O-12
BELT HEIGHT ADJUSTER KNOB -
INSTALLATION, SEAT.................8O-13
BELT HEIGHT ADJUSTER KNOB -
REMOVAL, SEAT.....................8O-13
BELT MOLDING - INSTALLATION, FRONT
DOOR INNER.......................23-112
BELT MOLDING - INSTALLATION, FRONT
DOOR OUTER......................23-110
BELT MOLDING - REMOVAL, FRONT
DOOR INNER.......................23-112
BELT MOLDING - REMOVAL, FRONT
DOOR OUTER......................23-110
BELT TENSION - STANDARD
PROCEDURE, CHECKING POWER
STEERING............................7-8
BELT TENSION, SPECIFICATIONS -
ACCESSORY DRIVE.....................7-5
BELT TENSIONER - 2.4L - INSTALLATION . . 7-10
BELT TENSIONER - 2.4L - REMOVAL......7-10
BELT TENSIONER - 3.3/3.8L -
INSTALLATION........................7-12
BELT TENSIONER - 3.3/3.8L - REMOVAL . . . 7-12
BELT TENSIONER - DESCRIPTION, SEAT . . 8O-16
BELT TENSIONER - OPERATION, SEAT....8O-16
BELT TENSIONER & PULLEY -
INSTALLATION, TIMING.................9-69
BELT TENSIONER & PULLEY -
REMOVAL, TIMING
....................9-68
BELTS - 2.4L - ADJUSTMENTS, DRIVE
.....7-10
BELTS - 2.4L - CLEANING, DRIVE
..........7-9
BELTS - 2.4L - INSPECTION, DRIVE
........7-9
BELTS - 2.4L - INSTALLATION, DRIVE
.....7-10BELTS - 2.4L - REMOVAL, DRIVE..........7-8
BELTS - 3.3/3.8L - CLEANING, DRIVE......7-11
BELTS - 3.3/3.8L - INSPECTION, DRIVE....7-11
BELTS - 3.3/3.8L - INSTALLATION, DRIVE . . 7-12
BELTS - 3.3/3.8L - REMOVAL, DRIVE......7-11
BENCH - INSTALLATION, SEAT BACK
HINGE COVERS - QUAD BUCKET, 50/50
SPLIT.............................23-100
BENCH - INSTALLATION, SEAT BELT
BUCKLE - FIRST ROW................8O-12
BENCH - INSTALLATION, SEAT BELT
BUCKLE - SECOND ROW - THREE
PASSENGER........................8O-14
BENCH - INSTALLATION, SEAT BELT
BUCKLE - SECOND ROW INBOARD -
50/50..............................8O-12
BENCH - INSTALLATION, SEAT CUSHION
COVER - QUAD BUCKET, 50/50 SPLIT....23-99
BENCH - REMOVAL, SEAT BACK HINGE
COVERS - QUAD BUCKET, 50/50 SPLIT . . 23-100
BENCH - REMOVAL, SEAT BELT BUCKLE
- FIRST ROW.......................8O-12
BENCH - REMOVAL, SEAT BELT BUCKLE
- SECOND ROW - THREE PASSENGER....8O-14
BENCH - REMOVAL, SEAT BELT BUCKLE
- SECOND ROW INBOARD - 50/50.......8O-12
BENCH - REMOVAL, SEAT CUSHION
COVER - QUAD BUCKET, 50/50 SPLIT....23-98
BENCH SEAT - REMOVAL, CHILD SEAT
MODULE...........................23-86
BENCH SEAT BACK - INSTALLATION.....23-101
BENCH SEAT BACK - REMOVAL........23-101
BENCH SEAT BACK COVER -
INSTALLATION......................23-102
BENCH SEAT BACK COVER - REMOVAL . . 23-102
BENCH SEAT BACK HINGE - REMOVAL . . 23-100
BENCH SEAT RISER - 50/50 SPLIT -
INSTALLATION.......................23-99
BENCH SEAT RISER - 50/50 SPLIT -
REMOVAL..........................23-99
BENCH SEAT RISER - SECOND ROW -
INSTALLATION......................23-100
BENCH SEAT RISER - SECOND ROW -
REMOVAL..........................23-99
BENCH SEAT RISER - THIRD ROW -
INSTALLATION......................23-100
BENCH SEAT RISER - THIRD ROW -
REMOVAL.........................23-100
BENCH SEAT TRACK - INSTALLATION . . . 23-102
BENCH SEAT TRACK - REMOVAL.......23-102
BENCH SEATBACK PANEL -
INSTALLATION.......................23-98
BENCH SEATBACK PANEL - REMOVAL....23-98
BEZEL - INSTALLATION, CLUSTER.......23-62
BEZEL - INSTALLATION, INSTRUMENT
PANEL CENTER......................23-67
BEZEL - INSTALLATION, SLIDING DOOR
STOP BUMPER......................23-25
BEZEL - REMOVAL, CLUSTER...........23-62
BEZEL - REMOVAL, INSTRUMENT PANEL
CENTER............................23-67
BEZEL - REMOVAL, SLIDING DOOR
STOP BUMPER......................23-25
BEZEL OUTLETS - INSTALLATION,
CENTER............................24-42
BEZEL OUTLETS - REMOVAL, CENTER....24-40
BI-DIRECTIONAL OVERRUNNING
CLUTCH - DESCRIPTION................3-34
BI-DIRECTIONAL OVERRUNNING
CLUTCH - OPERATION.................3-36
BIN - INSTALLATION, UNDER SEAT
STORAGE..........................23-103
BIN - REMOVAL, UNDER SEAT STORAGE . 23-103
BIN GUIDE - INSTALLATION, UNDER
SEAT STORAGE.....................23-104
BIN GUIDE - REMOVAL, UNDER SEAT
STORAGE..........................23-104
BIN LOCK/LATCH - INSTALLATION,
UNDER SEAT STORAGE...............23-104
BIN LOCK/LATCH - REMOVAL, UNDER
SEAT STORAGE.....................23-104
BLADES - CLEANING, WIPER
...........8R-17
BLADES - INSTALLATION, WIPER
........8R-17
BLADES - REMOVAL, WIPER
...........8R-17
BLEEDING - STANDARD PROCEDURE,
ANTILOCK BRAKE SYSTEM
..............5-78
BLEEDING - STANDARD PROCEDURE,
BASE BRAKE
..........................5-7BLEEDING - STANDARD PROCEDURE,
MASTER CYLINDER...................5-35
BLEND DOOR ACTUATOR -
DESCRIPTION..................24-11,24-30
BLEND DOOR ACTUATOR -
INSTALLATION..................24-12,24-31
BLEND DOOR ACTUATOR - OPERATION . . 24-11,
24-30
BLEND DOOR ACTUATOR - REMOVAL....24-12,
24-31
BLOCK - CLEANING, ENGINE.......9-112,9-36
BLOCK - DESCRIPTION, ENGINE.....9-112,9-35
BLOCK - DESCRIPTION, NON-ABS
JUNCTION...........................5-33
BLOCK - INSPECTION, ENGINE......9-112,9-36
BLOCK - INSTALLATION, NON-ABS
JUNCTION...........................5-33
BLOCK - OPERATION, NON-ABS
JUNCTION...........................5-33
BLOCK - REMOVAL, NON-ABS JUNCTION . . 5-33
BLOCK HEATER - DESCRIPTION, ENGINE . . . 7-20
BLOCK HEATER - INSTALLATION,
ENGINE.............................7-20
BLOCK HEATER - OPERATION, ENGINE....7-20
BLOCK HEATER - REMOVAL, ENGINE......7-20
BLOCK HEATER TESTING - DIAGNOSIS
AND TESTING, ENGINE.................7-20
BLOCKER LATCH - INSTALLATION, FUEL
FILL DOOR.........................23-52
BLOCKER LATCH - REMOVAL, FUEL FILL
DOOR.............................23-52
BLOCKER LATCH STRIKER -
INSTALLATION, FUEL FILL DOOR........23-52
BLOCKER LATCH STRIKER - REMOVAL,
FUEL FILL DOOR.....................23-52
BLOCKER LOCKOUT LINK -
INSTALLATION, FUEL FILL DOOR........23-53
BLOCKER LOCKOUT LINK - REMOVAL,
FUEL FILL DOOR.....................23-52
BLOWER MOTOR - DESCRIPTION . . 24-43,24-53
BLOWER MOTOR - DIAGNOSIS AND
TESTING......................24-43,24-54
BLOWER MOTOR - INSTALLATION . . 24-46,24-56
BLOWER MOTOR - OPERATION....24-43,24-54
BLOWER MOTOR - REMOVAL......24-46,24-56
BLOWER MOTOR RELAY - DESCRIPTION . 24-13,
24-32
BLOWER MOTOR RELAY - DIAGNOSIS
AND TESTING..................24-14,24-33
BLOWER MOTOR RELAY -
INSTALLATION..................24-14,24-33
BLOWER MOTOR RELAY - OPERATION . . . 24-13,
24-32
BLOWER MOTOR RELAY - REMOVAL....24-14,
24-33
BLOWER MOTOR RESISTOR -
DESCRIPTION..................24-14,24-34
BLOWER MOTOR RESISTOR -
DIAGNOSIS AND TESTING........24-15,24-34
BLOWER MOTOR RESISTOR -
INSTALLATION..................24-16,24-35
BLOWER MOTOR RESISTOR -
OPERATION....................24-15,24-34
BLOWER MOTOR RESISTOR - REMOVAL . 24-16,
24-35
BODY - ASSEMBLY, VALVE............21-257
BODY - DESCRIPTION, THROTTLE.......14-34
BODY - DESCRIPTION, VALVE..........21-250
BODY - DISASSEMBLY, VALVE.........21-252
BODY - INSTALLATION, THROTTLE.......14-35
BODY - INSTALLATION, VALVE.........21-262
BODY - OPERATION, THROTTLE.........14-34
BODY - OPERATION, VALVE...........21-250
BODY - REMOVAL, THROTTLE..........14-35
BODY - REMOVAL, VALVE.............21-251
BODY AND CABLE - DESCRIPTION,
ANTENNA...........................8A-4
BODY AND CABLE - DIAGNOSIS AND
TESTING, ANTENNA...................8A-4
BODY AND CABLE - INSTALLATION,
ANTENNA
...........................8A-6
BODY AND CABLE - OPERATION,
ANTENNA
...........................8A-4
BODY AND CABLE - REMOVAL,
ANTENNA
...........................8A-5
BODY CODE PLATE - DESCRIPTION
.....Intro.-1
BODY CONTROL MODULE -
DESCRIPTION
........................8E-3
RSINDEX3
Description Group-Page Description Group-Page Description Group-Page
ProCarManuals.com