lock CHRYSLER CARAVAN 2003 Service Manual
[x] Cancel search | Manufacturer: CHRYSLER, Model Year: 2003, Model line: CARAVAN, Model: CHRYSLER CARAVAN 2003Pages: 2177, PDF Size: 59.81 MB
Page 1528 of 2177

GEARSHIFT CABLE -
SELECTOR
REMOVAL
(1) Disconnect battery negative cable.
(2) Remove gearshift knob by pushing down and
rotating
1¤4-turn clock-wise (Fig. 160).
(3) Remove gearshift boot from center console by
disengaging at three (3) retaining clips (Fig. 161).(4) Apply park brake to allow park brake handle to
clear center console upon removal.
(5) Remove two (2) cupholder bottom plugs (Fig.
162).
(6) Remove four (4) center console-to-gearshift
mechanism screws. Remove console assembly (Fig.
163).
Fig. 160 Gearshift Knob Removal/Installation
1 - GEARSHIFT KNOB
2 - GEARSHIFT LEVER
Fig. 161 Gearshift Boot Removal/Installation
1 - GEARSHIFT BOOT
2 - CENTER CONSOLE
Fig. 162 Cup Holder Plugs
1 - CUPHOLDER PLUG (2)
Fig. 163 Center Console Removal/Installation (LHD
Shown Ð RHD Typical)
1 - CENTER CONSOLE
2 - SCREW (4)
3 - GEARSHIFT MECHANISM
RST850 MANUAL TRANSAXLE21-81
ProCarManuals.com
Page 1534 of 2177

(15) Install gearshift knob to gearshift lever (Fig.
183). Orient shift pattern1¤4-turn clockwise, push
down and rotate1¤4-turn counter-clockwise and
release. Secure boot to knob.
(16) Connect battery negative cable.
GEARSHIFT KNOB
REMOVAL
(1) Separate gearshift boot from base of knob.
(2) Remove gearshift knob by pushing down and
rotating
1¤4-turn clockwise (Fig. 184).
INSTALLATION
(1) Install gearshift knob pattern1¤4-turn clock-
wise, press down, and rotate1¤4-turn counter clock-
wise (Fig. 184).
(2) Secure gearshift boot to base of knob.
GEARSHIFT MECHANISM
REMOVAL
(1) Disconnect battery negative cable.
(2) Remove gearshift knob by pushing down and
rotating
1¤4turn clock-wise (Fig. 185).
Fig. 183 Gearshift Knob Removal/Installation
1 - GEARSHIFT KNOB
2 - GEARSHIFT LEVER
Fig. 184 Gearshift Knob Removal/Installation
1 - GEARSHIFT KNOB
2 - GEARSHIFT LEVER
Fig. 185 Gearshift Knob Removal/Installation
1 - GEARSHIFT KNOB
2 - GEARSHIFT LEVER
RST850 MANUAL TRANSAXLE21-87
GEARSHIFT CABLE - SELECTOR (Continued)
ProCarManuals.com
Page 1539 of 2177

(7) Install cupholder plugs (Fig. 202).
(8) Install gearshift boot to console (Fig. 203).
Secure with three (3) retainer clips.(9) Install gearshift knob to gearshift lever (Fig.
204). Orient shift pattern1¤4-turn clockwise, push
down and rotate1¤4-turn counter-clockwise and
release. Secure boot to knob.
(10) Connect battery negative cable.
Fig. 202 Cup Holder Plugs
1 - CUPHOLDER PLUG (2)
Fig. 203 Gearshift Boot Removal/Installation
1 - GEARSHIFT BOOT
2 - CENTER CONSOLE
Fig. 204 Gearshift Knob Removal/Installation
1 - GEARSHIFT KNOB
2 - GEARSHIFT LEVER
21 - 92 T850 MANUAL TRANSAXLERS
GEARSHIFT MECHANISM (Continued)
ProCarManuals.com
Page 1542 of 2177
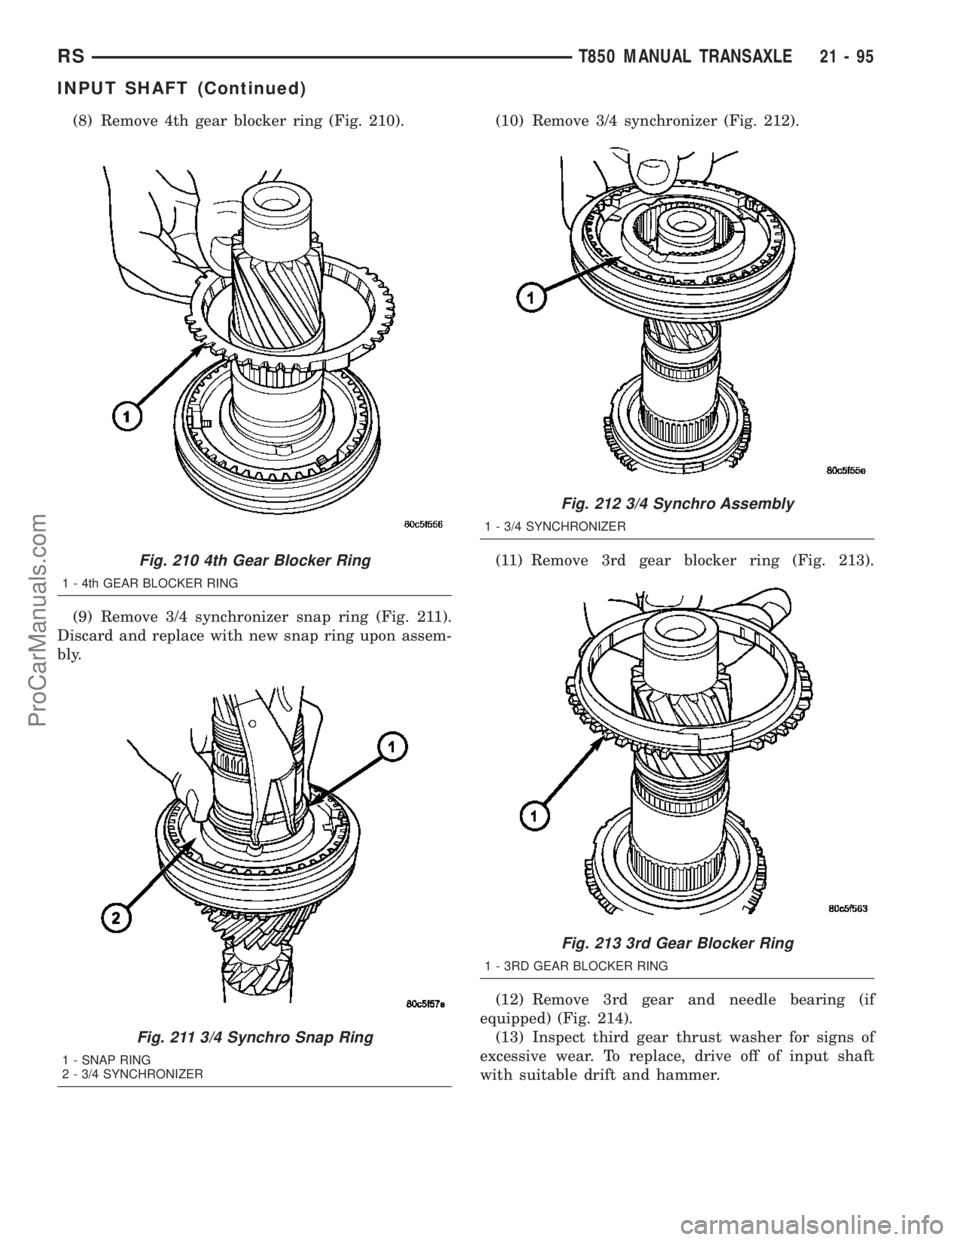
(8) Remove 4th gear blocker ring (Fig. 210).
(9) Remove 3/4 synchronizer snap ring (Fig. 211).
Discard and replace with new snap ring upon assem-
bly.(10) Remove 3/4 synchronizer (Fig. 212).
(11) Remove 3rd gear blocker ring (Fig. 213).
(12) Remove 3rd gear and needle bearing (if
equipped) (Fig. 214).
(13) Inspect third gear thrust washer for signs of
excessive wear. To replace, drive off of input shaft
with suitable drift and hammer.
Fig. 210 4th Gear Blocker Ring
1 - 4th GEAR BLOCKER RING
Fig. 211 3/4 Synchro Snap Ring
1 - SNAP RING
2 - 3/4 SYNCHRONIZER
Fig. 212 3/4 Synchro Assembly
1 - 3/4 SYNCHRONIZER
Fig. 213 3rd Gear Blocker Ring
1 - 3RD GEAR BLOCKER RING
RST850 MANUAL TRANSAXLE21-95
INPUT SHAFT (Continued)
ProCarManuals.com
Page 1544 of 2177
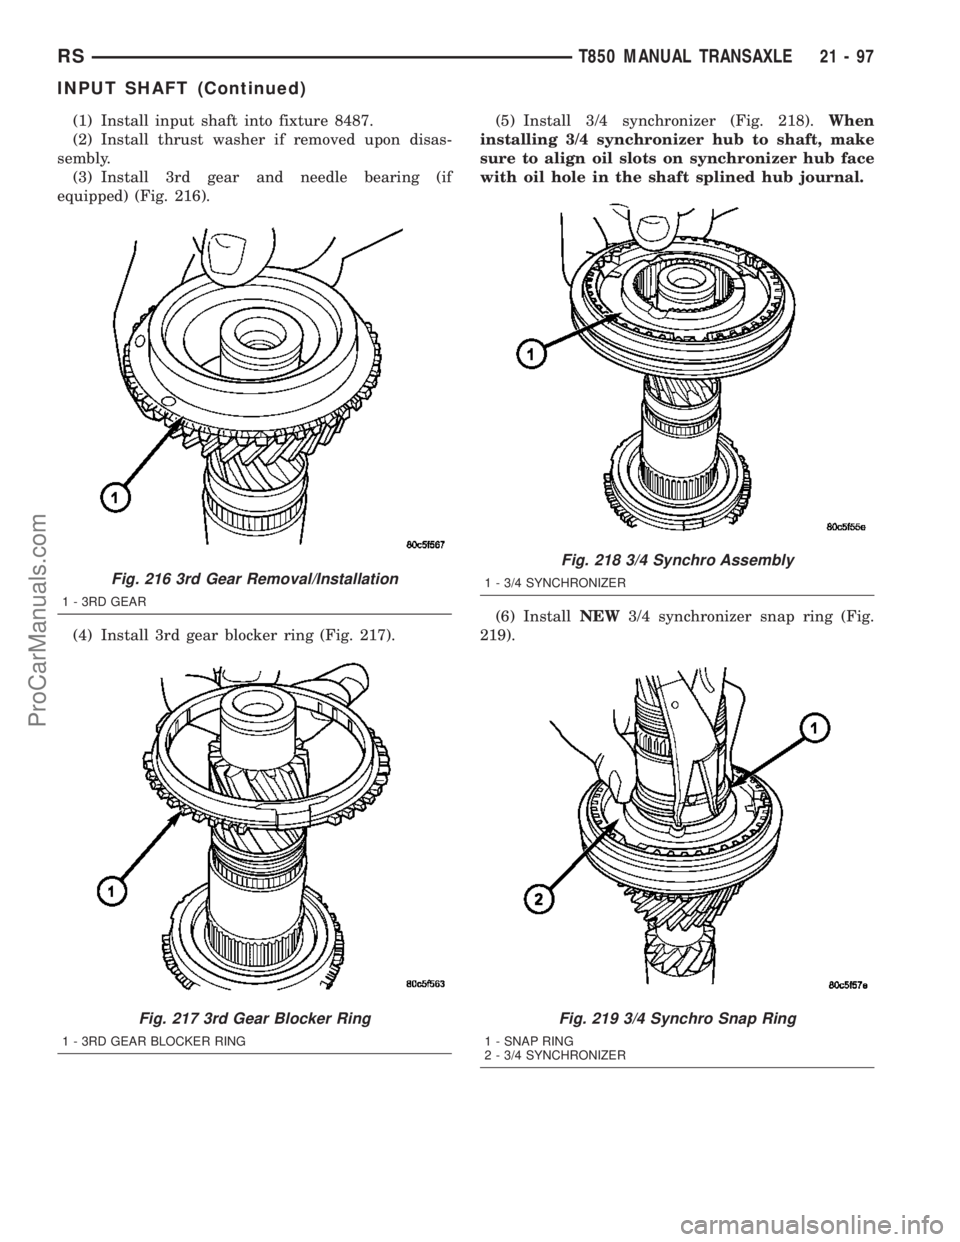
(1) Install input shaft into fixture 8487.
(2) Install thrust washer if removed upon disas-
sembly.
(3) Install 3rd gear and needle bearing (if
equipped) (Fig. 216).
(4) Install 3rd gear blocker ring (Fig. 217).(5) Install 3/4 synchronizer (Fig. 218).When
installing 3/4 synchronizer hub to shaft, make
sure to align oil slots on synchronizer hub face
with oil hole in the shaft splined hub journal.
(6) InstallNEW3/4 synchronizer snap ring (Fig.
219).
Fig. 216 3rd Gear Removal/Installation
1 - 3RD GEAR
Fig. 217 3rd Gear Blocker Ring
1 - 3RD GEAR BLOCKER RING
Fig. 218 3/4 Synchro Assembly
1 - 3/4 SYNCHRONIZER
Fig. 219 3/4 Synchro Snap Ring
1 - SNAP RING
2 - 3/4 SYNCHRONIZER
RST850 MANUAL TRANSAXLE21-97
INPUT SHAFT (Continued)
ProCarManuals.com
Page 1545 of 2177
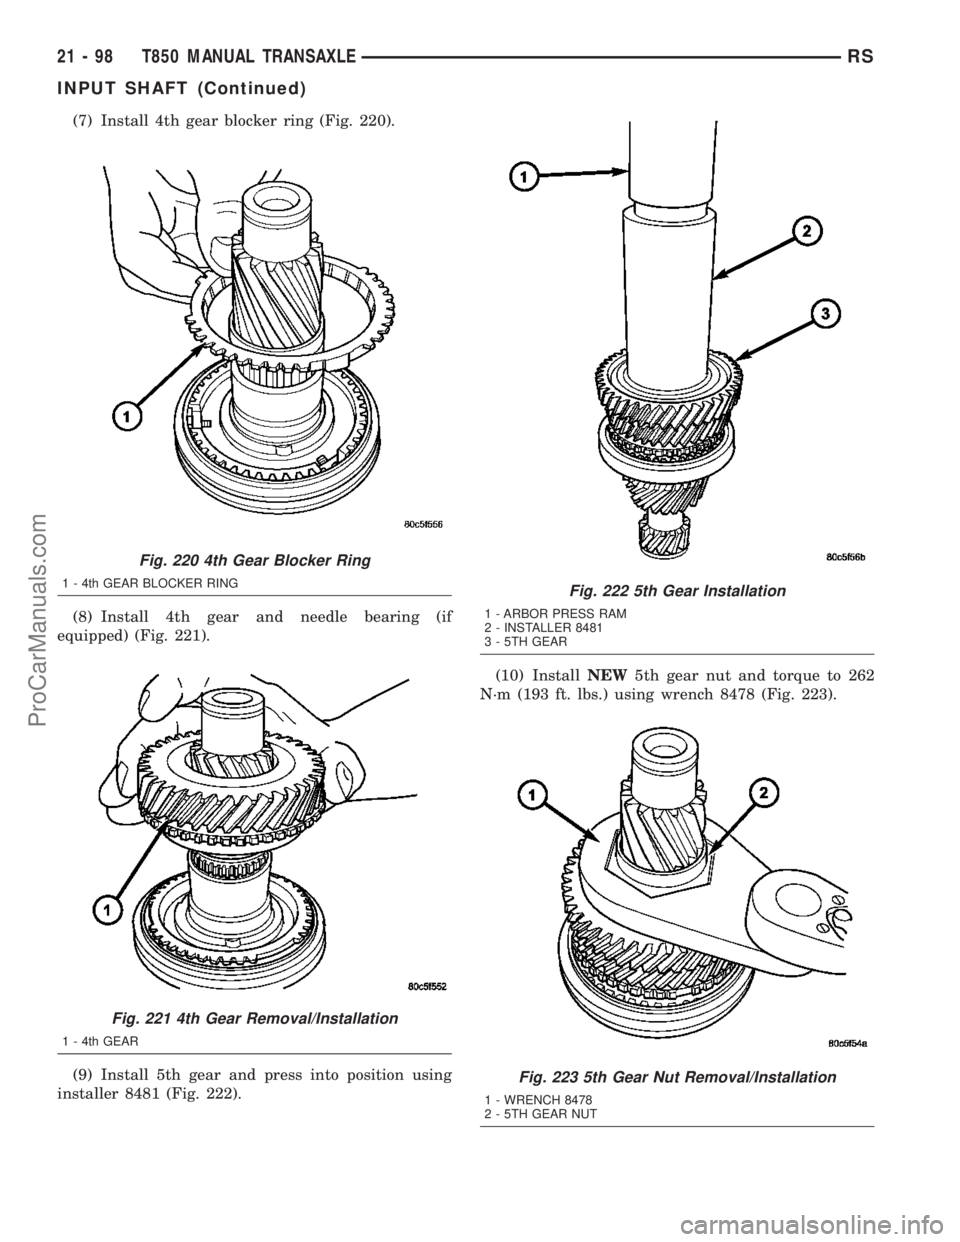
(7) Install 4th gear blocker ring (Fig. 220).
(8) Install 4th gear and needle bearing (if
equipped) (Fig. 221).
(9) Install 5th gear and press into position using
installer 8481 (Fig. 222).(10) InstallNEW5th gear nut and torque to 262
N´m (193 ft. lbs.) using wrench 8478 (Fig. 223).
Fig. 220 4th Gear Blocker Ring
1 - 4th GEAR BLOCKER RING
Fig. 221 4th Gear Removal/Installation
1 - 4th GEAR
Fig. 222 5th Gear Installation
1 - ARBOR PRESS RAM
2 - INSTALLER 8481
3 - 5TH GEAR
Fig. 223 5th Gear Nut Removal/Installation
1 - WRENCH 8478
2 - 5TH GEAR NUT
21 - 98 T850 MANUAL TRANSAXLERS
INPUT SHAFT (Continued)
ProCarManuals.com
Page 1548 of 2177
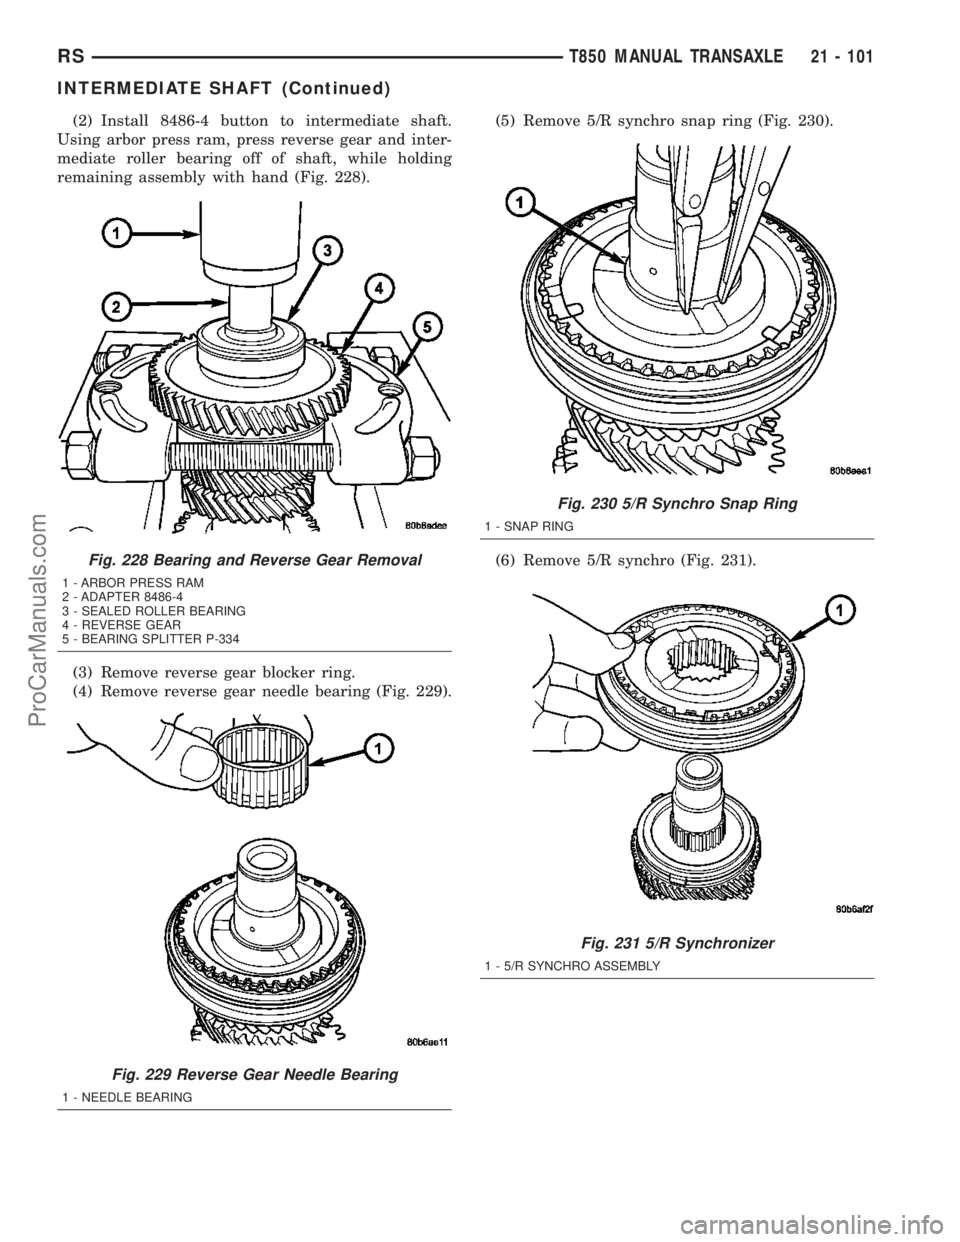
(2) Install 8486-4 button to intermediate shaft.
Using arbor press ram, press reverse gear and inter-
mediate roller bearing off of shaft, while holding
remaining assembly with hand (Fig. 228).
(3) Remove reverse gear blocker ring.
(4) Remove reverse gear needle bearing (Fig. 229).(5) Remove 5/R synchro snap ring (Fig. 230).
(6) Remove 5/R synchro (Fig. 231).
Fig. 228 Bearing and Reverse Gear Removal
1 - ARBOR PRESS RAM
2 - ADAPTER 8486-4
3 - SEALED ROLLER BEARING
4 - REVERSE GEAR
5 - BEARING SPLITTER P-334
Fig. 229 Reverse Gear Needle Bearing
1 - NEEDLE BEARING
Fig. 230 5/R Synchro Snap Ring
1 - SNAP RING
Fig. 231 5/R Synchronizer
1 - 5/R SYNCHRO ASSEMBLY
RST850 MANUAL TRANSAXLE21 - 101
INTERMEDIATE SHAFT (Continued)
ProCarManuals.com
Page 1549 of 2177
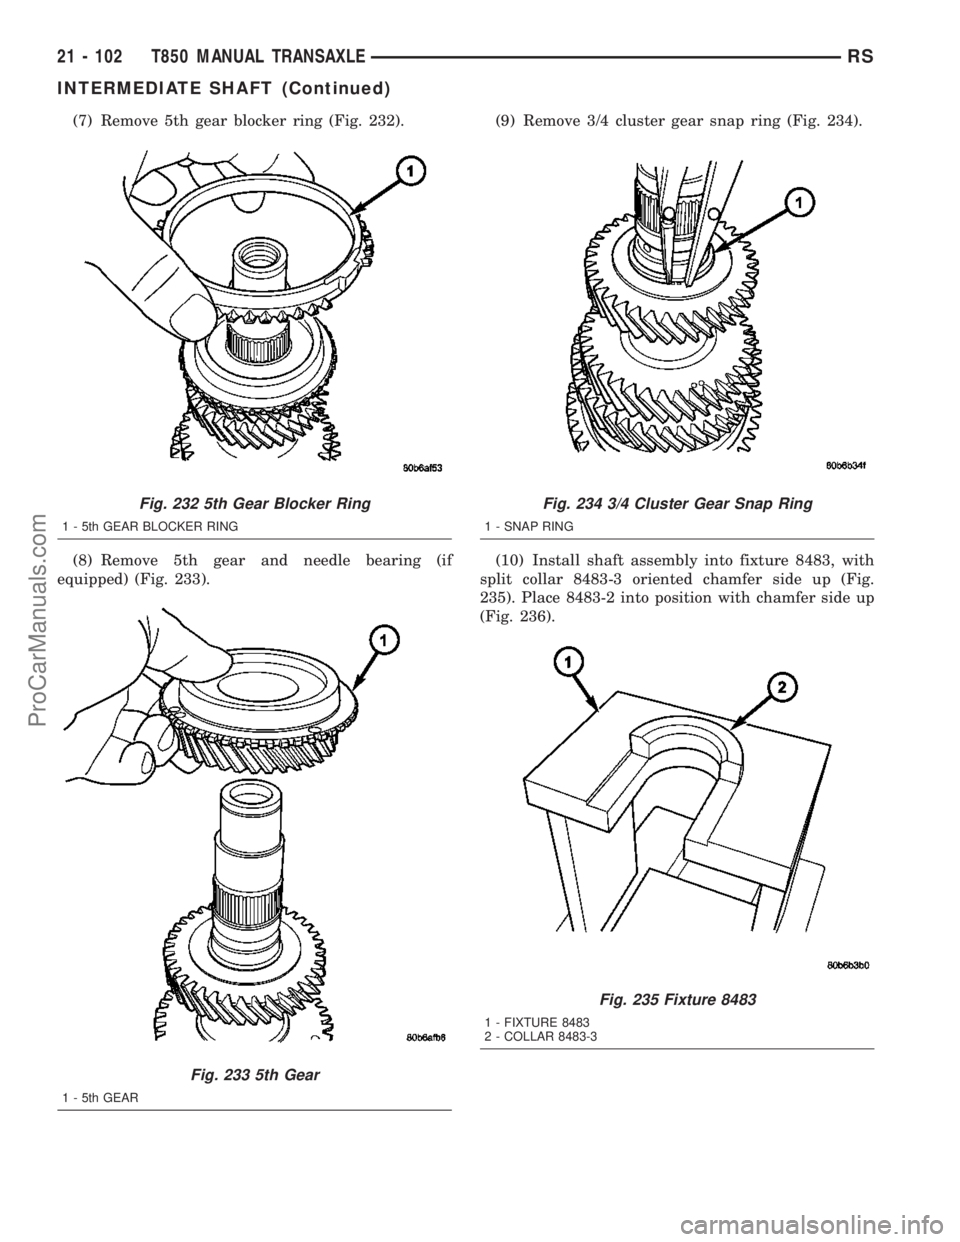
(7) Remove 5th gear blocker ring (Fig. 232).
(8) Remove 5th gear and needle bearing (if
equipped) (Fig. 233).(9) Remove 3/4 cluster gear snap ring (Fig. 234).
(10) Install shaft assembly into fixture 8483, with
split collar 8483-3 oriented chamfer side up (Fig.
235). Place 8483-2 into position with chamfer side up
(Fig. 236).
Fig. 232 5th Gear Blocker Ring
1 - 5th GEAR BLOCKER RING
Fig. 233 5th Gear
1 - 5th GEAR
Fig. 234 3/4 Cluster Gear Snap Ring
1 - SNAP RING
Fig. 235 Fixture 8483
1 - FIXTURE 8483
2 - COLLAR 8483-3
21 - 102 T850 MANUAL TRANSAXLERS
INTERMEDIATE SHAFT (Continued)
ProCarManuals.com
Page 1551 of 2177
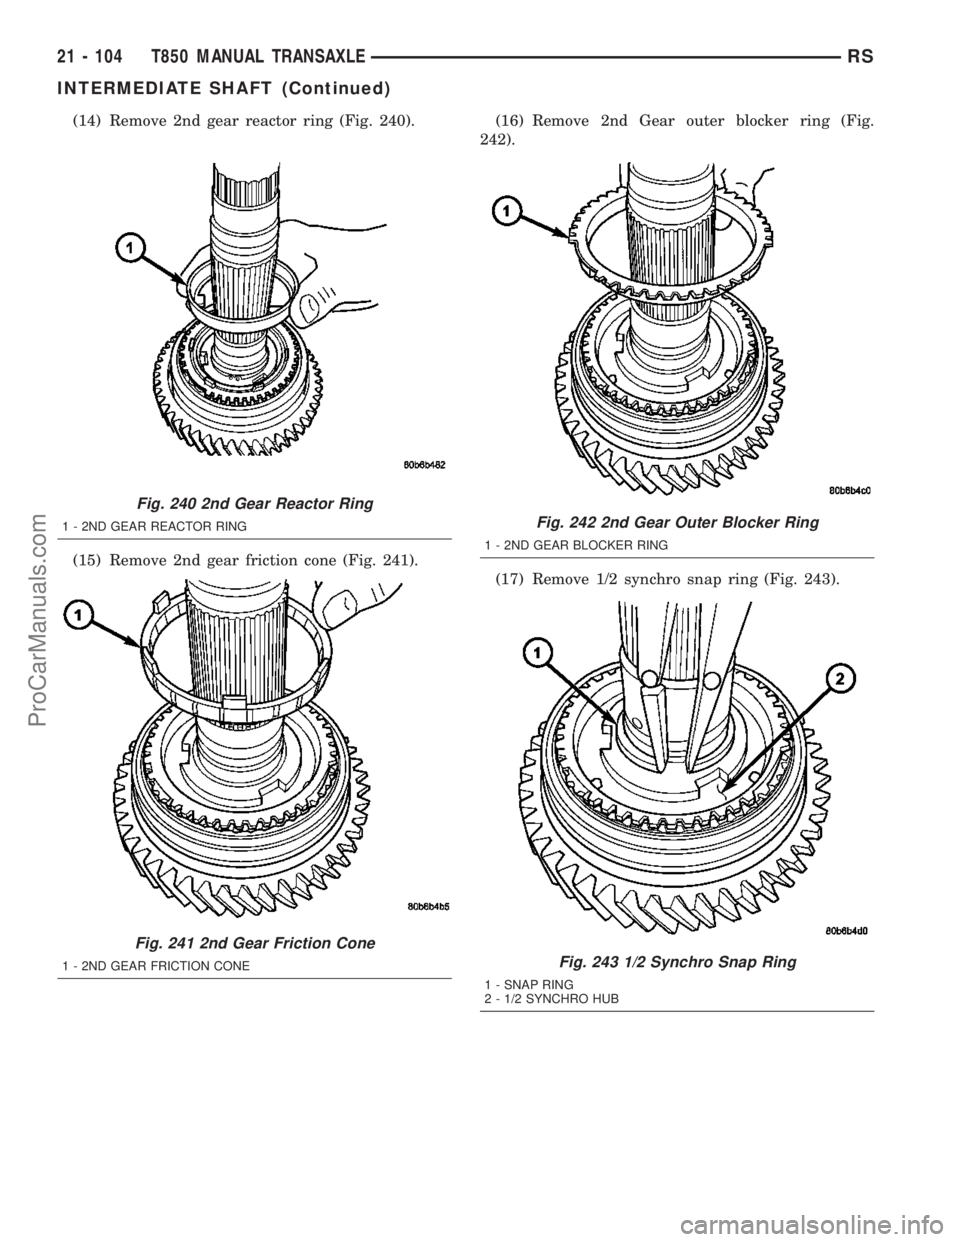
(14) Remove 2nd gear reactor ring (Fig. 240).
(15) Remove 2nd gear friction cone (Fig. 241).(16) Remove 2nd Gear outer blocker ring (Fig.
242).
(17) Remove 1/2 synchro snap ring (Fig. 243).
Fig. 240 2nd Gear Reactor Ring
1 - 2ND GEAR REACTOR RING
Fig. 241 2nd Gear Friction Cone
1 - 2ND GEAR FRICTION CONE
Fig. 242 2nd Gear Outer Blocker Ring
1 - 2ND GEAR BLOCKER RING
Fig. 243 1/2 Synchro Snap Ring
1 - SNAP RING
2 - 1/2 SYNCHRO HUB
21 - 104 T850 MANUAL TRANSAXLERS
INTERMEDIATE SHAFT (Continued)
ProCarManuals.com
Page 1552 of 2177
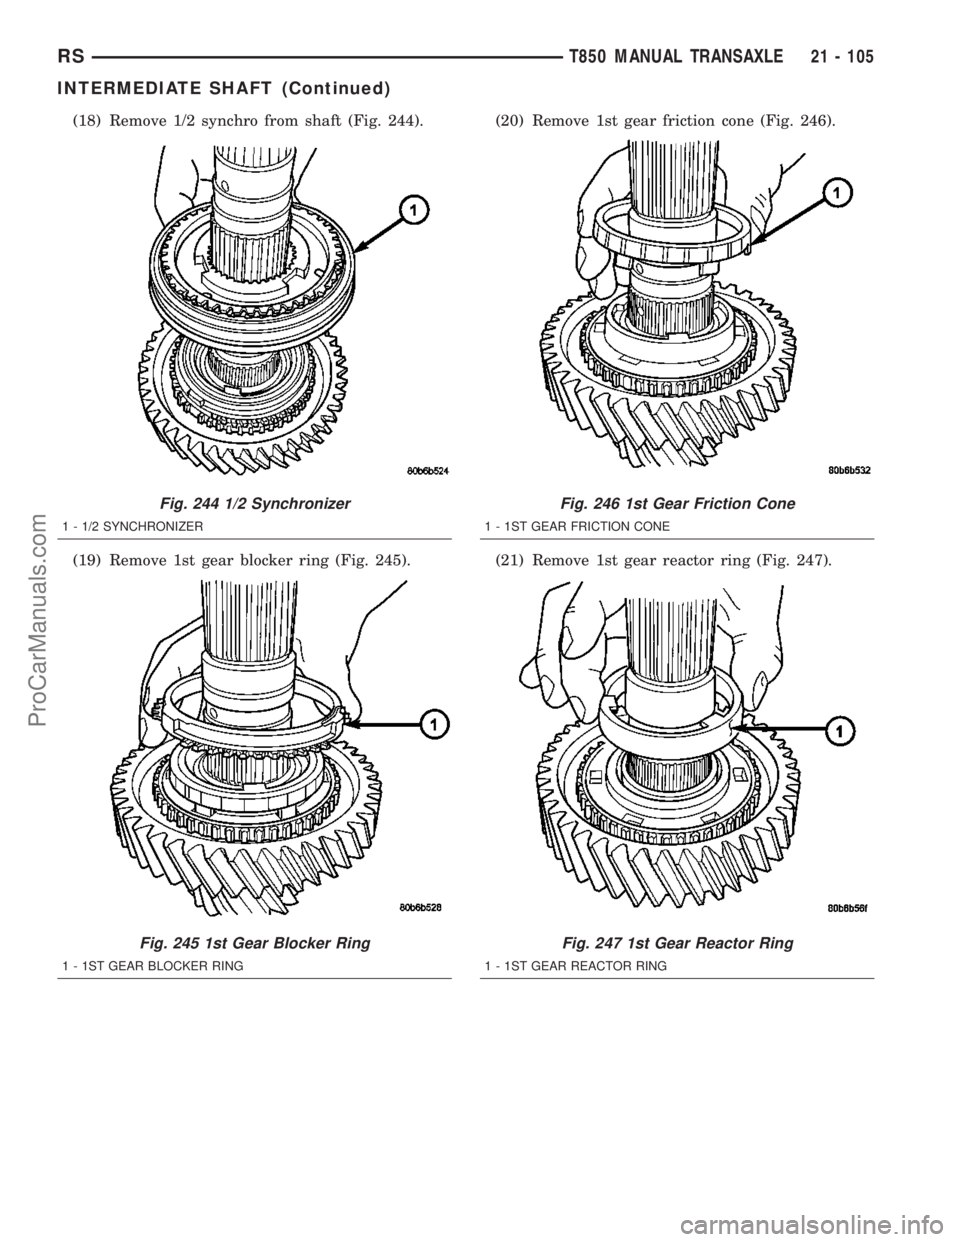
(18) Remove 1/2 synchro from shaft (Fig. 244).
(19) Remove 1st gear blocker ring (Fig. 245).(20) Remove 1st gear friction cone (Fig. 246).
(21) Remove 1st gear reactor ring (Fig. 247).
Fig. 244 1/2 Synchronizer
1 - 1/2 SYNCHRONIZER
Fig. 245 1st Gear Blocker Ring
1 - 1ST GEAR BLOCKER RING
Fig. 246 1st Gear Friction Cone
1 - 1ST GEAR FRICTION CONE
Fig. 247 1st Gear Reactor Ring
1 - 1ST GEAR REACTOR RING
RST850 MANUAL TRANSAXLE21 - 105
INTERMEDIATE SHAFT (Continued)
ProCarManuals.com