window CHRYSLER CROSSFIRE 2008 1.G Owner's Manual
[x] Cancel search | Manufacturer: CHRYSLER, Model Year: 2008, Model line: CROSSFIRE, Model: CHRYSLER CROSSFIRE 2008 1.GPages: 358, PDF Size: 4.7 MB
Page 161 of 358
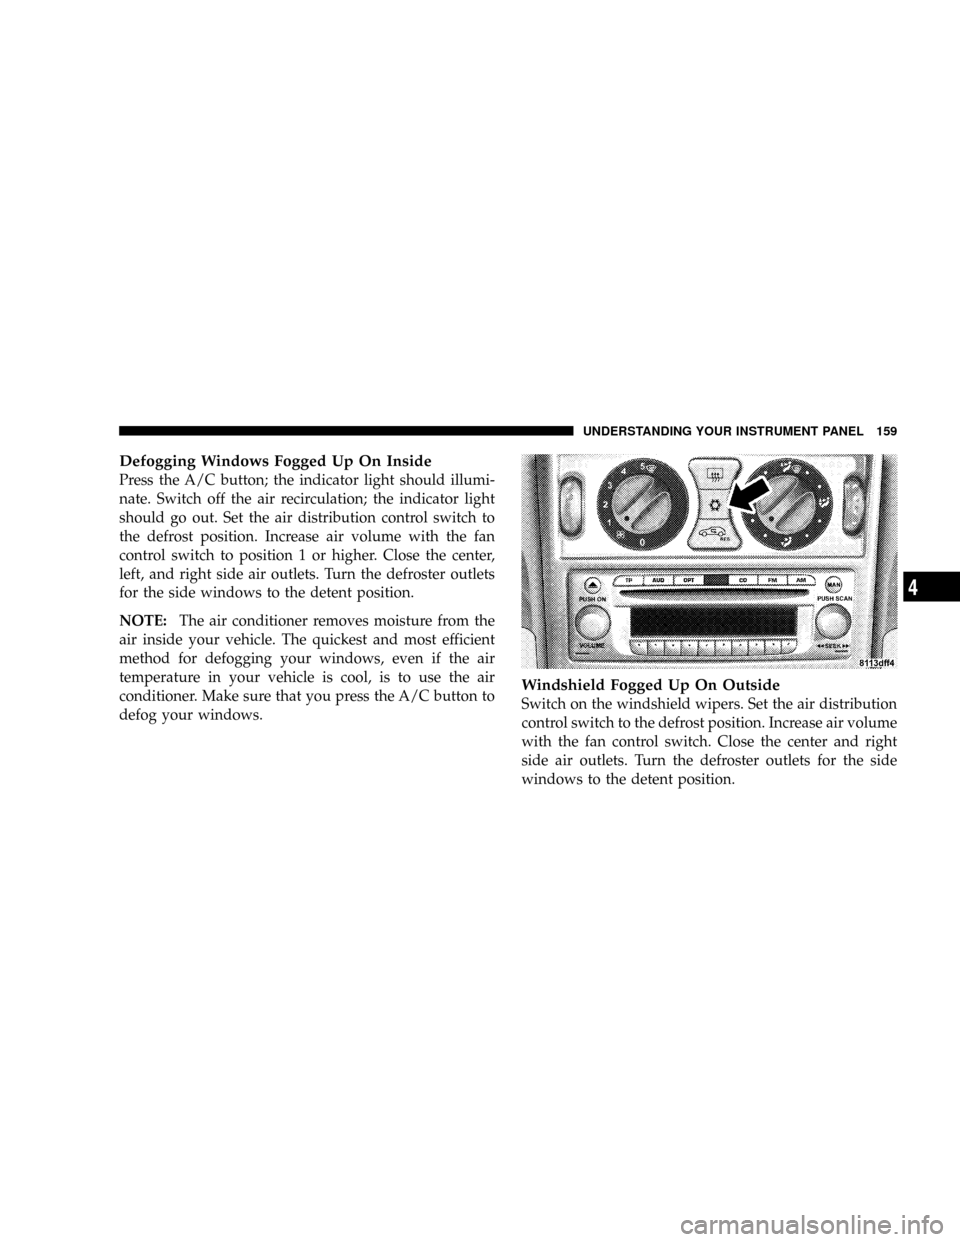
Defogging Windows Fogged Up On Inside
Press the A/C button; the indicator light should illumi-
nate. Switch off the air recirculation; the indicator light
should go out. Set the air distribution control switch to
the defrost position. Increase air volume with the fan
control switch to position 1 or higher. Close the center,
left, and right side air outlets. Turn the defroster outlets
for the side windows to the detent position.
NOTE:The air conditioner removes moisture from the
air inside your vehicle. The quickest and most efficient
method for defogging your windows, even if the air
temperature in your vehicle is cool, is to use the air
conditioner. Make sure that you press the A/C button to
defog your windows.
Windshield Fogged Up On Outside
Switch on the windshield wipers. Set the air distribution
control switch to the defrost position. Increase air volume
with the fan control switch. Close the center and right
side air outlets. Turn the defroster outlets for the side
windows to the detent position.
UNDERSTANDING YOUR INSTRUMENT PANEL 159
4
Page 162 of 358
Ventilation
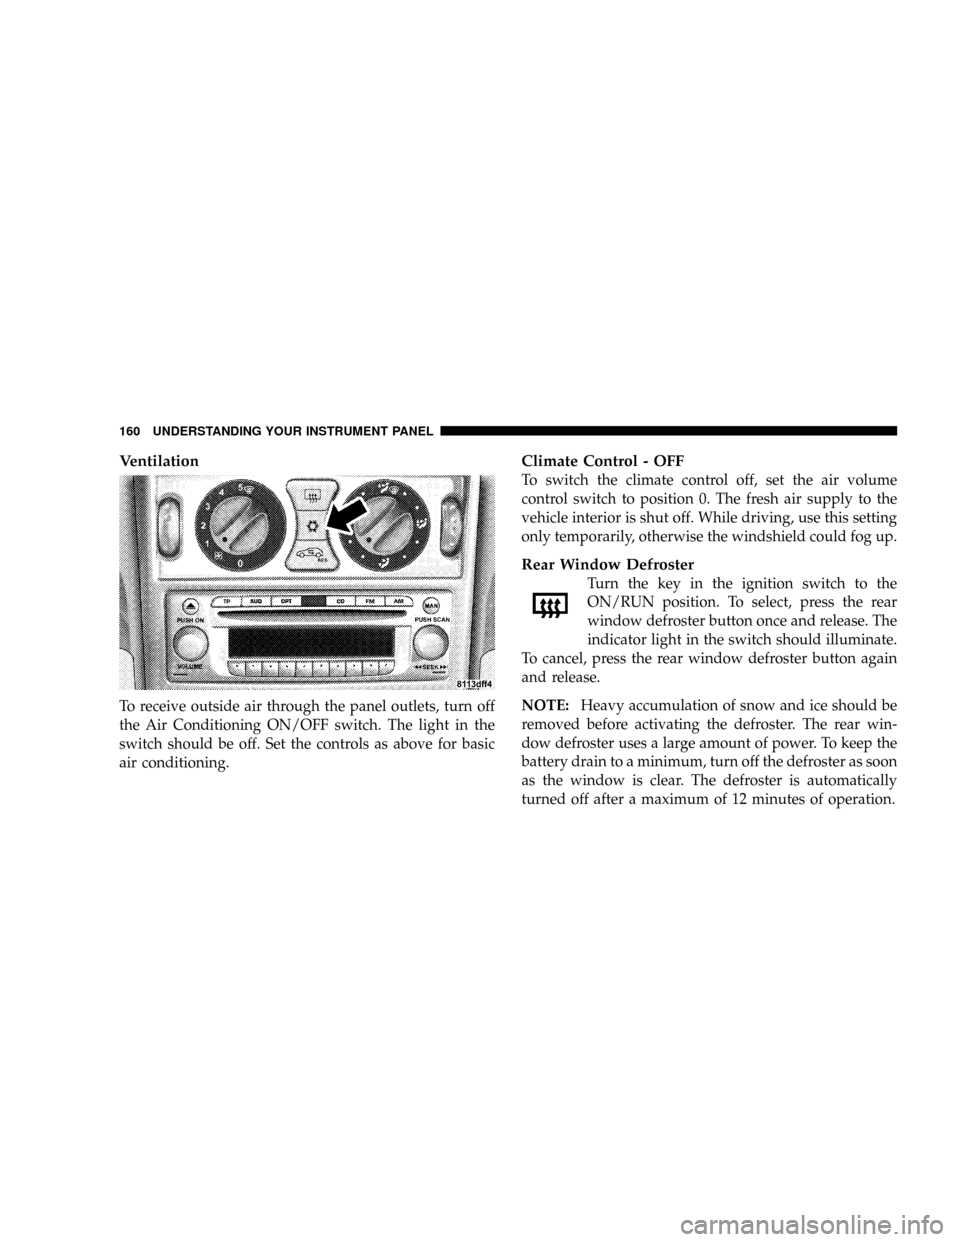
To receive outside air through the panel outlets, turn off
the Air Conditioning ON/OFF switch. The light in the
switch should be off. Set the controls as above for basic
air conditioning.
Climate Control - OFF
To switch the climate control off, set the air volume
control switch to position 0. The fresh air supply to the
vehicle interior is shut off. While driving, use this setting
only temporarily, otherwise the windshield could fog up.
Rear Window Defroster
Turn the key in the ignition switch to the
ON/RUN position. To select, press the rear
window defroster button once and release. The
indicator light in the switch should illuminate.
To cancel, press the rear window defroster button again
and release.
NOTE:Heavy accumulation of snow and ice should be
removed before activating the defroster. The rear win-
dow defroster uses a large amount of power. To keep the
battery drain to a minimum, turn off the defroster as soon
as the window is clear. The defroster is automatically
turned off after a maximum of 12 minutes of operation.
160 UNDERSTANDING YOUR INSTRUMENT PANEL
Page 163 of 358
If several components in the vehicle are consuming
power simultaneously, or the battery is only partially
charged, it is possible that the defroster will automati-
cally turn itself off. When this happens, the indicator light
inside the switch starts blinking. As soon as the battery
has sufficient voltage, the defroster automatically turns
itself back on.
CAUTION!
To avoid damaging the electrical conductors, do not
use scrapers, sharp instruments, or abrasive window
cleaners on the interior surface of the rear window.
Labels can be peeled off by soaking with warm
water.
Air Recirculation/REST
This mode can be selected to temporarily re-
duce the entry of annoying odors or dust into
the vehicle's interior. Outside air does not flow
into the vehicle's interior. To select, press the
recirculation button. To cancel, press the recirculation
button again.
The system will automatically switch from recirculated
air to fresh air after approximately five minutes at
outside temperatures below approximately 40ÉF (5ÉC);
after approximately 30 minutes, at outside temperatures
above approximately 40ÉF (5ÉC); after approximately five
minutes, if the A/C button is pressed.
At high outside temperatures, the system automatically
engages the recirculated air mode for approximately 30
minutes, thereby increasing the cooling capacity perfor-
mance. Press the recirculation button again to extend the
recirculated air mode.
UNDERSTANDING YOUR INSTRUMENT PANEL 161
4
Page 253 of 358
3. Turn the ignition OFF and continue to push down on
the switch for five seconds.
4. After five seconds the hydraulic system pressure will
be relieved.
WARNING!
It is important that a second person assist you to close
the convertible top manually to prevent injuries.
1. Lower the windows and open the doors.
2. Turn the ignition key OFF.
CAUTION!
Ensure that the decklid is closed while raising the
convertible top manually to prevent the possibility of
contact between the decklid and the tonneau cover.
WARNING!
Do not place your hands near the convertible top
frame, upper windshield area, or the convertible top
storage compartment while the convertible top is
being raised and locked. Serious personal injury may
occur.
WHAT TO DO IN EMERGENCIES 251
6
Page 255 of 358
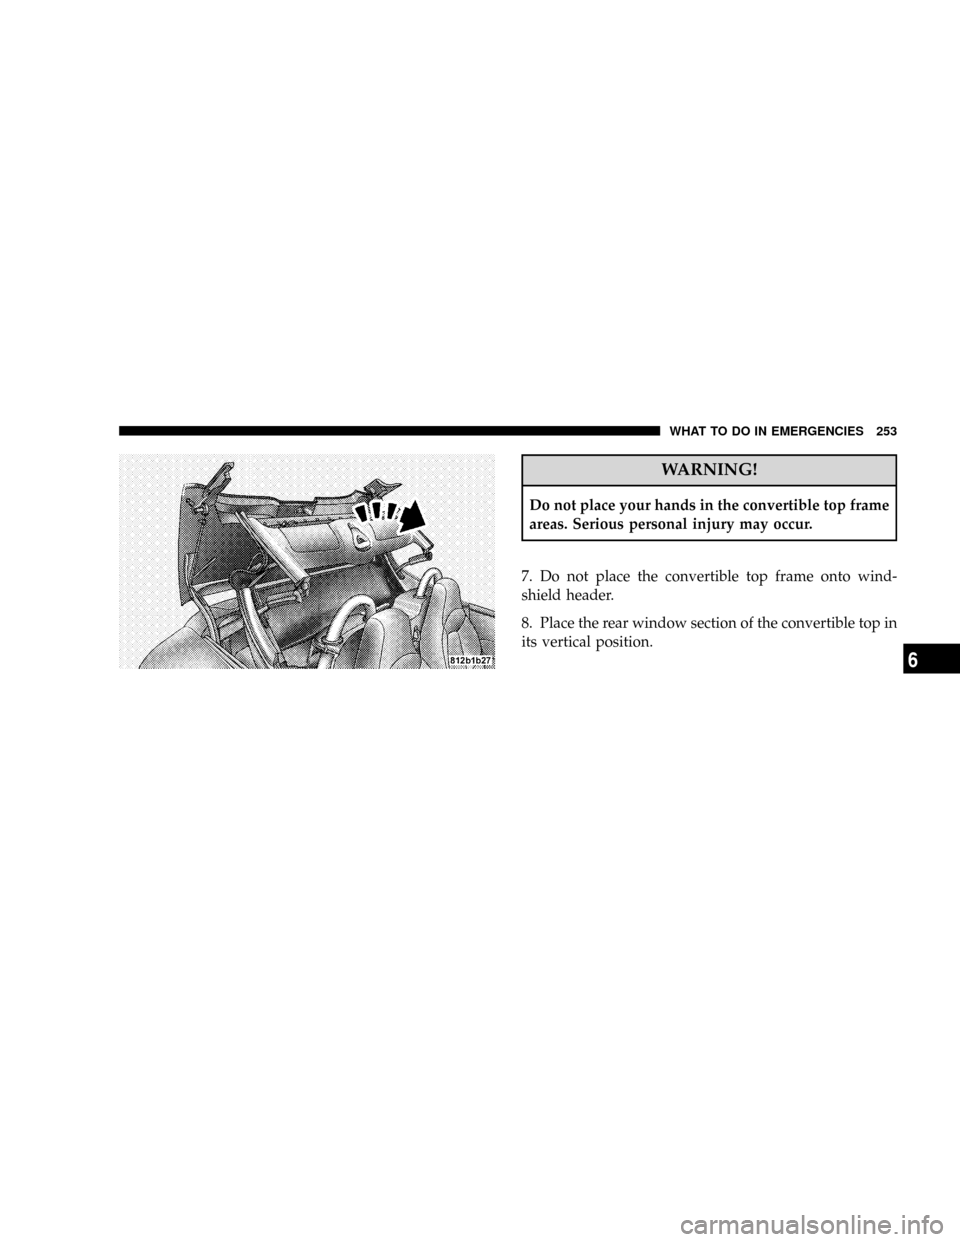
WARNING!
Do not place your hands in the convertible top frame
areas. Serious personal injury may occur.
7. Do not place the convertible top frame onto wind-
shield header.
8. Place the rear window section of the convertible top in
its vertical position.
WHAT TO DO IN EMERGENCIES 253
6
Page 257 of 358
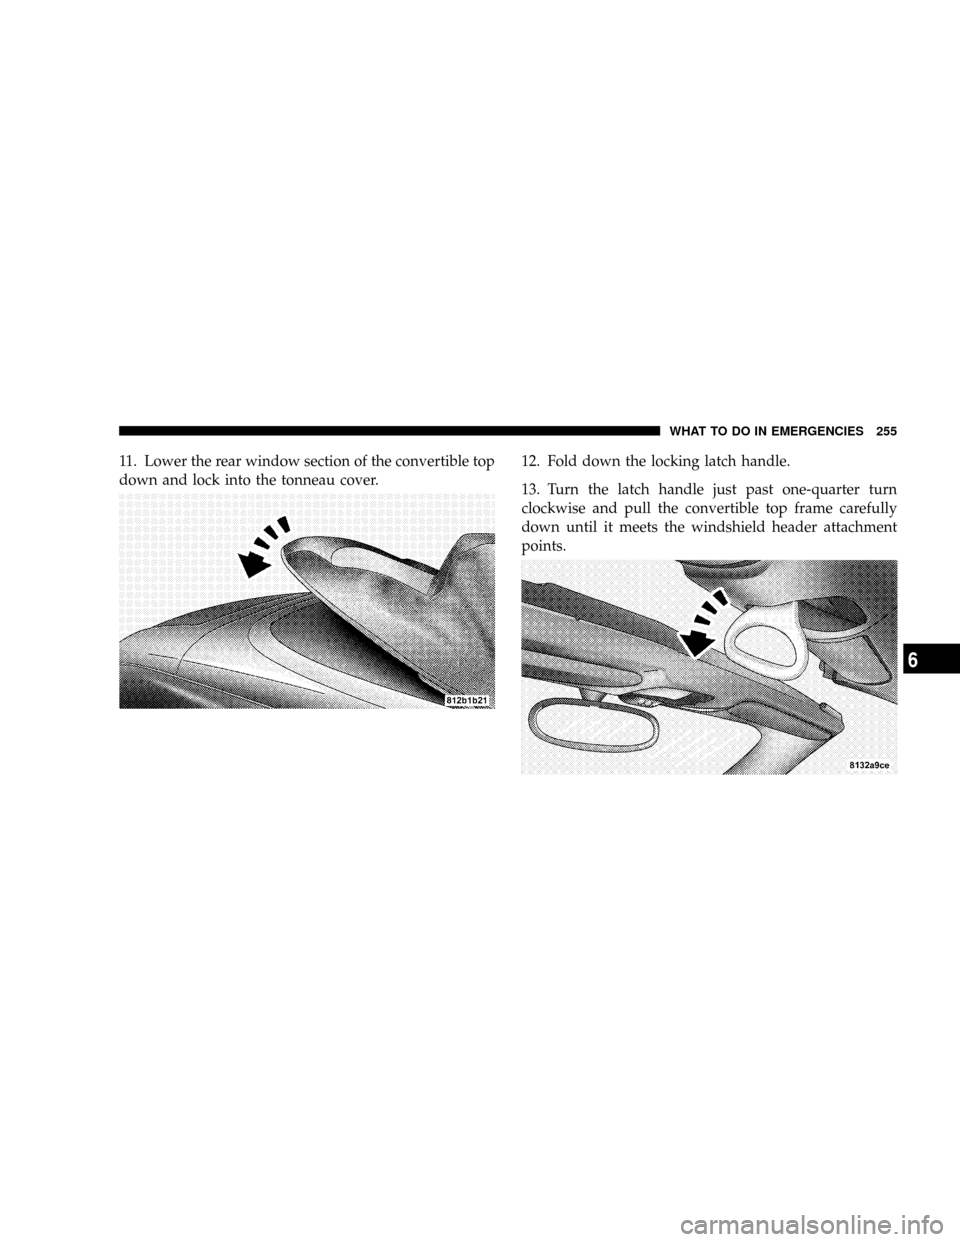
11. Lower the rear window section of the convertible top
down and lock into the tonneau cover.12. Fold down the locking latch handle.
13. Turn the latch handle just past one-quarter turn
clockwise and pull the convertible top frame carefully
down until it meets the windshield header attachment
points.
WHAT TO DO IN EMERGENCIES 255
6
Page 296 of 358
CAUTION!
The use of vinyl, leather or plastic protectants may
cause excessive gloss and/or discoloration of interior
trim parts.
WARNING!
Do not use volatile solvents for cleaning purposes.
Many are potentially flammable, and if used in
closed areas they may cause respiratory harm.
Cleaning Headlights
Your vehicle has plastic headlights that are lighter and
less susceptible to stone breakage than glass headlights.
Plastic is not as scratch resistant as glass and therefore
different lens cleaning procedures must be followed.To minimize the possibility of scratching the lenses and
reducing light output, avoid wiping with a dry cloth. To
remove road dirt, wash with a mild soap solution fol-
lowed by rinsing.
Do not use abrasive cleaning components, solvents, steel
wool or other aggressive material to clean the lenses.
Glass Surfaces
All glass surfaces should be cleaned on a regular basis
with any commercial household-type glass cleaner.
Never use an abrasive-type cleaner. Use caution when
cleaning inside rear windows equipped with electric
defrosters. Do not use scrapers or other sharp instru-
ments which may scratch the elements.
Instrument Panel Cover
The instrument panel cover has a low glare surface which
minimizes reflections in the windshield. Do not use
294 MAINTAINING YOUR VEHICLE
Page 302 of 358
Cavity Fuse Circuits
6 40 Amp
OrangeRoof Hydraulic Unit (Roadster)
7 5 Amp
BeigeOccupation Classification Module
(Right Seat)
8 15 Amp
BlueRadio
9 5 Amp
BeigeControl Unit Airbag
10 5 Amp
BeigeSpeed Control
11 15 Amp
BlueIgnition Coil 6 Cyl.
12 10 Amp
RedWasher Liquid Heater, Washer
Nozzle Heater
13 10 Amp
RedRoof Light, Horn, Anti-Theft-
Alarm, Trunk Light and Tire
Pressure ControlCavity Fuse Circuits
14 10 Amp
RedDiagnostic Socket
15 5 Amp
BeigeClimate Control, Auxiliary Water
Pump
16 10 Amp
RedSpoiler Motor
17 40 Amp
OrangeElectronic Stability Program
18 40 Amp
OrangeElectronic Stability Program
19 40 Amp
OrangePower Window, Front
20 30 Amp
GreenWiper Motor
21 30 Amp
GreenSeat Adjustment Right Side
22 30 Amp
GreenSeat Adjustment Left Side
300 MAINTAINING YOUR VEHICLE
Page 303 of 358
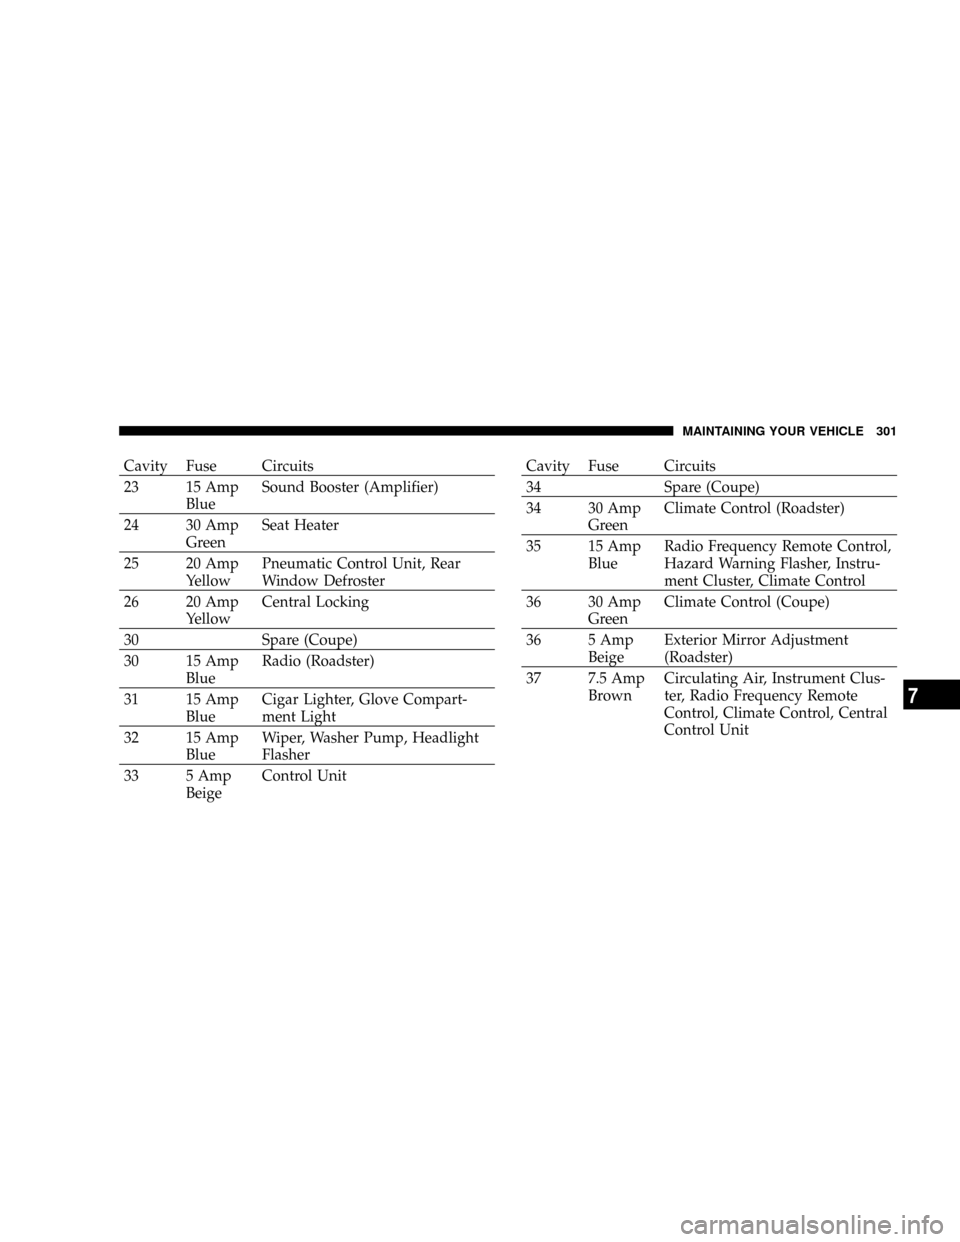
Cavity Fuse Circuits
23 15 Amp
BlueSound Booster (Amplifier)
24 30 Amp
GreenSeat Heater
25 20 Amp
YellowPneumatic Control Unit, Rear
Window Defroster
26 20 Amp
YellowCentral Locking
30 Spare (Coupe)
30 15 Amp
BlueRadio (Roadster)
31 15 Amp
BlueCigar Lighter, Glove Compart-
ment Light
32 15 Amp
BlueWiper, Washer Pump, Headlight
Flasher
33 5 Amp
BeigeControl UnitCavity Fuse Circuits
34 Spare (Coupe)
34 30 Amp
GreenClimate Control (Roadster)
35 15 Amp
BlueRadio Frequency Remote Control,
Hazard Warning Flasher, Instru-
ment Cluster, Climate Control
36 30 Amp
GreenClimate Control (Coupe)
36 5 Amp
BeigeExterior Mirror Adjustment
(Roadster)
37 7.5 Amp
BrownCirculating Air, Instrument Clus-
ter, Radio Frequency Remote
Control, Climate Control, Central
Control Unit
MAINTAINING YOUR VEHICLE 301
7
Page 320 of 358
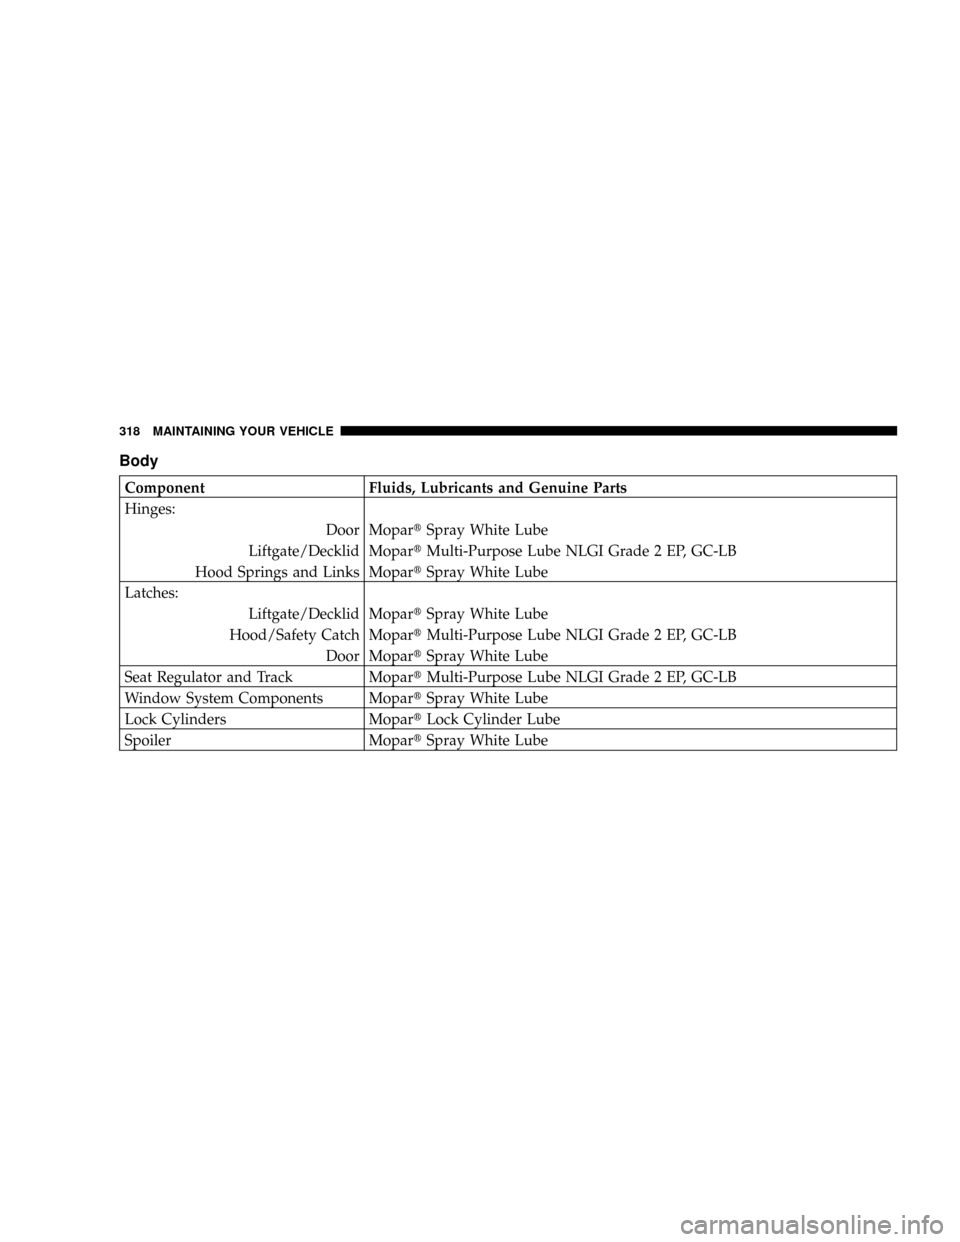
Body
Component Fluids, Lubricants and Genuine Parts
Hinges:
Door MopartSpray White Lube
Liftgate/Decklid MopartMulti-Purpose Lube NLGI Grade 2 EP, GC-LB
Hood Springs and Links MopartSpray White Lube
Latches:
Liftgate/Decklid MopartSpray White Lube
Hood/Safety Catch MopartMulti-Purpose Lube NLGI Grade 2 EP, GC-LB
Door MopartSpray White Lube
Seat Regulator and Track MopartMulti-Purpose Lube NLGI Grade 2 EP, GC-LB
Window System Components MopartSpray White Lube
Lock Cylinders MopartLock Cylinder Lube
Spoiler MopartSpray White Lube
318 MAINTAINING YOUR VEHICLE