stop CHRYSLER PACIFICA 2004 1.G Service Manual
[x] Cancel search | Manufacturer: CHRYSLER, Model Year: 2004, Model line: PACIFICA, Model: CHRYSLER PACIFICA 2004 1.GPages: 361, PDF Size: 5.21 MB
Page 251 of 361
IF YOUR ENGINE OVERHEATS
In any of the following situations, you can reduce the
potential for overheating by taking the appropriate ac-
tion.
²On the highways Ð Slow down.
²In city traffic Ð While stopped, put transmission in
neutral, but do not increase engine idle speed.
NOTE:There are steps that you can take to slow down
an impending overheat condition. If your air conditioner
is on, turn it off. The air conditioning system adds heat to
the engine cooling system and turning off the A/C
removes this heat. You can also turn the Temperature
control to maximum heat, the Mode control to floor, and
the fan control to High. This allows the heater core to act
as a supplement to the radiator and aids in removing heat
from the engine cooling system.
CAUTION!
Driving with a hot cooling system could damage
your vehicle. If temperature gauge reads ªHº, pull
over and stop the vehicle. Idle the vehicle with the
air conditioner turned off until the pointer drops
back into the normal range. If the pointer remains on
the ªHº, turn the engine off immediately, and call for
service.
WHAT TO DO IN EMERGENCIES 251
6
Page 257 of 361
WARNING!
A loose tire or jack, thrown forward in a collision or
hard stop could endanger the occupants of the ve-
hicle. Always stow the jack parts and the spare tire in
the places provided.
12. Secure the flat or spare tire as follows:
²The center cap of a cast aluminum wheel must be
removed prior to flat tire stowage. Store the center
cap inside the glove box or other storage compart-
ment.
²Turn the wheel so that the valve-stem is down. Slide
the wheel retainer through the center of the wheel
and position it properly across the wheel opening.
²For convenience in checking the spare tire inflation,
stow with the valve-stem toward the rear of the
vehicle.
²Using the jack-handle, rotate the drive nut to the
right until the wheel is drawn into place against the
underside of the vehicle.
²Continue to rotate the nut until you hear the mecha-
nism click three times. It cannot be overtightened.
Push against the tire several times to be sure it is
securely in place.
13. Stow jack and handle.
14. Check the tire pressure as soon as possible. Correct
pressure as required.
NOTE:When reinstalling the wheel center cap, insure
that the valve stem symbol on the back of the cap is
pointed toward the wheel valve stem. Install the center
cap using hand pressure only. Do not use a hammer.
WHAT TO DO IN EMERGENCIES 257
6
Page 260 of 361
WARNING!
Rapid acceleration on slippery surfaces is danger-
ous. Unequal traction can cause sudden pulling of
the front wheels. You could lose control of the
vehicle and possibly have an accident. Accelerate
slowly and carefully whenever there is likely to be
poor traction (ice, snow, wet mud, loose sand, etc.).
Traction
When driving on wet or slushy roads, it is possible for a
wedge of water to build up between the tire and road
surface. This is known as hydroplaning and may cause
partial or complete loss of vehicle control and stopping
ability. To reduce this possibility, the following precau-
tions should be observed:
1. Slow down during rainstorms or when roads are
slushy.2. Slow down if road has standing water or puddles.
3. Replace tires when tread wear indicators first become
visible.
4. Keep tires properly inflated.
5. Maintain sufficient distance between your vehicle and
the vehicle in front to avoid a collision in a sudden stop.
FREEING A STUCK VEHICLE
If your vehicle becomes stuck in mud, sand or snow, it
can often be moved by a rocking motion. Turn your
steering wheel right and left to clear the area around the
front wheels. Then shift back and forth between Reverse
and Drive. Usually the least accelerator pedal pressure to
maintain the rocking motion without spinning the
wheels is most effective.
260 WHAT TO DO IN EMERGENCIES
Page 267 of 361
NFront Park/Turn Signal And Sidemarker
Lights.............................309
NFront Fog Light......................309
NRear Tail, Stop, Turn Signal, Side Marker And
Back-Up Lights.......................310
NLicense Light........................311mFluid Capacities........................311
mRecommended Fluids, Lubricants And
Genuine Parts.........................312
NEngine.............................312
NChassis............................313
MAINTAINING YOUR VEHICLE 267
7
Page 272 of 361
NOTE:Intentional tampering with emissions control
systems can result in civil penalties being assessed
against you.
WARNING!
You can be badly injured working on or around a
motor vehicle. Do only that service work for which
you have the knowledge and the proper equipment.
If you have any doubt about your ability to perform
a service job, take your vehicle to a competent
mechanic.
MAINTENANCE PROCEDURES
The pages that follow contain therequiredmaintenance
services determined by the engineers who designed your
vehicle.
Besides the maintenance items for which there are fixed
maintenance intervals, there are other items that should
operate satisfactorily without periodic maintenance.
However, if a malfunction of these items does occur, it
could adversely affect the engine or vehicle performance.
These items should be inspected if a malfunction is
observed or suspected.
Engine Oil
Checking Oil Level
To assure proper engine lubrication, the engine oil must
be maintained at the correct level. Check the oil level at
regular intervals, such as every fuel stop.
272 MAINTAINING YOUR VEHICLE
Page 274 of 361
Change Engine Oil
Road conditions and your kind of driving affects the
interval at which your oil should be changed. Check the
following list to see if any apply to you.
²Day or night temperatures are below 32ÉF (0ÉC).
²Stop and Go driving.
²Extensive engine idling.
²Driving in dusty conditions.
²Short trips of less than 10 miles (16 km).
²More than 50% of your driving is at sustained high
speeds during hot weather, above 90ÉF (32ÉC).
²Trailer towing.
²Taxi, Police or delivery service (commercial service).
²Off-Road or desert operation.NOTE:IfANYof these apply to you then change your
engine oil every 3,000 miles (5 000 km) or 3 months,
whichever comes first and follow schedule ªBº of the
9Maintenance Schedules9section of this manual.
If none of these apply to you, then change your engine oil
at every interval shown on schedule9A9of the9Mainte-
nance Schedules9section of this manual.
NOTE:Under no circumstances should oil change in-
tervals exceed 6000 miles (10 000 km) or 6 months
whichever comes first.
Engine Oil Selection
For best performance and maximum protection under all
types of operating conditions, the manufacture only
recommends engine oils that are API certified and meet
the requirements of DaimlerChrysler Material Standard
MS-6395. Use Mopar or an equivalent oil meeting the
specification MS-6395.
274 MAINTAINING YOUR VEHICLE
Page 279 of 361
WARNING!
A hot exhaust system can start a fire if you park over
materials that can burn. Such materials might be
grass or leaves coming into contact with your ex-
haust system. Do not park or operate your vehicle in
areas where your exhaust system can contact any-
thing that can burn.
In unusual situations involving grossly malfunctioning
engine operation, a scorching odor may indicate severe
and abnormal catalyst overheating. If this occurs, the
vehicle should be stopped, the engine shut off and the
vehicle allowed to cool. Thereafter, service, including a
tune-up to manufacturer's specifications, should be ob-
tained immediately.To minimize the possibility of catalyst damage:
²Do not shut off the engine or interrupt the ignition
when the transmission is in gear and the vehicle is in
motion.
²Do not try to start engine by pushing or towing the
vehicle.
²Do not idle the engine with any spark plug wires
disconnected or removed, such as when diagnostic
testing, or for prolonged periods during very rough
idling or malfunctioning operating conditions.
Maintenance-Free Battery
The top of the MAINTENANCE-FREE battery is perma-
nently sealed. You will never have to add water, nor is
periodic maintenance required.
MAINTAINING YOUR VEHICLE 279
7
Page 290 of 361
Disposal of Used Engine Coolant
Used ethylene glycol based engine coolant is a regulated
substance requiring proper disposal. Check with your
local authorities to determine the disposal rules for your
community. To prevent ingestion by animals or children
do not store ethylene glycol based engine coolant in open
containers or allow it to remain in puddles on the
ground. If ingested by a child, contact a physician
immediately. Clean up any ground spills immediately.
Coolant Level
The coolant bottle provides a quick visual method for
determining that the coolant level is adequate. With the
engine off and cold, the coolant level should be between
the ranges indicated on the bottle. Some darkening of the
coolant bottle will occur over time. This is normal.
When additional coolant is needed to maintain the
proper level, it should be added to the coolant bottle. Do
not overfill. When filling the cooling system, utilize thebleed valve located on the top of the radiator in the
engine compartment on the passengers side. Use the
bleed valve to bleed air when the system is cold and the
pressure cap is removed from the coolant bottle.
Points to Remember
NOTE:When the vehicle is stopped after a few miles of
operation, you may observe vapor coming from the front
of the engine compartment. This is normally a result of
moisture from rain, snow, or high humidity accumulat-
ing on the radiator and being vaporized when the
thermostat opens, allowing hot water to enter the radia-
tor.
If an examination of your engine compartment shows no
evidence of radiator or hose leaks, the vehicle may be
safely driven. The vapor will soon dissipate.
²Do not overfill the coolant bottle.
²Check coolant freeze point in the system.
290 MAINTAINING YOUR VEHICLE
Page 299 of 361
Overrunning Clutch
The fill plug is located on the side of the overrunning
clutch housing. The fluid should be maintained at a level
even with the bottom of the fill plug hole when the
vehicle is parked on a level surface. If it becomes neces-
sary to add or replace the fluid, use only the manufac-
turers recommended transmission fluid, refer to Recom-
mended Fluids, Lubricants and Genuine Parts for correct
fluid type. To assure performance, it is important that the
proper lubricant be used.
Rear Carrier
The fill plug is located on the side of the rear carrier
housing. The fluid should be maintained at a level even
with the bottom of the fill plug hole when the vehicle is
parked on a level surface. if it becomes necessary to add
or replace the fluid, use only the manufacturers recom-
mended fluid, refer to Recommended Fluids, Lubricants
and Genuine Parts for correct fluid type.
Fluid Changes
The fluid should be changed as follows:
Normal UsageNo Service Required
Severe Usage
Power Transfer Unit 15,000 miles (24 000 km)
Overrunning Clutch 22,500 miles (36 000 km)
Rear Carrier 22,500 miles (36 000 km)
Severe Usage is defined as:
1. More than 50% of vehicle operation in stop and go
traffic where vehicle is driven regularly for more than 45
minutes of continuous operation, such as in heavy city or
in construction zone traffic,
2. Police, taxi, limousine, commercial type operation, or
trailer towing where the vehicle driven regularly for
more than 45 minutes of continuous operation.
MAINTAINING YOUR VEHICLE 299
7
Page 307 of 361
LIGHT BULBS Ð Exterior Bulb Number
Back-up............................... 921
Rear Stop, Turn Signal....................3157
Rear Sidemarker......................... 168
Fog Light.............................880L
Front Turn Signal........................3157
Front Sidemarker......................... 194
Headlight.............................. H7
License................................ 168
BULB REPLACEMENT
Standard Quad Headlights
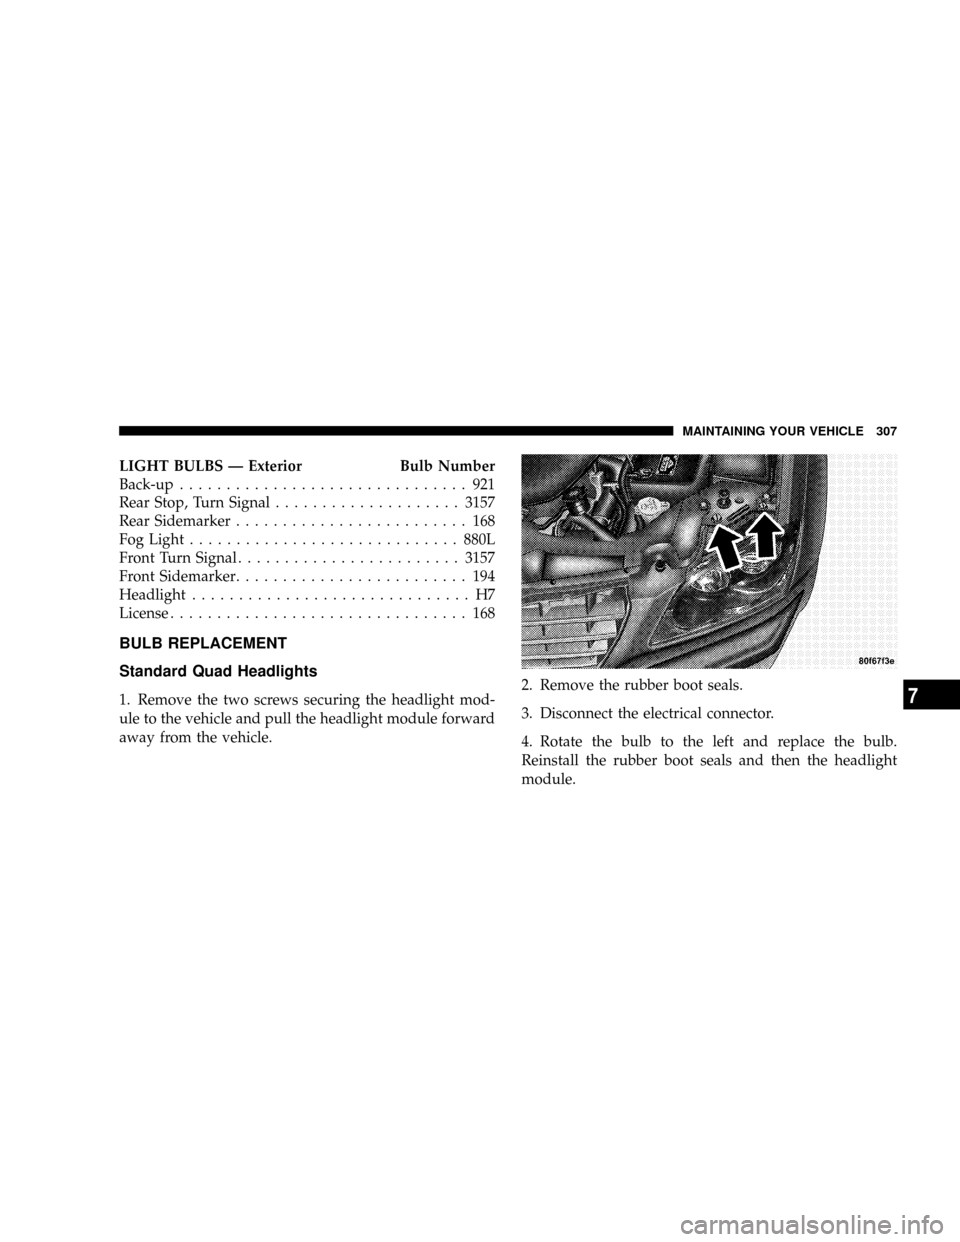
1. Remove the two screws securing the headlight mod-
ule to the vehicle and pull the headlight module forward
away from the vehicle.2. Remove the rubber boot seals.
3. Disconnect the electrical connector.
4. Rotate the bulb to the left and replace the bulb.
Reinstall the rubber boot seals and then the headlight
module.
MAINTAINING YOUR VEHICLE 307
7