CHRYSLER PACIFICA 2007 1.G Owners Manual
Manufacturer: CHRYSLER, Model Year: 2007, Model line: PACIFICA, Model: CHRYSLER PACIFICA 2007 1.GPages: 464, PDF Size: 5.92 MB
Page 401 of 464
Seat Belt Maintenance
Do not bleach, dye or clean the belts with chemical
solvents or abrasive cleaners. This will weaken the fabric.
Sun damage can also weaken the fabric.
If the belts need cleaning, use a mild soap solution or
lukewarm water. Do not remove the belts from the car to
wash them.
Replace the belts if they appear frayed or worn or if the
buckles do not work properly.
Cleaning The Center Console Cup Holders
Removal
Grab the center of the rubber portion of the cupholder
and lift upward.
Cleaning
Soak the rubber cupholder liner in a mixture of medium
hot tap water and one teaspoon of mild liquid dish soap.
Let soak for approximately one hour. After one hour pull
the liner from the water and dip it back into the water
about six times. This will loosen any remaining debris.
Rinse the liner thoroughly under warm running water.
Shake the excess water from the liner and dry the outer
surfaces with a clean soft cloth.
Installation
Align the liner in the cupholder and press down firmly.
MAINTAINING YOUR VEHICLE 401
7
Page 402 of 464
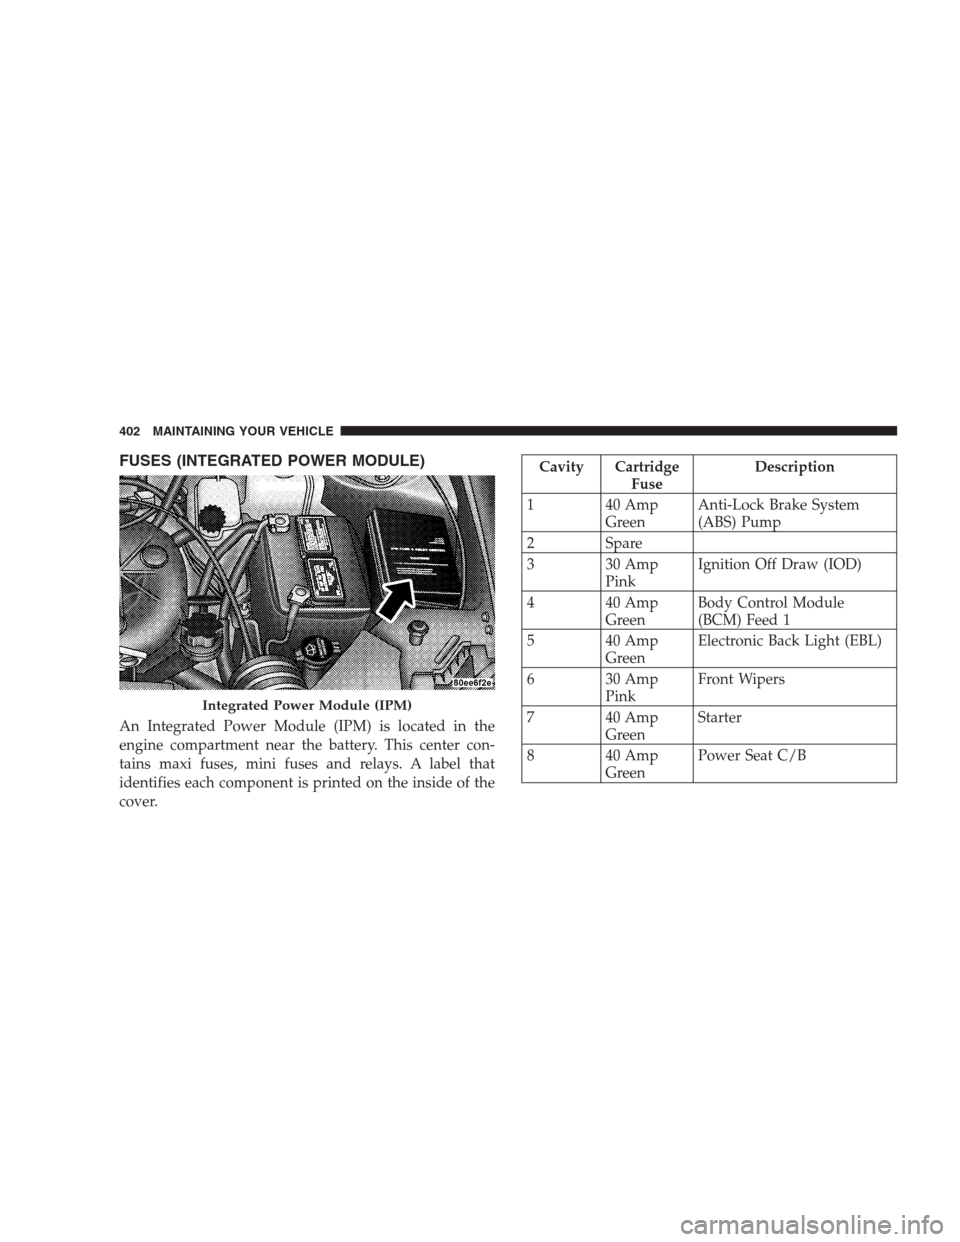
FUSES (INTEGRATED POWER MODULE)
An Integrated Power Module (IPM) is located in the
engine compartment near the battery. This center con-
tains maxi fuses, mini fuses and relays. A label that
identifies each component is printed on the inside of the
cover.
Cavity Cartridge
FuseDescription
1 40 Amp
GreenAnti-Lock Brake System
(ABS) Pump
2 Spare
3 30 Amp
PinkIgnition Off Draw (IOD)
4 40 Amp
GreenBody Control Module
(BCM) Feed 1
5 40 Amp
GreenElectronic Back Light (EBL)
6 30 Amp
PinkFront Wipers
7 40 Amp
GreenStarter
8 40 Amp
GreenPower Seat C/B
Integrated Power Module (IPM)
402 MAINTAINING YOUR VEHICLE
Page 403 of 464
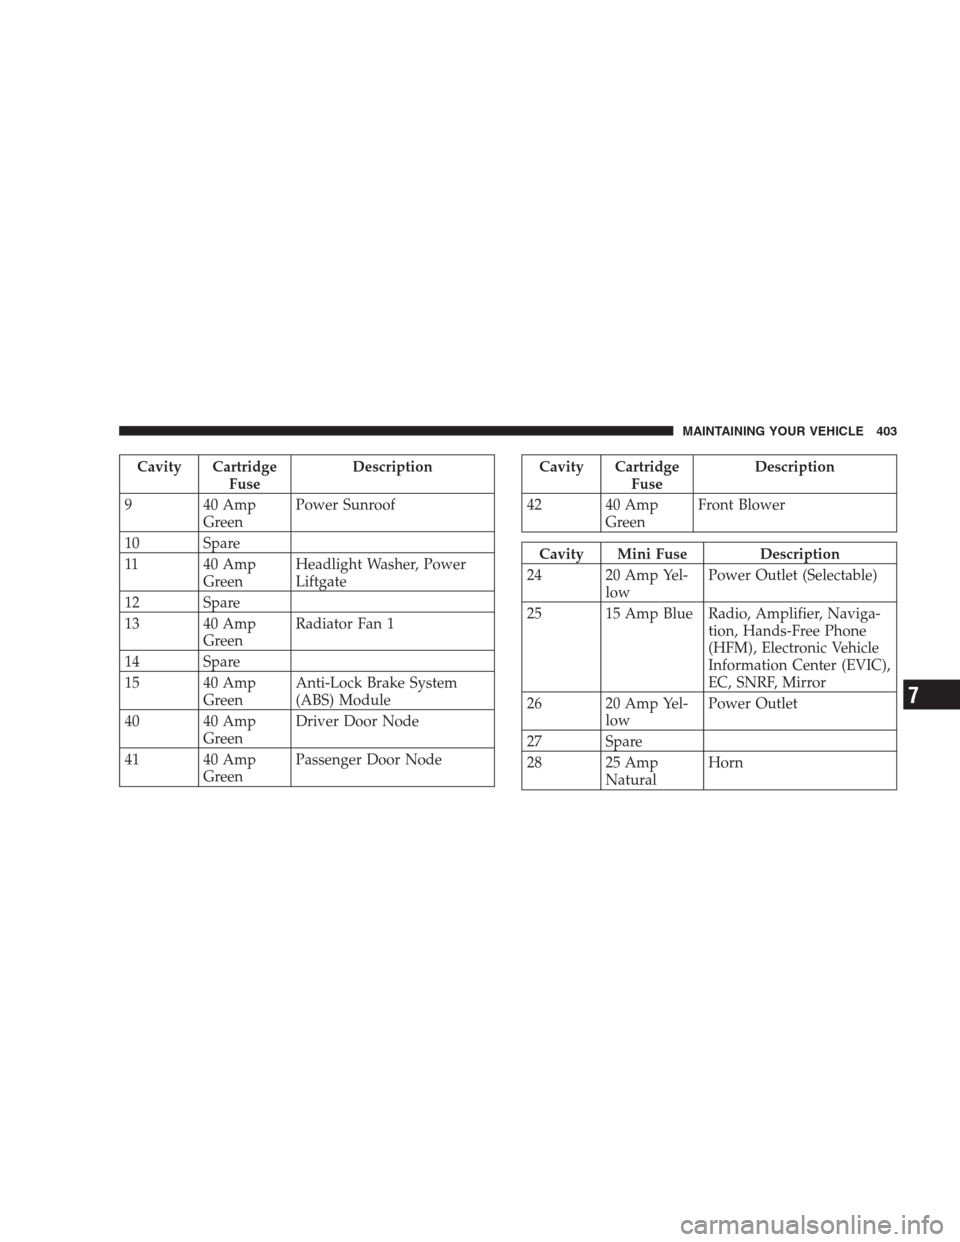
Cavity Cartridge
FuseDescription
9 40 Amp
GreenPower Sunroof
10 Spare
11 40 Amp
GreenHeadlight Washer, Power
Liftgate
12 Spare
13 40 Amp
GreenRadiator Fan 1
14 Spare
15 40 Amp
GreenAnti-Lock Brake System
(ABS) Module
40 40 Amp
GreenDriver Door Node
41 40 Amp
GreenPassenger Door NodeCavity Cartridge
FuseDescription
42 40 Amp
GreenFront Blower
Cavity Mini Fuse Description
24 20 Amp Yel-
lowPower Outlet (Selectable)
25 15 Amp Blue Radio, Amplifier, Naviga-
tion, Hands-Free Phone
(HFM), Electronic Vehicle
Information Center (EVIC),
EC, SNRF, Mirror
26 20 Amp Yel-
lowPower Outlet
27 Spare
28 25 Amp
NaturalHorn
MAINTAINING YOUR VEHICLE 403
7
Page 404 of 464
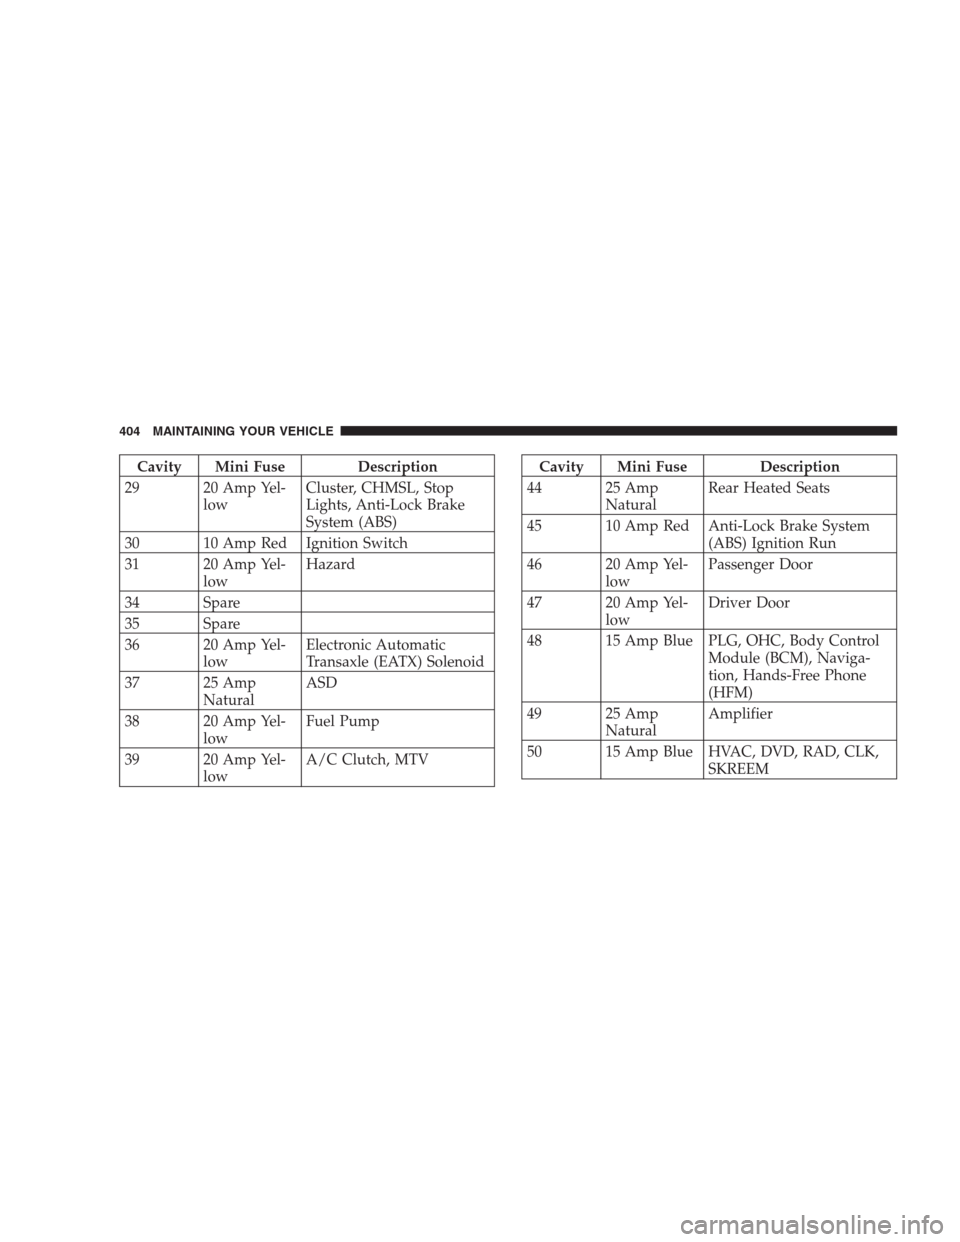
Cavity Mini Fuse Description
29 20 Amp Yel-
lowCluster, CHMSL, Stop
Lights, Anti-Lock Brake
System (ABS)
30 10 Amp Red Ignition Switch
31 20 Amp Yel-
lowHazard
34 Spare
35 Spare
36 20 Amp Yel-
lowElectronic Automatic
Transaxle (EATX) Solenoid
37 25 Amp
NaturalASD
38 20 Amp Yel-
lowFuel Pump
39 20 Amp Yel-
lowA/C Clutch, MTVCavity Mini Fuse Description
44 25 Amp
NaturalRear Heated Seats
45 10 Amp Red Anti-Lock Brake System
(ABS) Ignition Run
46 20 Amp Yel-
lowPassenger Door
47 20 Amp Yel-
lowDriver Door
48 15 Amp Blue PLG, OHC, Body Control
Module (BCM), Naviga-
tion, Hands-Free Phone
(HFM)
49 25 Amp
NaturalAmplifier
50 15 Amp Blue HVAC, DVD, RAD, CLK,
SKREEM
404 MAINTAINING YOUR VEHICLE
Page 405 of 464
CAUTION!
•When installing the Integrated Power Module
cover, it is important to ensure the cover is prop-
erly positioned and fully latched. Failure to do so
may allow water to get into the Integrated Power
Module, and possibly result in a electrical system
failure.
•When replacing a blown fuse, it is important to
use only a fuse having the correct amperage
rating. The use of a fuse with a rating other than
indicated may result in a dangerous electrical
system overload. If a properly rated fuse contin-
ues to blow, it indicates a problem in the circuit
that must be corrected.
VEHICLE STORAGE
If you are leaving your vehicle dormant for more than 21
days you may want to take steps to protect your battery.
You may:
•Disconnect the negative cable from the battery.
•Anytime you store your vehicle, or keep it out of
service (i.e. vacation) for two weeks or more, run the
air conditioning system at idle for about five minutes
in the fresh air and high blower setting. This will
insure adequate system lubrication to minimize the
possibility of compressor damage when the system is
started again.
MAINTAINING YOUR VEHICLE 405
7
Page 406 of 464
REPLACEMENT LIGHT BULBS
LIGHT BULBS — Interior Bulb Number
Center & Rear Reading Lights............... 578
Front Door Courtesy Light.................. 578
Liftgate Light(s).......................... 578
Overhead Console Reading Lights...........212–2
Visor Vanity Lights.....................V26377
NOTE:For lighted switches, see your dealer for replace-
ment instructions.
All of the interior bulbs are glass wedge base or glass
cartridge types. Aluminum base bulbs are not approved
and should not be used for replacement.LIGHT BULBS — Exterior Bulb Number
Back-up............................... 921
Rear Stop, Turn Signal....................3157
Rear Sidemarker......................... 168
Fog Light.............................9145
Front Turn Signal.......................3157A
Front Sidemarker......................... 194
Standard Headlight...................... H13
License................................ 168
BULB REPLACEMENT
Standard Quad Headlights
1. Remove the two screws securing the headlight mod-
ule to the vehicle and pull the headlight module forward
away from the vehicle, disengaging the assembly from
the lower attachment clip.
406 MAINTAINING YOUR VEHICLE
Page 407 of 464
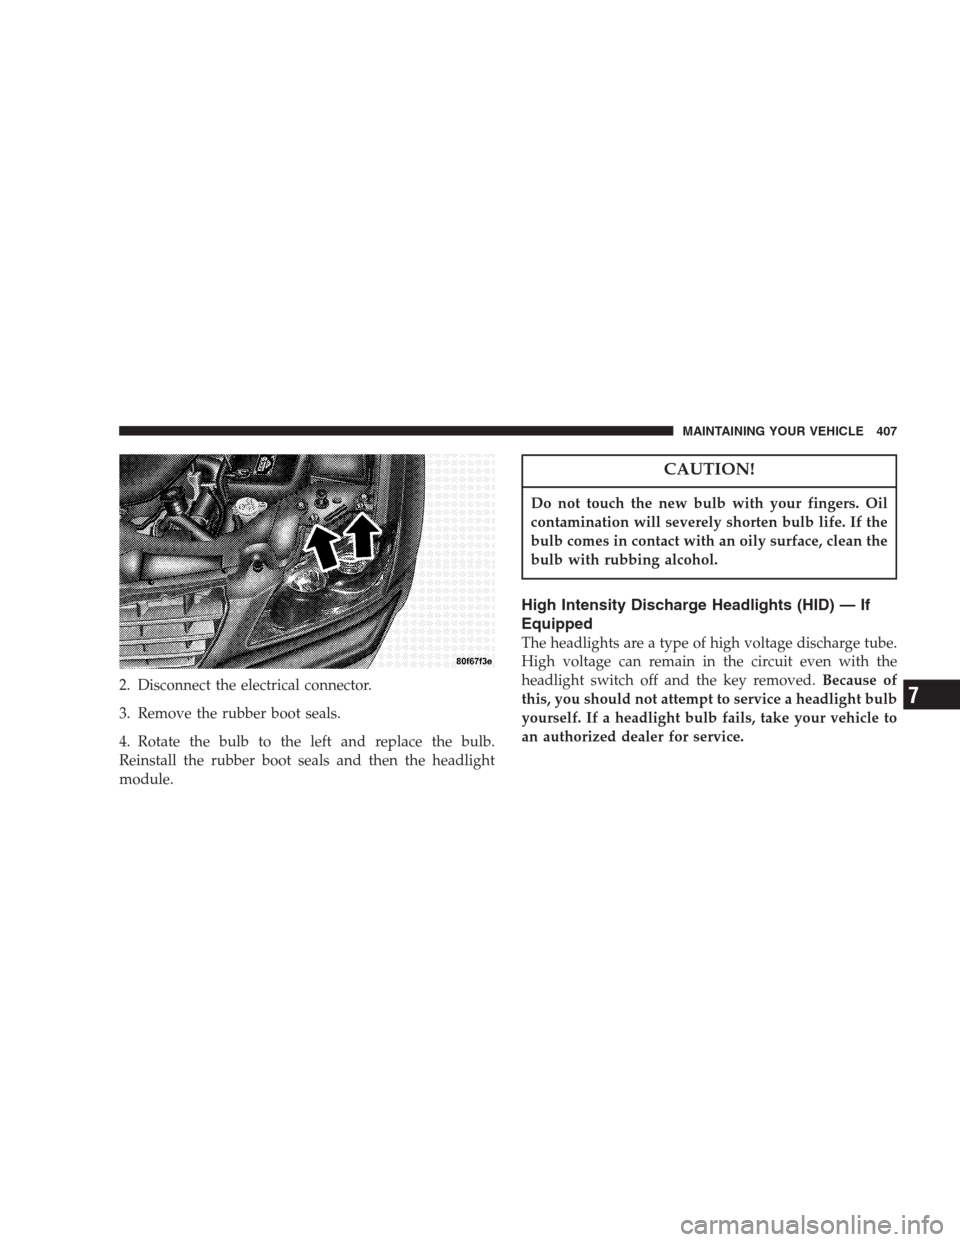
2. Disconnect the electrical connector.
3. Remove the rubber boot seals.
4. Rotate the bulb to the left and replace the bulb.
Reinstall the rubber boot seals and then the headlight
module.
CAUTION!
Do not touch the new bulb with your fingers. Oil
contamination will severely shorten bulb life. If the
bulb comes in contact with an oily surface, clean the
bulb with rubbing alcohol.
High Intensity Discharge Headlights (HID) — If
Equipped
The headlights are a type of high voltage discharge tube.
High voltage can remain in the circuit even with the
headlight switch off and the key removed.Because of
this, you should not attempt to service a headlight bulb
yourself. If a headlight bulb fails, take your vehicle to
an authorized dealer for service.
MAINTAINING YOUR VEHICLE 407
7
Page 408 of 464
WARNING!
A transient high tension occurs at the bulb sockets of
High Intensity Discharge (HID) headlights when the
headlight switch is turned ON. It may cause serious
electrical shock or electrocution if not serviced prop-
erly. See your authorized dealer for service.
NOTE:On vehicles equipped with High Intensity Dis-
charge Headlights (HID), when the headlights are turned
on there is a blue hue to the lights. This diminishes and
becomes more white after approximately 10 seconds, as
the system charges.
Front Park/Turn Signal and Sidemarker Lights
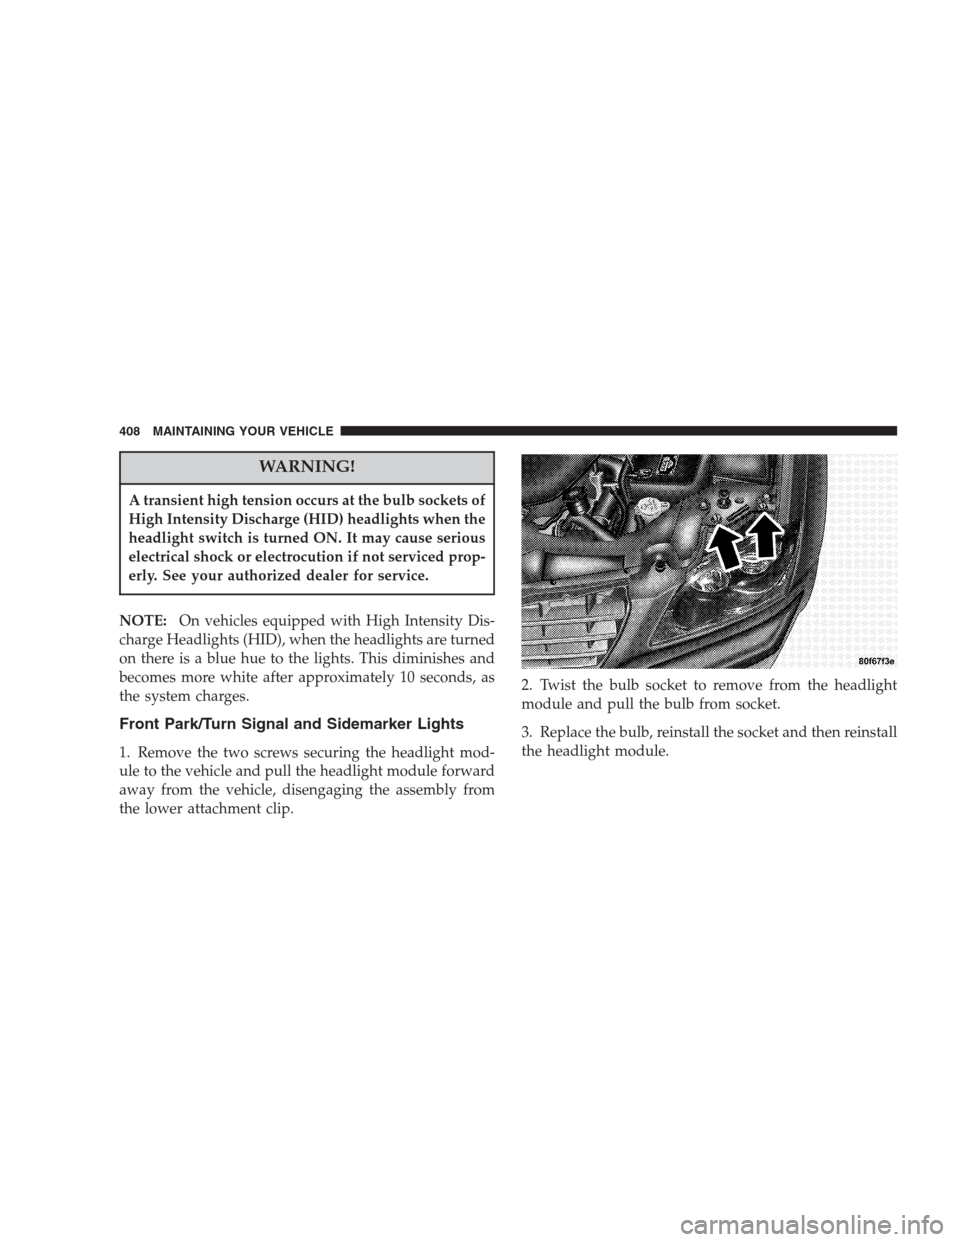
1. Remove the two screws securing the headlight mod-
ule to the vehicle and pull the headlight module forward
away from the vehicle, disengaging the assembly from
the lower attachment clip.2. Twist the bulb socket to remove from the headlight
module and pull the bulb from socket.
3. Replace the bulb, reinstall the socket and then reinstall
the headlight module.
408 MAINTAINING YOUR VEHICLE
Page 409 of 464
Front Fog Light
1. Reach under the front fascia and grasp the front fog
light bulb.
2. Twist the front fog light bulb to remove from the fog
light module.
3. Disconnect the electrical connector and replace the
bulb.
CAUTION!
Do not touch the new bulb with your fingers. Oil
contamination will severely shorten bulb life. If the
bulb comes in contact with an oily surface, clean the
bulb with rubbing alcohol.
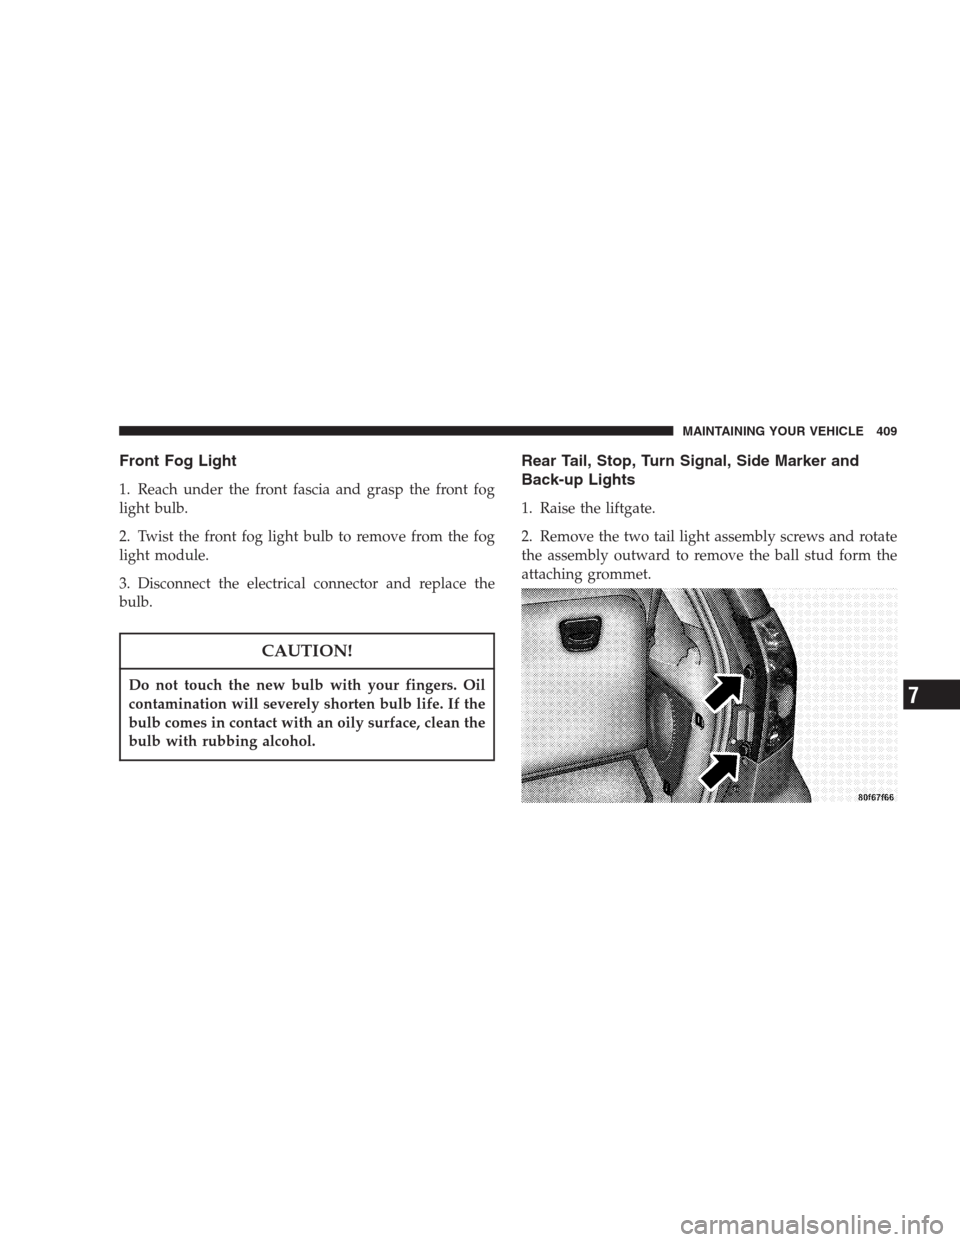
Rear Tail, Stop, Turn Signal, Side Marker and
Back-up Lights
1. Raise the liftgate.
2. Remove the two tail light assembly screws and rotate
the assembly outward to remove the ball stud form the
attaching grommet.
MAINTAINING YOUR VEHICLE 409
7
Page 410 of 464
3. Twist the socket assembly to remove it from the
housing.
4. Pull the bulb out of the socket.
5. Replace the bulb, reinstall the socket, and reattach the
tail light assembly.License Light
1. Place a screwdriver in the slot next to the release tab
and push on the release tab to remove the lens.
2. Pull the bulb out of the socket. Replace the bulb and
push on the lens until it snaps into place.
410 MAINTAINING YOUR VEHICLE