ECO CHRYSLER PACIFICA 2017 2.G Owner's Manual
[x] Cancel search | Manufacturer: CHRYSLER, Model Year: 2017, Model line: PACIFICA, Model: CHRYSLER PACIFICA 2017 2.GPages: 828, PDF Size: 7.58 MB
Page 82 of 828
WARNING!
•In a collision, you or others in your vehicle could
be injured if seats are not properly latched to their
floor attachments. Always be sure the seats are
fully latched.
• Sitting in a seat with the head restraint in its
lowered position could result in serious injury or
death in a collision. Always make sure the head
restraints are in their upright positions when the
seat is to be occupied.
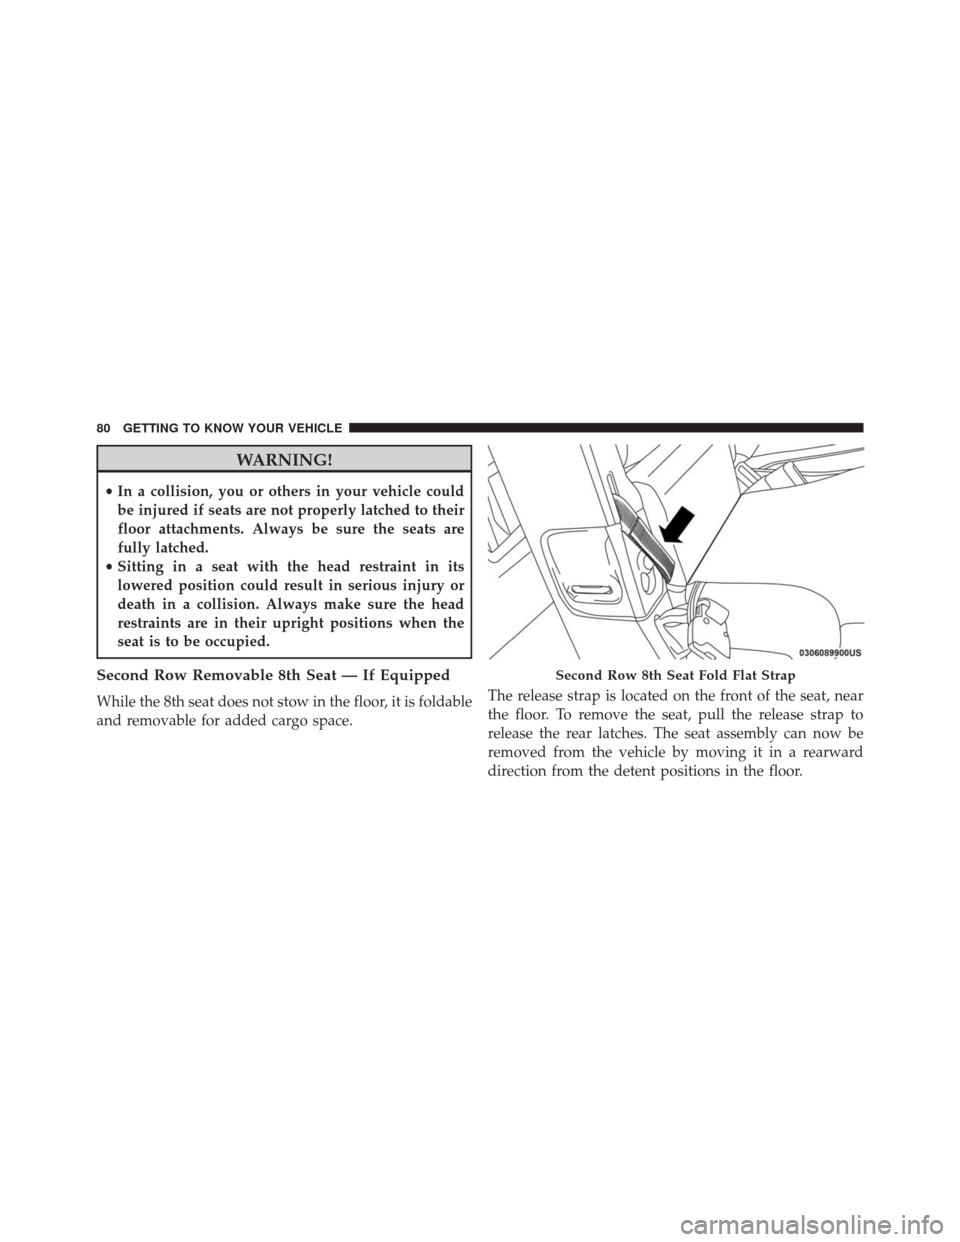
Second Row Removable 8th Seat — If Equipped
While the 8th seat does not stow in the floor, it is foldable
and removable for added cargo space. The release strap is located on the front of the seat, near
the floor. To remove the seat, pull the release strap to
release the rear latches. The seat assembly can now be
removed from the vehicle by moving it in a rearward
direction from the detent positions in the floor.
Second Row 8th Seat Fold Flat Strap
80 GETTING TO KNOW YOUR VEHICLE
Page 83 of 828

NOTE:Seat can be removed easier with one outboard
seat stowed in the load floor.
To reinstall the seat, align the seat into the detent posi-
tions on the floor. Tilt seat rearward to lock the seat back
into its original position.WARNING!
If not properly latched, the seat could become loose.
Personal injuries could result.
Release StrapIn Floor Detent Guides
3
GETTING TO KNOW YOUR VEHICLE 81
Page 87 of 828

WARNING!
•Adjusting a seat while driving may be dangerous.
Moving a seat while driving could result in loss of
control which could cause a collision and serious
injury or death.
• Seats should be adjusted before fastening the seat
belts and while the vehicle is parked. Serious
injury or death could result from a poorly adjusted
seat belt.
• Do not ride with the seatback reclined so that the
shoulder belt is no longer resting against your
chest. In a collision you could slide under the seat
belt, which could result in serious injury or death.
CAUTION!
Do not place any article under a power seat or
impede its ability to move as it may cause damage to
the seat controls. Seat travel may become limited if
movement is stopped by an obstruction in the seat’s
path.
Adjusting The Seat Forward Or Rearward
The seat can be adjusted both forward and rearward.
Push the seat switch forward or rearward. The seat will
move in the direction of the switch. Release the switch
when the desired position has been reached.
Adjusting The Seat Up Or Down
The height of the seats can be adjusted up or down. Pull
upward or push downward on the seat switch, the seat
will move in the direction of the switch. Release the
switch when the desired position has been reached.
3
GETTING TO KNOW YOUR VEHICLE 85
Page 88 of 828

Tilting The Seat Up Or Down
The angle of the seat cushion can be adjusted in four
directions. Pull upward or push downward on the front
or rear of the seat switch, the front or rear of the seat
cushion will move in the direction of the switch. Release
the switch when the desired position has been reached.
Reclining The Seatback
The angle of the seatback can be adjusted forward or
rearward. Push the seatback switch forward or rearward,
the seat will move in the direction of the switch. Release
the switch when the desired position is reached.
CAUTION!
Do not place any article under a power seat or
impede its ability to move as it may cause damage to
the seat controls. Seat travel may become limited if
(Continued)
CAUTION!(Continued)
movement is stopped by an obstruction in the seat’s
path.
WARNING!
•Adjusting a seat while driving may be dangerous.
Moving a seat while driving could result in loss of
control which could cause a collision and serious
injury or death.
• Seats should be adjusted before fastening the seat
belts and while the vehicle is parked. Serious
injury or death could result from a poorly adjusted
seat belt.
• Do not ride with the seatback reclined so that the
shoulder belt is no longer resting against your
chest. In a collision you could slide under the seat
belt, which could result in serious injury or death.
86 GETTING TO KNOW YOUR VEHICLE
Page 89 of 828
Power Lumbar — If Equipped
Vehicles equipped with power driver or passenger seats
may be equipped with power lumbar. The power lumbar
switch is located on the outboard side of the power seat.
Push the switch forward or rearward to increase or
decrease the lumbar support. Push the switch upward or
downward to raise or lower the lumbar support.
Power Adjustment (Rear Seats) — If Equipped
WARNING!
•Adjusting a seat while driving may be dangerous.
Moving a seat while driving could result in loss of
control which could cause a collision and serious
injury or death.
• Seats should be adjusted before fastening the seat
belts and while the vehicle is parked. Serious
(Continued)
WARNING! (Continued)
injury or death could result from a poorly adjusted
seat belt.
• Do not ride with the seatback reclined so that the
shoulder belt is no longer resting against your
chest. In a collision you could slide under the seat
belt, which could result in serious injury or death.
CAUTION!
Do not place any article under a power seat or
impede its ability to move as it may cause damage to
the seat controls. Seat travel may become limited if
movement is stopped by an obstruction in the seat’s
path.
3
GETTING TO KNOW YOUR VEHICLE 87
Page 93 of 828
Your vehicle may have been delivered with two RKE key
fobs, one RKE key fob can be linked to each of the
memory positions.
Programming The Memory Feature
To create a new memory profile, perform the following:
1. Cycle the vehicles ignition to the ON/RUN position(do not start the engine).
2. Adjust all memory profile settings to desired prefer- ences (i.e., driver ’s seat, outside mirrors and radio
station presets).
3. Push and release the S (Set) button on the memory switch.
4. Within five seconds, push and release either of the memory buttons (1) or (2). The Electronic Vehicle
Driver Memory Switch
1 — Memory Button 1
2 — Set Button
3 — Memory Button 2
3
GETTING TO KNOW YOUR VEHICLE 91
Page 95 of 828
5. Push and release the LOCK button on the RKE KeyFob within 10 seconds.
NOTE: Your RKE Key Fob can be unlinked to your
memory settings by pushing the SET (S) button, and
within 10 seconds, followed by pushing the UNLOCK
button on the RKE Key Fob.
Memory Position Recall
NOTE: The vehicle must be in PARK to recall memory
positions. If a recall is attempted when the vehicle is not
in PARK, a message will be displayed in the EVIC or
DID.
To recall the memory settings for driver one, push
MEMORY button 1 on the driver’s door or the UNLOCK
button on the RKE Key Fob linked to memory position 1.
To recall the memory setting for driver two, push
MEMORY button 2 on the driver’s door or the UNLOCK
button on the RKE Key Fob linked to Memory Position 2. A recall can be cancelled by pushing any of the MEMORY
buttons on the driver’s door during a recall (S, 1, or 2).
When a recall is cancelled, the driver’s seat stop moving.
A delay of one second will occur before another recall can
be selected.
NOTE:
Pushing the mirror adjust switch will cancel the
memory mirror recall.Easy Entry/Exit Seat (Available With Memory Seat
Only)
This feature provides automatic driver seat positioning to
enhance driver mobility when entering and exiting the
vehicle.
The distance the driver seat moves depends on where
you have the driver seat positioned when you remove the
key from the ignition switch.
• When the ignition switch transitions to the LOCK
position, the driver seat will move about 2.4 inches
3
GETTING TO KNOW YOUR VEHICLE 93
Page 97 of 828
•Press the heated seat buttononce to turn the HI
setting ON.
• Press the heated seat buttona second time to turn
the LO setting ON.
• Press the heated seat buttona third time to turn
the heating elements OFF.
If the HI-level setting is selected, the system will auto-
matically switch to LO-level after approximately 60 min-
utes of continuous operation. At that time, the display
will change from HI to LO, indicating the change. The
LO-level setting will turn OFF automatically after ap-
proximately 45 minutes.
NOTE:
• Once a heat setting is selected, heat will be felt within
two to five minutes. •
The engine must be running for the heated seats to
operate.
Vehicles Equipped With Remote Start
On models that are equipped with remote start, the
heated seats can be programmed to come on during a
remote start.
This feature can be programmed through the Uconnect
system. Refer to “Uconnect Settings” in “Multimedia” for
further information.
WARNING!
• Persons who are unable to feel pain to the skin
because of advanced age, chronic illness, diabetes,
spinal cord injury, medication, alcohol use, exhaus-
tion or other physical condition must exercise care
when using the seat heater. It may cause burns
(Continued)
3
GETTING TO KNOW YOUR VEHICLE 95
Page 98 of 828
WARNING!(Continued)
even at low temperatures, especially if used for
long periods of time
• Do not place anything on the seat or seatback that
insulates against heat, such as a blanket or cushion.
This may cause the seat heater to overheat. Sitting
in a seat that has been overheated could cause
serious burns due to the increased surface tempera-
ture of the seat.
Rear Heated Seats — If Equipped
On some models, the second row seats are equipped with
heaters. There are two heated seat switches that allow the
second row passengers to operate the seats indepen-
dently. The heated seat switches are located on the sliding
side door handle trim panels. You can choose from HI, LO or OFF heat settings. Amber
indicator lights in each switch indicate the level of heat in
use. Two indicator lights will illuminate for HI, one for
LO and none for OFF.Second Row Heated Seat Switch
96 GETTING TO KNOW YOUR VEHICLE
Page 99 of 828
Push the switch once to select HI-level heating. Push the
switch a second time to select LO-level heating. Push the
switch a third time to shut the heating elements OFF.
NOTE:Once a heat setting is selected, heat will be felt
within two to five minutes.
When the HI-level setting is selected, the heater will
provide a boosted heat level during the initial stages of
operation. Then, the heat output will drop to the normal
HI-level. If the HI-level setting is selected, the system will
automatically switch to LO-level after approximately 60
minutes of continuous operation. At that time, the dis-
play will change from HI to LO, indicating the change.
The LO-level setting will turn OFF automatically after
approximately 45 minutes.
Ventilated Seats — If Equipped
Located in the first row seat cushions are small fans that
draw the air from the passenger compartment and move air through fine perforations in the seat cover to help
keep the driver and front passenger cooler in higher
ambient temperatures. The fans operate at two speeds,
HI and LO.
The front ventilated seats control buttons are located
within the climate or controls screen of the touchscreen.
•
Press the ventilated seat button
once to choose HI.
•Press the ventilated seat buttona second time to
choose LO.
• Press the ventilated seat buttona third time to
turn the ventilated seat OFF.
NOTE: The engine must be running for the ventilated
seats to operate.
3
GETTING TO KNOW YOUR VEHICLE 97