AC plug CHRYSLER PACIFICA 2019 Owner's Manual
[x] Cancel search | Manufacturer: CHRYSLER, Model Year: 2019, Model line: PACIFICA, Model: CHRYSLER PACIFICA 2019Pages: 718, PDF Size: 8.6 MB
Page 495 of 718
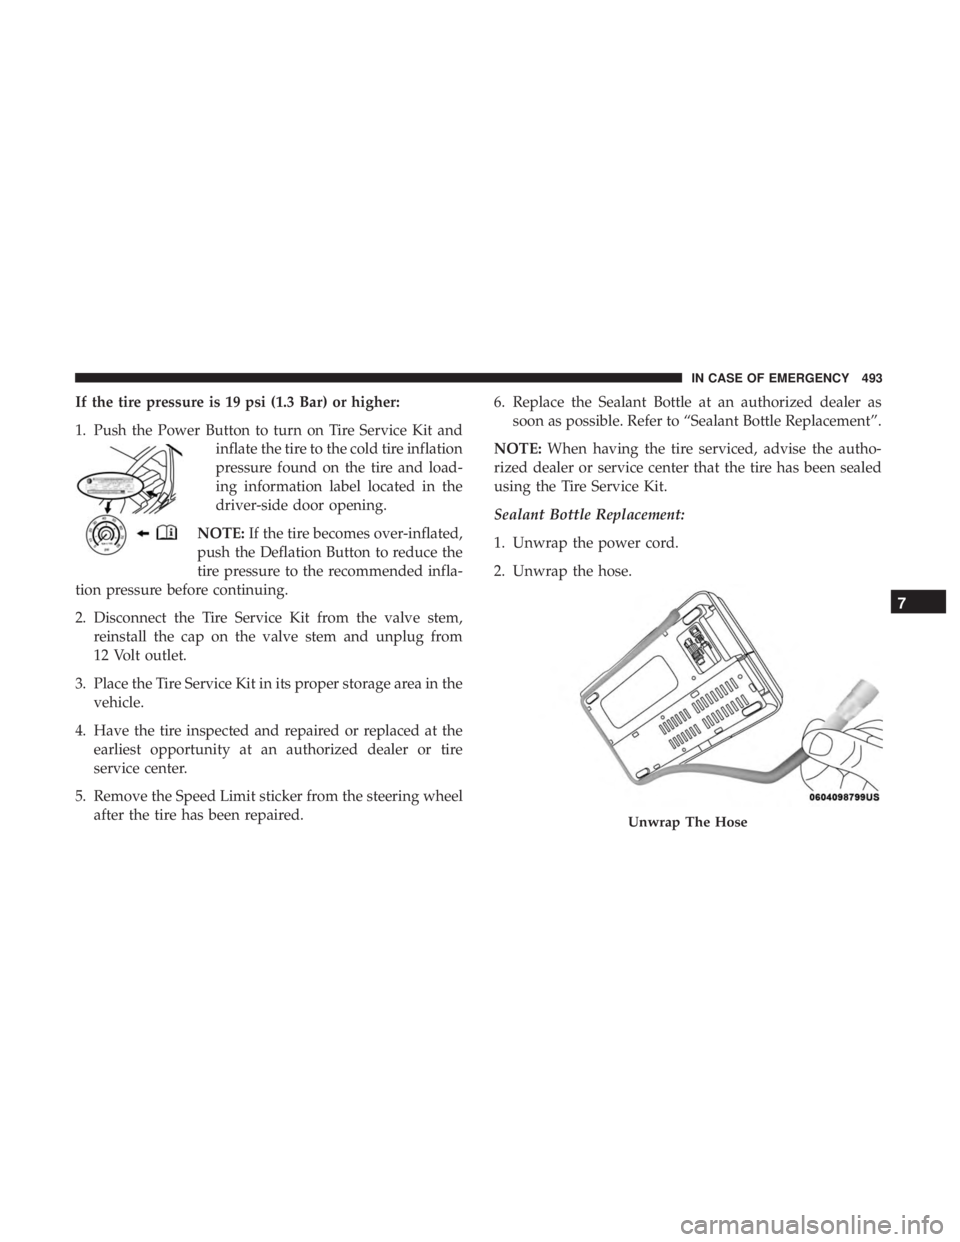
If the tire pressure is 19 psi (1.3 Bar) or higher:
1. Push the Power Button to turn on Tire Service Kit andinflate the tire to the cold tire inflation
pressure found on the tire and load-
ing information label located in the
driver-side door opening.
NOTE: If the tire becomes over-inflated,
push the Deflation Button to reduce the
tire pressure to the recommended infla-
tion pressure before continuing.
2. Disconnect the Tire Service Kit from the valve stem, reinstall the cap on the valve stem and unplug from
12 Volt outlet.
3. Place the Tire Service Kit in its proper storage area in the vehicle.
4. Have the tire inspected and repaired or replaced at the earliest opportunity at an authorized dealer or tire
service center.
5. Remove the Speed Limit sticker from the steering wheel after the tire has been repaired. 6. Replace the Sealant Bottle at an authorized dealer as
soon as possible. Refer to “Sealant Bottle Replacement”.
NOTE: When having the tire serviced, advise the autho-
rized dealer or service center that the tire has been sealed
using the Tire Service Kit.
Sealant Bottle Replacement:
1. Unwrap the power cord.
2. Unwrap the hose.
Unwrap The Hose
7
IN CASE OF EMERGENCY 493
Page 500 of 718
4. Connect the opposite end of the negative(-)jumper
cable to the negative post near the windshield cowl
(exposed metal part of the discharged vehicle’s engine).
WARNING!
Do not connect the jumper cable to the negative (-) post
of the discharged battery. The resulting electrical spark
could cause the battery to explode and could result in
personal injury. Only use the specific ground point, do
not use any other exposed metal parts.
5. Start the engine in the vehicle that has the booster battery, let the engine idle a few minutes, and then start
the engine in the vehicle with the discharged battery.
6. Once the engine is started, remove the jumper cables in the reverse sequence:
Disconnecting The Jumper Cables
1. Disconnect the negative (-)end of the jumper cable from
the engine ground of the vehicle with the discharged
battery.
2. Disconnect the opposite end of the negative (-)jumper
cable from the negative (-)post of the booster battery. 3. Disconnect the positive
(+)end of the jumper cable from
the positive (+)post of the booster battery.
4. Disconnect the opposite end of the positive (+)jumper
cable from the positive (+)post of the vehicle with the
discharged battery.
If frequent jump starting is required to start your vehicle
you should have the battery and charging system in-
spected at an authorized dealer.
CAUTION!
Accessories plugged into the vehicle power outlets
draw power from the vehicle’s battery, even when not
in use (i.e., cellular devices, etc.). Eventually, if plugged
in long enough without engine operation, the vehicle’s
battery will discharge sufficiently to degrade battery
life and/or prevent the engine from starting.
498 IN CASE OF EMERGENCY
Page 513 of 718
Mileage or time passed (whichever comes first)
20,000
30,000
40,000
50,000
60,000
70,000
80,000
90,000
100,000
110,000
120,000
130,000
140,000
150,000
Or Years: 2 3 4 5 6 7 8 9 10 11 12 13 14 15
Or Kilometers:
32,000
48,000
64,000
80,000
96,000
112,000
128,000
144,000
160,000
176,000
192,000
208,000
224,000
240,000
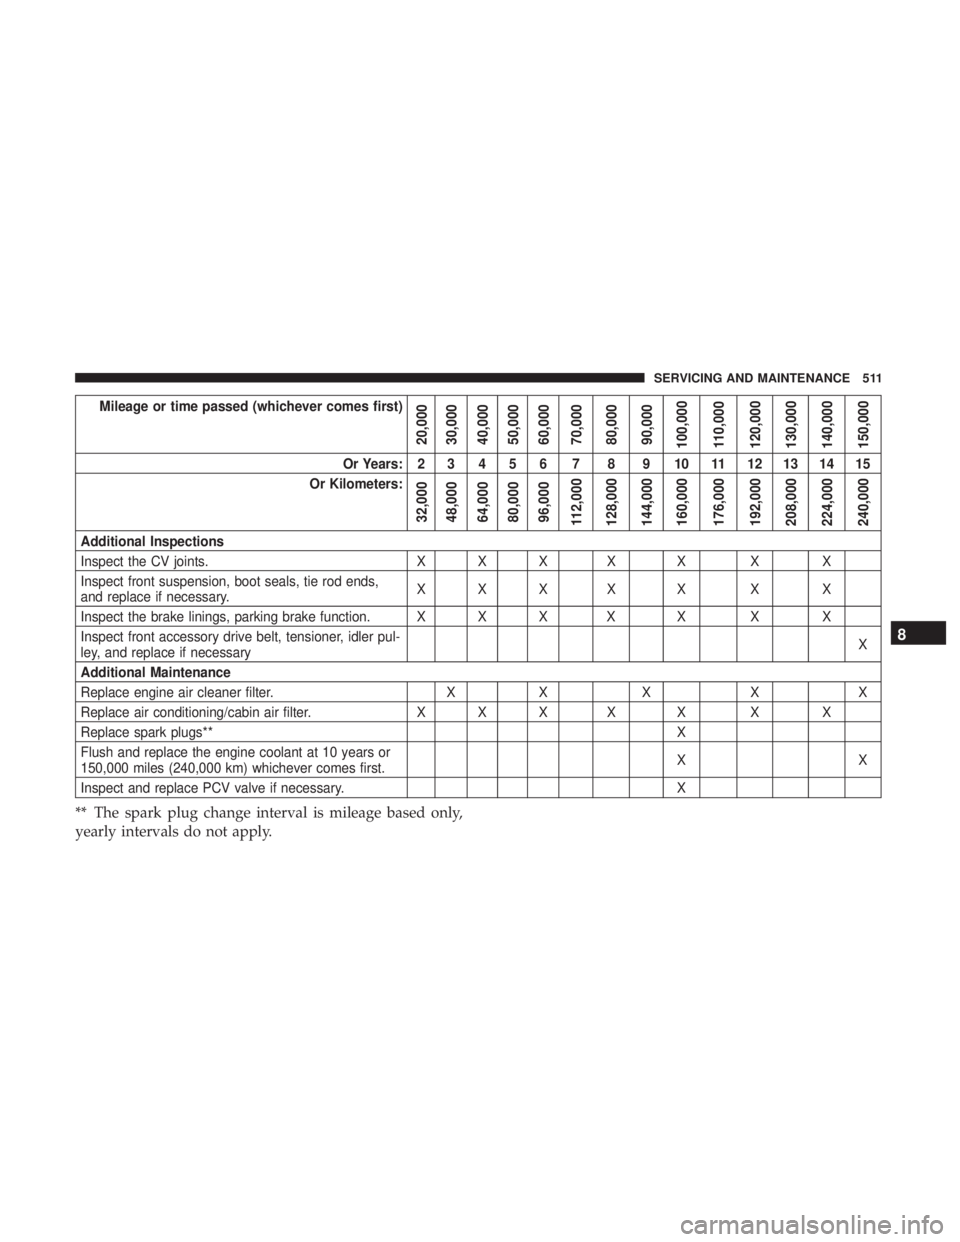
Additional Inspections
Inspect the CV joints. X X X X X X X
Inspect front suspension, boot seals, tie rod ends,
and replace if necessary. XXX X X X X
Inspect the brake linings, parking brake function. X X X X X X X
Inspect front accessory drive belt, tensioner, idler pul-
ley, and replace if necessary X
Additional Maintenance
Replace engine air cleaner filter. XX X XX
Replace air conditioning/cabin air filter. X X X X X X X
Replace spark plugs** X
Flush and replace the engine coolant at 10 years or
150,000 miles (240,000 km) whichever comes first. XX
Inspect and replace PCV valve if necessary. X
** The spark plug change interval is mileage based only,
yearly intervals do not apply.
8
SERVICING AND MAINTENANCE 511
Page 534 of 718
NOTE:
•Mixing of engine coolant (antifreeze) other than speci-
fied Organic Additive Technology (OAT) engine coolant
(antifreeze), may result in engine damage and may
decrease corrosion protection. Organic Additive Tech-
nology (OAT) engine coolant is different and should not
be mixed with Hybrid Organic Additive Technology
(HOAT) engine coolant (antifreeze) or any “globally
compatible” coolant (antifreeze). If a non-OAT engine
coolant (antifreeze) is introduced into the cooling system
in an emergency, the cooling system will need to be
drained, flushed, and refilled with fresh OAT coolant
(conforming to MS.90032), by an authorized dealer as
soon as possible.
• Do not use water alone or alcohol-based engine coolant
(antifreeze) products. Do not use additional rust inhibi-
tors or antirust products, as they may not be compatible
with the radiator engine coolant and may plug the
radiator.
• This vehicle has not been designed for use with propyl-
ene glycol-based engine coolant (antifreeze). Use of
propylene glycolbased engine coolant (antifreeze) is not
recommended. •
Some vehicles require special tools to add coolant prop-
erly. Failure to fill these systems properly could lead to
severe internal engine damage. If any coolant is needed
to be added to the system please contact an authorized
dealer.
Adding Coolant
Your vehicle has been built with an improved engine
coolant (OAT coolant conforming to MS.90032) that allows
extended maintenance intervals. This engine coolant (anti-
freeze) can be used up to ten years or 150,000 miles
(240,000 km) before replacement. To prevent reducing this
extended maintenance period, it is important that you use
the same engine coolant (OAT coolant conforming to
MS.90032) throughout the life of your vehicle.
Please review these recommendations for using Organic
Additive Technology (OAT) engine coolant (antifreeze)
that meets the requirements of FCA Material Standard
MS.90032. When adding engine coolant (antifreeze):
• We recommend using Mopar Antifreeze/Coolant 10
Year/150,000 Mile (240,000 km) Formula OAT (Organic
Additive Technology) that meets the requirements of
FCA Material Standard MS.90032.
532 SERVICING AND MAINTENANCE
Page 577 of 718
MMT In Gasoline
Methylcyclopentadienyl Manganese Tricarbonyl (MMT) is
a manganese-containing metallic additive that is blended
into some gasoline to increase octane. Gasoline blended
with MMT provides no performance advantage beyond
gasoline of the same octane number without MMT. Gaso-
line blended with MMT reduces spark plug life and
reduces emissions system performance in some vehicles.
The manufacturer recommends that gasoline without
MMT be used in your vehicle. The MMT content of
gasoline may not be indicated on the gasoline pump;
therefore, you should ask your gasoline retailer whether
the gasoline contains MMT. MMT is prohibited in Federal
and California reformulated gasoline.
Fuel System Cautions
CAUTION!
Follow these guidelines to maintain your vehicle’s
performance:
•The use of leaded gasoline is prohibited by Federal
law. Using leaded gasoline can impair engine perfor-
mance and damage the emissions control system.
(Continued)
CAUTION! (Continued)
•An out-of-tune engine or certain fuel or ignition
malfunctions can cause the catalytic converter to
overheat. If you notice a pungent burning odor or
some light smoke, your engine may be out of tune or
malfunctioning and may require immediate service.
Contact an authorized dealer for service assistance.
• The use of fuel additives, which are now being sold
as octane enhancers, is not recommended. Most of
these products contain high concentrations of metha-
nol. Fuel system damage or vehicle performance
problems resulting from the use of such fuels or
additives is not the responsibility of the manufac-
turer and may void or not be covered under the New
Vehicle Limited Warranty.
NOTE: Intentional tampering with the emissions control
system can result in civil penalties being assessed against
you.
9
TECHNICAL SPECIFICATIONS 575
Page 580 of 718
ComponentFluid, Lubricant, or Genuine Part
Spark Plugs We recommend you use Mopar Spark Plugs.
Fuel Selection – 3.6L Engine 87 Octane, 0-15% Ethanol (Do not use E-85).
CAUTION!
•Mixing of engine coolant (antifreeze) other than
specified Organic Additive Technology (OAT) en-
gine coolant (antifreeze), may result in engine dam-
age and may decrease corrosion protection. Organic
Additive Technology (OAT) engine coolant is differ-
ent and should not be mixed with Hybrid Organic
Additive Technology (HOAT) engine coolant (anti-
freeze) or any “globally compatible” coolant (anti-
freeze). If a non-OAT engine coolant (antifreeze) is
introduced into the cooling system in an emergency,
the cooling system will need to be drained, flushed,
and refilled with fresh OAT coolant (conforming to
MS.90032), by an authorized dealer as soon as pos-
sible.
(Continued)
CAUTION! (Continued)
•Do not use water alone or alcohol-based engine
coolant (antifreeze) products. Do not use additional
rust inhibitors or antirust products, as they may not
be compatible with the radiator engine coolant and
may plug the radiator.
• This vehicle has not been designed for use with
propylene glycol-based engine coolant (antifreeze).
Use of propylene glycol-based engine coolant (anti-
freeze) is not recommended.
578 TECHNICAL SPECIFICATIONS
Page 642 of 718
AUX/USB/MP3 CONTROL
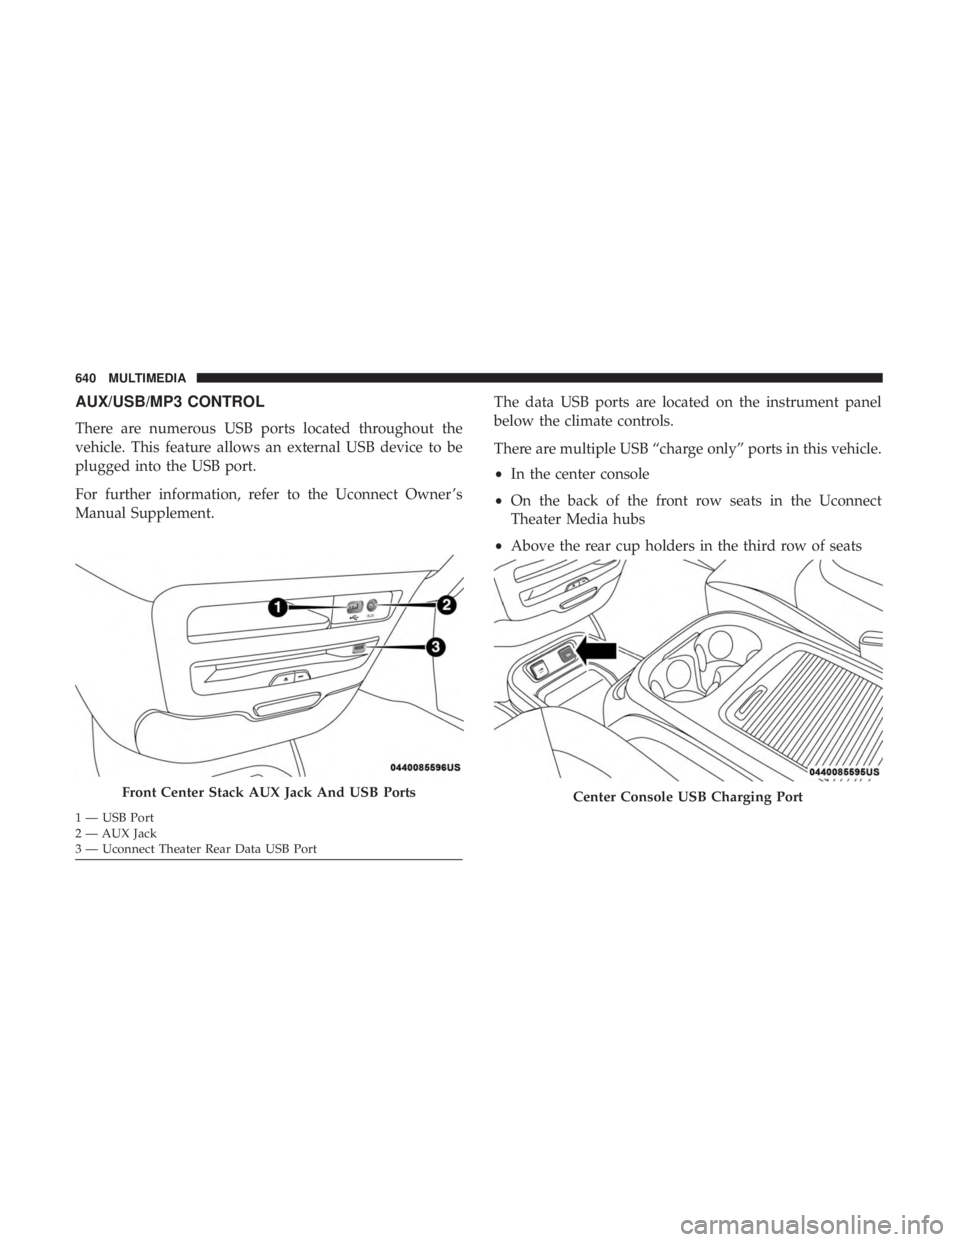
There are numerous USB ports located throughout the
vehicle. This feature allows an external USB device to be
plugged into the USB port.
For further information, refer to the Uconnect Owner ’s
Manual Supplement.The data USB ports are located on the instrument panel
below the climate controls.
There are multiple USB “charge only” ports in this vehicle.
•
In the center console
• On the back of the front row seats in the Uconnect
Theater Media hubs
• Above the rear cup holders in the third row of seats
Front Center Stack AUX Jack And USB Ports
1 — USB Port
2 — AUX Jack
3 — Uconnect Theater Rear Data USB Port
Center Console USB Charging Port
640 MULTIMEDIA
Page 643 of 718
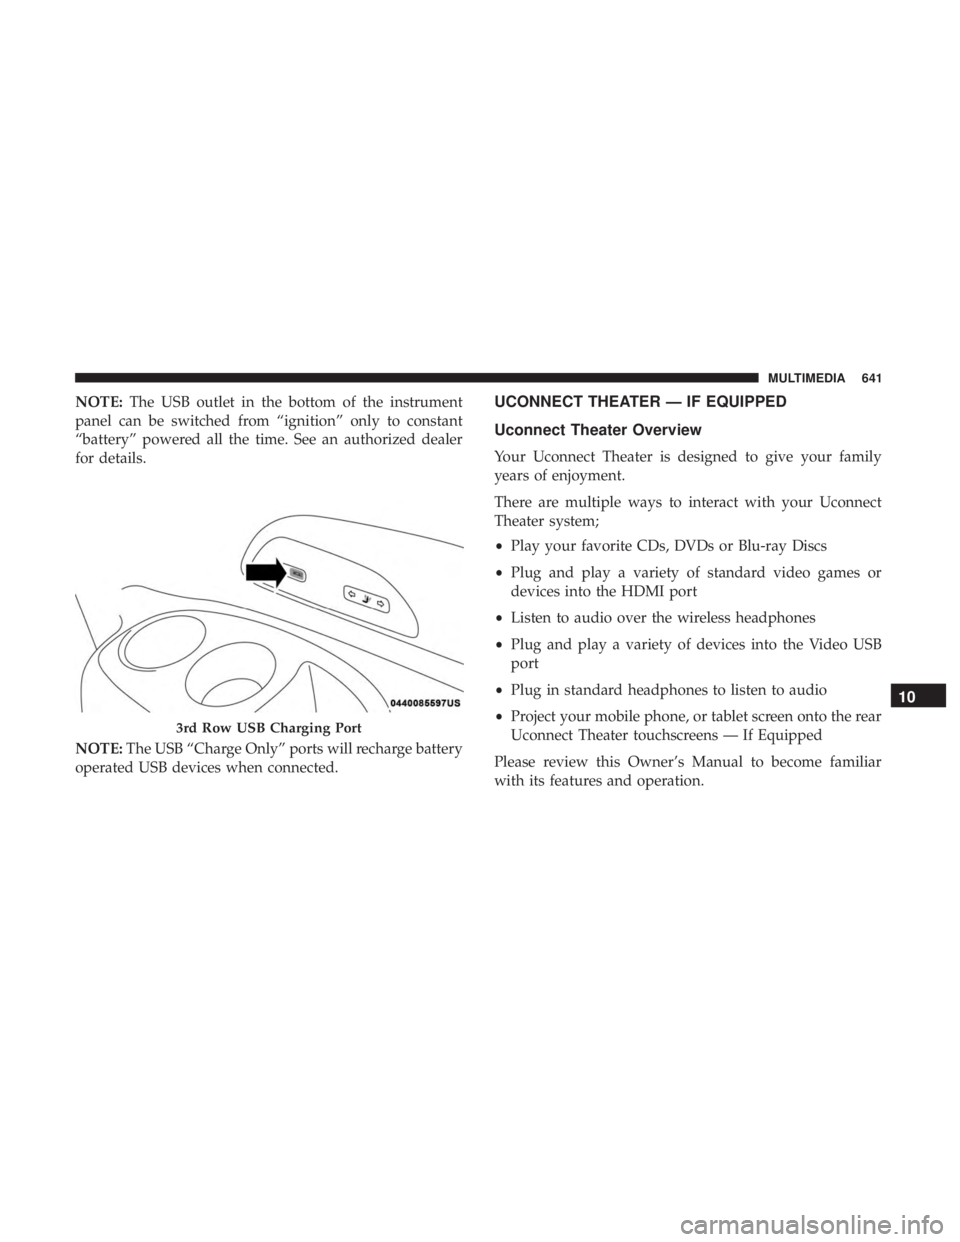
NOTE:The USB outlet in the bottom of the instrument
panel can be switched from “ignition” only to constant
“battery” powered all the time. See an authorized dealer
for details.
NOTE: The USB “Charge Only” ports will recharge battery
operated USB devices when connected.UCONNECT THEATER — IF EQUIPPED
Uconnect Theater Overview
Your Uconnect Theater is designed to give your family
years of enjoyment.
There are multiple ways to interact with your Uconnect
Theater system;
• Play your favorite CDs, DVDs or Blu-ray Discs
• Plug and play a variety of standard video games or
devices into the HDMI port
• Listen to audio over the wireless headphones
• Plug and play a variety of devices into the Video USB
port
• Plug in standard headphones to listen to audio
• Project your mobile phone, or tablet screen onto the rear
Uconnect Theater touchscreens — If Equipped
Please review this Owner’s Manual to become familiar
with its features and operation.
3rd Row USB Charging Port
10
MULTIMEDIA 641
Page 659 of 718
their frequency can be set up for route information by
using the arrow buttons, and can be turned on and off
using the “Notifications” button on the “Are We There
Yet?” App. Estimated time of arrival notifications pop-up
at the bottom center of the screen.
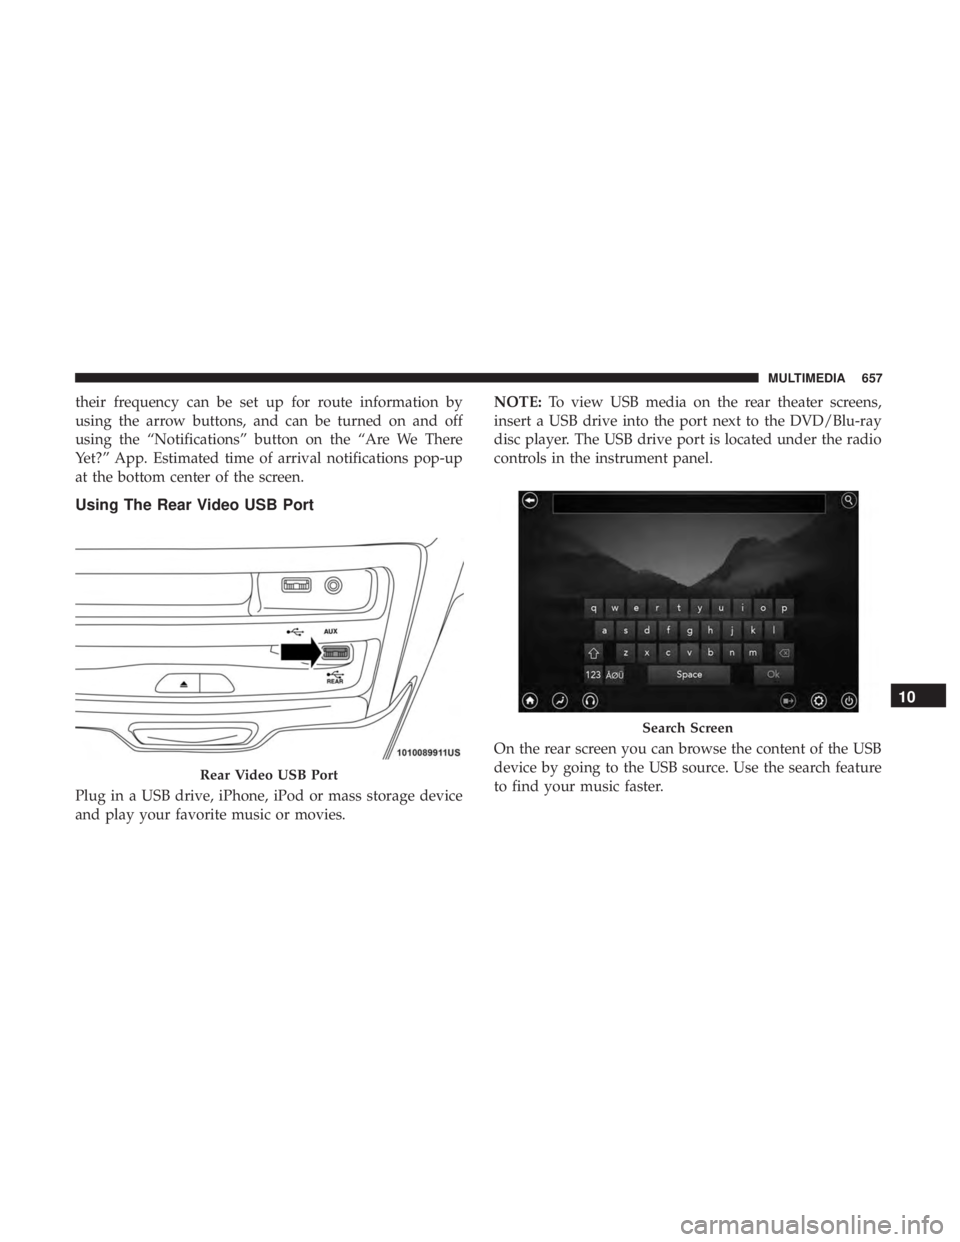
Using The Rear Video USB Port
Plug in a USB drive, iPhone, iPod or mass storage device
and play your favorite music or movies.NOTE:
To view USB media on the rear theater screens,
insert a USB drive into the port next to the DVD/Blu-ray
disc player. The USB drive port is located under the radio
controls in the instrument panel.
On the rear screen you can browse the content of the USB
device by going to the USB source. Use the search feature
to find your music faster.
Rear Video USB Port
Search Screen
10
MULTIMEDIA 657
Page 713 of 718
Tilting.............................. .50, 52
Security Alarm ........................... .209
Arm The System ..........................35
Disarm The System ........................35
Selection Of Coolant (Antifreeze) ...............577
Sentry Key Key Programming .........................34
Sentry Key (Immobilizer) ......................33
Sentry Key Replacement ......................34
Service Assistance ......................... .694
Service Contract .......................... .696
Service Manuals .......................... .698
Shifting Automatic Transmission ....................335
Shoulder Belts ............................ .249
Side View Mirror Adjustment ...................92
Signals, Turn .....................97, 215, 315, 453
Siri .................................... .686
SiriusXM Guardian Vehicle Health Alert ...................... .685
SmartBeams ...............................98
Snow Chains (Tire Chains) ....................559
Snow Tires .............................. .555
Spare Tires .....................467, 555, 556, 557
Spark Plugs ............................. .577Specifications
Oil.................................. .577
Speed Control Accel/Decel (ACC Only) ...................353
Cancel ............................... .348
Resume .............................. .348
Speed Control (Cruise Control) ..............346, 348
Starting .............................. .30, 321
Button .................................28
Cold Weather .......................... .326
Engine Fails To Start ..................... .326
Remote ................................30
Starting And Operating ..................... .321
Starting Procedures ........................ .321
Steering ................................ .341
Tilt Column .............................90
Wheel,
Heated ...........................90
Wheel, Tilt ..............................90
Steering Wheel Audio Controls .................639
Steering Wheel Mounted Sound System Controls . . . .639
Storage, Vehicle ........................... .136
Stow ‘n Go (Fold In Floor) Seats .................63
Stow ‘n Vac .............................. .152
Stuck, Freeing ............................ .501
Sunglasses Storage ......................... .180
12
INDEX 711