phone CHRYSLER PACIFICA 2020 User Guide
[x] Cancel search | Manufacturer: CHRYSLER, Model Year: 2020, Model line: PACIFICA, Model: CHRYSLER PACIFICA 2020Pages: 516, PDF Size: 28.69 MB
Page 399 of 516

MULTIMEDIA
UCONNECT SYSTEMS
For detailed information about your Uconnect
4/4C/4C Nav With 8.4-inch Display system, refer
to your Uconnect Owner’s Manual Supplement.
NOTE:
Uconn")
397
(Continued)
MULTIMEDIA
UCONNECT SYSTEMS
For detailed information about your Uconnect
4/4C/4C Nav With 8.4-inch Display system, refer
to your Uconnect Owner’s Manual Supplement.
NOTE:
Uconnect screen images are for illustration
purposes only and may not reflect exact soft-
ware for your vehicle.
CYBERSECURITY
Your vehicle may be a connected vehicle and
may be equipped with both wired and wireless
networks. These networks allow your vehicle to
send and receive information. This information
allows systems and features in your vehicle to
function properly.
Your vehicle may be equipped with certain
security features to reduce the risk of
unauthorized and unlawful access to vehicle
systems and wireless communications. Vehicle
software technology continues to evolve over
time and FCA US LLC, working with its suppliers,
evaluates and takes appropriate steps as
needed. Similar to a computer or other devices, your vehicle may require software updates to
improve the usability and performance of your
systems or to reduce the potential risk of
unauthorized and unlawful access to your
vehicle systems.
The risk of unauthorized and unlawful access to
your vehicle systems may still exist, even if the
most recent version of vehicle software (such as
Uconnect software) is installed.
NOTE:
FCA US LLC or your dealer may contact you
directly regarding software updates.
To help further improve vehicle security and
minimize the potential risk of a security
breach, vehicle owners should:
Routinely check www.driveuconnect.com
(US Residents) or www.driveuconnect.ca
(Canadian Residents) to learn about
available Uconnect software updates.
Only connect and use trusted media
devices (e.g. personal mobile phones,
USBs, CDs).
WARNING!
It is not possible to know or to predict all of
the possible outcomes if your vehicle’s
systems are breached. It may be possible
that vehicle systems, including safety related
systems, could be impaired or a loss of
vehicle control could occur that may result in
an accident involving serious injury or death.
ONLY insert media (e.g., USB, SD card, or CD)
into your vehicle if it came from a trusted
source. Media of unknown origin could
possibly contain malicious software, and if
installed in your vehicle, it may increase the
possibility for vehicle systems to be breached.
As always, if you experience unusual
vehicle behavior, take your vehicle to your
nearest authorized dealer immediately.
WARNING!
(Continued)
9
20_RU_OM_EN_US_t.book Page 397
Page 403 of 516
MULTIMEDIA401
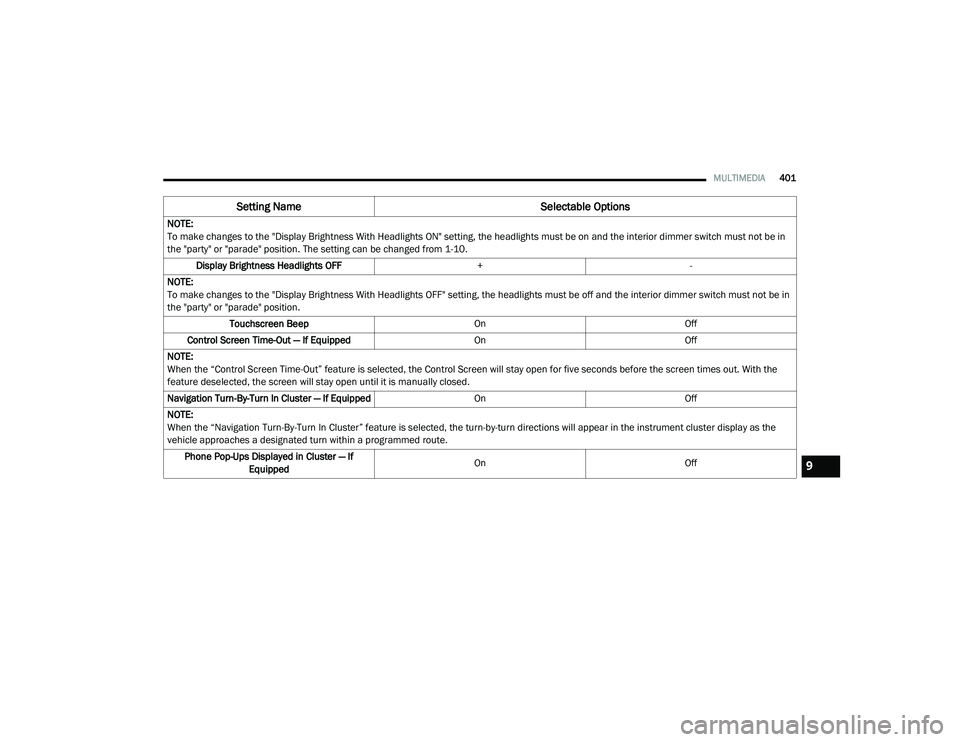
NOTE:
To make changes to the "Display Brightness With Headlights ON" setting, the headlights must be on and the interior dimmer switch must not be in
the "party" or "parade" position. The setting can be changed from 1-10.
Display Brightness Headlights OFF +-
NOTE:
To make changes to the "Display Brightness With Headlights OFF" setting, the headlights must be off and the interior dimmer switch must not be in
the "party" or "parade" position. Touchscreen Beep OnOff
Control Screen Time-Out — If Equipped OnOff
NOTE:
When the “Control Screen Time-Out” feature is selected, the Control Screen will stay open for five seconds before the screen times out. With the
feature deselected, the screen will stay open until it is manually closed.
Navigation Turn-By-Turn In Cluster — If Equipped OnOff
NOTE:
When the “Navigation Turn-By-Turn In Cluster” feature is selected, the turn-by-turn directions will appear in the instrument cluster display as the
vehicle approaches a designated turn within a programmed route. Phone Pop-Ups Displayed in Cluster — If Equipped On
Off
Setting Name Selectable Options
9
20_RU_OM_EN_US_t.book Page 401
Page 413 of 516

MULTIMEDIA411
Key Off Options
After pressing the Engine Off Options button on the touchscreen, the following settings will be available:
Setting Name Selectable Options
Key Off Power Delay — If Equipped 0 sec
45 sec
5 min 10 min
NOTE:
When the “Engine Off Power Delay” feature is selected, the power window switches, radio, Uconnect phone system (if equipped), DVD video system
(if equipped), power sunroof (if equipped), and power outlets will remain active for up to 10 minutes after the ignition is placed in the OFF position.
Opening either front door will cancel this feature.
Headlight Off Delay 0 sec
30 sec
60 sec 90 sec
NOTE:
When the “Headlight Off Delay” feature is selected, it allows the adjustment of the amount of time the headlights remain on after the engine is shut off. Easy Exit Seat — If Equipped OnOff
NOTE:
When the “Easy Exit Seat” feature is selected, it provides automatic driver seat positioning to enhance driver mobility when entering and exiting the
vehicle.
9
20_RU_OM_EN_US_t.book Page 411
Page 415 of 516

MULTIMEDIA413
Phone/Bluetooth®
After pressing the Phone/Bluetooth® button on the touchscreen, the following settings will be available:
SiriusXM® Setup — If Equipped
After pressing the SiriusXM® Setup button on the touchscreen, the following settings will be available:
Setting Name Selectable Options
Phone Pop-ups Displayed in Cluster OnOff
Do Not Disturb List of Settings
NOTE:
Press “Do Not Disturb” to access the available settings. The following settings are: Auto Reply (Both, Text, Call), Auto Reply Message (Custom, Default),
and Custom Auto Reply Message (Create Message). Paired Phones and Audio Devices List of Paired Phones
NOTE:
This feature shows which phones are paired to the Phone/Bluetooth® system. For further information, refer to the Uconnect Owner’s Manual Supplement.
Setting Name Selectable Options
Tune StartOnOff
Channel Skip List of Channels
NOTE:
SiriusXM® can be programmed to designate a group of channels that are the most desirable to listen to or to exclude undesirable channels while
scanning. This feature allows you to select the channels you would like to skip. Subscription Information Sirius ID
9
20_RU_OM_EN_US_t.book Page 413
Page 422 of 516

420MULTIMEDIA
Units
After pressing the Units button on the touchscreen, the following settings will be available:Touchscreen Beep
OnOff
Control Screen Time-Out — If Equipped On
Off
NOTE:
When the “Control Screen Time-Out” feature is selected, the Control Screen will stay open for five seconds before the screen times out. With the
feature deselected, the screen will stay open until it is manually closed. Navigation Next Turn Pop-ups In Cluster — If Equipped On
Off
NOTE:
When the “Navigation Next Turn Pop-ups In Cluster” feature is selected, the turn-by-turn directions will appear in the instrument cluster display as the
vehicle approaches a designated turn within a programmed route. Phone Pop-Ups Displayed in Cluster On
Off
Ready to Drive Pop-Up — If Equipped On
Off
Setting Name Selectable Options
Setting NameSelectable Options
UnitsUSMetric Custom
NOTE:
The “Custom” option allows you to set the “Speed” (MPH, or km/h), “Distance” (mi, or km), “Fuel Consumption” [MPG (US), MPG (UK), L/100 km, or
km/L], “Pressure” (psi, kPa, or bar), and “Temperature” (°C, or °F) units of measurement independently.
20_RU_OM_EN_US_t.book Page 420
Page 433 of 516

MULTIMEDIA431
Audio
After pressing the Audio button on the touchscreen, the following settings will be available:NOTE:
When the “Engine Off Power Delay” feature is selected, the power window switches, radio, Uconnect phone system (if equipped), DVD video system
(if equipped), power sunroof (if equipped), and power outlets will remain active for up to 10 minutes after the ignition is cycled to OFF. Opening either
front door will cancel this feature.
Headlight Off Delay 0 sec
30 sec
60 sec 90 sec
NOTE:
When the “Headlight Off Delay” feature is selected, it allows the adjustment of the amount of time the headlights remain on after the engine is shut off.
Setting Name Selectable Options
Setting NameSelectable Options
Balance/Fade Speaker Icon
NOTE:
When in this display you may adjust the “Balance/Fade” of the audio by pressing and dragging the Speaker Icon toward any location in the box. Equalizer BassMid Treble
NOTE:
When in this display you may adjust the “Bass”, “Mid”, and “Treble” settings. Adjust the settings with the + and – setting buttons on the touchscreen
or by selecting any point on the scale between the + and – buttons on the touchscreen. Bass/Mid/Treble also allow you to simply slide your finger up
or down to change the setting, as well as press directly on the desired setting. Speed Adjusted Volume Off123
Surround Sound — If Equipped OnOff
9
20_RU_OM_EN_US_t.book Page 431
Page 434 of 516

432MULTIMEDIA
Phone/Bluetooth®
After pressing the Phone/Bluetooth® button on the touchscreen, the following settings will be available:AUX Volume Offset — If Equipped
+-
NOTE:
This feature provides the ability to tune the audio level for portable devices connected through the AUX input. Auto Play OnOff
Setting Name Selectable Options
Setting NameSelectable Options
Phone Pop-ups Displayed in Cluster OnOff
Do Not Disturb List Of Settings
NOTE:
Press “Do Not Disturb” to access the available settings. The following settings are: Auto Reply (Both, Text, Call), Auto Reply Message (Custom, Default),
and Custom Auto Reply Message (Create Message). Paired Phones And Audio Devices List Of Paired Phones
NOTE:
This feature shows which phones and audio devices are paired to the Phone/Bluetooth® system. For further information, refer to the Uconnect
Owner’s Manual Supplement. Smartphone Projection Manager OnOff
20_RU_OM_EN_US_t.book Page 432
Page 438 of 516

436MULTIMEDIA
SAFETY AND GENERAL INFORMATION
Safety Guidelines
Ensure that all persons read this manual
carefully before using the system. It contains
instructions on how to use the system in a safe
and effective manner.
Do NOT attach any object to the touchscreen.
Doing so can result in damage to the
touchscreen.
Please read and follow these safety
precautions. Failure to do so may result in injury
or property damage.
Glance at the screen only when safe to do so.
If prolonged viewing of the screen is required,
park in a safe location and set the parking
brake.
Stop use immediately if a problem occurs.
Failure to do so may cause injury or damage
to the product. Return it to an authorized
dealer for repair.
Ensure the volume level of the system is set
to a level that still allows you to hear outside
traffic and emergency vehicles.
Safe Usage Of The Uconnect System
Read all instructions in this manual carefully
before using your system to ensure proper
usage.
The Uconnect system is a sophisticated elec -
tronic device. Do not let young children use
the system.
Permanent hearing loss may occur if you play
your music or the system at loud volumes.
Exercise caution when setting the volume on
the system.
Keep drinks, rain and other sources of mois -
ture away from the system. Besides damage
to the system, moisture can cause electric
shocks as with any electronic device. NOTE:
Many features of this system are speed depen
-
dent. For your own safety, it is not possible to
use some of the touchscreen features while the
vehicle is in motion.
Exposure To Radio Frequency Radiation
The internal wireless radio operates within
guidelines found in radio frequency safety
standards and recommendations, which reflect
the consensus of the scientific community. The
radio manufacturer believes the internal
wireless radio is safe for use by consumers. The
level of energy emitted is far less than the
electromagnetic energy emitted by wireless
devices such as mobile phones. However, the
use of wireless radios may be restricted in some
situations or environments, such as aboard
airplanes. If you are unsure of restrictions, you
are encouraged to ask for authorization before
turning on the wireless radio.
WARNING!
ALWAYS drive safely with your hands on the
steering wheel. You have full responsibility
and assume all risks related to the use of the
Uconnect features and applications in this
vehicle. Only use Uconnect when it is safe to
do so. Failure to do so may result in an
accident involving serious injury or death.
20_RU_OM_EN_US_t.book Page 436
Page 439 of 516
,
which could scratch the touchscreen surface!
Do n")
MULTIMEDIA437
Care And Maintenance
Touchscreen
Do not press the touchscreen with any hard or
sharp objects (pen, USB stick, jewelry, etc.),
which could scratch the touchscreen surface!
Do not spray any liquid or caustic chemicals
directly on the screen! Use a clean and dry
microfiber lens cleaning cloth in order to
clean the touchscreen.
If necessary, use a lint-free cloth dampened
with a cleaning solution, such as isopropyl
alcohol or an isopropyl alcohol and water solu -
tion ratio of 50:50. Be sure to follow the solvent
manufacturer's precautions and directions.
UCONNECT 4 WITH 7-INCH DISPLAY
Introduction
Uconnect 4 With 7-Inch Display
Uconnect 4 With 7-inch Display
NOTE:
Uconnect screen images are for illustration
purposes only and may not reflect exact soft -
ware for your vehicle.
1. Radio
Press the Radio button on the touchscreen
to enter Radio Mode. The different tuner
modes: AM, FM, and SXM can be selected
by pressing the corresponding buttons on
the touchscreen in Radio Mode.
2. Media Press the Media button on the touchscreen
to access media sources such as USB De -
vice, AUX, and Bluetooth® as long as the re -
quested media is present.
3. Climate Refer to “Climate Controls” in “Getting To
Know Your Vehicle” for further details.
4. Apps Press the Apps button on the touchscreen
to access Smartphone and Connected vehi -
cle options.
9
20_RU_OM_EN_US_t.book Page 437
Page 440 of 516
.
6. Phone Press the Phone button on the touc")
438MULTIMEDIA
5. Controls
Press the Controls button on the touch -
screen to adjust the heated and vented
seats or heated steering wheel (If
Equipped).
6. Phone Press the Phone button on the touchscreen
to access the Uconnect Phone feature.
7. Settings Press the Settings button on the touch -
screen to access the Uconnect Settings
menu.Drag & Drop Menu Bar
The Uconnect features and services in the main
menu bar are easily changed for your
convenience. Simply follow these steps:
Uconnect 4 Main Menu
1. Press the Apps button to open the App screen.
2. Press and hold, then drag the selected App to replace an existing shortcut in the main
menu bar. The new app shortcut, that was dragged down
onto the main menu bar, will now be an active
App/shortcut.
NOTE:
This feature is only available if the vehicle is in
PARK.
Radio Mode
Radio Controls
The radio is equipped with the following modes:
AM
FM
SiriusXM® Satellite Radio – If Equipped
Press the Radio button on the touchscreen,
bottom left corner, to enter the Radio Mode. The
different tuner modes, AM, FM, and SXM, can
then be selected by pressing the corresponding
buttons in the Radio mode.
20_RU_OM_EN_US_t.book Page 438