CHRYSLER PACIFICA 2020 Owners Manual
Manufacturer: CHRYSLER, Model Year: 2020, Model line: PACIFICA, Model: CHRYSLER PACIFICA 2020Pages: 516, PDF Size: 28.69 MB
Page 251 of 516
STARTING AND OPERATING249
Service ACC/FCW Warning
If the system turns off, and the instrument
cluster displays “ACC/FCW Unavailable Service
Required” or “Cruise/FCW Unavailable Service
Required”, there may be an internal system
fault or a temporary malfunction that limits ACC
functionality. Although the vehicle is still
drivable under normal conditions, ACC will be
temporarily unavailable. If this occurs, try
activating ACC again later, following an ignition
cycle. If the problem persists, see an authorized
dealer.
Precautions While Driving With ACC
In certain driving situations, ACC may have
detection issues. In these cases, ACC may
brake late or unexpectedly. The driver needs to
stay alert and may need to intervene.
Towing A Trailer
Towing a trailer is not advised when using ACC.
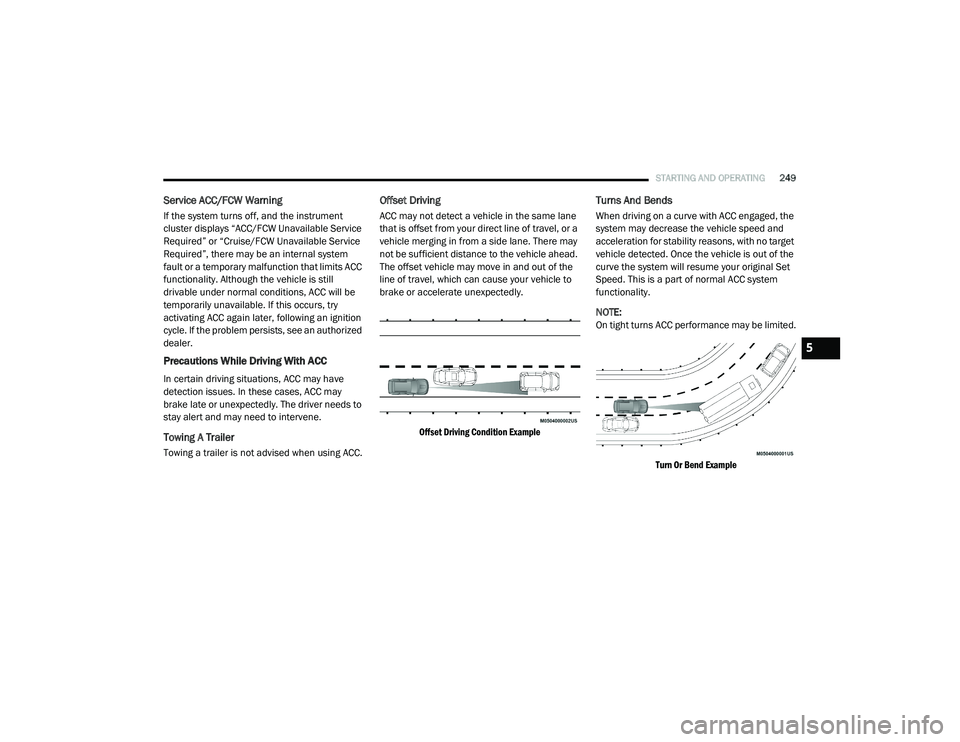
Offset Driving
ACC may not detect a vehicle in the same lane
that is offset from your direct line of travel, or a
vehicle merging in from a side lane. There may
not be sufficient distance to the vehicle ahead.
The offset vehicle may move in and out of the
line of travel, which can cause your vehicle to
brake or accelerate unexpectedly.
Offset Driving Condition Example
Turns And Bends
When driving on a curve with ACC engaged, the
system may decrease the vehicle speed and
acceleration for stability reasons, with no target
vehicle detected. Once the vehicle is out of the
curve the system will resume your original Set
Speed. This is a part of normal ACC system
functionality.
NOTE:
On tight turns ACC performance may be limited.
Turn Or Bend Example
5
20_RU_OM_EN_US_t.book Page 249
Page 252 of 516
250STARTING AND OPERATING
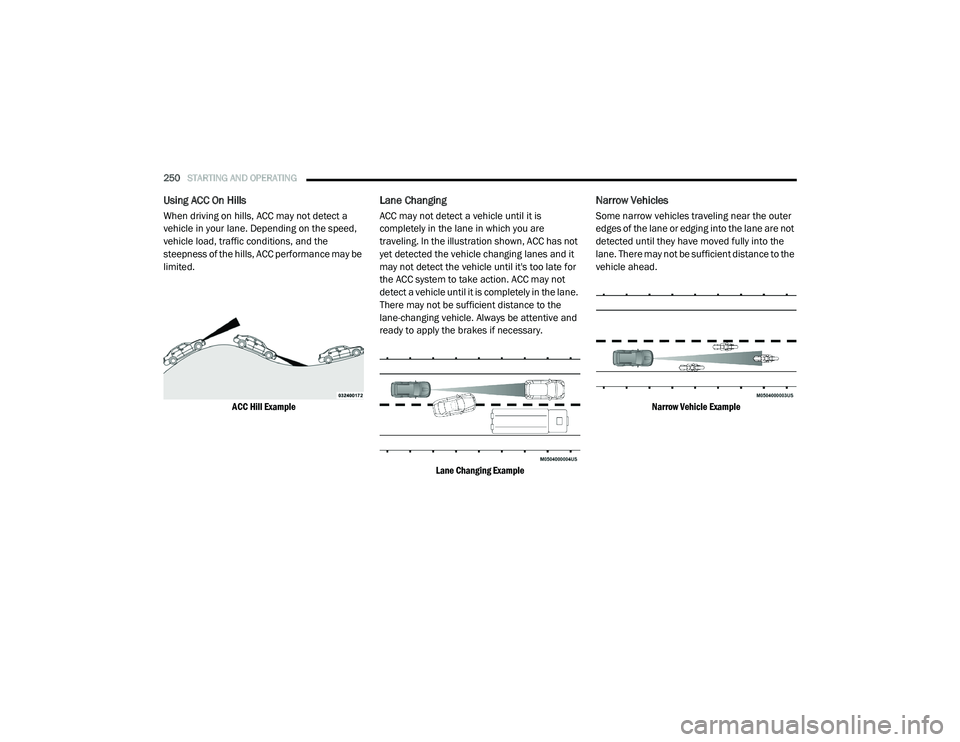
Using ACC On Hills
When driving on hills, ACC may not detect a
vehicle in your lane. Depending on the speed,
vehicle load, traffic conditions, and the
steepness of the hills, ACC performance may be
limited.
ACC Hill Example
Lane Changing
ACC may not detect a vehicle until it is
completely in the lane in which you are
traveling. In the illustration shown, ACC has not
yet detected the vehicle changing lanes and it
may not detect the vehicle until it's too late for
the ACC system to take action. ACC may not
detect a vehicle until it is completely in the lane.
There may not be sufficient distance to the
lane-changing vehicle. Always be attentive and
ready to apply the brakes if necessary.
Lane Changing Example
Narrow Vehicles
Some narrow vehicles traveling near the outer
edges of the lane or edging into the lane are not
detected until they have moved fully into the
lane. There may not be sufficient distance to the
vehicle ahead.
Narrow Vehicle Example
20_RU_OM_EN_US_t.book Page 250
Page 253 of 516
STARTING AND OPERATING251
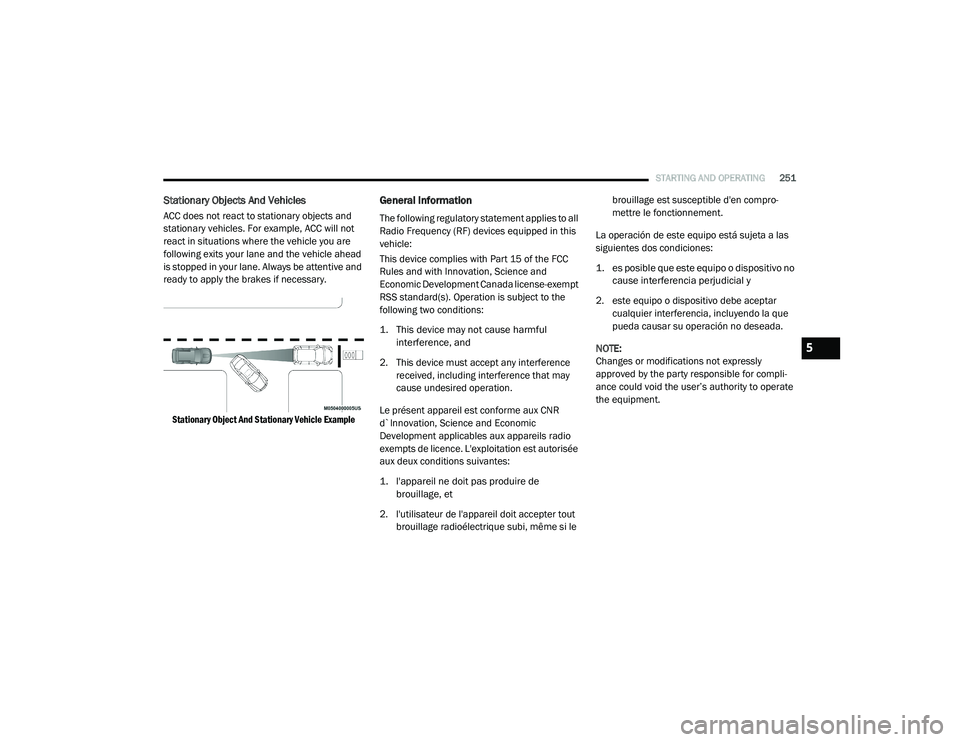
Stationary Objects And Vehicles
ACC does not react to stationary objects and
stationary vehicles. For example, ACC will not
react in situations where the vehicle you are
following exits your lane and the vehicle ahead
is stopped in your lane. Always be attentive and
ready to apply the brakes if necessary.
Stationary Object And Stationary Vehicle Example
General Information
The following regulatory statement applies to all
Radio Frequency (RF) devices equipped in this
vehicle:
This device complies with Part 15 of the FCC
Rules and with Innovation, Science and
Economic Development Canada license-exempt
RSS standard(s). Operation is subject to the
following two conditions:
1. This device may not cause harmful interference, and
2. This device must accept any interference received, including interference that may
cause undesired operation.
Le présent appareil est conforme aux CNR
d`Innovation, Science and Economic
Development applicables aux appareils radio
exempts de licence. L'exploitation est autorisée
aux deux conditions suivantes:
1. l'appareil ne doit pas produire de brouillage, et
2. l'utilisateur de l'appareil doit accepter tout brouillage radioélectrique subi, même si le brouillage est susceptible d'en compro
-
mettre le fonctionnement.
La operación de este equipo está sujeta a las
siguientes dos condiciones:
1. es posible que este equipo o dispositivo no cause interferencia perjudicial y
2. este equipo o dispositivo debe aceptar cualquier interferencia, incluyendo la que
pueda causar su operación no deseada.
NOTE:
Changes or modifications not expressly
approved by the party responsible for compli -
ance could void the user’s authority to operate
the equipment.
5
20_RU_OM_EN_US_t.book Page 251
Page 254 of 516
252STARTING AND OPERATING
Normal (Fixed Speed) Cruise Control Mode
In addition to Adaptive Cruise Control mode, a
Normal (Fixed Speed) Cruise Control mode is
available for cruising at fixed speeds. The
Normal (Fixed Speed) Cruise Control mode is
designed to maintain a set cruising speed
without requiring the driver to operate the
accelerator. Cruise Control can only be
operated if the vehicle speed is above 20 mph
(32 km/h).
To change between the different control modes,
push the Adaptive Cruise Control (ACC) on/off
button which turns the ACC and the Normal
(Fixed Speed) Cruise Control off. Pushing the
Normal (Fixed Speed) Cruise Control on/off
button will result in turning on (changing to) the
Normal (Fixed Speed) Cruise Control mode.
To Set A Desired Speed
Turn the Normal (Fixed Speed) Cruise
Control on. When the vehicle has
reached the desired speed, push the
SET (+) or SET (-) button and release.
Release the accelerator and the vehicle will
operate at the selected speed. Once a speed
has been set a message “CRUISE CONTROL SET
TO MPH (km/h)” will appear indicating what
speed was set. This light will turn on when the
system is turned on via the on/off control. It
turns green when the cruise control is set.
To Vary The Speed Setting
To Increase Speed
When the Normal (Fixed Speed) Cruise Control
is set, you can increase speed by pushing the
SET (+) button.
The driver’s preferred units can be selected
through the instrument cluster. Refer to
“Instrument Cluster Display” in “Getting To
Know Your Instrument Panel” for more
information. The speed increment shown is
dependent on the speed of U.S. (mph) or Metric
(km/h) units:
U.S. Speed (mph)
Pushing the SET (+) button once will result in
a 1 mph increase in set speed. Each subse -
quent tap of the button results in an increase
of 1 mph.
If the button is continually pushed, the set
speed will continue to increase in 5 mph
increments until the button is released. The
increase in set speed is reflected in the
instrument cluster display.
WARNING!
In the Normal (Fixed Speed) Cruise Control
mode, the system will not react to vehicles
ahead. In addition, the proximity warning
does not activate and no alarm will sound
even if you are too close to the vehicle ahead
since neither the presence of the vehicle
ahead nor the vehicle-to-vehicle distance is
detected. Be sure to maintain a safe distance
between your vehicle and the vehicle ahead.
Always be aware which mode is selected.
20_RU_OM_EN_US_t.book Page 252
Page 255 of 516
STARTING AND OPERATING253
Metric Speed (km/h)
Pushing the SET (+) button once will result in a
1 km/h increase in set speed. Each subsequent
tap of the button results in an increase of 1 km/h.
If the button is continually pushed, the set
speed will continue to increase in 10 km/h
increments until the button is released. The
increase in set speed is reflected in the
instrument cluster display.
To Decrease Speed
When the Normal (Fixed Speed) Cruise Control
is set, you can decrease speed by pushing the
SET (-) button.
The driver’s preferred units can be selected
through the instrument cluster. Refer to
“Instrument Cluster Display” in “Getting To
Know Your Instrument Panel” for more
information. The speed decrement shown is
dependent on the speed of U.S. (mph) or Metric
(km/h) units:
U.S. Speed (mph)
Pushing the SET (-) button once will result in
a 1 mph decrease in set speed. Each subse -
quent tap of the button results in a decrease
of 1 mph.
If the button is continually pushed, the set
speed will continue to decrease in 5 mph
decrements until the button is released. The
decrease in set speed is reflected in the
instrument cluster display.
Metric Speed (km/h)
Pushing the SET (-) button once will result in
a 1 km/h decrease in set speed. Each subse -
quent tap of the button results in a decrease
of 1 km/h.
If the button is continually pushed, the set
speed will continue to decrease in 10 km/h
decrements until the button is released. The
decrease in set speed is reflected in the
instrument cluster display.
To Cancel
The following conditions will cancel the Normal
(Fixed Speed) Cruise Control without clearing
the memory:
The brake pedal is applied.
The CANC (cancel) button is pushed.
The Electronic Stability Control/Traction
Control System (ESC/TCS) activates.
The vehicle parking brake is applied.
The braking temperature exceeds normal
range (overheated).
The gear selector is removed from the DRIVE
position.
To Resume Speed
To resume a previously set speed, push the RES
button and release. Resume can be used at any
speed above 20 mph (32 km/h).
To Turn Off
The system will turn off and erase the set speed
in memory if:
The Normal (Fixed Speed) Cruise Control on/
off button is pushed.
The ignition is placed in the OFF position.
The Adaptive Cruise Control (ACC) on/off
button is pushed.
5
20_RU_OM_EN_US_t.book Page 253
Page 256 of 516
254STARTING AND OPERATING
PARKSENSE REAR PARK ASSIST — IF
EQUIPPED
The ParkSense Rear Park Assist system
provides visual and audible indications of the
distance between the rear fascia and a
detected obstacle when backing up (e.g. during
a parking maneuver). If your vehicle is equipped
with an Automatic Transmission, the vehicle
brakes may be automatically applied and
released when performing a reverse parking
maneuver if the system detects a possible
collision with an obstacle.
NOTE:
The driver can override the automatic
braking function by pressing the gas pedal,
turning ParkSense off via ParkSense switch,
or changing the gear while the automatic
brakes are being applied.
Automatic brakes will not be available if ESC
is not available.
Automatic brakes will not be available if there
is a faulted condition detected with the Park -
Sense Park Assist system or the Braking
System Module.
The automatic braking function may not provide
enough vehicle deceleration to avoid colliding
with a detected obstacle depending on vehicle
speed, road conditions, and brake capability.
The automatic braking function may not be
applied fast enough for moving obstacles that
approach the rear of the vehicle from the left
and/or right sides.
The automatic braking function can be
enabled/disabled from the Customer-Program -
mable Features section of the Uconnect
System.
ParkSense will retain its last known configura -
tion state for the automatic braking function
through ignition cycles.
The automatic braking function is intended to
assist the driver in avoiding possible collisions
with detected obstacles when backing up in
REVERSE gear.
NOTE:
The driver is always responsible for
controlling the vehicle.
The system is provided to assist the driver
and not to substitute the driver.
The driver must stay in full control of the
vehicle's acceleration and braking and is
responsible for the vehicle's movements.
Refer to “ParkSense System Usage
Precautions” for limitations of this system and
recommendations.
ParkSense will retain the last system state
(enabled or disabled) from the last ignition cycle
when the ignition is changed to the ON/RUN
position.
ParkSense can be active only when the gear
selector is in REVERSE. If ParkSense is enabled
at this gear selector position, the system will
remain active until the vehicle speed is
increased to approximately 7 mph (11 km/h) or
above. When in REVERSE and above the
system's operating speed, a warning will appear
within the instrument cluster display indicating
the vehicle speed is too fast. The system will
become active again if the vehicle speed is
decreased to speeds less than approximately
6 mph (9 km/h).
20_RU_OM_EN_US_t.book Page 254
Page 257 of 516
STARTING AND OPERATING255
ParkSense Sensors
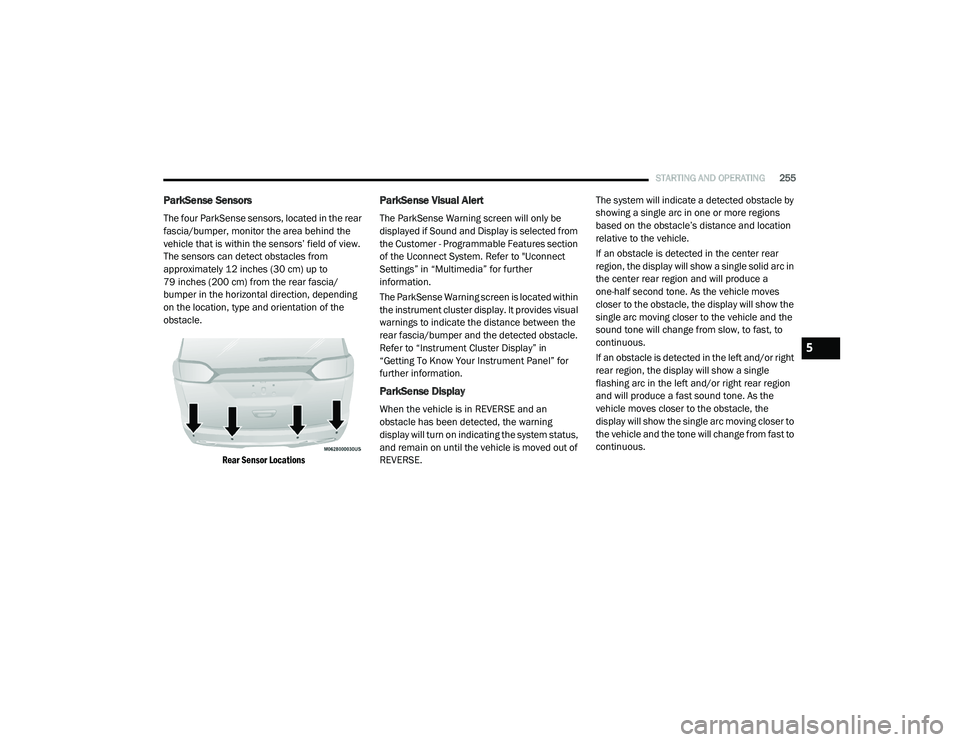
The four ParkSense sensors, located in the rear
fascia/bumper, monitor the area behind the
vehicle that is within the sensors’ field of view.
The sensors can detect obstacles from
approximately 12 inches (30 cm) up to
79 inches (200 cm) from the rear fascia/
bumper in the horizontal direction, depending
on the location, type and orientation of the
obstacle.
Rear Sensor Locations
ParkSense Visual Alert
The ParkSense Warning screen will only be
displayed if Sound and Display is selected from
the Customer - Programmable Features section
of the Uconnect System. Refer to "Uconnect
Settings” in “Multimedia” for further
information.
The ParkSense Warning screen is located within
the instrument cluster display. It provides visual
warnings to indicate the distance between the
rear fascia/bumper and the detected obstacle.
Refer to “Instrument Cluster Display” in
“Getting To Know Your Instrument Panel” for
further information.
ParkSense Display
When the vehicle is in REVERSE and an
obstacle has been detected, the warning
display will turn on indicating the system status,
and remain on until the vehicle is moved out of
REVERSE. The system will indicate a detected obstacle by
showing a single arc in one or more regions
based on the obstacle’s distance and location
relative to the vehicle.
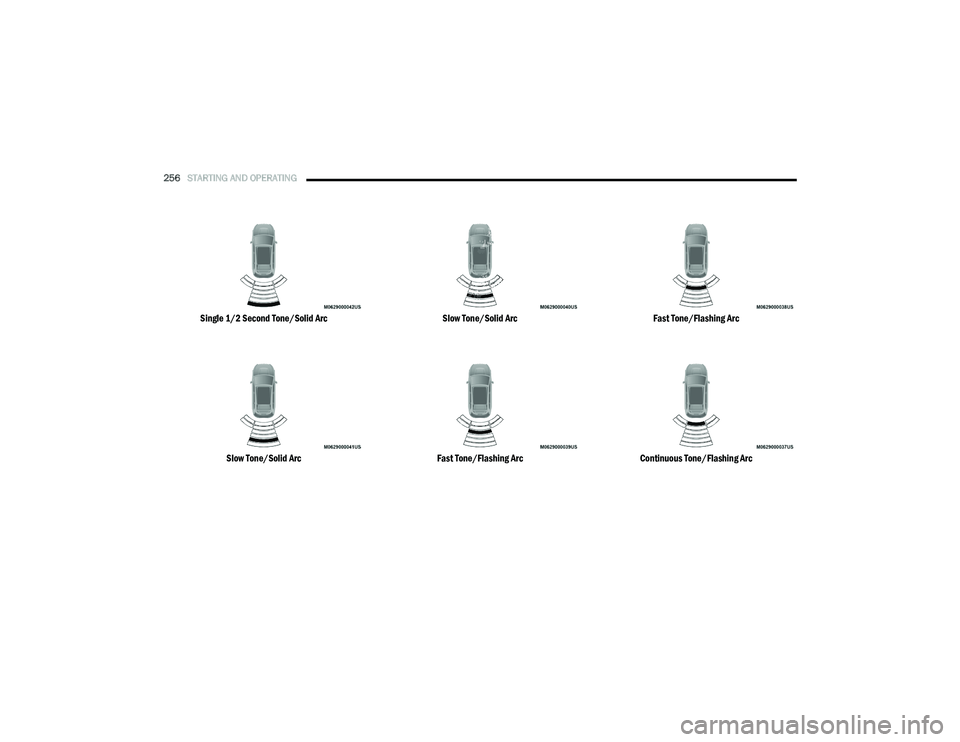
If an obstacle is detected in the center rear
region, the display will show a single solid arc in
the center rear region and will produce a
one-half second tone. As the vehicle moves
closer to the obstacle, the display will show the
single arc moving closer to the vehicle and the
sound tone will change from slow, to fast, to
continuous.
If an obstacle is detected in the left and/or right
rear region, the display will show a single
flashing arc in the left and/or right rear region
and will produce a fast sound tone. As the
vehicle moves closer to the obstacle, the
display will show the single arc moving closer to
the vehicle and the tone will change from fast to
continuous.
5
20_RU_OM_EN_US_t.book Page 255
Page 258 of 516
256STARTING AND OPERATING
Single 1/2 Second Tone/Solid Arc
Slow Tone/Solid Arc Slow Tone/Solid Arc
Fast Tone/Flashing Arc Fast Tone/Flashing Arc
Continuous Tone/Flashing Arc
20_RU_OM_EN_US_t.book Page 256
Page 259 of 516
STARTING AND OPERATING257
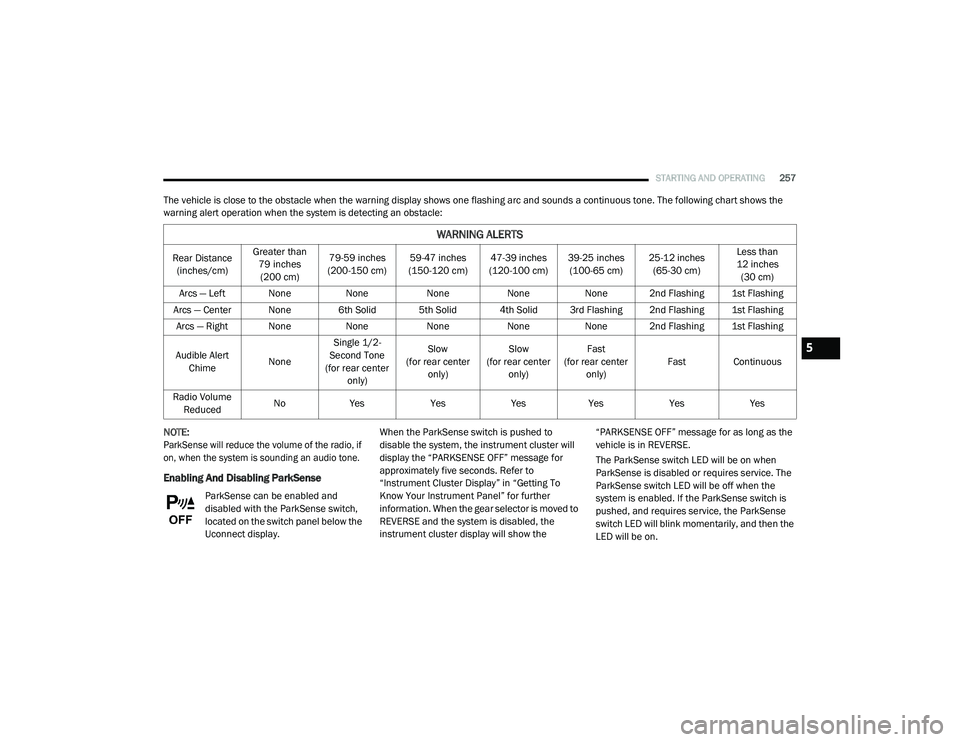
The vehicle is close to the obstacle when the warning display shows one flashing arc and sounds a continuous tone. The following chart shows the
warning alert operation when the system is detecting an obstacle:
NOTE:
ParkSense will reduce the volume of the radio, if
on, when the system is sounding an audio tone.
Enabling And Disabling ParkSense
ParkSense can be enabled and
disabled with the ParkSense switch,
located on the switch panel below the
Uconnect display. When the ParkSense switch is pushed to
disable the system, the instrument cluster will
display the “PARKSENSE OFF” message for
approximately five seconds. Refer to
“Instrument Cluster Display” in “Getting To
Know Your Instrument Panel” for further
information. When the gear selector is moved to
REVERSE and the system is disabled, the
instrument cluster display will show the “PARKSENSE OFF” message for as long as the
vehicle is in REVERSE.
The ParkSense switch LED will be on when
ParkSense is disabled or requires service. The
ParkSense switch LED will be off when the
system is enabled. If the ParkSense switch is
pushed, and requires service, the ParkSense
switch LED will blink momentarily, and then the
LED will be on.
WARNING ALERTS
Rear Distance
(inches/cm) Greater than
79 inches (200 cm) 79-59 inches
(200-150 cm) 59-47 inches
(150-120 cm) 47-39 inches
(120-100 cm) 39-25 inches
(100-65 cm) 25-12 inches
(65-30 cm) Less than
12 inches (30 cm)
Arcs — Left None NoneNoneNoneNone 2nd Flashing 1st Flashing
Arcs — Center None 6th Solid 5th Solid 4th Solid 3rd Flashing 2nd Flashing 1st Flashing Arcs — Right None NoneNoneNoneNone 2nd Flashing 1st Flashing
Audible Alert Chime NoneSingle 1/2-
Second Tone
(for rear center only) Slow
(for rear center only) Slow
(for rear center only) Fast
(for rear center only) Fast Continuous
Radio Volume Reduced No
Yes YesYesYes YesYes
5
20_RU_OM_EN_US_t.book Page 257
Page 260 of 516
258STARTING AND OPERATING
NOTE:
When the KeySense feature is in use, the Park -
Sense System will reject customer input to turn
the system off via the switch. The instrument
cluster display will show the "KeySense in Use
Selected Feature Cannot be Disabled"
message.
Service The ParkSense Rear Park Assist
System
During vehicle start-up, when the ParkSense
Rear Park Assist System has detected a faulted
condition, the instrument cluster will actuate a
single chime, once per ignition cycle, and it will
display the “PARKSENSE UNAVAILABLE WIPE
REAR SENSORS” or the “PARKSENSE
UNAVAILABLE SERVICE REQUIRED” message.
Refer to “Instrument Cluster Display” in “Getting
To Know Your Instrument Panel” for further
information. When the gear selector is moved to
REVERSE and the system has detected a faulted
condition, the instrument cluster display will
show the "PARKSENSE UNAVAILABLE WIPE REAR
SENSORS" or "PARKSENSE UNAVAILABLE
SERVICE REQUIRED" message for five seconds
while the vehicle is in REVERSE. Under this
condition, ParkSense will not operate and
“PARKSENSE OFF” message will be displayed.
If “PARKSENSE UNAVAILABLE WIPE REAR
SENSORS” appears in the instrument cluster
display, make sure the outer surface and the
underside of the rear fascia/bumper is clean
and clear of snow, ice, mud, dirt, or other
obstruction and then cycle the ignition. If the
message continues to appear, see an
authorized dealer.
If “PARKSENSE UNAVAILABLE SERVICE
REQUIRED” appears in the instrument cluster
display, see an authorized dealer.
Cleaning The ParkSense System
Clean the ParkSense sensors with water, car
wash soap, and a soft cloth. Do not use rough or
hard cloths. Do not scratch or poke the sensors.
Otherwise, you could damage the sensors.
ParkSense System Usage Precautions
NOTE:
Ensure that the rear bumper is free of snow,
ice, mud, dirt, and debris to keep the Park
-
Sense system operating properly.
Jackhammers, large trucks, and other vibra -
tions could affect the performance of Park -
Sense.
When you turn ParkSense off, the instrument
cluster will display “PARKSENSE OFF”.
Furthermore, once you turn ParkSense off, it
remains off until you turn it on again, even if
you cycle the ignition.
When you move the gear selector to the
REVERSE position and ParkSense is turned
off, the instrument cluster display will show
“PARKSENSE OFF” message for as long as
the vehicle is in REVERSE.
ParkSense, when on, will reduce the volume
of the radio when it is sounding a tone.
Clean the ParkSense sensors regularly,
taking care not to scratch or damage them.
The sensors must not be covered with ice,
snow, slush, mud, dirt, or debris. Failure to do
so can result in the system not working prop -
erly. The ParkSense system might not detect
an obstacle behind the fascia/bumper, or it
could provide a false indication that an
obstacle is behind the fascia/bumper.
20_RU_OM_EN_US_t.book Page 258