phone CHRYSLER PACIFICA 2021 Owners Manual
[x] Cancel search | Manufacturer: CHRYSLER, Model Year: 2021, Model line: PACIFICA, Model: CHRYSLER PACIFICA 2021Pages: 401, PDF Size: 26.88 MB
Page 2 of 401

WARNING: Operating, servicing and maintaining a passenger vehicle or off-highway motor vehicle can
expose you to chemicals including engine exhaust, carbon monoxide, phthalates, and lead, which are known to
the State of California to cause cancer and birth defects or other reproductive harm. To minimize exposure,
avoid breathing exhaust, do not idle the engine except as necessary, service your vehicle in a well-ventilated area
and wear gloves or wash your hands frequently when servicing your vehicle. For more information go to
www.P65Warnings.ca.gov/passenger-vehicle.
This Owner’s Manual illustrates and describes the operation of features and equipment that are either standard or optional on this vehicle. This manual may also include a
description of features and equipment that are no longer available or were not ordered on this vehicle. Please disregard any features and equipment described in this manual that
are not on this vehicle. FCA US LLC reserves the right to make changes in design and specifications, and/or make additions to or improvements to its products without imposing
any obligation upon itself to install them on products previously manufactured.
With respect to any vehicles sold in Canada, the name FCA US LLC shall be deemed to be deleted and the name FCA Canada Inc. used in substitution therefore.
This Owner’s Manual is intended to familiarize you with the important features of your vehicle. Your most up-to-date Owner’s Manual, Navigation/ Uconnect manuals and Warranty
Booklet can be found by visiting the website on the back cover.
U.S. Residents: If you are the first registered retail owner of your vehicle, you may obtain a complimentary printed copy of the Warranty Booklet by calling 1-800-247-9753 or by
contacting your dealer. Replacement kits can be purchased by visiting www.techauthority.com.
Canadian Residents: If you are the first registered retail owner of your vehicle, you may obtain a complimentary printed copy of the Warranty Booklet or purchase a replacement
kit by calling 1-800-387-1143 or by contacting your dealer.
The driver’s primary responsibility is the safe operation of the vehicle. Driving while distracted can result in loss of vehicle control, resulting in an accident and personal injury.
FCA US LLC strongly recommends that the driver use extreme caution when using any device or feature that may take their attention off the road. Use of any electrical devices,
such as cellular telephones, computers, portable radios, vehicle navigation or other devices, by the driver while the vehicle is moving is dangerous and could lead to a serious
accident. Texting while driving is also dangerous and should never be done while the vehicle is moving. If you find yourself unable to devote your full attention to vehicle
operation, pull off the road to a safe location and stop your vehicle. Some states or provinces prohibit the use of cellular telephones or texting while driving. It is always the driver’s
responsibility to comply with all local laws.
This Owner’s Manual has been prepared to help you get acquainted with your new Chrysler brand vehicle and to provide a convenient reference source for common questions.
Not all features shown in this manual may apply to your vehicle. For additional information, visit mopar.com/om (U.S.), owners.mopar.ca (Canada) or your local Chrysler
brand dealer.
Drunk driving is one of the most frequent causes of accidents. Your driving ability can be seriously impaired with blood alcohol
levels far below the legal minimum. If you are drinking, don’t drive. Ride with a designated non-drinking driver, call a cab, a friend
or use public transportation.
DRIVING AND ALCOHOL
Driving after drinking can lead to an accident. Your perceptions are less sharp, your reflexes are slower and your
judgment is impaired when you have been drinking. Never drink and then drive.
WARNING!
Page 8 of 401
6
Accessing The System From The
Uconnect Theater Rear Screens .................. 215
Pairing The Remote ....................................... 216
Unpairing The Remote .................................. 216
Media Sources............................................... 216
Uconnect Theater Remote Control............... 217
Uconnect Theater Home Screen And
Controls .......................................................... 218
Play A DVD/Blu-ray™ Or USB Media
File From Uconnect System .......................... 219
Disc Menu ...................................................... 220 Blu-ray™ Controls – Disc-Specific
Functions ....................................................... 221
Uconnect Theater Apps................................. 221Using The Rear Video USB Port .................... 223Play Video Games.......................................... 223
Headphones Operation ................................. 223Display Settings ............................................. 225
Listening To Audio With The Screen
Closed ............................................................ 225
Rear Climate Controls ................................... 225Accessibility — If Equipped............................ 227
Wireless Streaming — If Equipped ............... 227
BD And DVD Region Codes ........................... 229
Product Agreement ....................................... 231
FCC/IC Regulatory Notices ........................... 233 RADIO OPERATION AND MOBILE PHONES ..... 233
Regulatory And Safety Information .............. 233
SAFETY
SAFETY FEATURES .............................................. 234 Anti-Lock Brake System (ABS) ..................... 234
Electronic Brake Control (EBC) System ...... 235
AUXILIARY DRIVING SYSTEMS.......................... 240
Blind Spot Monitoring (BSM) —
If Equipped..................................................... 240Forward Collision Warning (FCW) With
Mitigation — If Equipped ............................... 244
Tire Pressure Monitoring System
(TPMS)............................................................ 247
OCCUPANT RESTRAINT SYSTEMS ................... 250
Occupant Restraint Systems Features ........ 250
Important Safety Precautions ...................... 250Seat Belt Systems ........................................ 251Supplemental Restraint Systems (SRS) ...... 261Child Restraints ............................................ 275 SAFETY TIPS ........................................................ 291
Transporting Passengers.............................. 291
Transporting Pets ....................................... 292
Safety Checks You Should Make
Inside The Vehicle ........................................ 292
Periodic Safety Checks You Should
Make Outside The Vehicle ............................ 293
Exhaust Gas ............................................... 294Carbon Monoxide Warnings ...................... 294
IN CASE OF EMERGENCY
HAZARD WARNING FLASHERS ......................... 295
ASSIST AND SOS MIRROR — IF EQUIPPED ..... 295
JACKING AND TIRE CHANGING —
IF EQUIPPED ......................................................... 298 Preparations For Jacking ............................. 299Jack And Spare Tire Location ....................... 299
Equipment Removal ..................................... 299Jacking Instructions ..................................... 301Road Tire Installation .................................... 304
Portable Air Compressor —
If Equipped .................................................... 305
Return Inflatable Spare Tire ........................ 306
21_RUP_OM_EN_USC_t.book Page 6
Page 16 of 401
14
GETTING TO KNOW YOUR VEHICLE
KEYS
KEY FOB
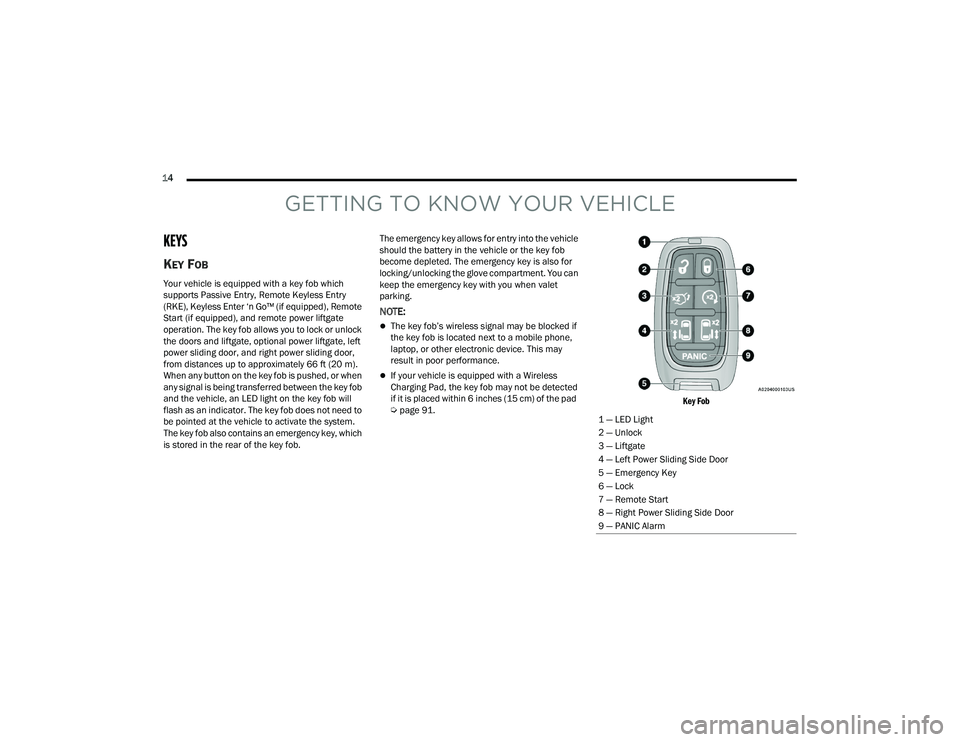
Your vehicle is equipped with a key fob which
supports Passive Entry, Remote Keyless Entry
(RKE), Keyless Enter ‘n Go™ (if equipped), Remote
Start (if equipped), and remote power liftgate
operation. The key fob allows you to lock or unlock
the doors and liftgate, optional power liftgate, left
power sliding door, and right power sliding door,
from distances up to approximately 66 ft (20 m).
When any button on the key fob is pushed, or when
any signal is being transferred between the key fob
and the vehicle, an LED light on the key fob will
flash as an indicator. The key fob does not need to
be pointed at the vehicle to activate the system.
The key fob also contains an emergency key, which
is stored in the rear of the key fob.The emergency key allows for entry into the vehicle
should the battery in the vehicle or the key fob
become depleted. The emergency key is also for
locking/unlocking the glove compartment. You can
keep the emergency key with you when valet
parking.
NOTE:
The key fob’s wireless signal may be blocked if
the key fob is located next to a mobile phone,
laptop, or other electronic device. This may
result in poor performance.
If your vehicle is equipped with a Wireless
Charging Pad, the key fob may not be detected
if it is placed within 6 inches (15 cm) of the pad
Ú
page 91.
Key Fob
1 — LED Light
2 — Unlock
3 — Liftgate
4 — Left Power Sliding Side Door
5 — Emergency Key
6 — Lock
7 — Remote Start
8 — Right Power Sliding Side Door
9 — PANIC Alarm
21_RUP_OM_EN_USC_t.book Page 14
Page 21 of 401
GETTING TO KNOW YOUR VEHICLE19
NOTE:
The key fob may not be detected by the vehicle
Keyless Enter ‘n Go™ system if it is located next
to a mobile phone, laptop or other electronic
device; these devices may block the key fob’s
wireless signal and prevent the Keyless Enter ‘n
Go™ system from starting the vehicle.
For the proper engine starting procedure, see
Úpage 132.
REMOTE START — IF EQUIPPED
If applicable, refer to the “Hybrid Supplement”
for additional information.
This system uses the key fob to start the
engine conveniently from outside the
vehicle while still maintaining security.
The system has a range of 328 ft
(100 m).
Remote Start is used to defrost windows in cold
weather and to reach a comfortable climate in all
ambient conditions before the customer enters the
vehicle.
NOTE:Obstructions between the vehicle and key fob may
reduce this range Ú page 387.
HOW TO USE REMOTE START
If applicable, refer to the “Hybrid Supplement”
for additional information.
Push and release the Remote Start button on the
key fob twice within five seconds. The vehicle
doors will lock, the parking lights will flash, and the
horn will chirp twice (if programmed). Then, the
engine will start, and the vehicle will remain in the
Remote Start mode for a 15 minute cycle.
Pushing the Remote Start button a third time shuts
the engine off. To drive the vehicle, push the unlock button, and
place the ignition in the ON/RUN position.
NOTE:
With Remote Start, the engine will only run for
15 minutes.
Remote Start can only be used twice.
If an engine fault is present or fuel level is
low, the vehicle will start and then shut down in
10 seconds.
The parking lights will turn on and remain on
during Remote Start mode.
For security, power window and power sunroof
operation (if equipped) are disabled when the
vehicle is in the Remote Start mode.
The ignition must be placed in the ON/RUN posi
-
tion before the Remote Start sequence can be
repeated for a third cycle.
WARNING!
Do not start or run an engine in a closed
garage or confined area. Exhaust gas contains
Carbon Monoxide (CO) which is odorless and
colorless. Carbon Monoxide is poisonous and
can cause serious injury or death when
inhaled.
Keep key fobs away from children. Operation
of the Remote Start system, windows, door
locks or other controls could cause serious
injury or death.
2
21_RUP_OM_EN_USC_t.book Page 19
Page 26 of 401
24GETTING TO KNOW YOUR VEHICLE
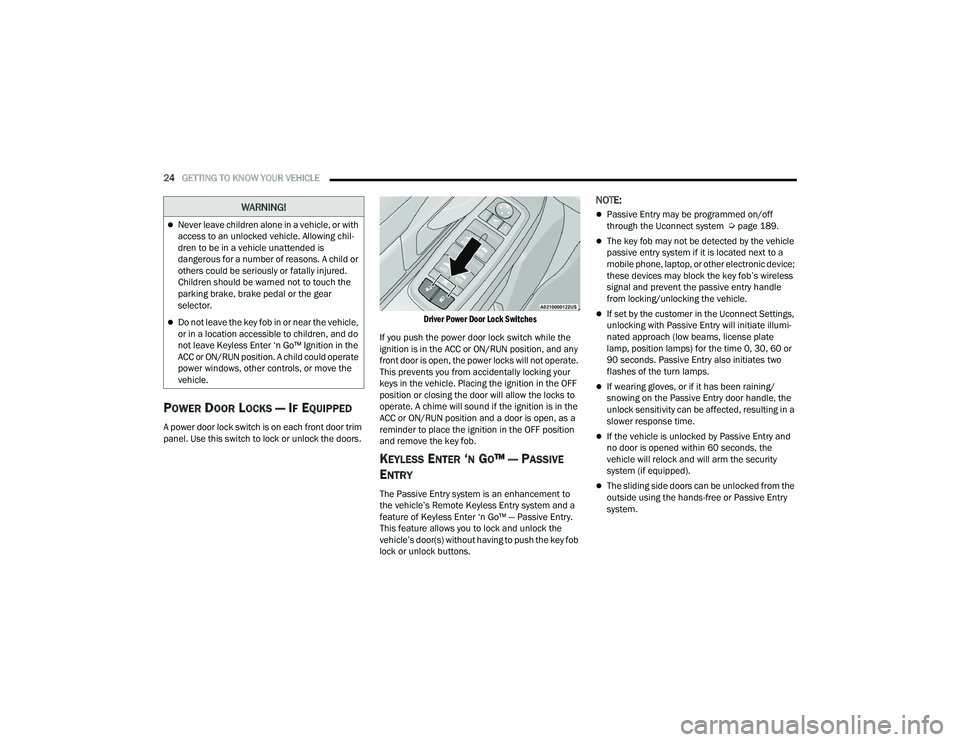
POWER DOOR LOCKS — IF EQUIPPED
A power door lock switch is on each front door trim
panel. Use this switch to lock or unlock the doors.
Driver Power Door Lock Switches
If you push the power door lock switch while the
ignition is in the ACC or ON/RUN position, and any
front door is open, the power locks will not operate.
This prevents you from accidentally locking your
keys in the vehicle. Placing the ignition in the OFF
position or closing the door will allow the locks to
operate. A chime will sound if the ignition is in the
ACC or ON/RUN position and a door is open, as a
reminder to place the ignition in the OFF position
and remove the key fob.
KEYLESS ENTER ‘N GO™ — PASSIVE
E
NTRY
The Passive Entry system is an enhancement to
the vehicle’s Remote Keyless Entry system and a
feature of Keyless Enter ‘n Go™ — Passive Entry.
This feature allows you to lock and unlock the
vehicle’s door(s) without having to push the key fob
lock or unlock buttons.
NOTE:
Passive Entry may be programmed on/off
through the Uconnect system Ú page 189.
The key fob may not be detected by the vehicle
passive entry system if it is located next to a
mobile phone, laptop, or other electronic device;
these devices may block the key fob’s wireless
signal and prevent the passive entry handle
from locking/unlocking the vehicle.
If set by the customer in the Uconnect Settings,
unlocking with Passive Entry will initiate illumi -
nated approach (low beams, license plate
lamp, position lamps) for the time 0, 30, 60 or
90 seconds. Passive Entry also initiates two
flashes of the turn lamps.
If wearing gloves, or if it has been raining/
snowing on the Passive Entry door handle, the
unlock sensitivity can be affected, resulting in a
slower response time.
If the vehicle is unlocked by Passive Entry and
no door is opened within 60 seconds, the
vehicle will relock and will arm the security
system (if equipped).
The sliding side doors can be unlocked from the
outside using the hands-free or Passive Entry
system.
Never leave children alone in a vehicle, or with
access to an unlocked vehicle. Allowing chil -
dren to be in a vehicle unattended is
dangerous for a number of reasons. A child or
others could be seriously or fatally injured.
Children should be warned not to touch the
parking brake, brake pedal or the gear
selector.
Do not leave the key fob in or near the vehicle,
or in a location accessible to children, and do
not leave Keyless Enter ‘n Go™ Ignition in the
ACC or ON/RUN position. A child could operate
power windows, other controls, or move the
vehicle.
WARNING!
21_RUP_OM_EN_USC_t.book Page 24
Page 33 of 401
GETTING TO KNOW YOUR VEHICLE31
The heated steering wheel control button is
located within the Uconnect system.
Press the heated steering wheel button once
to turn the heating element on.
Press the heated steering wheel button a
second time to turn the heating element off.
NOTE:The engine must be running for the heated
steering wheel to operate.
For information on use with the Remote Start
system, see Ú page 21.
DRIVER MEMORY SETTINGS — IF EQUIPPED
This feature allows the driver to save up to two
different memory profiles for easy recall through a
memory switch. Each memory profile saves
desired position settings for the following features:
Driver’s seat
Easy Entry/Exit seat operation (if equipped)
Power steering wheel position (if equipped)
Side mirrors (if equipped)
A set of desired radio station presets
NOTE:
Your vehicle is equipped with two key fobs, each
can be linked to either memory position 1 or 2.
If your vehicle is equipped with a Uconnect 5
radio, memory settings will be linked to the
driver profiles in the radio, in addition to several
other features (radio presets, home screens,
settings, navigation, phone, etc.) Ú page 189.
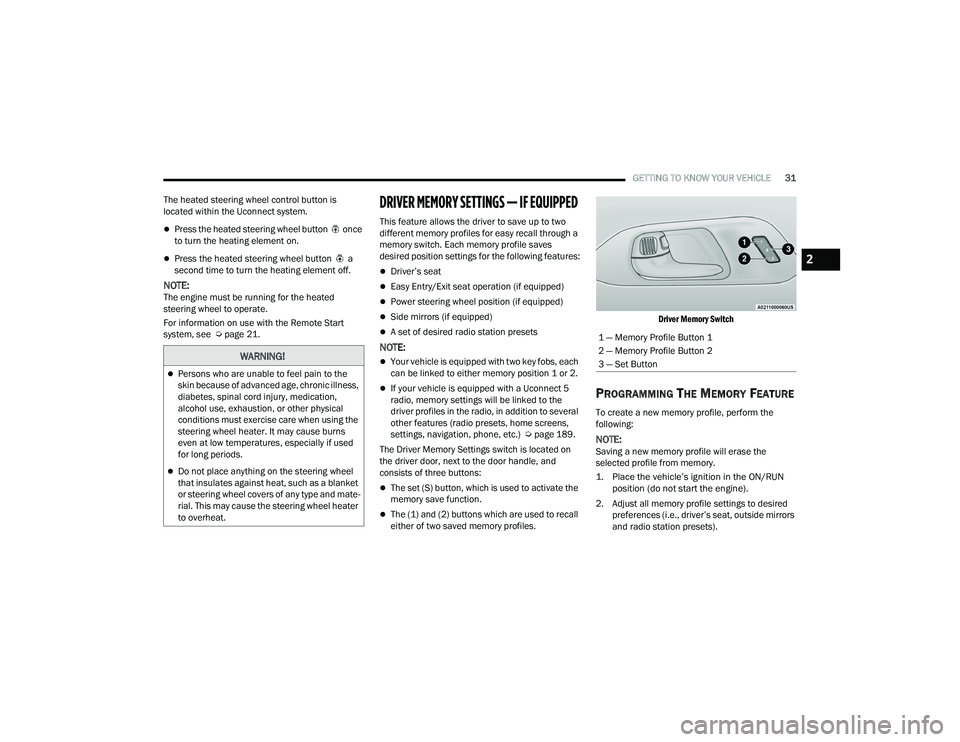
The Driver Memory Settings switch is located on
the driver door, next to the door handle, and
consists of three buttons:
The set (S) button, which is used to activate the
memory save function.
The (1) and (2) buttons which are used to recall
either of two saved memory profiles.
Driver Memory Switch
PROGRAMMING THE MEMORY FEATURE
To create a new memory profile, perform the
following:
NOTE:Saving a new memory profile will erase the
selected profile from memory.
1. Place the vehicle’s ignition in the ON/RUN
position (do not start the engine).
2. Adjust all memory profile settings to desired preferences (i.e., driver’s seat, outside mirrors
and radio station presets).
WARNING!
Persons who are unable to feel pain to the
skin because of advanced age, chronic illness,
diabetes, spinal cord injury, medication,
alcohol use, exhaustion, or other physical
conditions must exercise care when using the
steering wheel heater. It may cause burns
even at low temperatures, especially if used
for long periods.
Do not place anything on the steering wheel
that insulates against heat, such as a blanket
or steering wheel covers of any type and mate -
rial. This may cause the steering wheel heater
to overheat.
1 — Memory Profile Button 1
2 — Memory Profile Button 2
3 — Set Button
2
21_RUP_OM_EN_USC_t.book Page 31
Page 58 of 401
56GETTING TO KNOW YOUR VEHICLE
UCONNECT VOICE RECOGNITION —
IF EQUIPPED
INTRODUCING VOICE RECOGNITION
Start using Uconnect Voice Recognition (VR) with
these helpful quick tips. It provides the key Voice
Commands and tips you need to know to control
your system.
The Uconnect 5 NAV with 10.1-inch display is
equipped with Voice Recognition. If you see the
NAV icon on the bottom bar or in the Apps menus
of your 10.1-inch touchscreen, you have the
Uconnect 5 NAV system. If not, you have a
Uconnect 5 with 10.1-inch display system.
BASIC VOICE COMMANDS
The basic Voice Commands below can be given at
any point while using your Uconnect system.
Push the VR button . After the beep, say:
“Cancel ” to stop a current voice session.
“Help ” to hear a list of suggested Voice
Commands.
“ Repeat ” to listen to the system prompts again.
Notice the visual cues that inform you of your Voice
Recognition system’s status.
GET STARTED
The VR button is used to activate/deactivate
your Voice Recognition system.
Helpful hints for using Voice Recognition:
Reduce background noise. Wind noise and
passenger conversations are examples of noise
that may impact recognition.
Speak clearly at a normal pace and volume
while facing straight ahead.
Each time you give a Voice Command, first push
the VR button, wait until after the beep, then say
your Voice Command. You can also say the
vehicle “Wake Up” word and state your
command.
A passenger can press the VR button shortcut
on the radio status bar to also issue a
command.
You can interrupt the help message or system
prompts by pushing the VR button and saying a
Voice Command or saying the vehicle’s “Wake
Up” word and saying a command from the
current category.
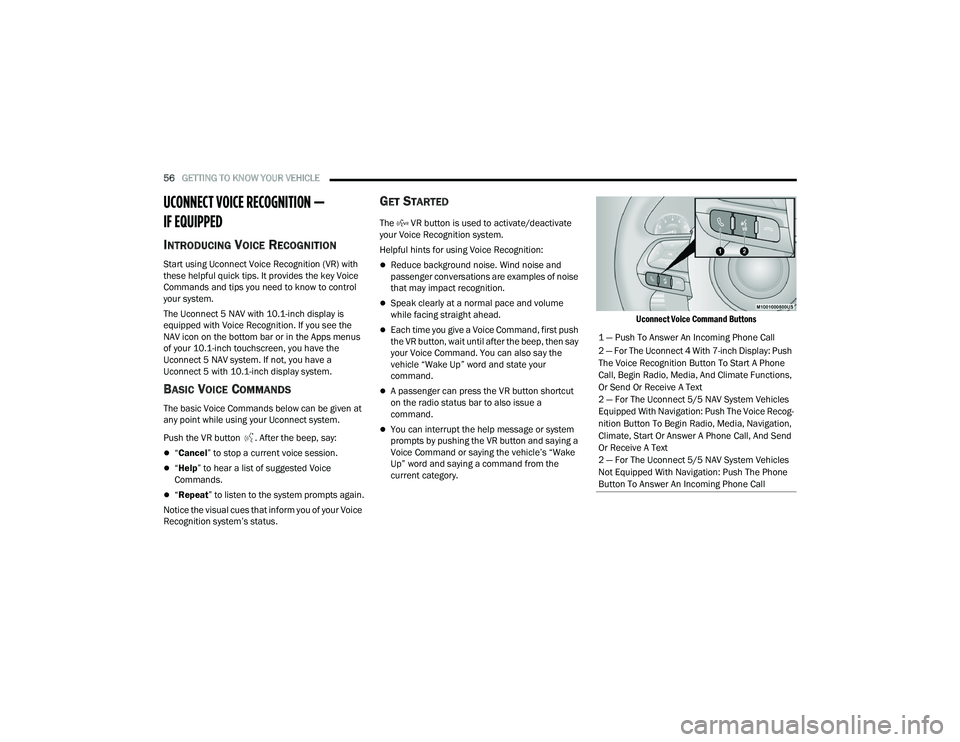
Uconnect Voice Command Buttons
1 — Push To Answer An Incoming Phone Call
2 — For The Uconnect 4 With 7-inch Display: Push
The Voice Recognition Button To Start A Phone
Call, Begin Radio, Media, And Climate Functions,
Or Send Or Receive A Text
2 — For The Uconnect 5/5 NAV System Vehicles
Equipped With Navigation: Push The Voice Recog
-
nition Button To Begin Radio, Media, Navigation,
Climate, Start Or Answer A Phone Call, And Send
Or Receive A Text
2 — For The Uconnect 5/5 NAV System Vehicles
Not Equipped With Navigation: Push The Phone
Button To Answer An Incoming Phone Call
21_RUP_OM_EN_USC_t.book Page 56
Page 89 of 401
GETTING TO KNOW YOUR VEHICLE87
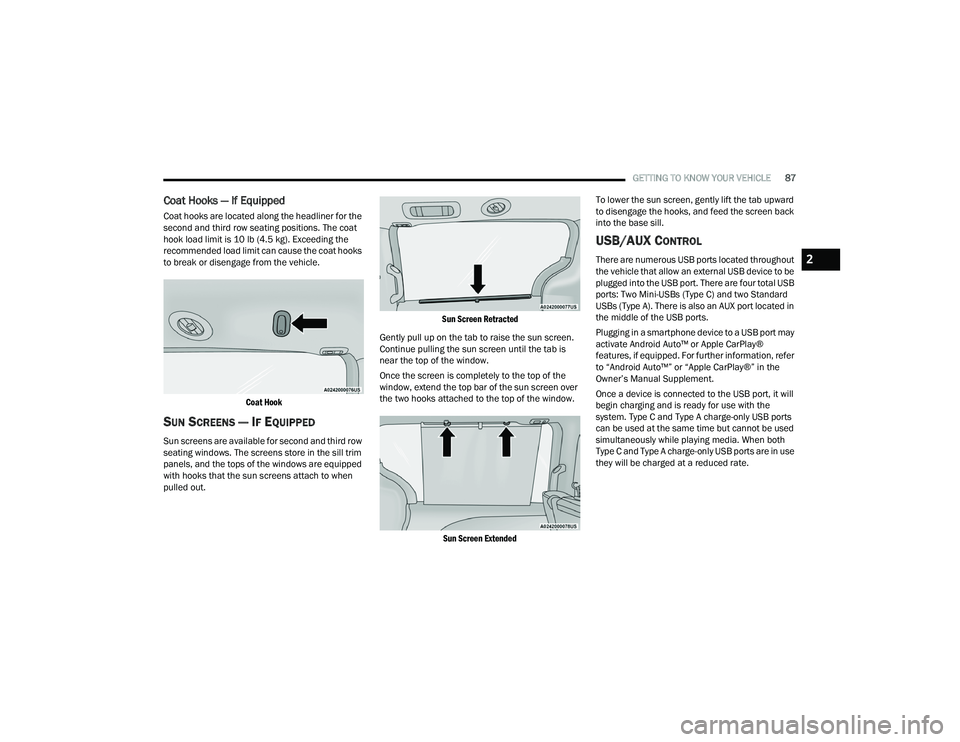
Coat Hooks — If Equipped
Coat hooks are located along the headliner for the
second and third row seating positions. The coat
hook load limit is 10 lb (4.5 kg). Exceeding the
recommended load limit can cause the coat hooks
to break or disengage from the vehicle.
Coat Hook
SUN SCREENS — IF EQUIPPED
Sun screens are available for second and third row
seating windows. The screens store in the sill trim
panels, and the tops of the windows are equipped
with hooks that the sun screens attach to when
pulled out.
Sun Screen Retracted
Gently pull up on the tab to raise the sun screen.
Continue pulling the sun screen until the tab is
near the top of the window.
Once the screen is completely to the top of the
window, extend the top bar of the sun screen over
the two hooks attached to the top of the window.
Sun Screen Extended
To lower the sun screen, gently lift the tab upward
to disengage the hooks, and feed the screen back
into the base sill.
USB/AUX CONTROL
There are numerous USB ports located throughout
the vehicle that allow an external USB device to be
plugged into the USB port. There are four total USB
ports: Two Mini-USBs (Type C) and two Standard
USBs (Type A). There is also an AUX port located in
the middle of the USB ports.
Plugging in a smartphone device to a USB port may
activate Android Auto™ or Apple CarPlay®
features, if equipped. For further information, refer
to “Android Auto™” or “Apple CarPlay®” in the
Owner’s Manual Supplement.
Once a device is connected to the USB port, it will
begin charging and is ready for use with the
system. Type C and Type A charge-only USB ports
can be used at the same time but cannot be used
simultaneously while playing media. When both
Type C and Type A charge-only USB ports are in use
they will be charged at a reduced rate.2
21_RUP_OM_EN_USC_t.book Page 87
Page 91 of 401
GETTING TO KNOW YOUR VEHICLE89
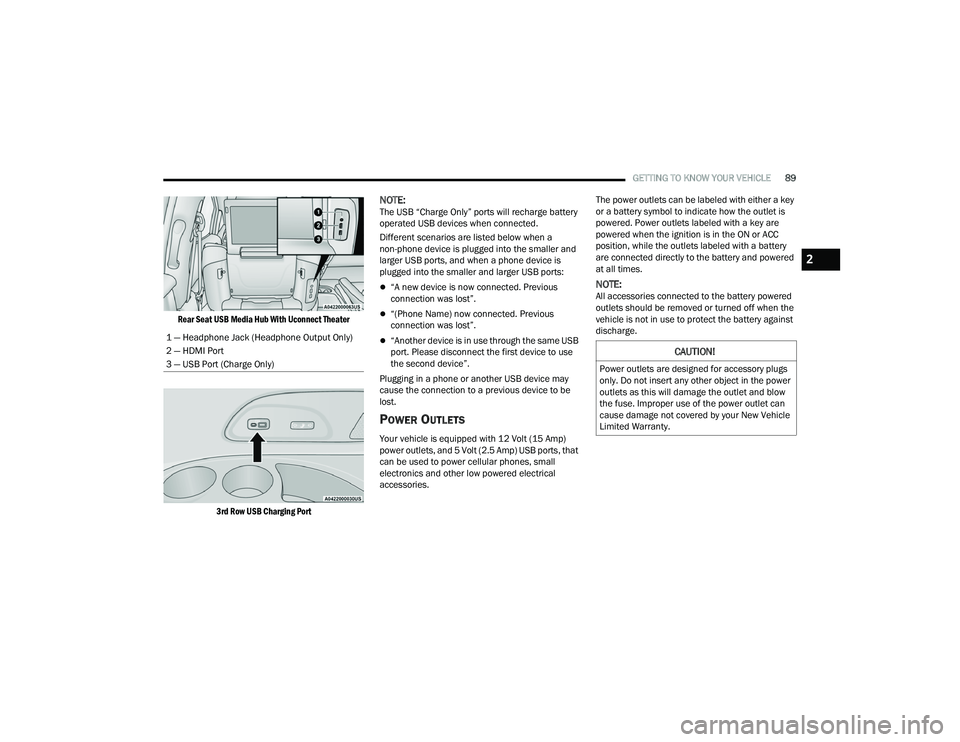
Rear Seat USB Media Hub With Uconnect Theater
3rd Row USB Charging Port
NOTE:The USB “Charge Only” ports will recharge battery
operated USB devices when connected.
Different scenarios are listed below when a
non-phone device is plugged into the smaller and
larger USB ports, and when a phone device is
plugged into the smaller and larger USB ports:
“A new device is now connected. Previous
connection was lost”.
“(Phone Name) now connected. Previous
connection was lost”.
“Another device is in use through the same USB
port. Please disconnect the first device to use
the second device”.
Plugging in a phone or another USB device may
cause the connection to a previous device to be
lost.
POWER OUTLETS
Your vehicle is equipped with 12 Volt (15 Amp)
power outlets, and 5 Volt (2.5 Amp) USB ports, that
can be used to power cellular phones, small
electronics and other low powered electrical
accessories. The power outlets can be labeled with either a key
or a battery symbol to indicate how the outlet is
powered. Power outlets labeled with a key are
powered when the ignition is in the ON or ACC
position, while the outlets labeled with a battery
are connected directly to the battery and powered
at all times.
NOTE:All accessories connected to the battery powered
outlets should be removed or turned off when the
vehicle is not in use to protect the battery against
discharge.
1 — Headphone Jack (Headphone Output Only)
2 — HDMI Port
3 — USB Port (Charge Only)
CAUTION!
Power outlets are designed for accessory plugs
only. Do not insert any other object in the power
outlets as this will damage the outlet and blow
the fuse. Improper use of the power outlet can
cause damage not covered by your New Vehicle
Limited Warranty.
2
21_RUP_OM_EN_USC_t.book Page 89
Page 93 of 401
GETTING TO KNOW YOUR VEHICLE91
POWER INVERTER — IF EQUIPPED
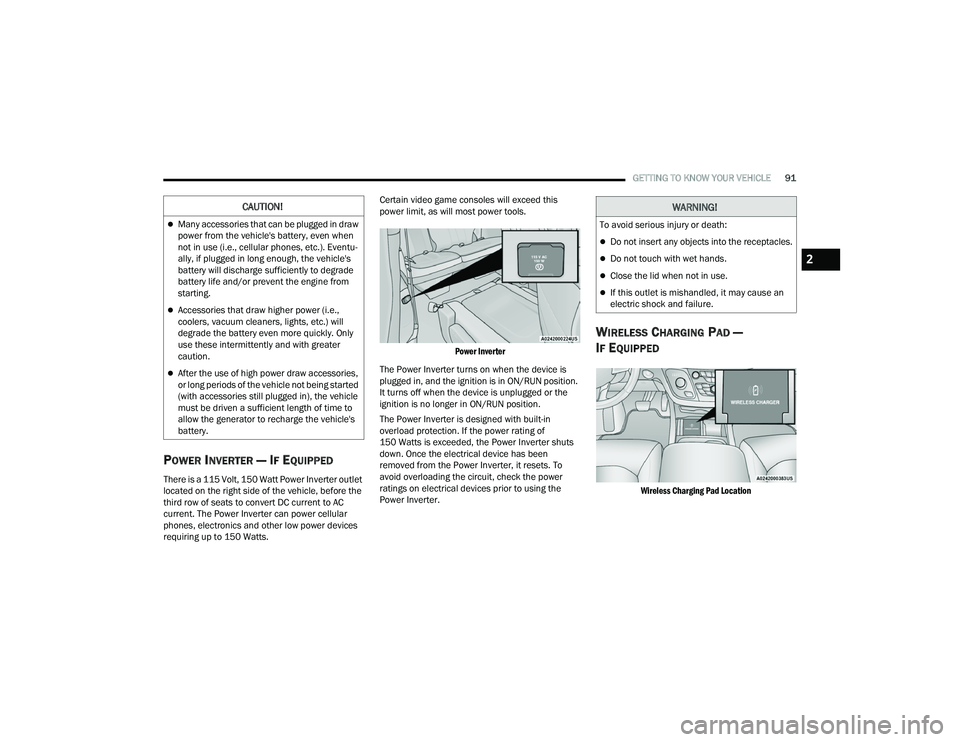
There is a 115 Volt, 150 Watt Power Inverter outlet
located on the right side of the vehicle, before the
third row of seats to convert DC current to AC
current. The Power Inverter can power cellular
phones, electronics and other low power devices
requiring up to 150 Watts. Certain video game consoles will exceed this
power limit, as will most power tools.
Power Inverter
The Power Inverter turns on when the device is
plugged in, and the ignition is in ON/RUN position.
It turns off when the device is unplugged or the
ignition is no longer in ON/RUN position.
The Power Inverter is designed with built-in
overload protection. If the power rating of
150 Watts is exceeded, the Power Inverter shuts
down. Once the electrical device has been
removed from the Power Inverter, it resets. To
avoid overloading the circuit, check the power
ratings on electrical devices prior to using the
Power Inverter.
WIRELESS CHARGING PAD —
I
F EQUIPPED
Wireless Charging Pad Location
CAUTION!
Many accessories that can be plugged in draw
power from the vehicle's battery, even when
not in use (i.e., cellular phones, etc.). Eventu -
ally, if plugged in long enough, the vehicle's
battery will discharge sufficiently to degrade
battery life and/or prevent the engine from
starting.
Accessories that draw higher power (i.e.,
coolers, vacuum cleaners, lights, etc.) will
degrade the battery even more quickly. Only
use these intermittently and with greater
caution.
After the use of high power draw accessories,
or long periods of the vehicle not being started
(with accessories still plugged in), the vehicle
must be driven a sufficient length of time to
allow the generator to recharge the vehicle's
battery.
WARNING!
To avoid serious injury or death:
Do not insert any objects into the receptacles.
Do not touch with wet hands.
Close the lid when not in use.
If this outlet is mishandled, it may cause an
electric shock and failure.
2
21_RUP_OM_EN_USC_t.book Page 91