warning light CHRYSLER PT CRUISER 2007 1.G Owner's Manual
[x] Cancel search | Manufacturer: CHRYSLER, Model Year: 2007, Model line: PT CRUISER, Model: CHRYSLER PT CRUISER 2007 1.GPages: 467, PDF Size: 7.57 MB
Page 192 of 467

Tapping the ªSET DECELº button once will result in a 1
mph (2 km/h) speed decrease. Each time the button is
tapped, speed decreases.
Manual Transaxle:
Depressing the clutch pedal will disengage the speed
control. A slight increase in engine RPM before the speed
control disengages is normal.
Vehicles equipped with manual transaxles may need to be
shifted into a lower gear to climb hills without speed loss.
WARNING!
Speed Control can be dangerous where the system
can't maintain a constant speed. Your vehicle could go
too fast for the conditions, and you could lose control.
An accident could be the result. Don't use Speed
Control in heavy traffic or on roads that are winding,
icy, snow-covered, or slippery.
To Accelerate For Passing:
Depress the accelerator as you would normally. When the
pedal is released, the vehicle will return to the set speed.
Using Speed Control On Hills
NOTE:The speed control system maintains speed up
and down hills. A slight speed change on moderate hills
is normal.
Vehicles equipped with four speed automatic transaxles
may experience a downshift to 3rd gear while climbing
uphill or descending downhill. This downshift to 3rd
gear is necessary to maintain vehicle set speed.
On steep hills a greater speed loss or gain may occur so
it may be preferable to drive without speed control.
192 UNDERSTANDING THE FEATURES OF YOUR VEHICLE
Page 195 of 467

Programming The Universal Transceiver
For best results, install a new battery in the hand held
transmitter before programming. If your garage door
opener (located in the garage) is equipped with an
antenna, make sure that the antenna is hanging straight
down.
1. Turn off the engine.
WARNING!
Vehicle exhaust contains carbon monoxide, a danger-
ous gas. Do not run the vehicle's exhaust while
training the transceiver. Exhaust gas can cause seri-
ous injury or death.
WARNING!
Your motorized door or gate will open and close
while you are training the Universal Transceiver. Do
not train the transceiver if people or pets are in the
path of the door or gate. A moving door or gate can
cause serious injury or death to people and pets or
damage to objects.
2. Erase the factory test codes by pressing the two
outside buttons. Release the buttons when the light in the
Universal Transceiver begins to flash (about 20 seconds).
NOTE:Step 2 does not have to be followed to program
additional hand held transmitters.
UNDERSTANDING THE FEATURES OF YOUR VEHICLE 195
3
Page 202 of 467

WARNING!
In an accident, there is a greater risk of being thrown
from a vehicle with an open sunroof. You could also
be seriously injured or killed. Always fasten your
seat belt properly and make sure all passengers are
properly secured too.
Do not allow small children to operate the sunroof.
Never allow fingers or other body parts, or any
object to project through the sunroof opening. Injury
may result.
Wind Buffeting
Wind buffeting can be described as the perception of
pressure on the ears or a helicopter type sound in the
ears. Your vehicle may exhibit wind buffeting with the
windows down, or the sunroof (if equipped) in certain
open or partially open positions. This is a normal occur-
rence and can be minimized. If the buffeting occurs withthe rear windows open, open the front and rear windows
together to minimize the buffeting. If the buffeting occurs
with the sunroof open, adjust the sunroof opening to
minimize the buffeting or open any window.
Sunroof Maintenance
Use only a non-abrasive cleaner and a soft cloth to clean
the glass panel.
ELECTRICAL POWER OUTLETS
The outlets include tethered caps, labeled with a key
symbol or battery symbol, indicating power source. All
outlets are protected by a single 20 Amp fuse.
The standard outlet in the front of the center floor console
is a conventional cigar lighter outlet.
202 UNDERSTANDING THE FEATURES OF YOUR VEHICLE
Page 227 of 467

12. Brake System Warning Light
This light monitors various brake functions,
including brake fluid level and parking brake
application. If the brake light turns on, it may
indicate that the parking brake is applied, there
is a low brake fluid level or there is a problem with the
anti-lock brake system.
The dual brake system provides a reserve braking capac-
ity in the event of a failure to a portion of the hydraulic
system. Failure of either half of the dual brake system is
indicated by the Brake Warning Light which will turn on
when the brake fluid level in the master cylinder has
dropped below a specified level.
The light will remain on until the cause is corrected.
NOTE:The light may flash momentarily during sharp
cornering maneuvers which change fluid level condi-
tions. The vehicle should have service performed, and
the brake fluid level checked.If brake failure is indicated, immediate repair is neces-
sary.
WARNING!
Driving a vehicle with the brake light on is danger-
ous. Part of the brake system may have failed. It will
take longer to stop the vehicle. You could have an
accident. Have the vehicle checked immediately.
Vehicles equipped with Anti-Lock brakes (ABS), are also
equipped with Electronic Brake Force Distribution (EBD).
In the event of an EBD failure, the Brake Warning Light
will turn on along with the ABS Light. Immediate repair
to the ABS system is required.
The operation of the Brake Warning Light can be checked
by turning the ignition switch from the OFF position to
UNDERSTANDING YOUR INSTRUMENT PANEL 227
4
Page 228 of 467

the ON position. The light should illuminate for approxi-
mately two seconds. The light should then turn off unless
the parking brake is applied or a brake fault is detected.
If the light does not illuminate, have the light inspected
by an authorized dealer.
The light also will turn on when the parking brake is
applied with the ignition switch in the ON position.
NOTE:This light shows only that the parking brake is
applied. It does not show the degree of brake application.
13. Charging System Light
This light shows the status of the electrical charg-
ing system. The light should come on briefly when
the ignition switch is first turned ON and remain on
briefly as a bulb check. If the light stays on or comes on
while driving, it means that there is a problem with the
charging system. Obtain SERVICE IMMEDIATELY.14. Engine Temperature Warning Light
This light warns of an overheated engine condi-
tion. If the engine is critically hot, a warning chime
will sound 10 times. After the chime turns off, the
engine will still be critically hot until the light goes out.
15. Seat Belt Reminder Light
When the ignition switch is first turned ON, this
light will come on for about six seconds. A chime
will sound if you have not pulled the shoulder belt
out of the retractor. This is a reminder to ªbuckle upº. If
you do not buckle up, the light will remain on.
16. Theft Alarm Light Ð If Equipped
This light will flash rapidly for several seconds when the
alarm system is arming. The light will begin to flash
slowly indicating that the system is armed. (See page 35
for more information.)
228 UNDERSTANDING YOUR INSTRUMENT PANEL
Page 229 of 467

17. Low Fuel Light
When the fuel level drops to 2 gallons, the fuel
symbol will light and a single chime will sound.
18. Anti-Lock Warning Light (ABS) Ð If Equipped
This light monitors the Anti-Lock Brake System
(ABS) described elsewhere in this manual. This
light will come on when the ignition key is
turned to the ON position and may stay on for
as long as four seconds.
If the ABS light remains on or comes on during driving,
it indicates that the Anti-Lock portion of the brake system
is not functioning and that service is required, however,
the conventional brake system will continue to operate
normally provided that the BRAKE warning light is not
on.
If the ABS light is on, the brake system should be serviced
as soon as possible to restore the benefit of Anti-Lock
Brakes.The warning light should be checked frequently to assure
that it is operating properly. Turn the ignition key to the
on position, but do not start the vehicle. The light should
come on. If the light does not come on, have the system
checked by an authorized dealer.
19. Front Fog Light Indicator Ð If Equipped
This light shows when the front fog lights are ON.
(See page 183 for more information.)
20. Airbag Light
The light comes on and remains on for 6 to 8
seconds as a bulb check when the ignition
switch is first turned ON. If the light does not
come on during starting, stays on, or comes on
while driving, have the system checked by an authorized
dealer. (See page 102 for more information.)
21. Oil Pressure Light
Shows low engine oil pressure. The light will come
on and remain on when the ignition switch is
UNDERSTANDING YOUR INSTRUMENT PANEL 229
4
Page 281 of 467

Manual Transaxle
Before starting the engine fully apply the parking brake,
press the clutch pedal to the floor and place the gear
selector in NEUTRAL.
NOTE:The engine will not start unless the clutch pedal
is pressed to the floor.
Normal Starting
Normal Starting of either a cold or a warm engine does
not require pumping or depressing the accelerator pedal.
Simply turn the ignition switch to the ªSTART'º position
and release when the engine starts. If the engine has not
started within 3 seconds, slightly depress the accelerator
pedal while continuing to crank. If the engine fails to start
within 15 seconds, turn the ignition switch to the ªOFFº
position, wait 10 to 15 seconds, then repeat the normal
starting procedure.
WARNING!
Do not attempt to push or tow your vehicle to get it
started. Vehicles equipped with an automatic trans-
axle cannot be started this way. Unburned fuel could
enter the catalytic converter and once the engine has
started, ignite and damage the converter and vehicle.
If the vehicle has a discharged battery, booster cables
may be used to obtain a start from another vehicle.
This type of start can be dangerous if done improp-
erly, so follow the procedure carefully. See section 6
of this manual for jump starting instructions.
Extremely Cold Weather (below220ÉF or229ÉC)
To insure reliable starting at these temperatures, use of an
externally powered electric engine block heater (available
from your dealer) is recommended.
STARTING AND OPERATING 281
5
Page 290 of 467

MANUAL TRANSAXLE OPERATION
WARNING!
You or others could be injured if you leave the
vehicle unattended without having the parking
brake fully applied. The parking brake should al-
ways be applied when the driver is not in the
vehicle, especially on an incline.
Fully depress the clutch pedal before you shift gears. As
you release the clutch pedal, lightly depress the accelera-
tor pedal.
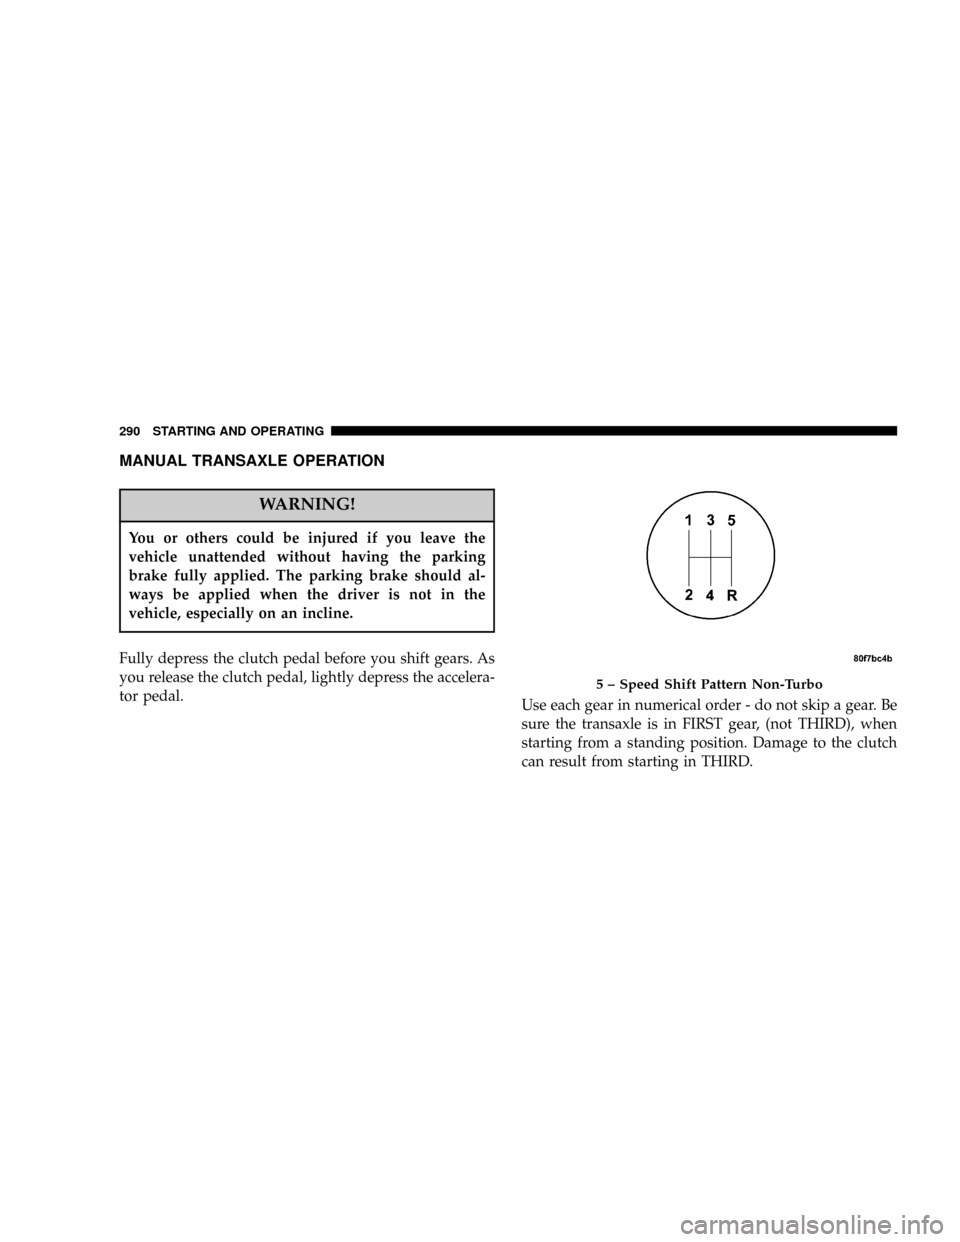
Use each gear in numerical order - do not skip a gear. Be
sure the transaxle is in FIRST gear, (not THIRD), when
starting from a standing position. Damage to the clutch
can result from starting in THIRD.
5 ± Speed Shift Pattern Non-Turbo
290 STARTING AND OPERATING
Page 296 of 467

WARNING!
Riding the brakes can lead to brake failure and
possibly an accident. Driving with your foot resting
or riding on the brake pedal can result in abnormally
high brake temperatures, excessive lining wear, and
possible brake damage. You wouldn't have your full
braking capacity in an emergency.
If either of the two hydraulic systems lose normal capa-
bility, the remaining system will still function with some
loss of overall braking effectiveness. This will be evident
by increased pedal travel during application and greater
pedal force required to slow or stop. In addition, if the
malfunction is caused by an internal leak, as the brake
fluid in the master cylinder drops, the brake warning
indicator will light.
WARNING!
Driving a vehicle with the brake light on is danger-
ous. A significant decrease in braking performance
or vehicle stability during braking may occur. It will
take you longer to stop the vehicle or will make your
vehicle harder to control. You could have an acci-
dent. Have the vehicle checked immediately.
Anti-Lock Brake System (ABS) Ð If Equipped
The Anti-Lock Brake System provides increased vehicle
stability and brake performance under most braking
conditions. The system automatically ªpumpsº the
brakes during severe braking conditions to prevent
wheel lock-up.
296 STARTING AND OPERATING
Page 298 of 467

The ABS light monitors the Anti-Lock Brake
System. The light will come on when the
ignition switch is turned to the ON position
and may stay on for as long as four seconds.
If the ABS light remains on or comes on while driving, it
indicates that the Anti-Lock portion of the brake system
is not functioning and that service is required. However,
the conventional brake system will continue to operate
normally if the BRAKE warning light is not on.
If the ABS light is on, the brake system should be serviced
as soon as possible to restore the benefits of Anti-Lock
brakes. If the ABS light does not come on when the
Ignition switch is turned to the ON position, have the
bulb repaired as soon as possible.
If both the Brake Warning Light and the ABS Light
remain on, the Anti-Lock brakes (ABS) and Electronic
Brake Force Distribution (EBD) systems are not function-
ing. Immediate repair to the ABS system is required.When the vehicle is driven over 7 mph (11 km/h), you
may also hear a slight clicking sound as well as some
related motor noises. These noises are the system per-
forming its self check cycle to ensure that the ABS system
is working properly. This self check occurs each time the
vehicle is started and accelerated past 7 mph (11 km/h).
ABS is activated during braking under certain road or
stopping conditions. ABS-inducing conditions can in-
clude ice, snow, gravel, bumps, railroad tracks, loose
debris, or panic stops.
You also may experience the following when the brake
system goes into Anti-lock:
²The ABS motor running (it may continue to run for a
short time after the stop),
²the clicking sound of solenoid valves,
²brake pedal pulsations,
298 STARTING AND OPERATING