key CHRYSLER PT CRUISER 2008 1.G Service Manual
[x] Cancel search | Manufacturer: CHRYSLER, Model Year: 2008, Model line: PT CRUISER, Model: CHRYSLER PT CRUISER 2008 1.GPages: 491, PDF Size: 7.08 MB
Page 247 of 491
Auto Unlock On ExitWhen ON is selected all the vehicle’s doors will unlock
when the driver’s door is opened if the vehicle is stopped
(manual transmissions) or the vehicle is stopped and the
transmission is in PARK or NEUTRAL position (auto-
matic transmissions). Press and hold the EVIC button
when in this display until ON or OFF appears to make
your selection.Remote Unlock Driver’s Door 1stWhenDRIVER’S DOOR 1st is selected only the driver’s
door will unlock on the first press of the remote keyless
entry unlock button and require a second press to unlock
the remaining locked doors. When REMOTE UNLOCK
ALL DOORS is selected all of the doors will unlock at
the first press of the remote keyless entry unlock button.
Press and hold the EVIC button when in this display until
DRIVER’S DOOR 1st or ALL DOORS appears to make
your selection.
Sound Horn with Remote Key LockWhen ON is selected a short horn sound will occur when
the remote keyless entry LOCK button is pressed. This
feature may be selected with or without the flash lights
on LOCK/UNLOCK feature. Press and hold the EVIC
button when in this display until ON or OFF appears to
make your selection.Flash Lights with Remote Key LockWhen ON is selected, the front and rear turn signals will
flash when the doors are locked or unlocked using the
remote keyless entry transmitter. This feature may be
selected with or without the sound horn on lock feature
selected. Press and hold the EVIC button when in this
display until ON or OFF appears to make your selection.Delay Turning Headlamps OffWhen this feature is selected the driver can choose to
have the headlamps remain on for 0, 30, 60, or 90 seconds
UNDERSTANDING YOUR INSTRUMENT PANEL 245
4
Page 248 of 491
when exiting the vehicle. Press and hold the EVIC button
when in this display until 0, 30, 60, or 90 appears to make
your selection.Headlamps On With Wipers (Available with Auto
Headlights Only)When ON is selected and the headlight switch is in the
AUTO position, the headlights will turn on approxi-
mately 10 seconds after the wipers are turned on. The
headlights will also turn off when the wipers are turned
off if they were turned on by this feature. Press and hold
the EVIC button when in this display until ON or OFF
appears to make your selection.
NOTE:Turning the headlights on during the daytime
causes the instrument panel lights to dim. To increase the
brightness, refer to “Lights” in this section.Delay Power Off to Accessories Until ExitWhen this feature is selected, the power window
switches, radio, hands–free system, DVD video system, power sunroof, and power outlets will remain active for
up to 60 minutes after the ignition switch has been turned
off. Opening a vehicle door will cancel this feature. Press
and hold the EVIC button when in this display until
“Off”, “45 sec.”, “5 min.”, or “10 min.” appears to make
your selection.
Turn Headlamps on with Remote Key UnlockWhen this feature is selected the headlamps will activate
and remain on for up to 90 seconds when the doors are
unlocked using the remote keyless entry transmitter.
Press and hold the EVIC button when in this display until
“OFF”, “30 sec.”, “60 sec.”, or “90 sec.” appears to make
your selection.Confirmation of Voice Commands — If EquippedWhen ON is selected all voice commands from the
U-Connect™ system are confirmed. Press and hold the
EVIC button when in this display until ON or OFF
appears to make your selection.
246 UNDERSTANDING YOUR INSTRUMENT PANEL
Page 293 of 491
STARTING PROCEDURESBefore starting your vehicle, adjust your seat, adjust both
inside and outside mirrors, and fasten your seat belts.
WARNING!
Never leave children alone in a vehicle. Leaving
children in a vehicle unattended is dangerous for a
number of reasons. A child or others could be seri-
ously or fatally injured. Don’t leave the keys in the
ignition. A child could operate power windows,
other controls, or move the vehicle.
WARNING!
Be sure to turn off the engine if you want to rest or
sleep in your car. Accidents can be caused by inad-
vertently moving the gear selector lever or by press-
ing the accelerator pedal. This may cause excessive
heat in the exhaust system, resulting in overheating
and vehicle fire which may cause serious or fatal
injuries.AUTOMATIC TRANSAXLEThe gear selector lever must be in the NEUTRAL or
PARK position before you can start the engine. Apply the
brakes and depress the gear selector lever knob button
before shifting to any driving gear.
NOTE:You must press the brake pedal before shifting
out of PARK.
STARTING AND OPERATING 291
5
Page 295 of 491
IF THE ENGINE FAILS TO STARTIf the engine fails to start after you have followed the
“NORMAL STARTING” procedure, it may be flooded.
Push the accelerator pedal all the way to the floor and
hold it there. Crank the engine for no more than 15
seconds. This should clear any excess fuel in case the
engine is flooded. Leave the ignition key in the ON
position, release the accelerator pedal and repeat the
“NORMAL STARTING” procedure.
WARNING!
Never pour fuel or other flammable liquid into the
throttle body air inlet opening in an attempt to start
the vehicle. This could result in flash fire causing
serious personal injury.
CAUTION!
To prevent damage to the starter, do not crank the
engine for more than 15 seconds at a time. Wait 10 to
15 seconds before trying again.AFTER STARTINGThe idle speed will automatically decrease as the engine
warms up.TURBOCHARGER COOL-DOWN NOTE:Letting the engine idle after severe operation
allows the turbine housing to cool to normal operating
temperature. Do not increase the idle speed manually.
STARTING AND OPERATING 293
5
Page 297 of 491
WARNING!
It is dangerous to shift the gear selector lever out of
PARK, or NEUTRAL if the engine speed is higher
than idle speed. If your foot is not firmly on the
brake pedal, the vehicle could accelerate quickly
forward or in REVERSE. You could lose control of the
vehicle and hit someone or something. Only shift the
gear selector lever into gear when the engine is idling
normally and when your right foot is firmly on the
brake pedal.BRAKE/TRANSMISSION INTERLOCK SYSTEMThis system prevents you from shifting the gear selector
lever out of PARK and into any gear unless the brake
pedal is pressed. This system is active only while the
ignition switch is in the ON or ACC positions.Alwaysstep on the brake pedal and depress the gear selector
lever knob button before shifting out of PARK.
NOTE:
If a malfunction occurs, the system will function
normally, except you may be able to shift the vehicle from
PARK, without depressing the brake pedal. If this occurs
obtain service from an authorized dealer as soon as
possible.
AUTOMATIC TRANSAXLE IGNITION INTERLOCK
SYSTEMThis system prevents the key from being removed unless
the gear selector lever is in PARK and the gear selector
lever knob push button is out. It also prevents shifting
out of PARK unless the key is in the ACC or ON
positions, and the brake pedal is depressed.
NOTE: If a malfunction occurs, the system will trap the
key in the ignition cylinder to warn you that this safety
STARTING AND OPERATING 295
5
Page 298 of 491

feature is inoperable. The engine can be started and
stopped but the key cannot be removed until you obtain
service.FOUR-SPEED AUTOMATIC TRANSAXLEThe electronically controlled transaxle provides a precise
shift schedule. The transaxle electronics are self calibrat-
ing; therefore, the first few shifts on a new vehicle may be
somewhat abrupt. This is a normal condition, and preci-
sion shifts will develop within a few shift cycles.RESET MODEThe transaxle is monitored electronically for abnormal
conditions. If a condition is detected that could cause
damage, the transaxle shifts automatically into second
gear. The transaxle remains in second gear despite the
forward gear selected. PARK, REVERSE, and NEUTRAL
will continue to operate. This second gear limp-in feature
allows the vehicle to be driven to a dealer for service
without damaging the transaxle.In the event that the problem has been momentary, the
transaxle can be reset to regain all forward gears.
Stop the vehicle and shift the gear selector lever into
PARK.
Turn the Key to OFF then restart the engine.
Shift the gear selector lever into DRIVE and resume
driving.
If the transaxle cannot be reset, authorized dealer service
is required.
NOTE:
Even if the transaxle can be reset, it is recom-
mended that you visit an authorized dealer at your
earliest possible convenience. Your authorized dealer has
diagnostic equipment to determine if the problem could
recur.296 STARTING AND OPERATING
Page 299 of 491
GEAR RANGES FOR THE FOUR-SPEED
AUTOMATIC TRANSAXLEDO NOT race the engine when shifting from PARK or
NEUTRAL positions into another gear range.PARKPARK supplements the parking brake by locking the
transmission. The engine can be started in this range.
Never use PARK while the vehicle is in motion. Apply
the parking brake when leaving the vehicle in this range.
Always apply the parking brake first, and then shift the
gear selector lever into the PARK position.
WARNING!
Unintended movement of a vehicle could injure
those in and near the vehicle. As with all vehicles,
you should never exit a vehicle while the engine is
running. Before exiting a vehicle, you should always
shift the vehicle into PARK, remove the key from the
ignition, and apply the parking brake. Once the key
is removed from the ignition, the transmission gear
selector lever is locked in the PARK position, secur-
ing the vehicle against unwanted movement. Further-
more, you should never leave children unattended
inside a vehicle.
STARTING AND OPERATING 297
5
Page 308 of 491
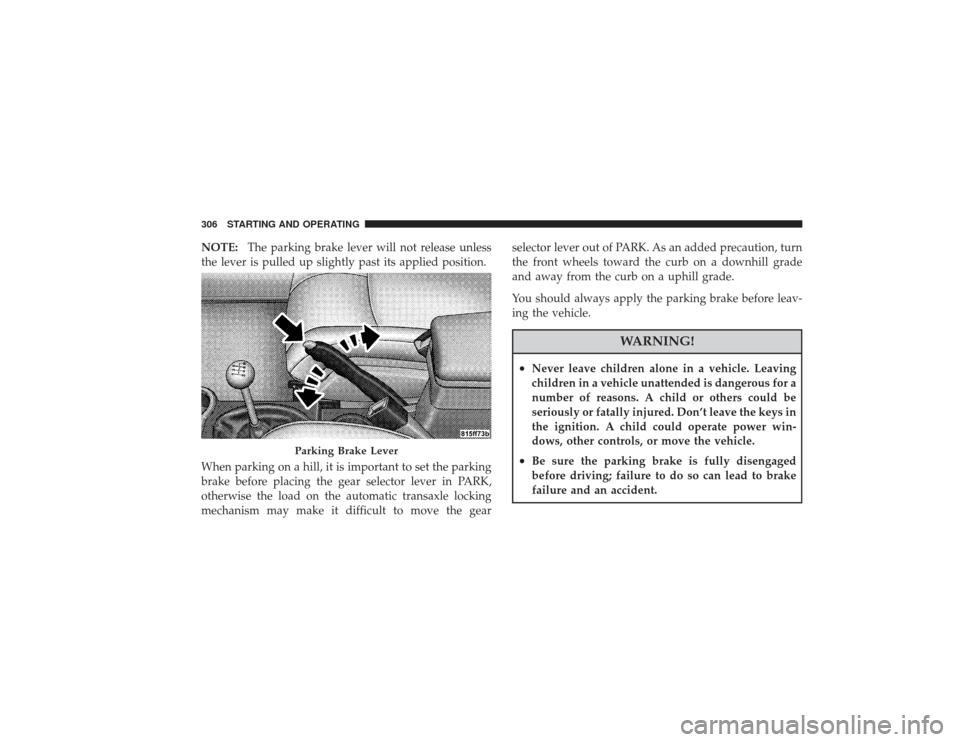
NOTE:The parking brake lever will not release unless
the lever is pulled up slightly past its applied position.
When parking on a hill, it is important to set the parking
brake before placing the gear selector lever in PARK,
otherwise the load on the automatic transaxle locking
mechanism may make it difficult to move the gear selector lever out of PARK. As an added precaution, turn
the front wheels toward the curb on a downhill grade
and away from the curb on a uphill grade.
You should always apply the parking brake before leav-
ing the vehicle.
WARNING!
•
Never leave children alone in a vehicle. Leaving
children in a vehicle unattended is dangerous for a
number of reasons. A child or others could be
seriously or fatally injured. Don’t leave the keys in
the ignition. A child could operate power win-
dows, other controls, or move the vehicle.
•
Be sure the parking brake is fully disengaged
before driving; failure to do so can lead to brake
failure and an accident.
Parking Brake Lever
306 STARTING AND OPERATING
Page 337 of 491
Tire Pressure Monitoring Low Pressure Warnings
The TPM Light will illuminate in the instrument
cluster and a chime will sound when tire pressure
is low in one or more of the four active road tires.
Should this occur, you should stop as soon as possible,
check the inflation pressure of each tire on your vehicle,
and inflate each tire to the vehicle’s recommended cold
placard pressure value. Once the system receives the
updated tire pressures, the system will automatically
update and the TPM Light will turn off. The vehicle may
need to be driven for up to 10 minutes above 15 mph (25
km/h) in order for the TPMS to receive this information.
Check TPMS WarningThe TPM Light will flash on and off for 75 seconds and
then remain on solid when a system fault is detected. The
system fault will also sound a chime. If the ignition key is
cycled, this sequence will repeat, providing the system fault still exists. The TPM Light will turn off when the
fault condition no longer exists. A system fault can occur
due to any of the following:
1. Signal interference due to electronic devices or driving
next to facilities emitting the same Radio Frequencies as
the TPM sensors.
2. Installing aftermarket window tinting that contains
materials which may block radio wave signals.
3. Excessive accumulation of snow or ice around the
wheels or wheel housings.
4. Using tire chains on the vehicle.
5. Using wheels/tires not equipped with TPM sensors.
NOTE:
1. The compact spare tire (if so equipped) does not have
a tire pressure monitoring sensor. Therefore, the TPMS
will not monitor the pressure in the compact spare tire.
STARTING AND OPERATING 335
5
Page 338 of 491
2. If you install the compact spare tire in place of a road
tire that has a pressure below the low-pressure warning
limit, upon the next ignition key cycle, a chime will
sound and the TPM Telltale Light will turn ON due to the
low tire.
3. After driving the vehicle for up to 10 minutes above 15
mph (25 km/h), the TPM Telltale Light will flash on and
off for 75 seconds and then remain on solid.
4. For each subsequent ignition key cycle, a chime will
sound and the TPM Telltale Light will flash on and off for
75 seconds and then remain on solid.
5. Once you repair or replace the original road tire, and
reinstall it on the vehicle in place of the compact spare,
the TPMS will update automatically and the TPM Telltale
Light will turn OFF, as long no tire pressure is below the
low-pressure warning limit in any of the four active roadtires. The vehicle may need to be driven for up to 10
minutes above 15 mph (25 km/h) in order for the TPMS
to receive this information.
GENERAL INFORMATIONThis device complies with part 15 of the FCC rules and
RSS 210 of Industry Canada. Operation is subject to the
following conditions:•
This device may not cause harmful interference.
•
This device must accept any interference received,
including interference that may cause undesired op-
eration.
The tire pressure sensors are covered under one of the
following licenses:
United States ..................... KR5S120123
Canada ........................ 2671-S120123
336 STARTING AND OPERATING