lock CHRYSLER PT CRUISER 2010 1.G Owner's Manual
[x] Cancel search | Manufacturer: CHRYSLER, Model Year: 2010, Model line: PT CRUISER, Model: CHRYSLER PT CRUISER 2010 1.GPages: 60, PDF Size: 6.19 MB
Page 34 of 60

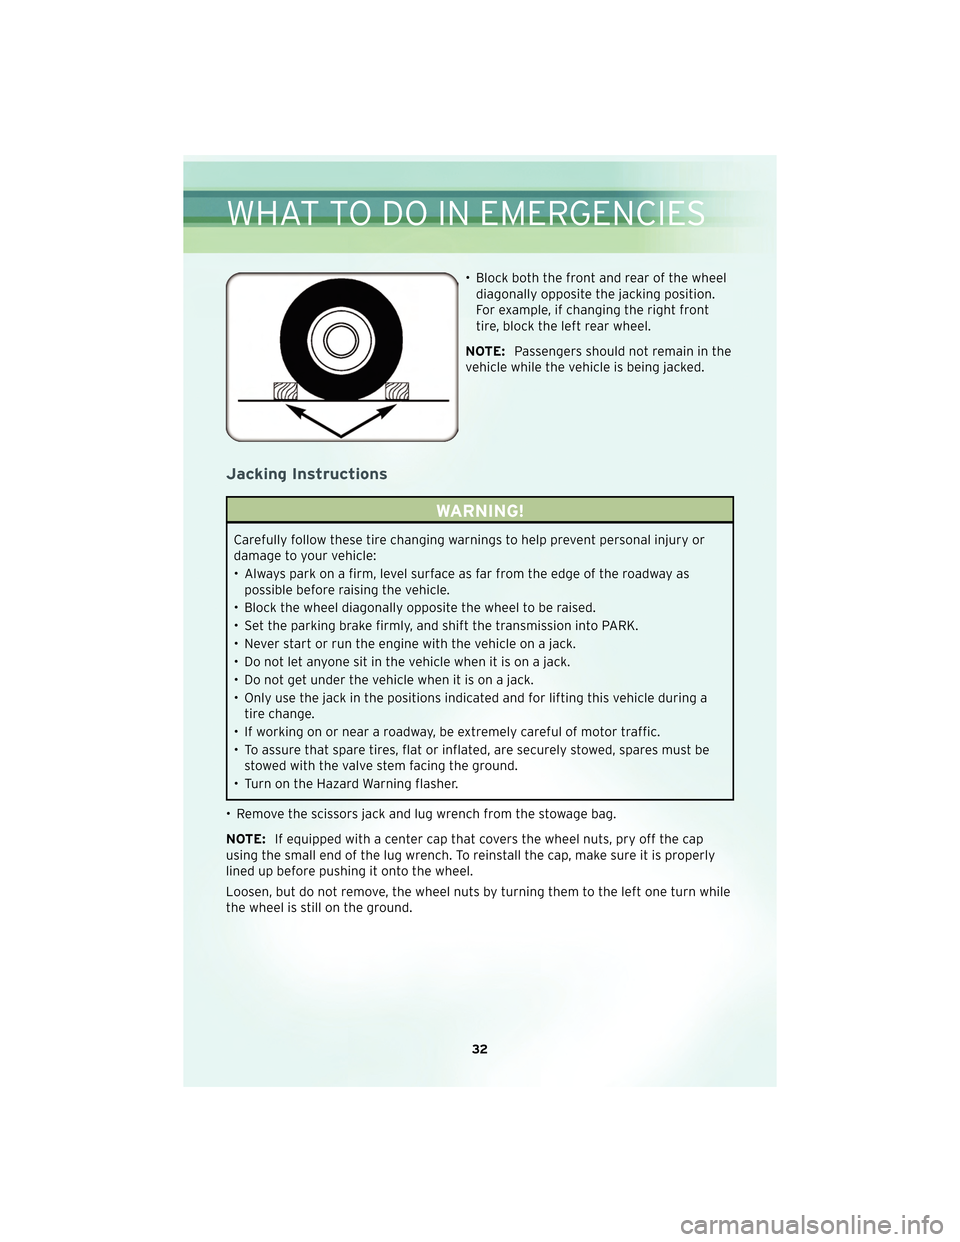
• Block both the front and rear of the wheeldiagonally opposite the jacking position.
For example, if changing the right front
tire, block the left rear wheel.
NOTE: Passengers should not remain in the
vehicle while the vehicle is being jacked.
Jacking Instructions
WARNING!
Carefully follow these tire changing warnings to help prevent personal injury or
damage to your vehicle:
• Always park on a firm, level surface as far from the edge of the roadway as possible before raising the vehicle.
• Block the wheel diagonally opposite the wheel to be raised.
• Set the parking brake firmly, and shift the transmission into PARK.
• Never start or run the engine with the vehicle on a jack.
• Do not let anyone sit in the vehicle when it is on a jack.
• Do not get under the vehicle when it is on a jack.
• Only use the jack in the positions indicated and for lifting this vehicle during a tire change.
• If working on or near a roadway, be extremely careful of motor traffic.
• To assure that spare tires, flat or inflated, are securely stowed, spares must be stowed with the valve stem facing the ground.
• Turn on the Hazard Warning flasher.
• Remove the scissors jack and lug wrench from the stowage bag.
NOTE: If equipped with a center cap that covers the wheel nuts, pry off the cap
using the small end of the lug wrench. To reinstall the cap, make sure it is properly
lined up before pushing it onto the wheel.
Loosen, but do not remove, the wheel nuts by turning them to the left one turn while
the wheel is still on the ground.
WHAT TO DO IN EMERGENCIES
32
Page 36 of 60

NOTE:The wheel cover is held on the wheel by the wheel nuts. When reinstalling
original wheel, properly align the wheel cover to the valve stem, place the wheel
cover onto the wheel, then install the wheel nuts.
• Lower the vehicle by turning the jack screw to the left.
• Finish tightening the nuts. Push down on the wrench while tightening the wheel nuts. Alternate nuts until each nut has been tightened twice. The correct wheel nut
torque is 100 ft lbs (135 N m). If you doubt that you have tightened the nuts
correctly, have them checked with a torque wrench by your authorized dealer or at
a qualified service station.
• Remove the wheel blocks and lower the jack until it is free. Stow the lug wrench and jack in their designated location. Secure all parts using the means provided.
WARNING!
A loose tire or jack thrown forward in a collision or hard stop could endanger the
occupants of the vehicle. Always stow the jack parts and the spare tire in the
places provided. Have the deflated (flat) tire repaired or replaced immediately.
• Place the deflated (flat) tire in the cargo area; have the tire repaired or replaced
as soon as possible.
• Check the tire pressure as soon as possible. Correct the pressure as required.
JUMP-STARTING
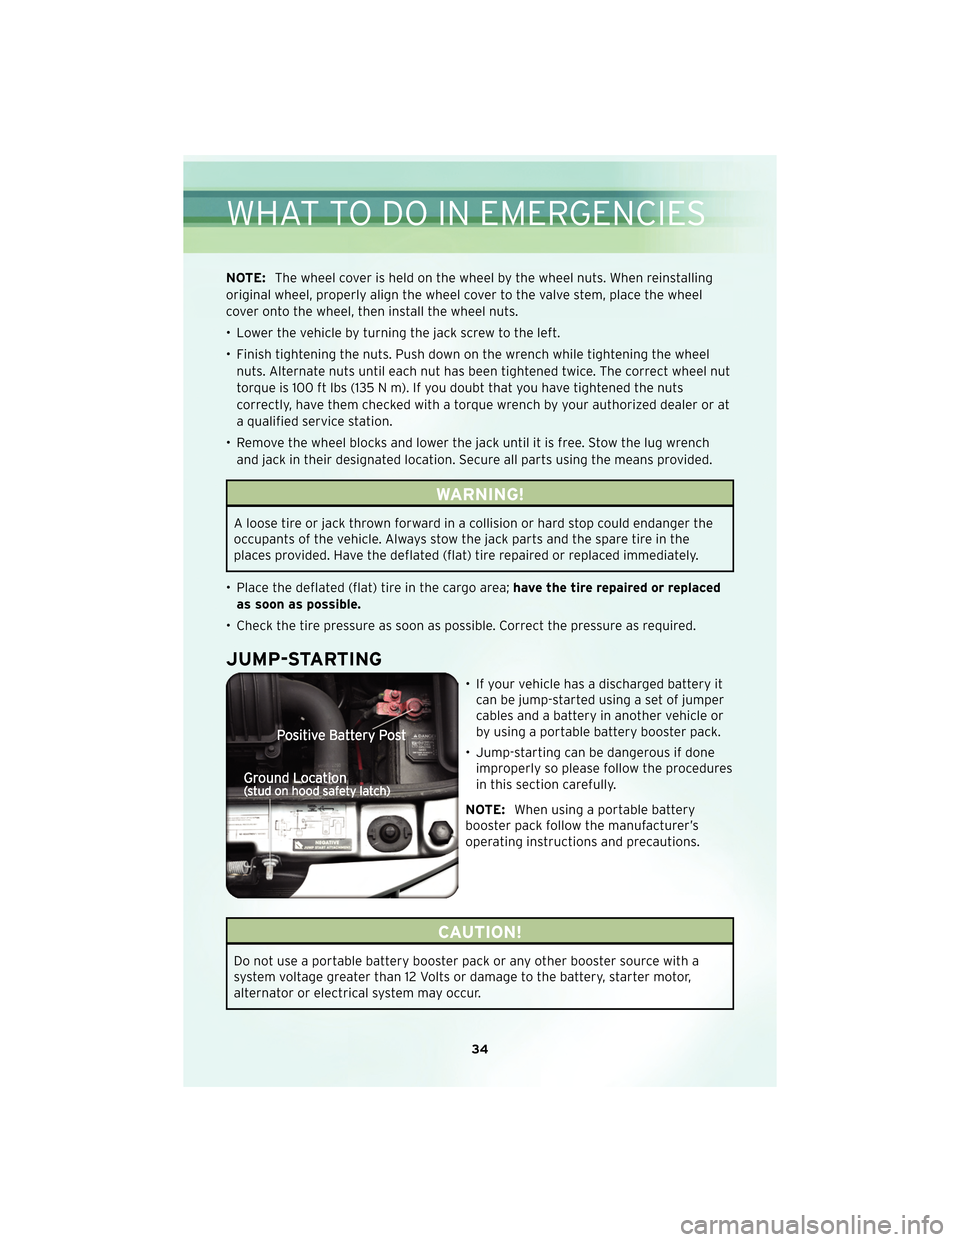
• If your vehicle has a discharged battery it can be jump-started using a set of jumper
cables and a battery in another vehicle or
by using a portable battery booster pack.
• Jump-starting can be dangerous if done improperly so please follow the procedures
in this section carefully.
NOTE: When using a portable battery
booster pack follow the manufacturer’s
operating instructions and precautions.
CAUTION!
Do not use a portable battery booster pack or any other booster source with a
system voltage greater than 12 Volts or damage to the battery, starter motor,
alternator or electrical system may occur.
WHAT TO DO IN EMERGENCIES
34
Page 37 of 60

WARNING!
When temperatures are below the freezing point, electrolyte in a discharged
battery may freeze. Do not attempt jump-starting because the battery could
rupture or explode and cause personal injury. Battery temperature must be
brought above the freezing point before attempting a jump-start.
Preparations for Jump-Start
• The battery in your vehicle is located in the engine compartment just behind theleft front headlight assembly.
WARNING!
• Take care to avoid the radiator cooling fan whenever the hood is raised. It canstart anytime the ignition switch is on. You can be injured by moving fan blades.
• Remove any metal jewelry such as watch bands or bracelets that might make an inadvertent electrical contact. You could be seriously injured.
• Batteries contain sulfuric acid that can burn your skin or eyes and generate hydrogen gas which is flammable and explosive. Keep open flames or sparks
away from the battery.
• Set the parking brake, shift the automatic transmission into PARK and turn the ignition to LOCK.
• Turn off the heater, radio, and all unnecessaryelectrical acc essories.
• If using a another vehicle to jump-start the battery, park the vehicle within the jumper cables reach, set the parking brake and make sure the ignition is OFF.
WARNING!
Do not allow vehicles to touch each other as this could establish a ground
connection and personal injury could result.
35
WHAT TO DO IN EMERGENCIES
Page 43 of 60

OPENING THE HOOD
• Pull the release lever located below the instrument panel and in front of thedriver’s door.
• Raise the hood and locate the safety latch, in the middle of the hood opening.
• Move the safety latch while lifting the hood at the same time.
• Insert the support rod into the slot on the hood.
• To close the hood, remove the support rod and place it in the retaining clip, then lower the hood slowly.
WARNING!
Be sure the hood is fully latched before driving your vehicle. If the hood is not fully
latched, it could open when the vehicle is in motion and block your vision. Failure
to follow this warning could result in serious injury or death.
41
MAINTAINING YOUR VEHICLE
Page 48 of 60

FUSES
Integrated Power Module (IPM)
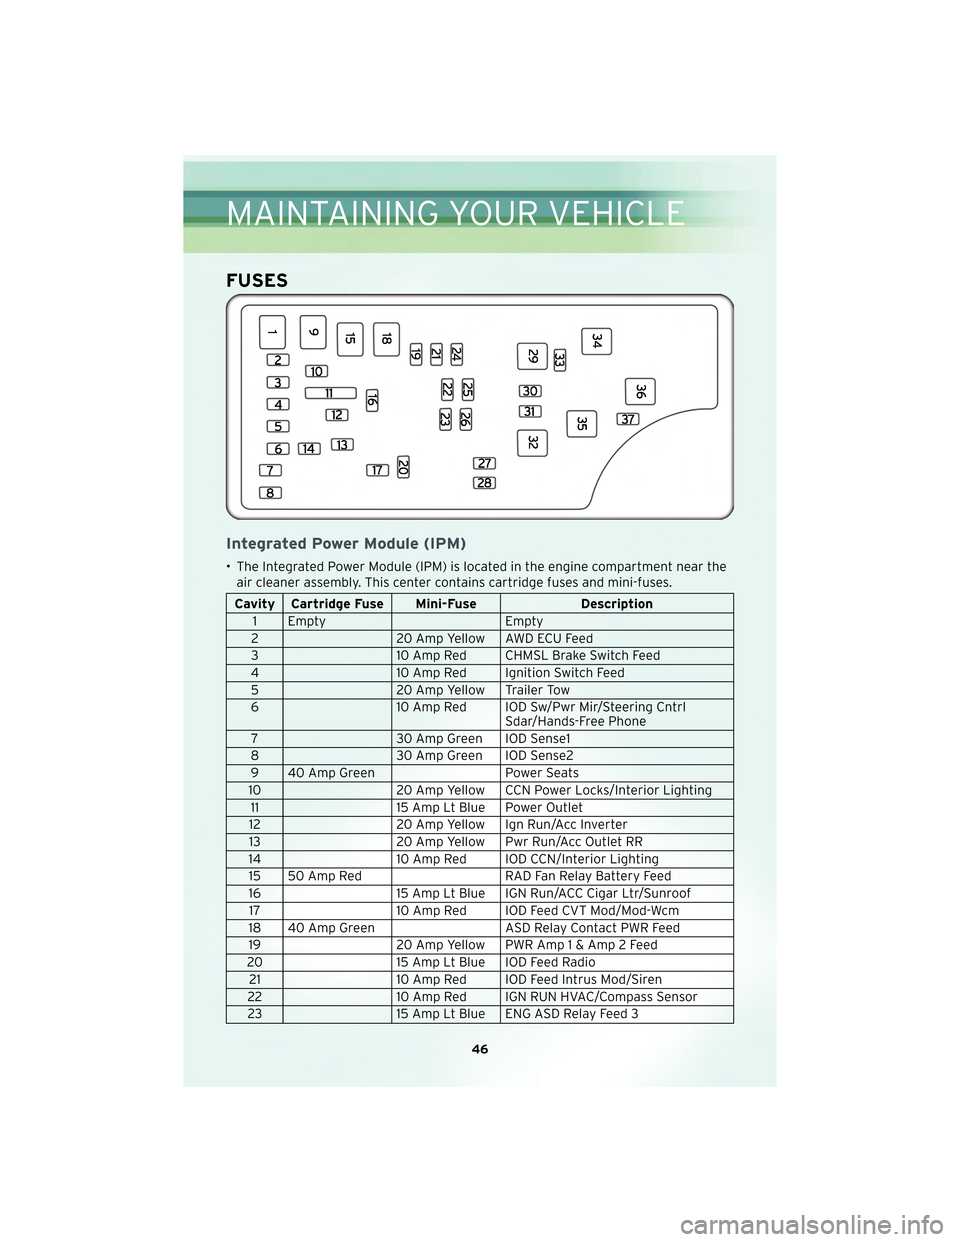
• The Integrated Power Module (IPM) is located in the engine compartment near theair cleaner assembly. This center contains cartridge fuses and mini-fuses.
Cavity Cartridge Fuse Mini-Fuse Description
1 Empty Empty
2 20 Amp Yellow AWD ECU Feed
3 10 Amp Red CHMSL Brake Switch Feed
4 10 Amp Red Ignition Switch Feed
5 20 Amp Yellow Trailer Tow
6 10 Amp Red IOD Sw/Pwr Mir/Steering Cntrl
Sdar/Hands-Free Phone
7 30 Amp Green IOD Sense1
8 30 Amp Green IOD Sense2
9 40 Amp Green Power Seats
10 20 Amp Yellow CCN Power Locks/Interior Lighting
11 15 Amp Lt Blue Power Outlet
12 20 Amp Yellow Ign Run/Acc Inverter
13 20 Amp Yellow Pwr Run/Acc Outlet RR
14 10 Amp Red IOD CCN/Interior Lighting
15 50 Amp Red RAD Fan Relay Battery Feed
16 15 Amp Lt Blue IGN Run/ACC Cigar Ltr/Sunroof
17 10 Amp Red IOD Feed CVT Mod/Mod-Wcm
18 40 Amp Green ASD Relay Contact PWR Feed
19 20 Amp Yellow PWR Amp1&Amp2Feed
20 15 Amp Lt Blue IOD Feed Radio
21 10 Amp Red IOD Feed Intrus Mod/Siren
22 10 Amp Red IGN RUN HVAC/Compass Sensor
23 15 Amp Lt Blue ENG ASD Relay Feed 3
MAINTAINING YOUR VEHICLE
46