lights CHRYSLER PT CRUISER 2010 1.G User Guide
[x] Cancel search | Manufacturer: CHRYSLER, Model Year: 2010, Model line: PT CRUISER, Model: CHRYSLER PT CRUISER 2010 1.GPages: 60, PDF Size: 6.19 MB
Page 3 of 60
INTRODUCTION/WELCOME
WELCOME FROM
CHRYSLER GROUP LLC......... 2
CONTROLS AT A GLANCE
DRIVER COCKPIT.............4
INSTRUMENT CLUSTER .........6
GETTING STARTED
KEYFOB ..................8
THEFT ALARM..............8
SEATBELT ................9
CHILD RESTRAINTS ...........9
FRONTSEATS...............11
TILT STEERING COLUMN ........13
PROGRAMMABLE FEATURES ......14
OPERATING YOUR VEHICLE
TURN SIGNAL/LIGHTS LEVER .....15
WIPER/WASHER LEVER .........16
SPEED CONTROL LEVER ........17
POWER WINDOWS ............18
SLIDING CENTER ARMREST .......18
TUMBLING REAR SEAT/SEAT
REMOVAL .................19
CLIMATE CONTROLS .......... 20
POWERSUNROOF ........... 20
WIND BUFFETING .............21
ELECTRONICS
NON-TOUCH-SCREEN RADIO ......22
ELECTRONIC VEHICLE INFORMATION
CENTER (EVIC) ..............23
UNIVERSAL GARAGE DOOR OPENER .23
POWER OUTLET ............ 25
UTILITY
TRAILER TOWING WEIGHTS
(MAXIMUM TRAILER WEIGHT
RATINGS)................ 26
RECREATIONAL TOWING (BEHIND
MOTORHOME, ETC.) .......... 26 BRAKE/TRANSMISSION INTERLOCK
SYSTEM ................. 26
WHAT TO DO IN EMERGENCIES
24 HOUR TOWING ASSISTANCE -
U.S. ONLY
.................27
INSTRUMENT CLUSTER WARNING
LIGHTS ...................27
IF YOUR ENGINE OVERHEATS .... 29
JACKING AND TIRE CHANGING .... 30
JUMP-STARTING ............ 34
TOWING A DISABLED VEHICLE .... 38
FREEING A STUCK VEHICLE ...... 39
EVENT DATA RECORDER (EDR) . . . 40
MAINTAINING YOUR VEHICLE
OPENING THE HOOD ...........41
ENGINE COMPARTMENT ....... 42
FLUIDS AND CAPACITIES ....... 43
MAINTENANCE CHART ........ 44
FUSES .................. 46
TIREPRESSURES............ 47
WHEEL AND WHEEL TRIM CARE . . . 48
EXTERIOR BULBS ............ 48
CONSUMER ASSISTANCE
CHRYSLER GROUP LLC CUSTOMER
CENTER ................. 49
CHRYSLER CANADA INC.
CUSTOMER CENTER .......... 49
ASSISTANCE FOR THE HEARING
IMPAIRED ................ 49
PUBLICATIONS ORDERING ...... 49
REPORTING SAFETY DEFECTS IN
THE 50 UNITED STATES AND
WASHINGTON, D.C. ........... 50
TIREWARRANTY ............ 50
MOPAR ACCESSORIES
MOPAR®ACCESSORIES ........ 53
TABLE OF CONTENTS
Page 8 of 60
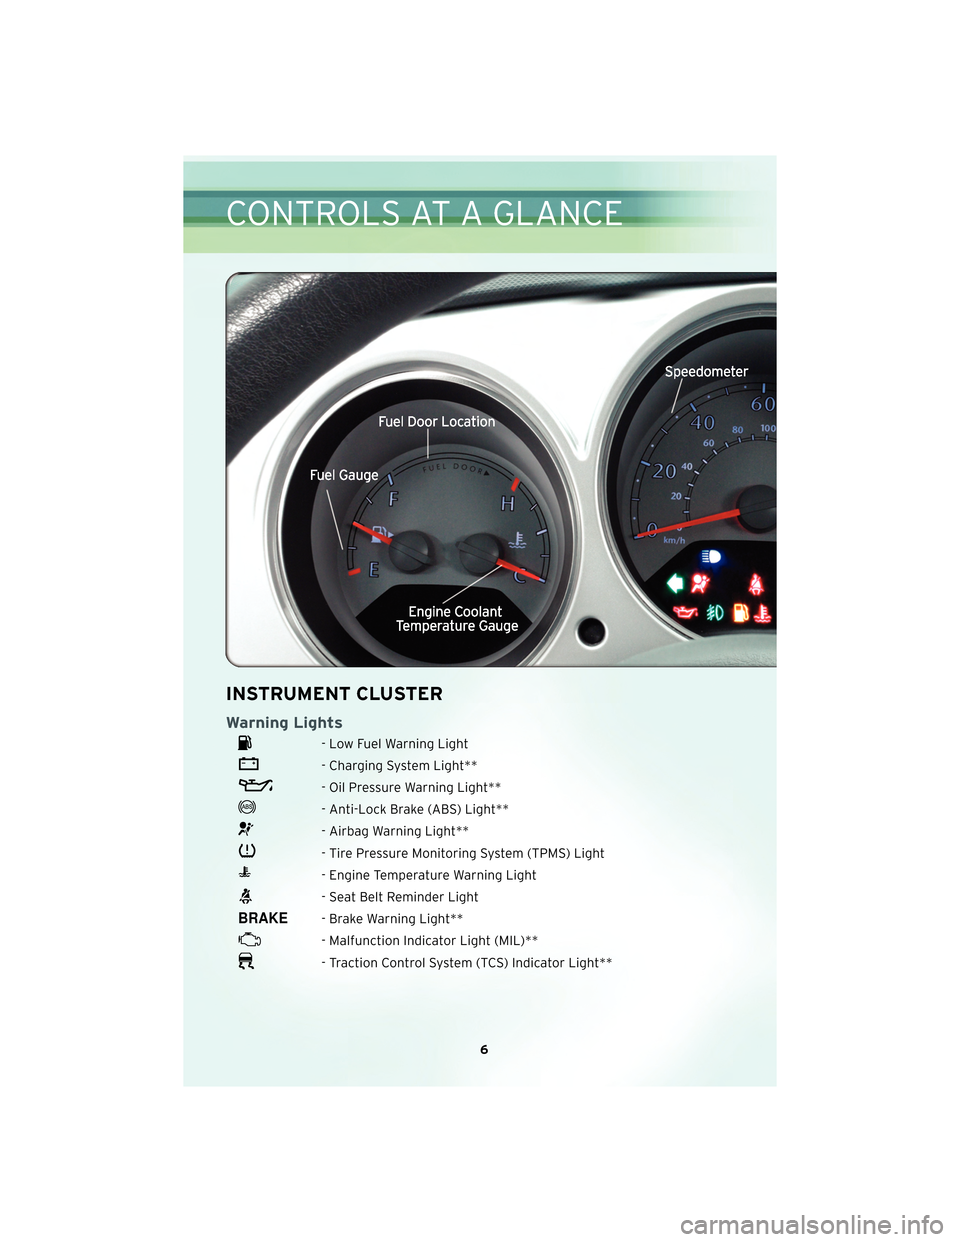
INSTRUMENT CLUSTER
Warning Lights
- Low Fuel Warning Light
- Charging System Light**
- Oil Pressure Warning Light**
- Anti-Lock Brake (ABS) Light**
- Airbag Warning Light**
- Tire Pressure Monitoring System (TPMS) Light
- Engine Temperature Warning Light
- Seat Belt Reminder Light
- Brake Warning Light**
- Malfunction Indicator Light (MIL)**
- Traction Control System (TCS) Indicator Light**
6
CONTROLS AT A GLANCE
Page 16 of 60
PROGRAMMABLE FEATURES
Electronic Vehicle Information Center (EVIC) - If Equipped
• Press the EVIC button, located below the speedometer, until Personal Settings isdisplayed on the EVIC. Use the EVIC button to select one of the following, then
press and hold the EVIC button to select either “ON” or “OFF”.
• Language • Key-Off Power Delay
• Auto Door Locks • Display Units of Measure In
• Auto Unlock On Exit • Confirmation of Voice Commands
• Sound Horn With Remote Key Lock • Automatic Compass Calibration
• Illuminated Approach • Compass Variance
• Headlamp Off Delay • Manual Compass Calibration
• RKE Unlock (Remote Key Unlock) Driver’s Door 1st • Flash Lamps With Lock (Flashing Lights
with Remote Key Lock)
Key Fob Programmable Features
• The following features may also be programmed using the Key Fob transmitter or
the ignition switch and driver’s door lock switch.
NOTE: Pressing the LOCK button while you are inside the vehicle will activate the
Vehicle Security Alarm. Opening a door with the Vehicle Security Alarm activated will
cause the alarm to sound. Press the UNLOCK button to deactivate the Vehicle
Security Alarm.
Unlock On First Press
• To unlock either the driver’s side, or all doors, on the first press of the UNLOCK button:
• Press and hold the LOCK button for at least 4 seconds, but no longer than 10 seconds. Then, press and hold the UNLOCK button while still holding the
LOCK button.
• Release both buttons at the same time.
Sound Horn With Lock
• To turn the horn chirp on or off when the doors are locked: • Press the LOCK button for at least 4 seconds, but no longer than 10 seconds.Then, press the PANIC button while still holding the LOCK button.
• Release both buttons at the same time.
Flashing Lights With Lock
• The turn signal lights flashing, when the doors are locked or unlocked, feature can be turned on or off. To turn this feature on or off:
• Press and hold the UNLOCK button for at least 4 seconds, but no longer than 10 seconds. Then, press and hold the LOCK button while still holding the
UNLOCK button.
• Release both buttons at the same time.
GETTING STARTED
14
Page 17 of 60
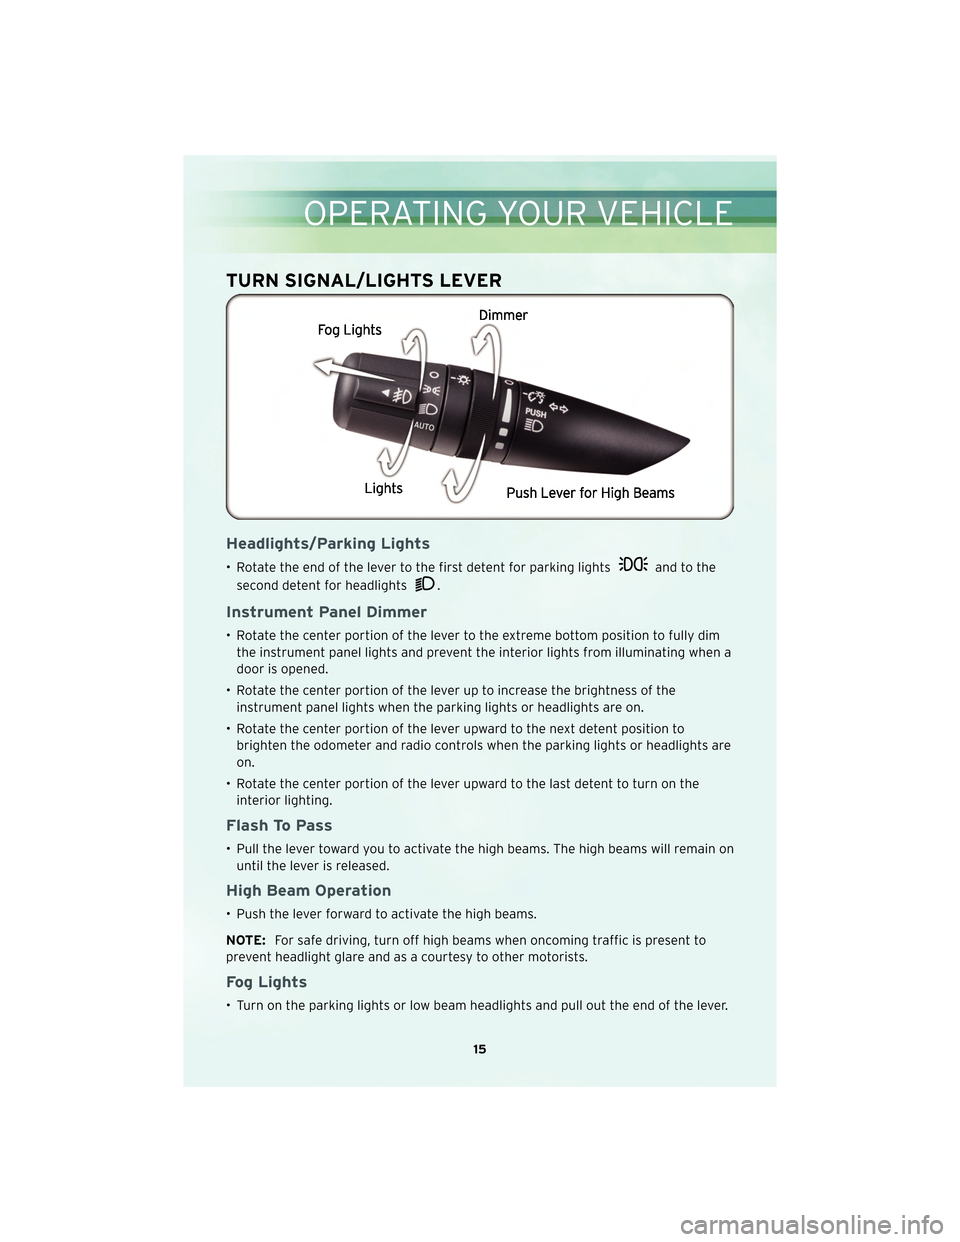
TURN SIGNAL/LIGHTS LEVER
Headlights/Parking Lights
• Rotate the end of the lever to the first detent for parking lightsand to the
second detent for headlights
.
Instrument Panel Dimmer
• Rotate the center portion of the lever to the extreme bottom position to fully dim the instrument panel lights and prevent the interior lights from illuminating when a
door is opened.
• Rotate the center portion of the lever up to increase the brightness of the instrument panel lights when the parking lights or headlights are on.
• Rotate the center portion of the lever upward to the next detent position to brighten the odometer and radio controls when the parking lights or headlights are
on.
• Rotate the center portion of the lever upward to the last detent to turn on the interior lighting.
Flash To Pass
• Pull the lever toward you to activate the high beams. The high beams will remain onuntil the lever is released.
High Beam Operation
• Push the lever forward to activate the high beams.
NOTE: For safe driving, turn off high beams when oncoming traffic is present to
prevent headlight glare and as a courtesy to other motorists.
Fog Lights
• Turn on the parking lights or low beam headlights and pull out the end of the lever.
15
OPERATING YOUR VEHICLE
Page 29 of 60
24 HOUR TOWING ASSISTANCE - U.S. ONLY
• Dial toll-free 1-800-521-2779.
• Provide your name, vehicle identification number and license plate number.
• Provide your location, including telephone number, from which you are calling.
• Briefly describe the nature of the problem and answer a few simple questions.
• You will be given the name of the service provider and an estimated time of arrival.If you feel you are in an “unsafe situation”, please let us know. With your consent,
we will contact local police or safety authorities.
INSTRUMENT CLUSTER WARNING LIGHTS
- Traction Control System (TCS) Indicator Light
• If this indicator light flashes during acceleration, apply as little throttle as possible.While driving, ease up on the accelerator. Adapt your speed and driving to the
prevailing road conditions. To improve the vehicle’s traction when starting off in
deep snow, sand or gravel, it may be desirable to switch the TCS system off.
- Tire Pressure Monitoring System (TPMS) Light
• A Tire Pressure Monitoring Light and a “low tire” message will display in yourinstrument cluster along with an audible chime if one or more of your vehicle’s four
road tires are significantly under-inflated.
• Check the inflation pressure of each tire and inflate to the recommended pressure for your vehicle. The tire pressures recommended for your vehicle are found on the
“Tire and Loading Information” label located on the driver’s side door opening. The
TPMS light should not be used as a tire pressure gauge when adjusting your tire
pressure.
• It is recommended that you check the tire pressure in the morning when tires are cool; inflate each tire to the recommended pressure for your vehicle. The light will
turn off after your vehicle’s tire pressures are properly inflated and the pressure
has been recognized. The vehicle may need to be driven for up to 20 minutes
above 15 mph (25 km/h) before the light will turn off.
• Temperature changes can affect tire pressure, causing the TPMS light to turn on. Tire pressures will also increase as the vehicle is driven – this is normal and you
should not adjust for this increased pressure.
• Driving on under-inflated tires reduces your vehicle’s fuel efficiency and tire tread life. If a spare tire is in use on the vehicle, the TPMS light may turn on.
- Brake Warning Light
• The Brake Warning light illuminates when there is either a system malfunction orthe parking brake is applied. If the light is on and the parking brake is not applied, it
indicates a possible brake hydraulic malfunction, brake booster problem or an
Anti-Lock Brake System problem.
27
WHAT TO DO IN EMERGENCIES
Page 55 of 60
MOPAR®ACCESSORIES
• The following highlights just some ofthe authentic Chrysler Accessories by
MOPAR®that have been engineered to customize your Chrysler PT Cruiser.
• To see the full line of acc essories, stop by your Chry sler dealer or visit MOPAR.com.
CHROME:
• Exhaust Tip • Fuel Filler Door• Door Spears
EXTERIOR:
• Door Entry Guards • Side Window Air Deflectors• Front Air Deflector
• Hitch Receiver • Front End Cover • Molded Splash Guards
INTERIOR:
• Premium Carpet Floor Mats • Door Sill Guards • Molded Cargo Tray
• Slush Mats
CARRIERS:
• Hitch Mount Bike Carrier • Roof Mount Bike Carrier • Roof Box Cargo Carrier
• Roof Mount Ski and Snowboard Carrier • Roof Mount Water
Sports Carrier • Roof Mount Canoe
Carrier
53
MOPAR ACCESSORIES