buttons CHRYSLER SEBRING 2010 3.G User Guide
[x] Cancel search | Manufacturer: CHRYSLER, Model Year: 2010, Model line: SEBRING, Model: CHRYSLER SEBRING 2010 3.GPages: 76, PDF Size: 9.55 MB
Page 18 of 76

WARNING!
Do not adjust the steering wheel while driving. The tilt/telescoping adjustment
must be locked while driving. Adjusting the steering wheel while driving or driving
without the tilt/telescoping adjustment locked could cause the driver to lose
control of the vehicle. Failure to follow this warning may result in serious injury or
death.
PROGRAMMABLE FEATURES
Electronic Vehicle Information Center (EVIC) – If Equipped
• The EVIC can be used to program the following Personal Settings. Press andrelease the MENU button
until Personal Settings displays, then press the
STEP button
to scroll through the settings. Press the RESET
button
until ON or OFF appears.
• Language • Headlights With Wipers
• Auto Unlock On Exit • Headlamp Off Delay
• Remote Key Unlock • Key Off Power Delay
• Sound Horn With LOCK • ILLUMIN. Approach
• Flash Lights With LOCK • Display Units Of Measure In
Key Fob Programmable Features
• The following features may also be programmed by using the Key Fob transmitter
or the ignition switch and driver’s door lock switch.
NOTE: Pressing the LOCK button while you are inside the vehicle will activate the
Vehicle Security Alarm. Opening a door with the Vehicle Security Alarm activated will
cause the alarm to sound. Press the UNLOCK button to deactivate the Vehicle
Security Alarm.
Unlock On First Press
• To unlock either the driver’s side, or all doors, on the first press of the UNLOCK button:
• Press and hold the LOCK button for at least 4 seconds, but no longer than 10 seconds. Then, press and hold the UNLOCK button while still holding the
LOCK button.
• Release both buttons at the same time.
Auto Unlock Doors On Exit
• To have all of the vehicle doors unlock when any door is opened: • Close all doors and place the key in the ignition.
• Within 15 seconds, cycle the ignition switch between LOCK and ON and then backto LOCK four times, ending up in the LOCK position (do not start the engine).
• Within 30 seconds, press the power door UNLOCK switch to unlock the doors.
GETTING STARTED
16
Page 19 of 76

Auto Door Lock
• To have the doors lock automatically when the vehicle’s speed exceeds 15 mph(24 km/h):
• The auto door lock feature can be enabled or disabled by your authorized dealer. See your authorized dealer for programming.
Sound Horn With Lock
• To turn the horn chirp on or off when the doors are locked:
• Press the LOCK button for at least 4 seconds, but no longer than 10 seconds.Then, press the PANIC button while still holding the LOCK button.
• Release both buttons at the same time.
Flashing Lights With Lock
• The turn signal lights flashing, when the doors are locked or unlocked, feature can be turned on or off. To turn this feature on or off:
• Press and hold the UNLOCK button for at least 4 seconds, but no longer than 10 seconds. Then, press and hold the LOCK button while still holding the
UNLOCK button.
• Release both buttons at the same time.
17
GETTING STARTED
Page 27 of 76

Media Center 230 (REQ)
NOTE:Uconnect™ Phone and Voice Command are vehicle options which must be
ordered separately. The buttons on the radio will only be active if the vehicle has
been equipped with the option.
• The radio sales code is located on the lower right side of the radio faceplate.
• Unless otherwise noted, the information provided on the operation and functionality of the radios in this section is common to all non-touch-screen radios.
Seek Up/Down Buttons
• Press to seek through radio stations in AM, FM or SAT bands. Seek through tracksin CD.
• Holding either button will bypass stations without stopping.
Audio Settings
• Press the TUNE/SCROLL control knob and BASS, MID, TREBLE, BALANCE and FADE will display. Rotate the TUNE/SCROLL control knob to select the desired setting.
25
ELECTRONICS
Page 30 of 76

Media Center 430 (RBZ)
NOTE:Uconnect™ Phone and Voice Command are vehicle options which must be
ordered separately. The buttons on the radio will only be active if the vehicle has
been equipped with the option.
• The radio sales code is located on the lower right side of the radio faceplate.
• Unless otherwise noted, the information provided on the operation and functionality of the radios in this section is common to all touch-screen radios.
Seek Up/Down
• REN and RER Radios – Press the SEEK hard-key to seek through radio stations inAM, FM, or SAT bands. Seek through tracks in CD or iPod®modes or through songs
in the HDD playlist.
• RBZ Radio – Touch the SCAN soft-key, right or left arrow soft-keys to change the currently playing station in AM, FM or SAT bands.
Radio Mode
• Press the RADIO/MEDIA (RER and REN) or RADIO (RBZ) hard-key to display thedifferent radio modes, then press the desired soft-key to select AM, FM, SAT, HDD,
Disk or AUX modes.
ELECTRONICS
28
Page 34 of 76

REMOTE AUDIO CONTROLS
• The remote audio controls are located onthe rear surface of the steering wheel.
Right Switch
• Press the switch up or down to increase ordecrease the volume.
• Press the button in the center to change modes AM/FM/CD/SAT.
Left Switch
• Press the switch up or down to search forthe next listenable station or select the
next or previous CD track.
• Press the button in the center to select the next preset station (radio) or to change
CDs if equipped with a CD Changer.
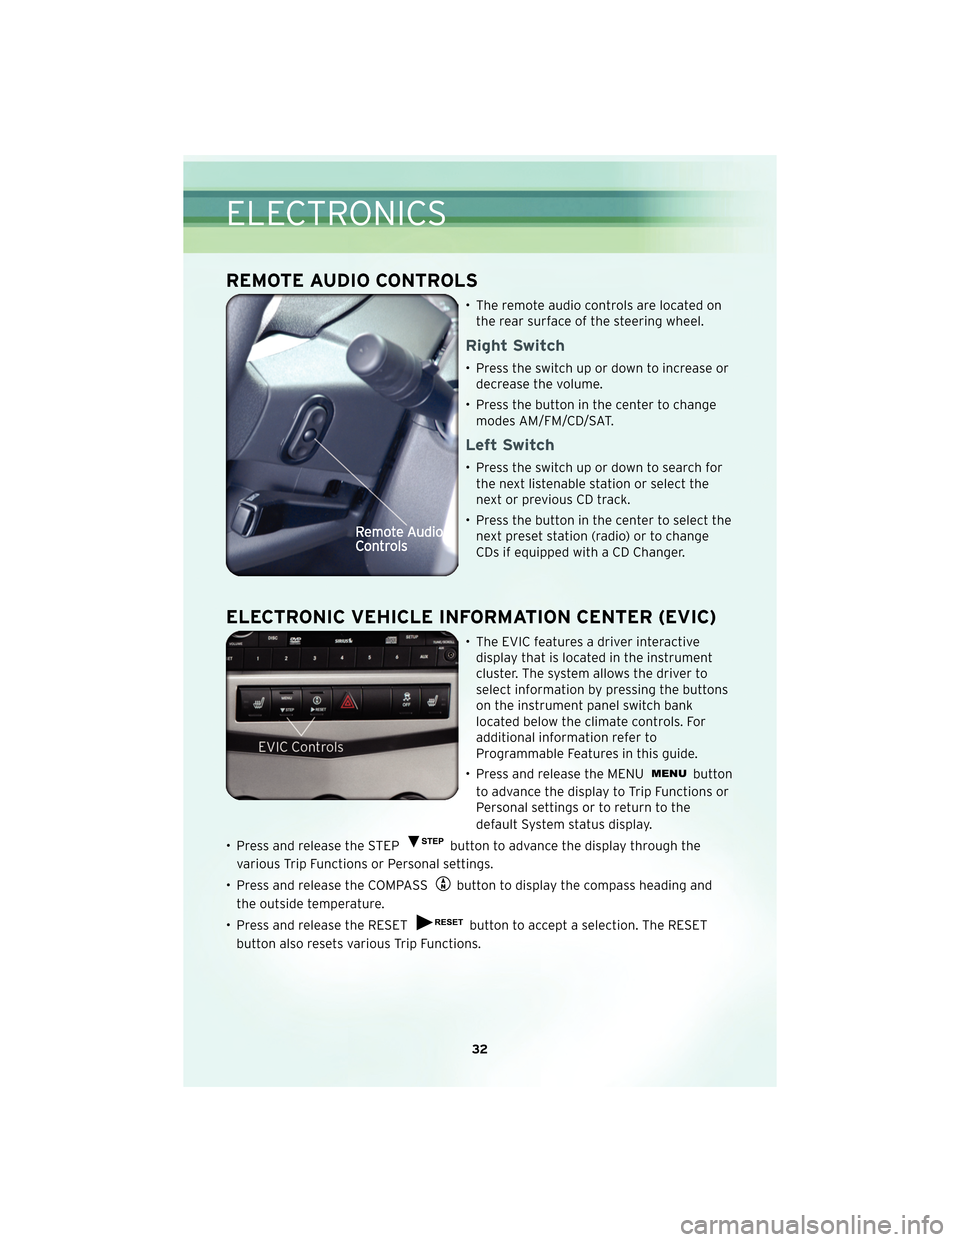
ELECTRONIC VEHICLE INFORMATION CENTER (EVIC)
• The EVIC features a driver interactivedisplay that is located in the instrument
cluster. The system allows the driver to
select information by pressing the buttons
on the instrument panel switch bank
located below the climate controls. For
additional information refer to
Programmable Features in this guide.
• Press and release the MENU
button
to advance the display to Trip Functions or
Personal settings or to return to the
default System status display.
• Press and release the STEP
button to advance the display through the
various Trip Functions or Personal settings.
• Press and release the COMPASS
button to display the compass heading and
the outside temperature.
• Press and release the RESET
button to accept a selection. The RESET
button also resets various Trip Functions.
ELECTRONICS
32
Page 35 of 76

UNIVERSAL GARAGE DOOR OPENER
Programming HomeLink®
Begin Programming
• The HomeLink®buttons are located in the
sun visor.
• Erase all channels before you begin training by holding the two outside buttons
for up to 20 seconds until the red indicator
flashes.
• Park your vehicle outside of the garage and turn the ignition switch to the ON/RUN position.
• Place the hand-held transmitter 1 to 3 in (3 to 8 cm) from the HomeLink
®buttons
while keeping the indicator light in view.
• Simultaneously, press and hold both the chosen HomeLink
®button and the
hand-held transmitter button until the HomeLink®indicator flash rate changes
from a slow to a rapidly blinking light, then release both the HomeLink®and the
hand-held transmitter buttons. This may take up to 30 seconds, or longer in rare
cases.
• Press and hold the just-trained HomeLink
®button; if the indicator light stays on
constantly, programming is complete and the garage door should open.
WARNING!
• Your motorized door or gate will open and close while you are training the universal transceiver. Do not train the transceiver if people or pets are in the
path of the door or gate. Only use this transceiver with a garage door opener
that has a “stop and reverse” feature as required by Federal safety standards.
This includes most garage door opener models manufactured after 1982. Do not
use a garage door opener without these safety features. Call toll-free
1–800–355–3515 or, on the Internet, at www.HomeLink.com for safety
information or assistance.
• Vehicle exhaust contains Carbon Monoxide (CO), a dangerous gas. Do not run your vehicle in the garage while training the transceiver. Exhaust gas can cause
serious injury or death.
NOTE: If you are having difficulty training your HomeLink
®and your garage door
opener was manufactured after 1995, you may have a rolling code. Follow the steps
below for Programming A Rolling Code System.
33
ELECTRONICS