tow CHRYSLER SEBRING CONVERTIBLE 2004 2.G User Guide
[x] Cancel search | Manufacturer: CHRYSLER, Model Year: 2004, Model line: SEBRING CONVERTIBLE, Model: CHRYSLER SEBRING CONVERTIBLE 2004 2.GPages: 271, PDF Size: 5.31 MB
Page 125 of 271
NOTE:The defroster turns off automatically after 15
minutes of operation. Each later activation will allow 10
minutes of operation.
Side Window Demisters
A side window demister outlet is at each end of the
instrument panel. These non-adjustable outlets direct air
toward the side windows when the system is in either the
FLOOR, MIX, or DEFROST modes. A small amount of air
is directed to the side window demisters in BI-LEVEL
mode as well. The air is directed at the area of the
windows through which you view the outside mirrors.
Windshield and Side Window Fogging
Interior fogging on the windshield can be quickly
removed by using the defrost position on the mode
control.
Your side windows may fog on the inside in mild
rainy or humid weather. To clear the windows,
select the Panel-Air Conditioning mode on the
Mode Control. Point the panel outlets toward the side
windows.
NOTE:Do not use the recirculation mode as it will not
clear windows under these conditions.
Summer Operation
Air conditioned vehicles must be protected with a high-
quality antifreeze coolant to provide proper corrosion
protection and to raise the boiling point of the coolant for
protection against overheating. A 50 % concentration is
recommended.
Winter Operation
The blower air will heat faster in cold weather if you use
only the low blower speeds for the first 10 minutes of
operation. During engine warm up in cold weather, use
the Defrost mode to direct any cold air away from vehicle
occupants. Use of the Recirculate-Air Conditioning Mode
during winter months is not recommended due to the
possibility of window fogging.
NOTE:See Operating Tips chart (for Manual A/C
Control) at the end of this section for suggested control
settings in different weather conditions.
UNDERSTANDING YOUR INSTRUMENT PANEL 125
4
Page 131 of 271
mTrailer Towing........................166
NWarranty Requirements.................166
mFlexible Fuel ± (2.7L Engines With Automatic
Transmission Only)
.....................168
NE-85 General Information................168
NEthanol Fuel (E-85)....................168
NFuel Requirements....................168NSelection Of Engine Oil.................169
NStarting............................170
NCruising Range.......................170
NReplacement Parts.....................171
NMaintenance.........................171
STARTING AND OPERATING 131
5
Page 133 of 271

WARNING!
Never pour fuel or other flammable liquid into the
throttle body air inlet opening in an attempt to start
the vehicle. This could result in flash fire causing
serious personal injury.
CAUTION!
Do not attempt to push or tow your vehicle to get it
started. Vehicles equipped with an automatic trans-
axle cannot be started this way. Unburned fuel could
enter the catalytic converter and once the engine has
started, ignite and damage the converter and vehicle.
If the vehicle has a discharged battery, booster cables
may be used to obtain a start from another vehicle.
This type of start can be dangerous if done improp-
erly, so follow the procedure carefully. See section 6
of this manual for jump starting instructions.
Extreme Cold Weather (below -20ÉF or -29ÉC)
To insure reliable starting at these temperatures, use of an
externally powered electric engine block heater and
battery blanket heater package (available from your
dealer) is recommended.
STARTING AND OPERATING 133
5
Page 138 of 271
WARNING!
Your vehicle could move and injure you and others if
it is not completely in P (Park). Check by trying to
move the gearshift lever back and forth without
depressing the shift button after you have set it in P.
Make sure it is in Park before leaving the vehicle.
WARNING!
Never use the Park position as a substitute for the
parking brake. Always apply the parking brake fully
when parked to guard against vehicle movement and
possible injury or damage.
ªRº Reverse
Shift into this range only after the vehicle has come to a
complete stop.
ªNº Neutral
Engine may be started in this range.
ªDº Overdrive
This range should be used for most city and highway
driving. It provides smoothest up shifts and down shifts
and best fuel economy.
When frequent transaxle shifting occurs while using the
Overdrive range, such as when operating the vehicle
under heavy loading conditions (in hilly terrain, travel-
ing into strong head winds, or while towing heavy
trailers), use the ª3º range.
ª3º Drive
This range eliminates shifts into Overdrive. The transaxle
will operate normally in first and second while in this
range.
A delayed shift from second to third will occur at speeds
of about 31 to 38 mph (50 to 60 km/h) and low levels of
accelerator pedal travel. An early down-shift from third
to second will occur at a speed of about 34 to 30 mph (54
to 48 km/h). This is done to provide second gear engine
braking at speeds less than 30 mph (48 km/h).
138 STARTING AND OPERATING
Page 141 of 271
PARKING BRAKE
When the parking brake is applied with the ignition on,
the brake light in the instrument cluster will come on.
NOTE:This light only shows that the parking brake is
on. It does not show the degree of brake application.
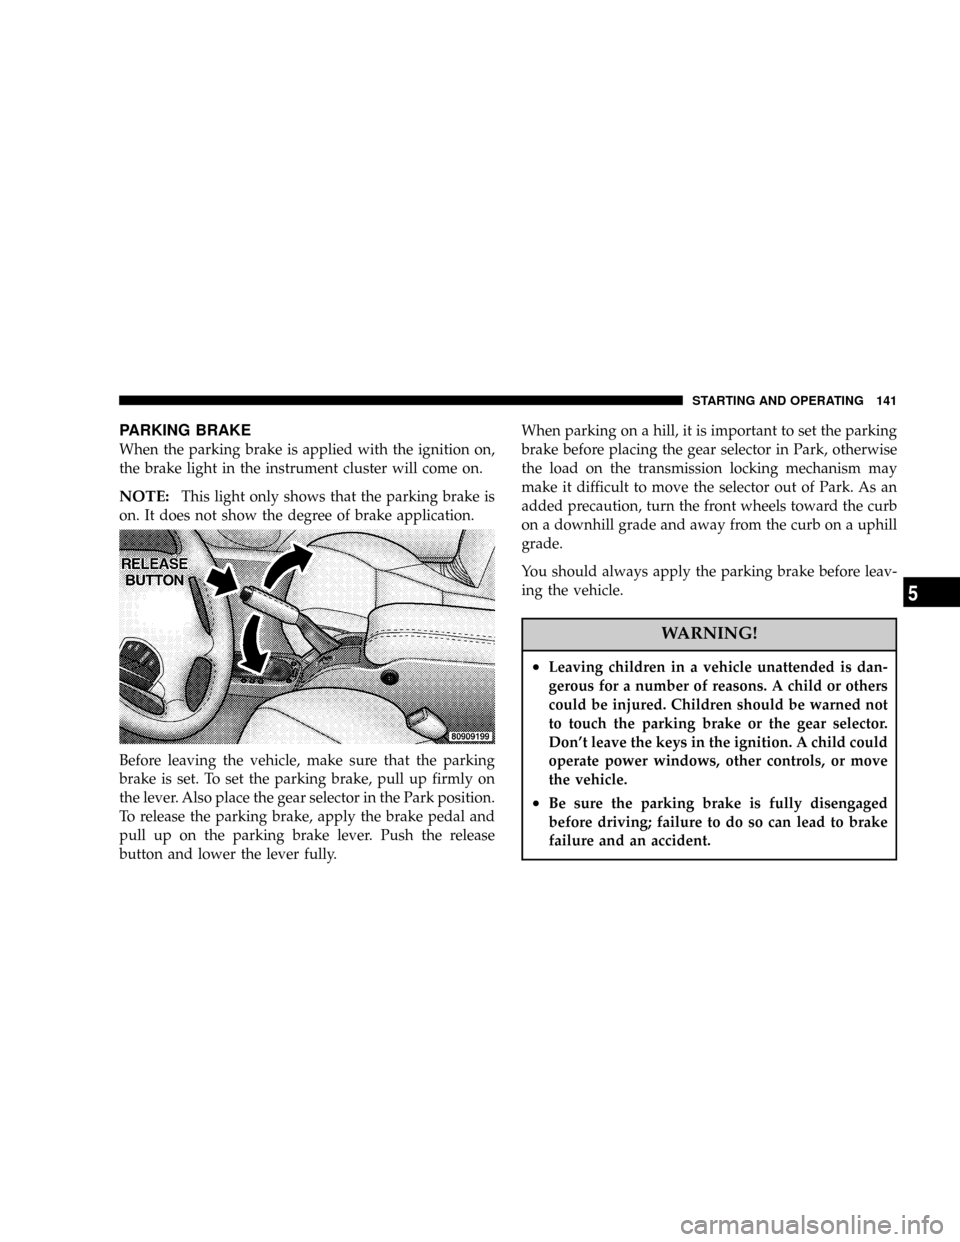
Before leaving the vehicle, make sure that the parking
brake is set. To set the parking brake, pull up firmly on
the lever. Also place the gear selector in the Park position.
To release the parking brake, apply the brake pedal and
pull up on the parking brake lever. Push the release
button and lower the lever fully.When parking on a hill, it is important to set the parking
brake before placing the gear selector in Park, otherwise
the load on the transmission locking mechanism may
make it difficult to move the selector out of Park. As an
added precaution, turn the front wheels toward the curb
on a downhill grade and away from the curb on a uphill
grade.
You should always apply the parking brake before leav-
ing the vehicle.
WARNING!
²Leaving children in a vehicle unattended is dan-
gerous for a number of reasons. A child or others
could be injured. Children should be warned not
to touch the parking brake or the gear selector.
Don't leave the keys in the ignition. A child could
operate power windows, other controls, or move
the vehicle.
²Be sure the parking brake is fully disengaged
before driving; failure to do so can lead to brake
failure and an accident.
STARTING AND OPERATING 141
5
Page 150 of 271

adhere to the loading conditions, tire size and cold tire
inflation pressures specified on the Tire and Loading
Information placard and the Vehicle Loading section of
this manual.
NOTE:Under a maximum loaded vehicle condition,
gross axle weight ratings (GAWR's) for the front and rear
axles must not be exceeded. For further information on
GAWR's, vehicle loading and trailer towing, see the
Vehicle Loading section of this manual.
To determine the maximum loading conditions of your
vehicle, locate the statement ªThe combined weight of
occupants and cargo should never exceed XXX kg or XXX
lbs.º on the Tire and Loading Information placard. The
combined weight of occupants, cargo/luggage and
trailer tongue weight (if applicable) should never exceed
the weight referenced here.
Steps for Determining Correct Load Limit
1. Locate the statement ªThe combined weight of occu-
pants and cargo should never exceed XXX poundsº on
your vehicle's placard.
2. Determine the combined weight of the driver and
passengers that will be riding in your vehicle.3. Subtract the combined weight of the driver and pas-
sengers from XXX kilograms or XXX pounds.
4.
The resulting figure equals the available amount of cargo
and luggage load capacity. For example, if ªXXXº amount
equals 1400 lbs. and there will be five 150 lb. passengers in
your vehicle, the amount of available cargo and luggage
load capacity is 650 lb. (1400±750 (5 x 150) = 650 lb.)
5. Determine the combined weight of luggage and cargo
being loaded on the vehicle. That weight may not safely
exceed the available cargo and luggage load capacity
calculated in step 4.
6. If your vehicle will be towing a trailer, load from your
trailer will be transferred to your vehicle. Consult this
manual to determine how this reduces the available
cargo and luggage load capacity of your vehicle.
NOTE:The following table shows examples on how to
calculate total load, cargo/luggage and towing capacities
of your vehicle with varying seating configurations and
number and size of occupants. This table is for illustra-
tion purposes only and may not be accurate for the
seating and load carry capacity of your vehicle.
150 STARTING AND OPERATING
Page 160 of 271
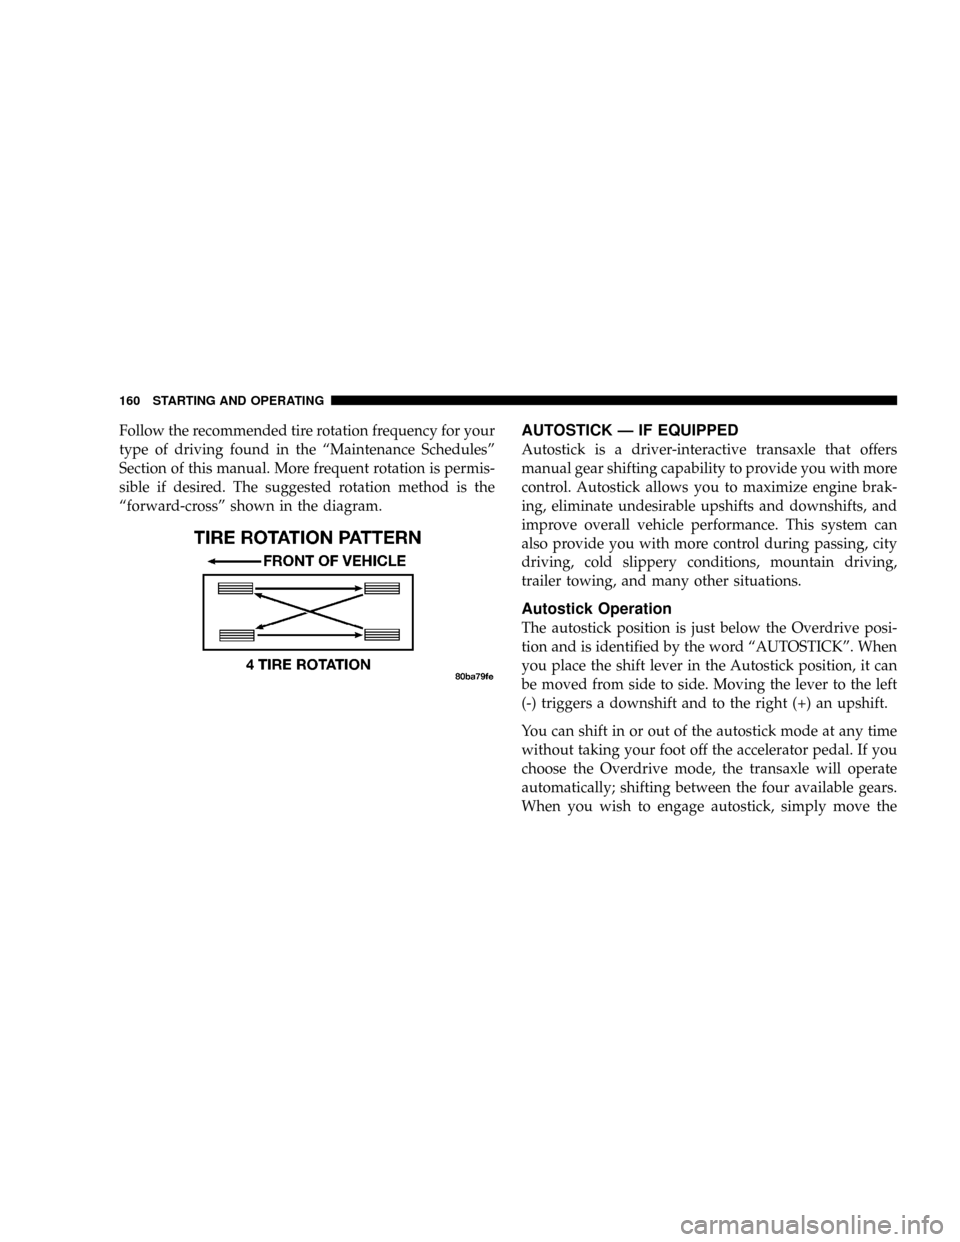
Follow the recommended tire rotation frequency for your
type of driving found in the ªMaintenance Schedulesº
Section of this manual. More frequent rotation is permis-
sible if desired. The suggested rotation method is the
ªforward-crossº shown in the diagram.AUTOSTICK Ð IF EQUIPPED
Autostick is a driver-interactive transaxle that offers
manual gear shifting capability to provide you with more
control. Autostick allows you to maximize engine brak-
ing, eliminate undesirable upshifts and downshifts, and
improve overall vehicle performance. This system can
also provide you with more control during passing, city
driving, cold slippery conditions, mountain driving,
trailer towing, and many other situations.
Autostick Operation
The autostick position is just below the Overdrive posi-
tion and is identified by the word ªAUTOSTICKº. When
you place the shift lever in the Autostick position, it can
be moved from side to side. Moving the lever to the left
(-) triggers a downshift and to the right (+) an upshift.
You can shift in or out of the autostick mode at any time
without taking your foot off the accelerator pedal. If you
choose the Overdrive mode, the transaxle will operate
automatically; shifting between the four available gears.
When you wish to engage autostick, simply move the
160 STARTING AND OPERATING
Page 166 of 271
VEHICLE LOADING
Vehicle Loading Capacities
Front Seat Occupants....................... 2
Rear Seat Occupants........................ 2
Luggage...................... 115lbs. (52 kg)
Rated Vehicle Capacity............ 715lbs. (324 kg)
TRAILER TOWING
In this section you will find safety tips and information
on limits to the type of towing you can reasonably do
with your vehicle. Before towing a trailer carefully re-
view this information to tow your load as efficiently and
safely as possible.
To maintain warranty coverage, follow the requirements
and recommendations in this manual concerning ve-
hicles used for trailer towing.
Perform maintenance services as prescribed in the main-
tenance schedules manual. When your vehicle is used for
trailer towing, never exceed the gross axle weight rating
(GAWR) by the addition of:
²The tongue weight of the trailer.
²The weight of any other type of cargo or equipment
put in or on your vehicle.
²Remember that everything put in or on the trailer adds
to the load on your vehicle.
Warranty Requirements
The Manufacturer's Passenger Vehicle Warranty will
apply to vehicles used to tow trailers for non-commercial
use. However the following conditions must be met:
²The maximum trailer load is 1,000 lbs (450 kg).
²The maximum frontal area of the trailer cannot exceed
20 square feet (1.86 square meters).
²If using a manual transaxle vehicle for trailer towing,
all starts must be in FIRST gear to avoid excessive
clutch slippage.
²The trailer tongue load must be considered as part of
the combined weight of occupants and cargo, and
should never exceed the weight referenced on the Tire
and Loading Information placard. Refer to the Tire±
Safety Information Section in this manual.
166 STARTING AND OPERATING
Page 167 of 271
²The ªDº range can be selected when towing. However,
if frquent shifting occurs while in this range, the ª3º
range must be selected.
NOTE:Using the ª3º range while operating the vehicle
under heavy operating conditions will improve perfor-
mance and extend tranaxle life by reducing excessive
shifting and heat build up.
WARNING!
Connecting trailer brakes to your vehicle's hydraulic
brake lines can overload your brake system and
cause it to fail. You might not have brakes when you
need them and could have an accident.
²Do not attempt to tow a trailer while using a compact
spare tire.
²Whenever you pull a trailer, regardless of the trailer
size, stop lights and turn signals on the trailer are
recommended for motoring safety.
²The automatic transaxle fluid and filter should be
changed if you REGULARLY tow a trailer for more
than 45 minutes of continuous operation. See Schedule
ªBº in section 8 of this manual for transaxle fluid
change intervals.
NOTE:Check the automatic transaxle fluid level before
towing. Fluid discoloration, or a burnt odor, shows the
need for a transmission fluid and filter change.
NOTE:For vehicles equipped with Autostick. By using
the Autostick modes, and slecting a specific gear range,
frequent shifting can be avoided. The highest gear range
should be selected that allows for adequate performance.
For example, choose ª4º if the desired speed can be
maintaned. Choose ª3º or ª2º if needed to maintain the
desired speed.
NOTE:Extended driving at high RPM should be
avoided to prevent excess heat generation. A reduction in
vehicle speed may be required to avoid extended driving
at high RPM. Return to a higher gear range or vehicle
speed when road conditions and RPM level allows.
STARTING AND OPERATING 167
5
Page 173 of 271
WHAT TO DO IN EMERGENCIES
CONTENTS
mHazard Warning Flasher.................174
mIf Your Engine Overheats................174
mJacking And Tire Changing...............176
NPreparations For Jacking................176
mJump-Starting The Battery...............181
mDriving On Slippery Surfaces.............184
NAcceleration.........................184
NTraction............................184
mFreeing A Stuck Vehicle.................185
mTowing A Disabled Vehicle...............185
mTowing This Vehicle Behind Another Vehicle
(Flat Towing With All Four Wheels On The
Ground)
.............................186
NAutomatic Transaxle...................186
NManual Transaxle.....................186
NAll Transaxles........................1866