CHRYSLER SEBRING CONVERTIBLE 2004 2.G Owners Manual
Manufacturer: CHRYSLER, Model Year: 2004, Model line: SEBRING CONVERTIBLE, Model: CHRYSLER SEBRING CONVERTIBLE 2004 2.GPages: 271, PDF Size: 5.31 MB
Page 221 of 271
CONVERTIBLE TOP CARE
Immediate removal of any contaminant is recommended.
Regular washing of the top will enhance its life and
appearance, and make successive cleanings easier. Do not
subject the top to excessive heat. Frequently vacuum the
top and storage compartment.
Washing
Hand washing is highly recommended. Automatic car
washing equipment can damage the top material. If you
must use an automatic car wash, soft cloth systems are
preferred.
CAUTION!
Avoid high pressure car washes, as they can damage
the top material. Also, increased water pressure may
force water past the weather strips.
General Cleaning
Careful vacuuming of the top before washing is helpful
in removing dust and other foreign particles. Wash in
partial shade instead of direct sun. Wet the entire vehicle
before washing the top. The top should be washed with
a soft, natural bristle scrub brush, and a mild soap
solution such as liquid dish washing soap. Do not use
detergent.
CAUTION!
Never use an abrasive type cleaner or bleaches.
Cleaners should not contain silicones, organic sol-
vents, petroleum distillates or plasticizers. always
wait until the top is thoroughly dry before lowering
it into the storage area.
Scrub in all directions, covering an area of about two
square feet at a time. Avoid heavy scrubbing. Rinse the
entire vehicle with water to remove all soap and dirt from
the top fabric and to prevent streaking on painted and
chrome surfaces. Allow the top to dry before lowering.
MAINTAINING YOUR VEHICLE 221
7
Page 222 of 271
Vacuuming the top with a wet/dry shop vacuum will
decrease the top's drying time, ensure removal of all dirt,
and delete streaks in the material. Multiple cleanings
may be necessary to remove stubborn stains. If stains
persist, contact your local dealership for further sugges-
tions.
Cloth Top Additional Cleaning Procedure
For additional cleaning assistance in removing stubborn
stains, apply Mopar Convertible Cloth Top Cleaner #
4883061 to the complete stain, extending 2 inches (50
mm) beyond the stain. With a soft bristle brush, scrub in
all directions over the stain. Avoid heavy scrubbing.
Rinse the area with warm water. If the stain is still
apparent, repeat the cleaning procedure. When the stain
is no longer showing, rinse the complete top with warm
water. Let the top dry before lowering it.
Cloth Top Protection
For appearance purposes, you may wish to protect your
TwillfastŸ (cloth) top periodically. A fabric protectant
such as Scotchguardtis suggested. The top should be
clean and dry before application of the protectant.
CAUTION!
Avoid getting Scotchguardton the surrounding
weather strips, moldings, paint, or glass. Damage to
these items might occur.
Weather Strip Care
Lubricate all top and door glass weather strips periodi-
cally with Mopar Weather Strip Lubricant (part number
4773427), to keep them soft and pliable.
222 MAINTAINING YOUR VEHICLE
Page 223 of 271

FUSES
Underhood Fuses (Power Distribution Center)A Power Distribution Center is located in the engine
compartment, near the air cleaner. This information ap-
plies to vehicles built without the fuse and relay num-
bering embossed on the Power Distributuion Center Top
Cover.
Interior Fuses
The fuse access panel is behind the end cover at the left
side of the instrument panel. To remove the panel, pull it
out, as shown.
MAINTAINING YOUR VEHICLE 223
7
Page 224 of 271
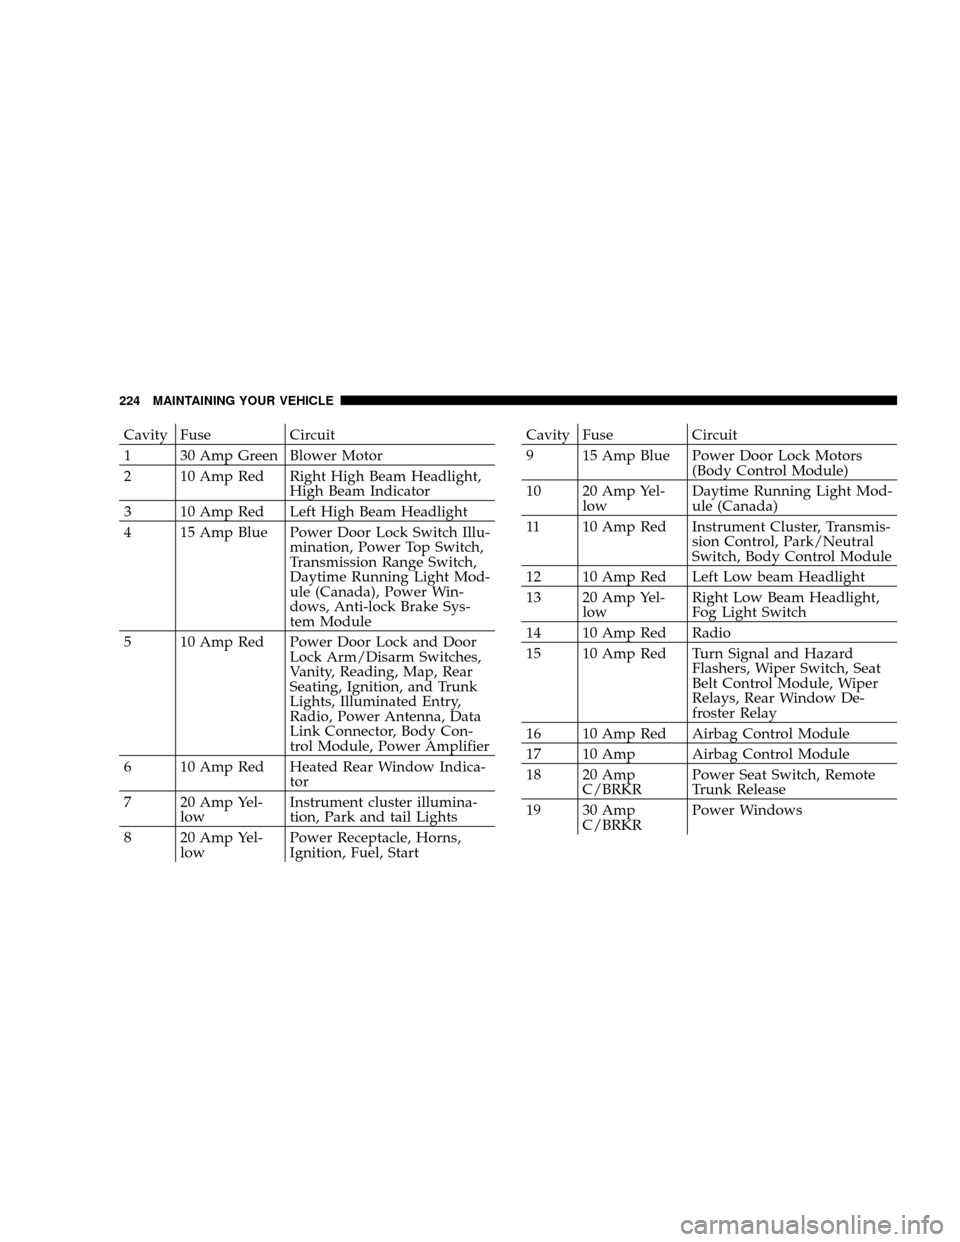
Cavity Fuse Circuit
1 30 Amp Green Blower Motor
2 10 Amp Red Right High Beam Headlight,
High Beam Indicator
3 10 Amp Red Left High Beam Headlight
4 15 Amp Blue Power Door Lock Switch Illu-
mination, Power Top Switch,
Transmission Range Switch,
Daytime Running Light Mod-
ule (Canada), Power Win-
dows, Anti-lock Brake Sys-
tem Module
5 10 Amp Red Power Door Lock and Door
Lock Arm/Disarm Switches,
Vanity, Reading, Map, Rear
Seating, Ignition, and Trunk
Lights, Illuminated Entry,
Radio, Power Antenna, Data
Link Connector, Body Con-
trol Module, Power Amplifier
6 10 Amp Red Heated Rear Window Indica-
tor
7 20 Amp Yel-
lowInstrument cluster illumina-
tion, Park and tail Lights
8 20 Amp Yel-
lowPower Receptacle, Horns,
Ignition, Fuel, StartCavity Fuse Circuit
9 15 Amp Blue Power Door Lock Motors
(Body Control Module)
10 20 Amp Yel-
lowDaytime Running Light Mod-
ule (Canada)
11 10 Amp Red Instrument Cluster, Transmis-
sion Control, Park/Neutral
Switch, Body Control Module
12 10 Amp Red Left Low beam Headlight
13 20 Amp Yel-
lowRight Low Beam Headlight,
Fog Light Switch
14 10 Amp Red Radio
15 10 Amp Red Turn Signal and Hazard
Flashers, Wiper Switch, Seat
Belt Control Module, Wiper
Relays, Rear Window De-
froster Relay
16 10 Amp Red Airbag Control Module
17 10 Amp Airbag Control Module
18 20 Amp
C/BRKRPower Seat Switch, Remote
Trunk Release
19 30 Amp
C/BRKRPower Windows
224 MAINTAINING YOUR VEHICLE
Page 225 of 271
CAUTION!
When replacing a blown fuse, it is important to use
only a fuse having the correct amperage rating. The
use of a fuse with a rating other than indicated may
result in a dangerous electrical system overload. If a
properly rated fuse continues to blow, it shows a
problem in the circuit that must be corrected.
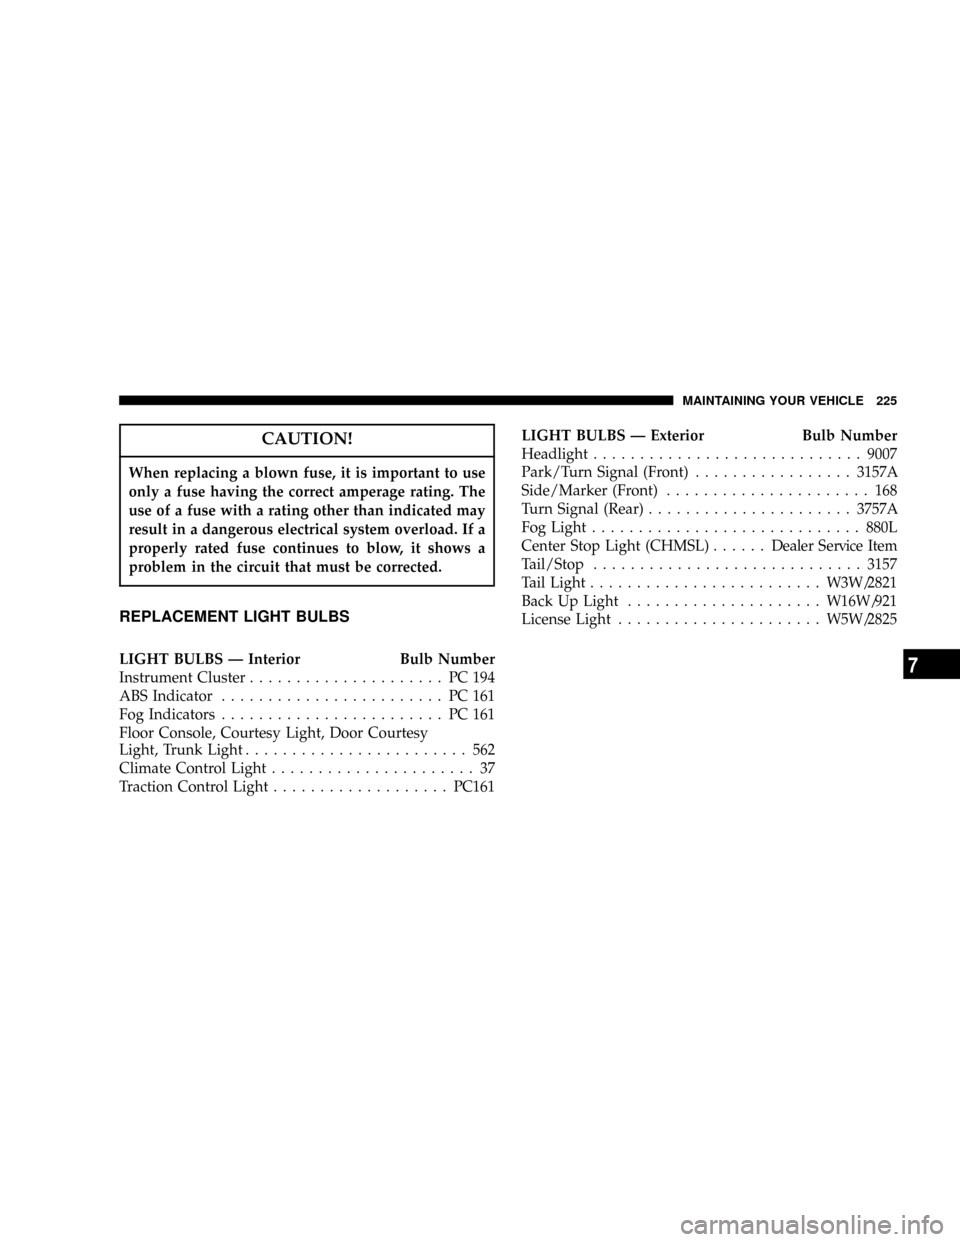
REPLACEMENT LIGHT BULBS
LIGHT BULBS Ð Interior Bulb Number
Instrument Cluster..................... PC194
ABS Indicator........................ PC161
Fog Indicators........................ PC161
Floor Console, Courtesy Light, Door Courtesy
Light, Trunk Light........................ 562
Climate Control Light...................... 37
Traction Control Light...................PC161LIGHT BULBS Ð Exterior Bulb Number
Headlight.............................9007
Park/Turn Signal (Front).................3157A
Side/Marker (Front)...................... 168
Turn Signal (Rear)......................3757A
Fog Light.............................880L
Center Stop Light (CHMSL)......Dealer Service Item
Tail/Stop.............................3157
Tail Light.........................W3W/2821
Back Up Light.....................W16W/921
License Light......................W5W/2825
MAINTAINING YOUR VEHICLE 225
7
Page 226 of 271

BULB REPLACEMENT
Headlight Bulb Replacement
1. Open the hood and remove the two headlight mount-
ing screws.2. Remove the push-in fasteners by prying under the
head of the fasteners with a flat bladed tool.
226 MAINTAINING YOUR VEHICLE
Page 227 of 271
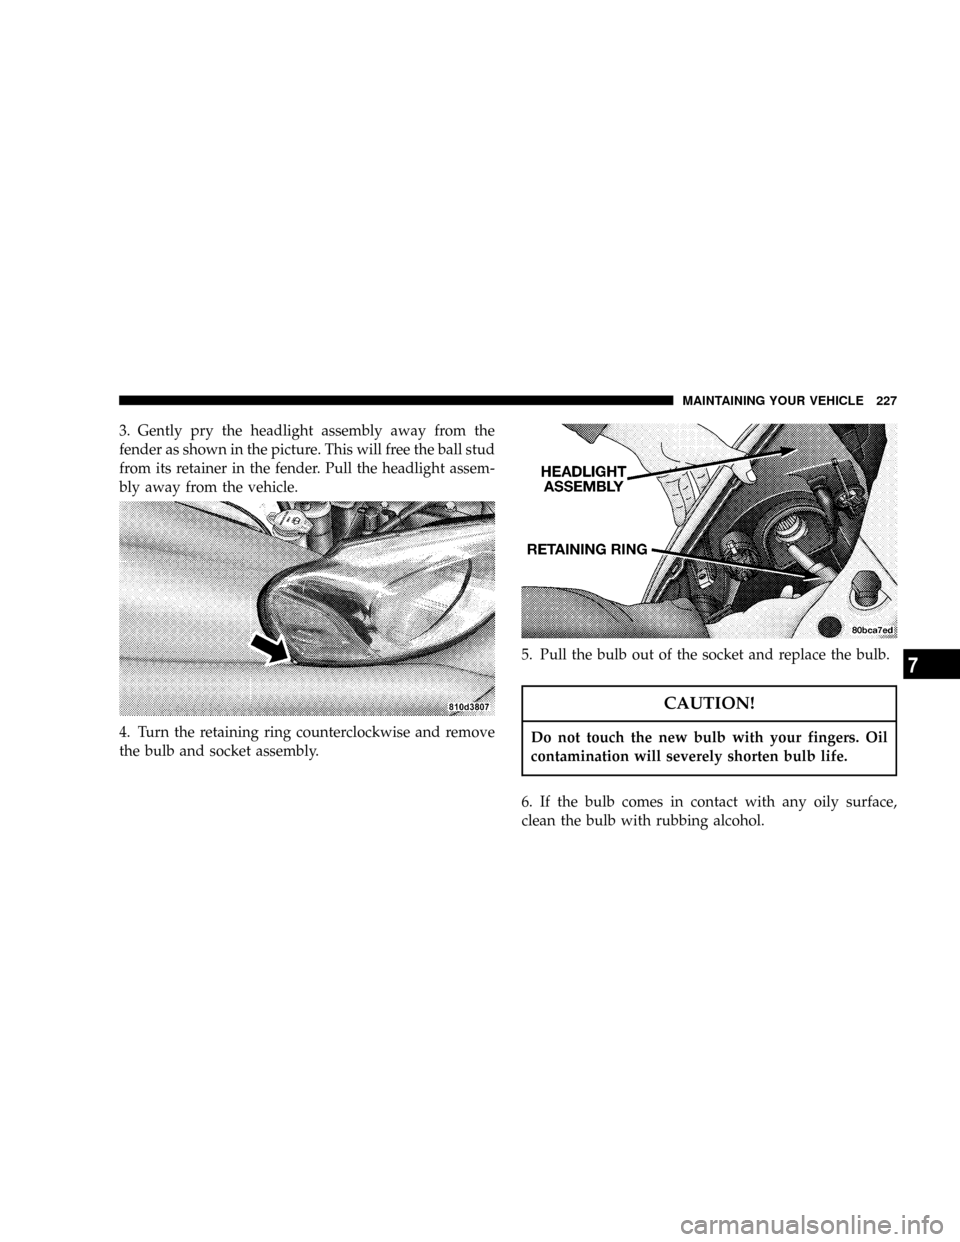
3. Gently pry the headlight assembly away from the
fender as shown in the picture. This will free the ball stud
from its retainer in the fender. Pull the headlight assem-
bly away from the vehicle.
4. Turn the retaining ring counterclockwise and remove
the bulb and socket assembly.5. Pull the bulb out of the socket and replace the bulb.
CAUTION!
Do not touch the new bulb with your fingers. Oil
contamination will severely shorten bulb life.
6. If the bulb comes in contact with any oily surface,
clean the bulb with rubbing alcohol.
MAINTAINING YOUR VEHICLE 227
7
Page 228 of 271

7. Reinsert the bulb and socket assembly and turn the
retaining ring clockwise to secure the bulb.
8. Reinstall the headlight assembly.
Park, Turn Signal, Sidemarker Bulb Replacement
1. Open the hood and remove the two headlight assem-
bly mounting screws. Pull the headlight assembly away
from the vehicle.2. Gently pry the headlight assembly away from the
fender as shown in the picture. This will free the ball stud
from its retainer in the fender. Pull the headlight assem-
bly away from the vehicle.
228 MAINTAINING YOUR VEHICLE
Page 229 of 271
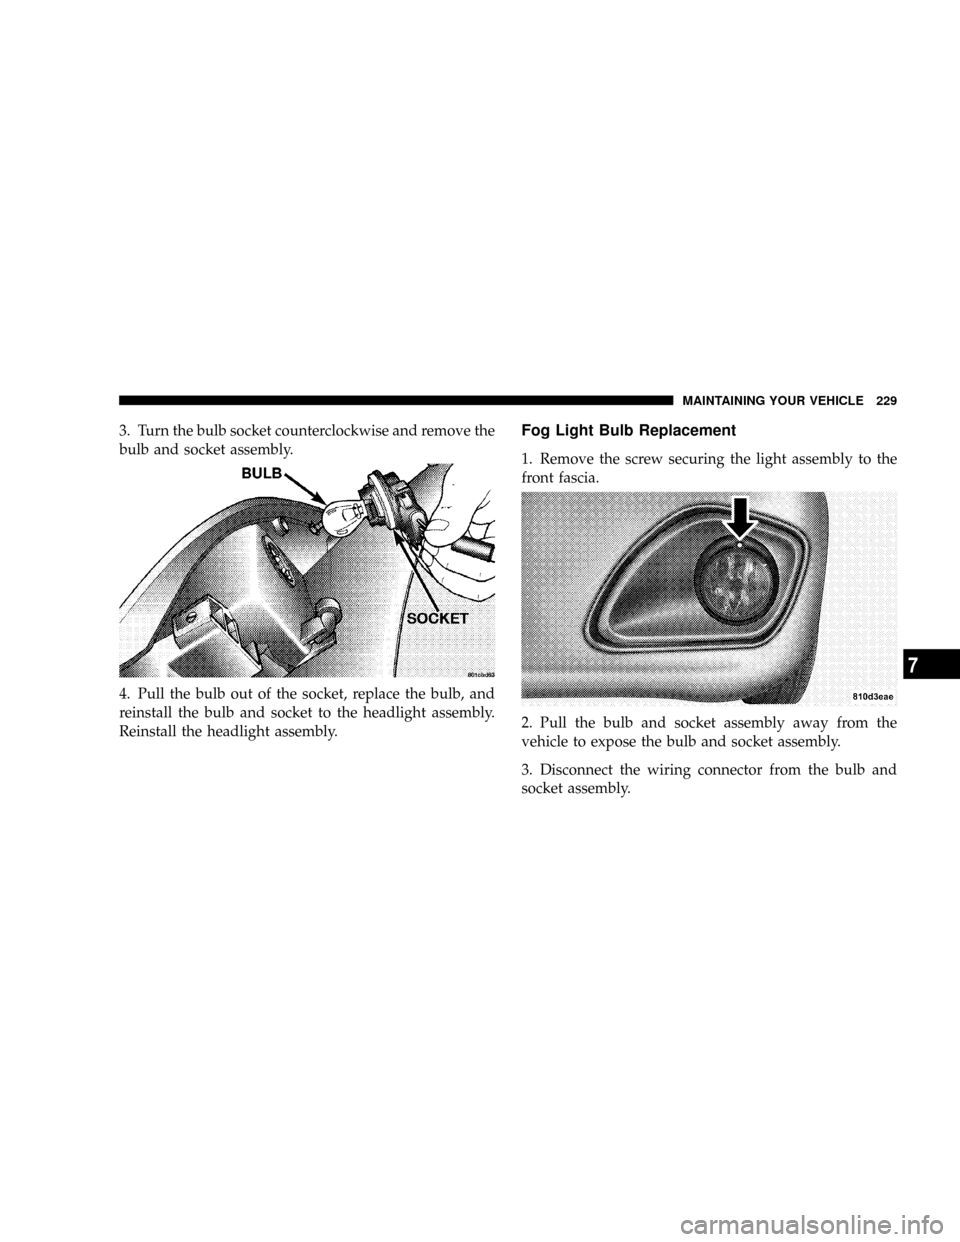
3. Turn the bulb socket counterclockwise and remove the
bulb and socket assembly.
4. Pull the bulb out of the socket, replace the bulb, and
reinstall the bulb and socket to the headlight assembly.
Reinstall the headlight assembly.Fog Light Bulb Replacement
1. Remove the screw securing the light assembly to the
front fascia.
2. Pull the bulb and socket assembly away from the
vehicle to expose the bulb and socket assembly.
3. Disconnect the wiring connector from the bulb and
socket assembly.
MAINTAINING YOUR VEHICLE 229
7
Page 230 of 271

4. Turn the bulb and socket assembly counterclockwise
to remove it from the housing.
5. Install the new bulb and socket assembly, reattach the
wiring connector, and reinstall the fog light assembly.
Center Stoplight Bulb Replacement
You may wish to see your dealer for service of this light.
A detailed service procedure is contained in the manu-
facturer's Service Manual. Information on purchasing a
Service Manual can be found at the back of this Owner's
Manual.
Rear Light Bulb Replacement
1. Open the trunk and pull the trunk liner away to
expose the wiring connector and light housing plastic
retainers.
230 MAINTAINING YOUR VEHICLE