warning CHRYSLER SEBRING CONVERTIBLE 2006 2.G Owner's Manual
[x] Cancel search | Manufacturer: CHRYSLER, Model Year: 2006, Model line: SEBRING CONVERTIBLE, Model: CHRYSLER SEBRING CONVERTIBLE 2006 2.GPages: 302, PDF Size: 10.1 MB
Page 35 of 302

Children 12 years and under should ride properly buck-
led up in a rear seat. According to crash statistics,
children are safer when properly restrained in the rear
seat rather than in the front.
WARNING!
In a collision, an unrestrained child, even a tiny
baby, can become a missile inside the vehicle. The
force required to hold even an infant on your lap
could become so great that you could not hold the
child, no matter how strong you are. The child and
others could be badly injured. Any child riding in
your vehicle should be in a proper restraint for the
child’s size.
There are different sizes and types of restraints for
children from newborn size to the child almost large
enough for an adult safety belt. Always check the child
seat Owner’s Manual to ensure you have the right seat
for your child. Use the restraint that is correct for your
child:
Infants and Child Restraints
•
Safety experts recommend that children ride
rearward-facing in the vehicle until they are at least
one year oldandweigh at least 20 lbs (9 kg). Two types
of child restraints can be used rearward-facing: infant
carriers and “convertible” child seats.
•The infant carrier is only used rearward-facing in the
vehicle. It is recommended for children who weigh up
to about 20 lbs (9 kg). “Convertible” child seats can be
used either rearward-facing or forward-facing in the
vehicle. Convertible child seats often have a higher
weight limit in the rearward-facing direction than
infant carriers do, so they can be used rearward-facing
by children who weigh more than 20 lbs (9 kg) but are
less than one year old. Both types of child restraints are
held in the vehicle by the lap/shoulder belt or the
LATCH child restraint anchorage system. (See the
LATCH-Child Seat Anchorage System section.)
•Rearward-facing child seats mustNEVERbe used in
the front seat of a vehicle with the front passenger
airbag. An airbag deployment could cause severe
injury or death to infants in this position.
THINGS TO KNOW BEFORE STARTING YOUR VEHICLE 35
2
Page 36 of 302

WARNING!
•Improper installation can lead to failure of an
infant or child restraint. It could come loose in a
collision. The child could be badly injured or
killed. Follow the manufacturer’s directions ex-
actly when installing an infant or child restraint.
•A rearward facing infant restraint should only be
used in a rear seat. A rearward facing infant
restraint in the front seat may be struck by a
deploying passenger airbag which may cause se-
vere or fatal injury to the infant.
Here are some tips on getting the most out of your child
restraint:
•Before buying any restraint system, make sure that it
has a label certifying that it meets all applicable Safety
Standards. We also recommend that you make sure
that you can install the child restraint in the vehicle
where you will use it before you buy it.
•The restraint must be appropriate for your child’s
weight and height. Check the label on the restraint for
weight and height limits.
•Carefully follow the instructions that come with the
restraint. If you install the restraint improperly, it may
not work when you need it.
•Buckle the child into the seat according to the child
restraint manufacturer’s directions.
•When your child restraint is not in use, secure it in the
vehicle with the seat belt or remove it from the vehicle.
Do not leave it loose in the vehicle. In a sudden stop or
collision, it could strike the occupants or seat backs
and cause serious personal injury.
NOTE:For additional information, refer to
www.seatcheck.org or call 1–866–SEATCHECK.
Older Children and Child Restraints
Children who weigh more than 20 lbs (9 kg) and who are
older than one year can ride forward-facing in the
vehicle. Forward-facing child seats and convertible child
seats used in the forward-facing direction are for children
who weigh 20 to 40 lbs (9 to 18 kg) and who are older
36 THINGS TO KNOW BEFORE STARTING YOUR VEHICLE
Page 38 of 302

connection to the top tether anchorages have been avail-
able for some time. For some older child restraints, many
child restraint manufacturers offer add-on tether strap
kits or retro-fit kits. You are urged to take advantage of all
the available attachments provided with your child re-
straint in any vehicle.
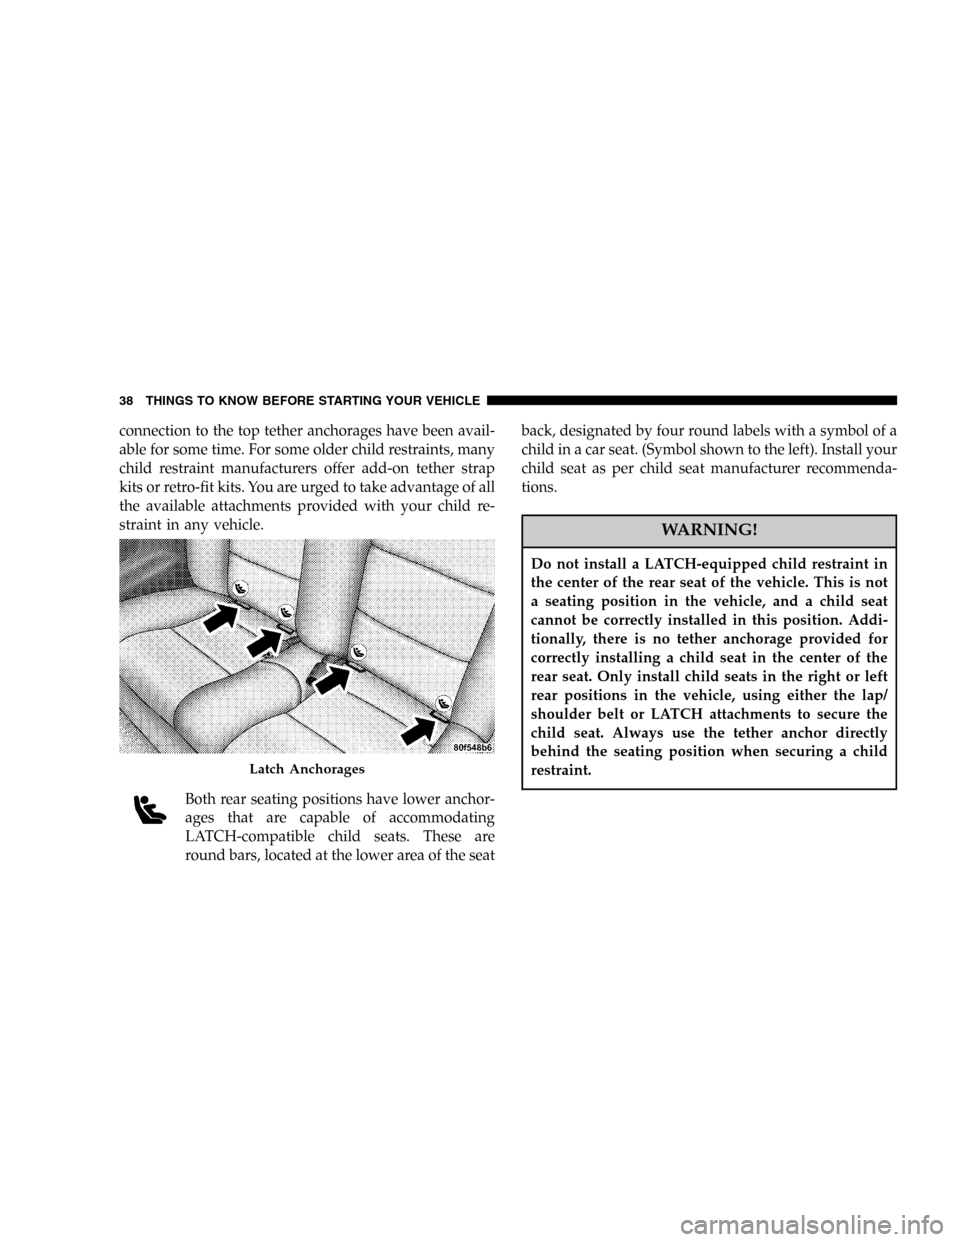
Both rear seating positions have lower anchor-
ages that are capable of accommodating
LATCH-compatible child seats. These are
round bars, located at the lower area of the seatback, designated by four round labels with a symbol of a
child in a car seat. (Symbol shown to the left). Install your
child seat as per child seat manufacturer recommenda-
tions.
WARNING!
Do not install a LATCH-equipped child restraint in
the center of the rear seat of the vehicle. This is not
a seating position in the vehicle, and a child seat
cannot be correctly installed in this position. Addi-
tionally, there is no tether anchorage provided for
correctly installing a child seat in the center of the
rear seat. Only install child seats in the right or left
rear positions in the vehicle, using either the lap/
shoulder belt or LATCH attachments to secure the
child seat. Always use the tether anchor directly
behind the seating position when securing a child
restraint.
Latch Anchorages
38 THINGS TO KNOW BEFORE STARTING YOUR VEHICLE
Page 40 of 302

installing the child restraint buckle the seat belt so the
seat belt is tucked behind the child restraint and out of
reach. If the buckled seat belt interferes with the child
restraint installation, instead of tucking the seat belt
behind the child restraint, route the seat belt through the
child restraint belt path and then buckle it. This should
stow the seat belt out of the reach of an inquisitive child.
Remind all children in the vehicle that the seat belts are
not toys and should not be played with, and never leave
your child unattended in the vehicle.
WARNING!
Improper installation of a child restraint to the
LATCH anchorages can lead to failure of an infant or
child restraint. The child could be badly injured or
killed. Follow the manufacturer’s directions exactly
when installing an infant or child restraint.
Installing Child Restraints Using the Vehicle Seat
Belts
The passenger seat belts are equipped with cinching latch
plates which are designed to keep the lap portion tight
around the child restraint so that it is not necessary to use
a locking clip. Pulling up on the shoulder portion of the
lap/shoulder belt will tighten the belt. The cinching latch
plate will keep the belt tight, however, any seat belt
system will loosen with time, so check the belt occasion-
ally and pull it tight if necessary.
In the rear seat, you may have trouble tightening the
lap/shoulder belt on the child restraint because the
buckle or latch plate is too close to the belt path opening
on the restraint. Disconnect the latch plate from the
buckle and twist the short buckle-end belt several times
to shorten it. Insert the latch plate into the buckle with the
release button facing out.
If the belt still can’t be tightened, or if by pulling and
pushing on the restraint loosens the belt, you may need
to do something more. Disconnect the latch plate from
the buckle, turn the buckle around, and insert the latch
plate into the buckle again. If you still can’t make the
child restraint secure, try a different seating position.
40 THINGS TO KNOW BEFORE STARTING YOUR VEHICLE
Page 41 of 302

To attach a child restraint tether strap:
1. Lift the carpet flap to expose the anchor directly behind
the seat where you are placing the child restraint.
2. Route the tether strap to provide the most direct path
for the strap between the anchor and the child seat.
3. Attach the tether strap hook (A) of the child restraint to
the anchor and remove slack in the tether strap (B)
according to the child restraint manufacturer’s instruc-
tions.
WARNING!
An incorrectly anchored tether strap could lead to
increased head motion and possible injury to the
child. Use only the anchor positions directly behind
the child seat to secure a child restraint top tether
strap.Child Tether Anchor Location
Hook And Anchor
THINGS TO KNOW BEFORE STARTING YOUR VEHICLE 41
2
Page 43 of 302

SAFETY TIPS
Exhaust Gas
WARNING!
Exhaust gases can injure or kill. They contain carbon
monoxide (CO) which is colorless and odorless.
Breathing it can make you unconscious and can
eventually poison you. To avoid breathing (CO)
follow the safety tips below.
•Do not run the engine in a closed garage or in confined
areas any longer than needed to move your vehicle in
or out of the area.
•If it is necessary to sit in a parked vehicle with the
engine running, adjust your heating or cooling con-
trols to force outside air into the vehicle. Set the blower
at high speed.
•To avoid drawing exhaust gases into the vehicle, close
the trunk while driving. However, if for some reason itmust remain open, close all windows. Adjust the
heating or cooling system to force outside air into the
vehicle. Set the blower at high speed.
Safety Checks You Should Make Inside the
Vehicle
Seat Belts
Inspect the belt system periodically, checking for cuts,
frays and loose parts. Damaged parts must be replaced
immediately. Do not disassemble or modify the system.
Safety belt assemblies must be replaced after a collision if
they have been damaged (bent retractor, torn webbing,
etc.). If there is any question regarding belt or retractor
condition, replace the belt.
Airbag Light
The light should come on and remain on for 6 to
8 seconds as a bulb check when the ignition
switch is first turned ON. If the bulb is not lit
during starting, have it replaced. If the light stays on or
comes on while driving, have the system checked by an
authorized dealer.
THINGS TO KNOW BEFORE STARTING YOUR VEHICLE 43
2
Page 47 of 302

CONVERTIBLE TOP OPERATION
WARNING!
The convertible top does not provide the structural
protection that a reinforced metal roof does, and the
fabric top cannot be expected to prevent the ejection
of the occupants of a vehicle in a collision. Therefore
it is important that all occupants wear their seat belts
at all times when riding in a convertible. Studies
have shown that it is generally safer to remain inside
a vehicle during a collision, than to be ejected from
the vehicle.
NOTE:The top and top storage area should be thor-
oughly dry before lowering the top.
To Lower The Top:
NOTE:
To avoid damage to the convertible top or its
components, your vehicle is equipped with a feature that
prevents convertible top operation at speeds over 10 mph
(16 km/h).
CAUTION!
To avoid damage to the sunvisors, rotate the driver’s
and passenger’s sunvisor to the forward (against
glass) position before raising or lowering the con-
vertible top.
CAUTION!
To fully insure that no damage occurs, be sure that
the vehicle is at a complete stop with the gear
selector in the Park position before lowering or
raising the top.
1. To avoid damage to either the top or the rear window,
check the top storage area at the rear of the vehicle
interior to be sure that it is clear of debris or other items.
Be sure that child seat flip up bars are lowered. Do not
use the top storage area for other storage purposes.
2. Turn the ignition key to the On position.
UNDERSTANDING THE FEATURES OF YOUR VEHICLE 47
3
Page 58 of 302

Outside Mirror Adjustment — Driver’s Side
Adjust the outside mirror to center on the adjacent lane of
traffic, with a slight overlap of the view obtained on the
inside mirror.
Right Side Mirror Adjustment
Adjust the convex outside mirror so you can just see the
side of your vehicle in the part of the mirror closest to the
vehicle.
WARNING!
Vehicles and other objects seen in the right side
convex mirror will look smaller and farther away
than they really are. Relying too much on your right
side mirror could cause you to collide with another
vehicle or other object. Use your inside mirror when
judging the size or distance of a vehicle seen in this
convex mirror.
Illuminated Vanity Mirrors
An illuminated vanity mirror is on each sun visor. To use
the mirror, rotate the sun visor down and swing the
mirror cover upward. The lights will turn on automati-
cally. Closing the mirror cover turns off the lights.
Illuminated Vanity Mirror
58 UNDERSTANDING THE FEATURES OF YOUR VEHICLE
Page 60 of 302

WARNING!
•Adjusting a seat while the vehicle is moving is
dangerous. The sudden movement of the seat
could cause you to lose control. The seat belt
might not be properly adjusted and you could be
injured. Adjust the seat only while the vehicle is
parked.
•Do not ride with the seatback reclined so that the
shoulder belt is no longer resting against your
chest. In a collision you could slide under the seat
belt and be seriously or even fatally injured. Use
the recliner only when the vehicle is parked.
Lumbar Support — If Equipped
This feature allows you to increase or decrease the
amount of lumbar support. The control lever is located
on the inboard side of the driver’s seatback. Turn the
control lever forward to increase and rearward to de-
crease the desired amount of lumbar support.
Power Driver’s Seat
The power seat switches are on the outboard side of the
seat, near the floor. Use the forward switch to move the
front of the seat cushion up and down. Use the rear
switch to move the rear of the seat cushion up and down.
The middle switch will move either the entire seat
forward and rearward or the seat cushion up and down.
The rear lever controls the seatback reclining angle. The
seatback may have to be readjusted if the seat cushion
position is changed.
Power Driver’s Seat Switches
60 UNDERSTANDING THE FEATURES OF YOUR VEHICLE
Page 61 of 302

CAUTION!
Do not place any article under a power seat as it may
cause damage to the seat controls.
Heated Seats — If Equipped
WARNING!
Persons who are unable to feel pain to the skin
because of advanced age, chronic illness, diabetes,
spinal cord injury, medication, alcohol use, exhaus-
tion or other physical condition must exercise care
when using the seat heater. It may cause burns even
at low temperatures, especially if used for long
periods of time. Do not place anything on the seat
that insulates against heat, such as a blanket or
cushion. This may cause the seat heater to overheat.
This feature heats the front driver and passenger seats on
models equipped with leather seats. The controls for the
heated seats are located in the floor console next to the
parking brake.
The left rotary switch controls the heat level for the
driver’s seat, and the right rotary switch controls the heat
level for the passenger’s seat. These switches feature
several heat settings ranging from 0 to 6.
Heated Seat Switches
UNDERSTANDING THE FEATURES OF YOUR VEHICLE 61
3