ESP CHRYSLER SEBRING CONVERTIBLE 2008 3.G User Guide
[x] Cancel search | Manufacturer: CHRYSLER, Model Year: 2008, Model line: SEBRING CONVERTIBLE, Model: CHRYSLER SEBRING CONVERTIBLE 2008 3.GPages: 454, PDF Size: 5.8 MB
Page 136 of 454

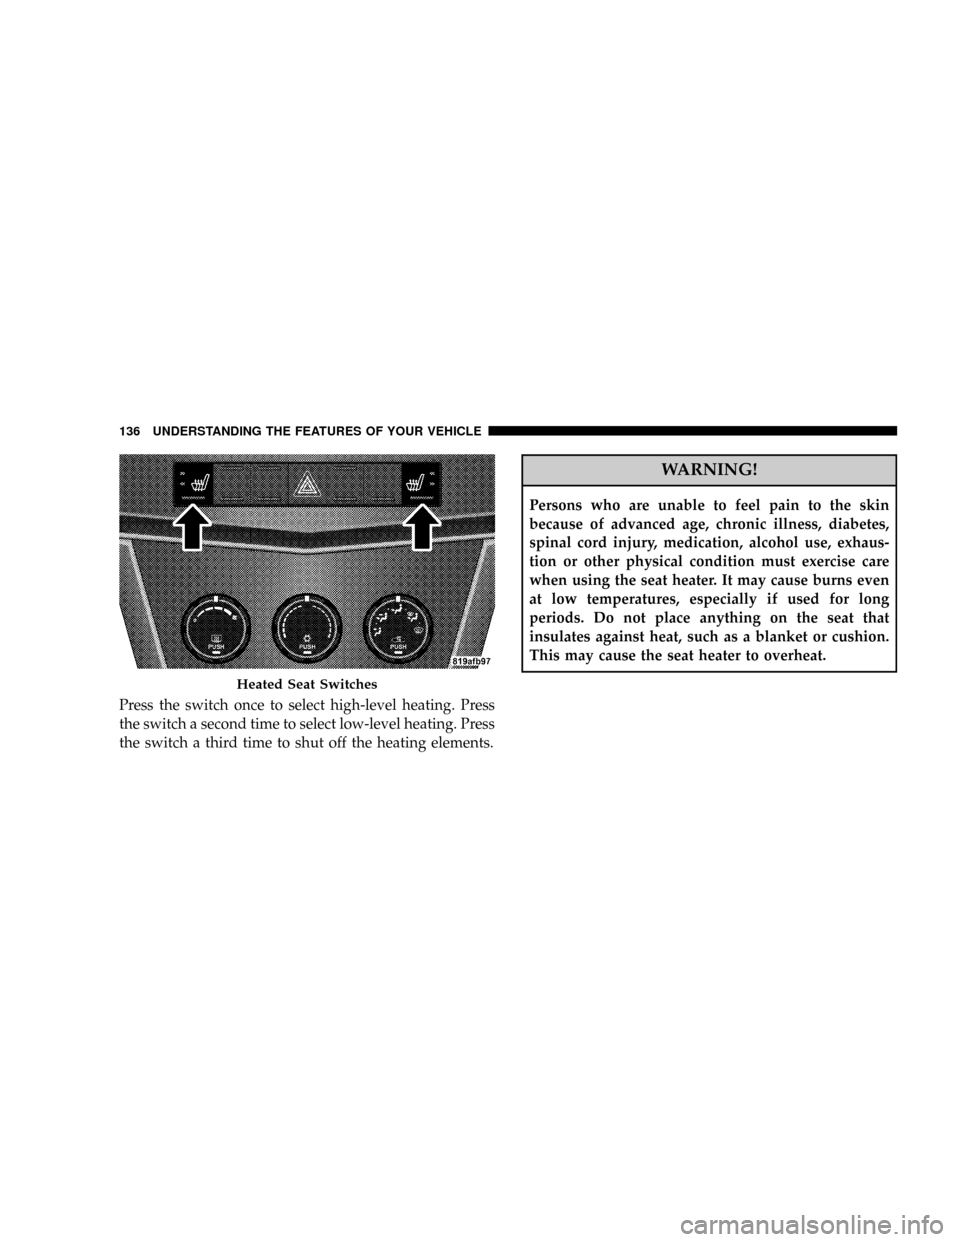
Press the switch once to select high-level heating. Press
the switch a second time to select low-level heating. Press
the switch a third time to shut off the heating elements.
WARNING!
Persons who are unable to feel pain to the skin
because of advanced age, chronic illness, diabetes,
spinal cord injury, medication, alcohol use, exhaus-
tion or other physical condition must exercise care
when using the seat heater. It may cause burns even
at low temperatures, especially if used for long
periods. Do not place anything on the seat that
insulates against heat, such as a blanket or cushion.
This may cause the seat heater to overheat.
Heated Seat Switches
136 UNDERSTANDING THE FEATURES OF YOUR VEHICLE
Page 142 of 454

Turn Signals
Move the Multi-Function Lever upward or downward
and the corresponding turn signal indicator on the in-
strument panel will flash to show proper operation of the
front and rear turn signal lights.You can signal a lane change by moving the lever
partially upward or downward without moving beyond
the detent.
Check for a defective outside light bulb if either light
remains on and does not flash or has a very fast flash rate.
If an indicator fails to light when the lever is moved, it
would suggest that the fuse or indicator is defective.
Highbeam/Lowbeam Select Switch
Push the Multi-Function Control Lever away from you to
switch the headlights to HIGH beam. Pull the Lever
toward you, to switch the headlights back to LOW beam.
Turn Signal Control
142 UNDERSTANDING THE FEATURES OF YOUR VEHICLE
Page 161 of 454

²Press the Learn Button on the Garage Door Opener to
complete the training for Rolling Code.
²Did you unplug the device for training, and remember
to plug it back in?
If you are have any problems, or require assistance,
please call toll-free 1±800±355±3515 or, on the Internet at
www.HomeLink.com for information or assistance.
General Information
This device complies with FCC rules part 15 and Industry
Canada RSS-210. Operation is subject to the following
two conditions:
1. This device may not cause harmful interference
2. This device must accept any interference that may be
received including interference that may cause undesired
operationNOTE:The transmitter has been tested and it complies
with FCC and IC rules. Changes or modifications not
expressly approved by the party responsible for compli-
ance could void the user 's authority to operate the
device.
The term ªIC:º before the certification/registration num-
ber only signifies that Industry Canada technical specifi-
cations were met.ELECTRICAL POWER OUTLETS
There are two 12-volt electrical outlets on this vehicle.
Both of the outlets are protected by a fuse.
The instrument panel power outlet, located below the
climate control knobs, has power available only when the
ignition is on. This outlet will also operate a conventional
cigar lighter unit.
UNDERSTANDING THE FEATURES OF YOUR VEHICLE 161
3
Page 181 of 454

Dual Trip Odometer Ð If Equipped
Press and release this button to change the display from
odometer to ªTrip A.º Press and release it a second time
to change the display to ªTrip B.º Press and release it a
third time to change the display back to the odometer.
To reset the trip odometer, first display the trip mileage
that you want to reset, ªTrip Aº or ªTrip B.º Then push
and hold the button (approximately 2 seconds) until the
display resets to 0. The odometer must be in Trip Mode to
reset the trip odometer.
17. Electronic Throttle Control Indicator Light
This red illuminated light informs you of a
problem with the Electronic Throttle Control
system. If a problem is detected, the light will
come on while the engine is running. If the
light remains lit with the engine running your vehicle
will usually be drivable and not need towing, however
see your dealer for service as soon as possible.If the light is flashing when the engine is running you
may experience power loss, an elevated/rough idle, and
increased brake pedal effort, and your vehicle may
require towing. Immediate service is required.
The light will come on when the ignition switch is first
turned on and remain on briefly as a bulb check. This is
normal. If the light does not come on during starting,
have the system checked by an authorized dealer.
18. Electronic Stability Program (ESP) Indicator
Light/Traction Control System (TCS) Indicator Light Ð
If Equipped
If this indicator light flashes during accelera-
tion, apply as little throttle as possible. While
driving, ease up on the accelerator. Adapt your
speed and driving to the prevailing road con-
ditions, and do not switch off the ESP, or TCS Ð if
equipped.
UNDERSTANDING YOUR INSTRUMENT PANEL 181
4
Page 183 of 454

The operation of the Brake Warning Light can be checked
by turning the ignition switch from the OFF position to
the ON position. The light should illuminate for approxi-
mately two seconds. The light should then turn off unless
the parking brake is applied or a brake fault is detected.
If the light does not illuminate, have the light inspected
by an authorized dealer.
The light also will turn on when the parking brake is
applied with the ignition switch in the ON position.
NOTE:This light shows only that the parking brake is
applied. It does not show the degree of brake application.
20. Turn Signal Indicators
The arrows will flash in unison with the exterior
turn signal, when using the turn signal lever.
21. Front Fog Light Indicator Ð If Equipped
This light shows when the front fog lights are ON.22. Electronic Stability Program (ESP) Indicator Light
The yellow ESP/BAS malfunction indicator
light will turn on when the ignition switch is
turned to the ªONº position. The light should
go out with the engine running. If the light
remains on after several ignition cycles, and you have
driven the vehicle several miles at speeds greater than 30
mph (48 km/h), and the ESP is synchronized (refer to
Synchronizing ESP), see your authorized dealer as soon
as possible to have the problem diagnosed and corrected.
23. Anti-Lock Warning Light (ABS)
This light monitors the ABS. This light will
come on when the ignition key is turned to the
ON position and may stay on for as long as
four seconds.
If the ABS light remains on or comes on during driving,
it indicates that the Anti-Lock portion of the brake system
is not functioning and that service is required, however,
UNDERSTANDING YOUR INSTRUMENT PANEL 183
4
Page 185 of 454

NOTE:Please note that the TPMS is not a substitute for
proper tire maintenance, and it is the driver 's responsi-
bility to maintain correct tire pressure, even if under-
inflation has not reached the level to trigger illumination
of the TPMS low tire pressure telltale.
Your vehicle has also been equipped with a TPMS
malfunction indicator to indicate when the system is not
operating properly. The TPMS malfunction indicator is
combined with the low tire pressure telltale. When the
system detects a malfunction, the telltale will flash for
approximately one minute and then remain continuously
illuminated. This sequence will continue upon subse-
quent vehicle start-ups as long as the malfunction exists.
When the malfunction indicator is illuminated, the sys-
tem may not be able to detect or signal low tire pressure
as intended. TPMS malfunctions may occur for a variety
of reasons, including the installation of replacement or
alternate tires or wheels on the vehicle that prevent the
TPMS from functioning properly. Always check theTPMS malfunction telltale after replacing one or more
tires or wheels on your vehicle to ensure that the replace-
ment or alternate tires and wheels allow the TPMS to
continue to function properly.
CAUTION!
The TPMS has been optimized for the original
equipment tires and wheels. TPMS pressures and
warning have been established for the tire size
equipped on your vehicle. Undesirable system opera-
tion or sensor damage may result when using re-
placement equipment that is not of the same size,
type, and/or style. Aftermarket wheels can cause
sensor damage. Do not use aftermarket tire sealants
or balance beads if your vehicle is equipped with a
TPMS, as damage to the sensors may result.
UNDERSTANDING YOUR INSTRUMENT PANEL 185
4
Page 194 of 454

Personal Settings (Customer Programmable
Features)
Personal Settings allows the driver to set and recall
features when the automatic transaxle is in PARK.
Press and release the MENU button until ªPersonal
Settingsº displays in the EVIC.
Press and release the STEP button to display the follow-
ing programmable features:
Language
When in this display you may select different languages
for all display nomenclature, including the trip functions.
Pressing the RESET button while in this display selects
English, Espanol, or Francais depending on availability.
As you continue, the displayed information will be
shown in the selected language.
Auto Unlock On Exit
When ON is selected, all doors will unlock when the
vehicle is stopped and the transaxle is in the PARK or
NEUTRAL position and the driver's door is opened. To
make your selection, press and hold the RESET button
until ON or OFF appears.
Remote Key Unlock
WhenDriver Door 1st Pressis selected, only the driver's
door will unlock on the first press of the remote keyless
entry unlock button. When Driver Door 1st Press is
selected, you must press of the remote keyless entry
unlock button twice to unlock the passenger's doors.
WhenAll Doors 1st Pressis selected, all of the doors will
unlock on the first press of the remote keyless entry
unlock button. To make your selection, press and release
the RESET button until ªDriver Door 1st Pressº or ªAll
Doors 1st Pressº appears.
194 UNDERSTANDING YOUR INSTRUMENT PANEL
Page 206 of 454

SET Button Ð To Set the Pushbutton Memory
When you are receiving a station that you wish to
commit to pushbutton memory, press the SET button.
The symbol SET 1 will now show in the display window.
Select the button (1-6) you wish to lock onto this station
and press and release that button. If a button is not
selected within five seconds after pressing the SET but-
ton, the station will continue to play but will not be
stored into pushbutton memory.
You may add a second station to each pushbutton by
repeating the above procedure with this exception: Press
the SET button twice and SET 2 will show in the display
window. Each button can be set for SET 1 and SET 2 in
both AM and FM. This allows a total of 12 AM, 12 FM,
and 12 Satellite (if equipped) stations to be stored into
pushbutton memory. The stations stored in SET 2
memory can be selected by pressing the pushbutton
twice.Every time a preset button is used, a corresponding
button number will display.
Buttons1-6
These buttons tune the radio to the stations that you
commit to pushbutton memory {12 AM, 12 FM, and 12
Satellite (if equipped) stations}.
DISC Button
Pressing the DISC button will allow you to switch from
AM/FM modes to Disc modes.
Operation Instructions - (DISC MODE for CD and
MP3/WMA Audio Play, DVD-VIDEO)
The radio DVD player and many DVD discs are coded by
geographic region. These region codes must match in
order for the disc to play. If the region code for the DVD
disc does not match the region code for the radio DVD
player, it will not play the disc. Customers may take their
vehicle to an authorized dealer to change the region code
of the player a maximum of five times.
206 UNDERSTANDING YOUR INSTRUMENT PANEL
Page 207 of 454

CAUTION!
The radio may shut down during extremely hot
conditions. When this occurs, the radio will indicate
ªDisc Hotº and shut off until a safe temperature is
reached. This shutdown is necessary to protect the
optics of the DVD player and other radio internal
components.
NOTE:The ignition switch must be in the ON or ACC
position to operate the radio.
LOAD Button Ð Loading Compact Disc(s)
Press the LOAD button and the pushbutton with the
corresponding number (1-6) where the CD is being
loaded. The radio will display PLEASE WAIT and
prompt when to INSERT DISC. After the radio displays
9INSERT DISC,9insert the CD into the player.Radio display will show9LOADING DISC9when the disc
is loading and ªREADING DISCº when the radio is
reading the disc.
CAUTION!
This CD player will accept 4±3/4 inch (12 cm) discs
only. The use of other sized discs may damage the
CD player mechanism.
Eject Button Ð Ejecting Compact Disc(s)
Press the eject button and the pushbutton with
the corresponding number (1-6) where the CD
was loaded and the disc will unload and move
to the entrance for easy removal. Radio display
will show9EJECTING DISC9when the disc is being
ejected and prompt the user to remove the disc.
UNDERSTANDING YOUR INSTRUMENT PANEL 207
4
Page 217 of 454

SALES CODE RER Ð MULTIMEDIA SYSTEM Ð IF
EQUIPPED
NOTE:The sales code is located on the lower right side
of the unit's faceplate.
The RER multimedia system contains a radio, Sirius
Satellite Radio player, Navigation system, CD/DVD
player, USB port, 20 gigabyte Hard Drive (HDD), and the
UConnectthands-free Bluetooth cellular system.
NOTE:If your vehicle is not equipped with UConnectt,
the unit will respond with a ªFeature Not Availableº
message when selecting controls related to this feature.
A 6.5-inch touch screen allows easy menu selection, while
the Advanced Voice Dialog System recognizes more than
1,000 words for audio, navigation, entertainment, and
hands-free mobile phone use.The satellite navigation capability combines a Global-
Positioning System-based navigation system with an
integrated color screen to provide maps, turn identifica-
tion, selection menus, and instructions for selecting a
variety of destinations and routes.
A shared Hard Drive (HDD) for the navigation system,
the database, and other radio features allows uploads of
music and photos from CDs or through the USB port.
While the Gracenote database finds the artist, track, and
title for the music.
An auxiliary input jack permits passengers to listen to a
portable MP3 player through the vehicle's speakers. For
vehicles equipped with the Vehicle Entertainment System
(VES), separate audio outputs allow passengers to listen
to the car speakers while different audio tracks play
through the system's wireless headphones. This means
UNDERSTANDING YOUR INSTRUMENT PANEL 217
4