window CHRYSLER SEBRING COUPE 2004 2.G Owners Manual
[x] Cancel search | Manufacturer: CHRYSLER, Model Year: 2004, Model line: SEBRING COUPE, Model: CHRYSLER SEBRING COUPE 2004 2.GPages: 382, PDF Size: 2.23 MB
Page 6 of 382

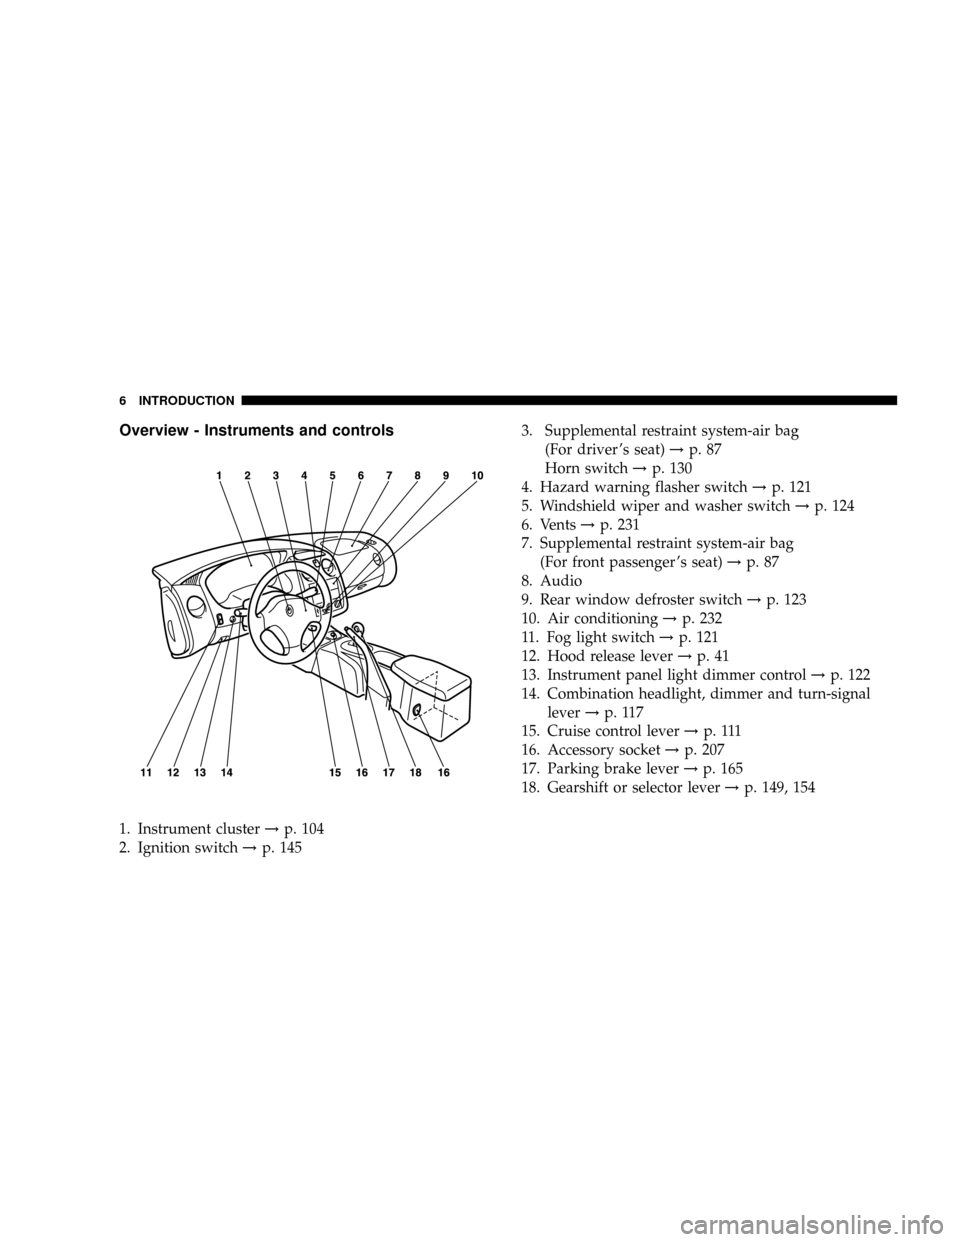
Overview - Instruments and controls
1. Instrument cluster!p. 104
2. Ignition switch!p. 1453. Supplemental restraint system-air bag
(For driver 's seat)!p. 87
Horn switch!p. 130
4. Hazard warning flasher switch!p. 121
5. Windshield wiper and washer switch!p. 124
6. Vents!p. 231
7. Supplemental restraint system-air bag
(For front passenger 's seat)!p. 87
8. Audio
9. Rear window defroster switch!p. 123
10. Air conditioning!p. 232
11. Fog light switch!p. 121
12. Hood release lever!p. 41
13. Instrument panel light dimmer control!p. 122
14. Combination headlight, dimmer and turn-signal
lever!p. 117
15. Cruise control lever!p . 111
16. Accessory socket!p. 207
17. Parking brake lever!p. 165
18. Gearshift or selector lever!p. 149, 154
6 INTRODUCTION
Page 7 of 382

Interior
1. Seat belt!p. 66
Adjustable seat belt shoulder anchor (for front
seats)!p. 712. Remote trunk lid release!p. 36
3. Power window switch!p. 43
4. Window lock switch!p. 44
5. Electric remote-controlled outside mirror
switch!p. 184
6. Power door lock switch!p. 34
7. Sun visor!p. 205
8. Sunroof switch (for vehicles with sunroof)!p. 45
Dome light (for vehicles without sunroof)!p. 127
9. Inside day/night rearview mirror!p. 173
Electrochromic inside rearview mirror (if so equipped)
!p. 174
Dome light (for vehicles with sunroof)
10. Vanity mirror!p. 206
11. Glove compartment!p. 210
12. Cup holder (for rear seat)!p. 208
13. Rear seat!p. 64
14. Center console with lid!p. 211
15. Supplemental restraint system-side air bag!p. 87
(for front seats, if so equipped)
16. Cup holder (for front seats)!p. 208
17. Front seat
18. Ash receptacle receiver.
INTRODUCTION 7
1
Page 16 of 382

If this problem occurs¼
Problem Do this Ref. Page
Cannot turn the key
(1)ªLOCKº to ªACCº
Turn the key while slightly turning the steering wheel
right and left.
(2)ºACCº to ªLOCKº
Vehicle with automatic transaxle
Check the position of gear selector lever.
The key cannot be removed unless the gear selector
lever is set to the ªPº (PARK) position.
Vehicle with manual transaxle
Place the key at the ``ACC'' position. Push the key in
and turn it.P. 147
Cannot shift the gear selector lever
from the ªPº (PARK) positionShift the gear selector lever while depressing the brake
pedal. Check if the ignition key is in the ªONº position.P. 150, 155
The windows are fogged up.
1.Set the heater/air conditioning mode selection dial to
the ªºorªº position.
2.Turn on the blower.P. 240
16 INTRODUCTION
Page 21 of 382

LOCKING AND UNLOCKING
CONTENTS
mKeys.................................23
mSentry Key............................23
mDoor locks (Manual).....................26
NTo lock the door without using the key.......26
NTo lock the door with the key
(Driver 's side only).....................27
NTo lock the door from the inside............28
mKeyless entry system.....................29
NConfirmation function...................29
NUsing the panic alarm...................31
NProcedure for replacing keyless transmitter
battery..............................32
mPower door locks........................34
NLocking and unlocking with the door lock
switch...............................34
NLocking and unlocking with key or inside lock
knob................................35
NLocking by means of the inside lock knob.....35
mTrunk lid..............................35
NRemote trunk lid release..................36
NInside emergency trunk release.............37
mFuel filler.............................39
mEngine hood release......................41
mPower windows........................43
NDriver switch..........................44
2
Page 43 of 382

CAUTION!
Be careful that hands or fingers are not trapped
when closing the engine hood.
POWER WINDOWS
NOTE
1. The windows can be operated when the ignition key is
in the ªON ºposition. The door windows can be openedor closed for a 30-second period even after the ignition
switch is turned off. However, once the driver's door or
the front passenger's door is opened, the windows can-
not be operated until the ignition switch is turned on
again.
2. Never try to operate the driver switch and passenger
switch in opposing directions at the same time. Doing so
will cause the window to freeze in position.
3. Repeated operation with the engine stopped (key
ªONº) will run down the battery. Operate the window
switches while the engine is running.
WARNING!
²Before operating the power windows, make sure
that nothing can be trapped (head, hand, finger,
etc.) in the window.
²Never leave the vehicle without removing the key.
²Never leave a child in the vehicle alone.
F17A0250
Open
Close
LOCKING AND UNLOCKING 43
2
Page 44 of 382

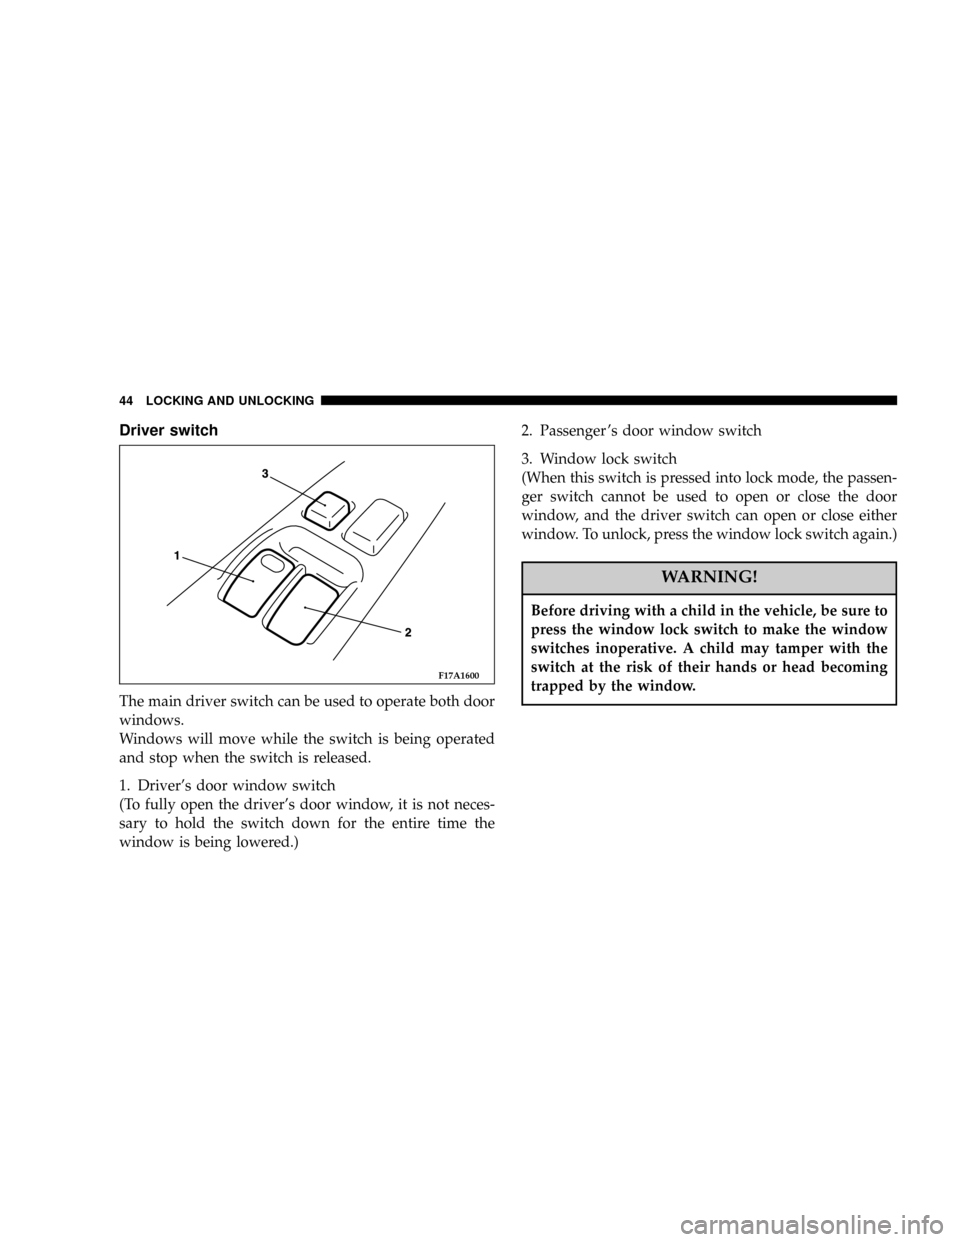
Driver switch
The main driver switch can be used to operate both door
windows.
Windows will move while the switch is being operated
and stop when the switch is released.
1. Driver's door window switch
(To fully open the driver's door window, it is not neces-
sary to hold the switch down for the entire time the
window is being lowered.)2. Passenger 's door window switch
3. Window lock switch
(When this switch is pressed into lock mode, the passen-
ger switch cannot be used to open or close the door
window, and the driver switch can open or close either
window. To unlock, press the window lock switch again.)
WARNING!
Before driving with a child in the vehicle, be sure to
press the window lock switch to make the window
switches inoperative. A child may tamper with the
switch at the risk of their hands or head becoming
trapped by the window.
F17A1600
44 LOCKING AND UNLOCKING
Page 45 of 382

Passenger switch
The passenger switch can be used to operate the passen-
ger door window.
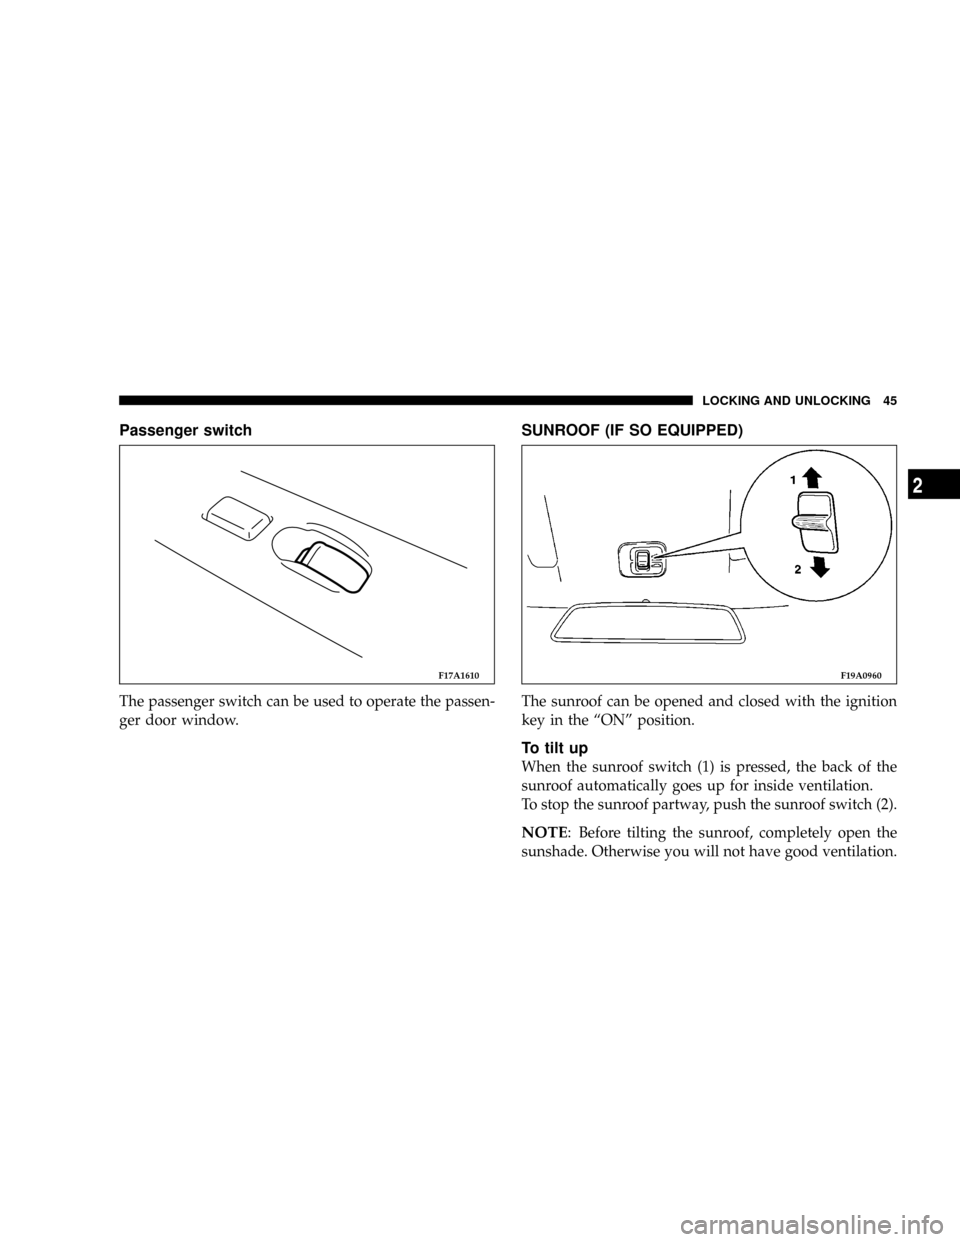
SUNROOF (IF SO EQUIPPED)
The sunroof can be opened and closed with the ignition
key in the ªONº position.
To tilt up
When the sunroof switch (1) is pressed, the back of the
sunroof automatically goes up for inside ventilation.
To stop the sunroof partway, push the sunroof switch (2).
NOTE: Before tilting the sunroof, completely open the
sunshade. Otherwise you will not have good ventilation.
F17A1610F19A0960
LOCKING AND UNLOCKING 45
2
Page 52 of 382

3. If the UNLOCK switch is pressed when all doors are
closed and no door is opened within approximately 30
seconds, re-arming will automatically occur.
NOTE: Once the system has been disarmed, it cannot be
rearmed except by repeating the arming procedure.
Testing the theft-alarm system
Use the following procedure to test the system:
1. Lower the driver's window.
2. Arm the system as explained in ªArmed stageº.
3. Make sure that the theft-alarm indicator illuminates
and goes off in approximately 20 seconds.
4. Wait a few seconds and then unlock the driver's side
door by using the inside door lock knob and opening the
door.
5. Check to be sure that the horn sounds intermittently
and the headlights blink on and off when the door is
opened.6. Disarm the system by unlocking the front driver's
door, passenger's door or the trunk lid by using the key
or the remote keyless transmitter.
NOTE: To make sure the alarm sounds when the trunk
lid is opened, open the trunk lid by using the trunk lid
release lever.
52 LOCKING AND UNLOCKING
Page 88 of 382

WARNING!
²IT IS VERY IMPORTANT TO ALWAYS WEAR
YOUR SEAT BELT PROPERLY EVEN WITH
AN AIR BAG.
²Seat belts help keep the driver and front pas-
senger properly positioned. This reduces the
risk of injury in all collisions, and reduces the
risk of serious or fatal injuries when the air bags
inflate. During sudden braking just before a
collision, an unrestrained or improperly re-
strained driver or front passenger can move
forward into direct contact with, or within close
proximity to, the air bag when it begins to
inflate. The beginning stage of air bag inflation
is the most forceful and can cause serious or
fatal injuries if the occupant comes in contact
with the air bag at this time.
²Seat belts reduce the risk of injury in rollovers,
side or rear impact collisions, and in lower-
speed frontal collisions, because the air bags are
not designed to inflate in those situations.
²Seat belts reduce the risk of being thrown from
your vehicle in a collision or rollover.
WARNING!
²IT IS VERY IMPORTANT TO BE PROPERLY
SEATED.
A driver or front passenger sitting too close to the
steering wheel or instrument panel during air bag
deployment can be killed or seriously injured
Air bags inflate very quickly and with great force. If
the driver and front passenger are not properly
seated and restrained, the air bag may not provide
proper protection, and could cause serious or fatal
injuries when it inflates.
²Before driving, adjust the driver 's seat as far back
as possible without affecting your ability to be in
complete control of the vehicle.
²Before driving, adjust the front passenger seat as
far back as possible.
²Make sure all vehicle occupants are always prop-
erly restrained using the available seat belts.
²With seat belts properly fastened, the driver and
front passenger should sit well back in their seats
and remain upright without leaning against the
window or door.
88 SEATS, SEAT BELTS, CHILD RESTRAINTS AND AIR BAGS
Page 92 of 382

5. Side air bag modules (if so equipped)
6. Side impact sensors (if so equipped)
The air bag control unit monitors the readiness of the
electronic parts of the system whenever the ignition
switch is in the ``ON'' or ``START'' position. These
include all of the items listed above and all related
wiring.The air bags will operate only when the ignition switch is
in the ``ON'' or ``START'' position.
When an impact sensor detects a front or side impact of
sufficient force, it automatically ignities materials in the
module inflator which generate gas and inflates the
appropriate air bags.
NOTEA collision that is not severe enough to need
airbag protection will not activate the system. This does
not mean something is wrong with the air bag system.
Deployment of the air bags produces a sudden, loud
noise and releases some smoke and powder. This is not
dangerous and does not indicate a fire in the vehicle.
People with breathing problems may feel some tempo-
rary irritation from chemicals used to inflate the bags. If
irritation continues see your doctor. You may open the
windows after air bags inflates, if it is safe to do so.
After deployment, the air bags deflate very rapidly, so
there is little danger of not being able to see. The time
between the sensors first detecting an impact and the air
bags deflating after deployment is shorter than a blink of
an eye.
92 SEATS, SEAT BELTS, CHILD RESTRAINTS AND AIR BAGS