park assist CHRYSLER TOWN AND COUNTRY 2008 5.G Owners Manual
[x] Cancel search | Manufacturer: CHRYSLER, Model Year: 2008, Model line: TOWN AND COUNTRY, Model: CHRYSLER TOWN AND COUNTRY 2008 5.GPages: 531, PDF Size: 4.51 MB
Page 100 of 531
mDriver Memory Seat Ð If Equipped.........153
NSetting Memory Positions And Linking RKE
Transmitter To Memory.................154
mTo Open And Close The Hood.............156
NHood Safety Switch Ð If Equipped........158
mLights...............................159
NInterior Lighting......................159
NExterior Lights.......................161
mMultifunction Lever.....................165
NTurn Signals.........................165
mTilt Steering Column Ð If Equipped.........169
mRear Park Assist System Ð If Equipped.......170
NRear Park Assist Sensors................170mAdjustable Pedals Ð If Equipped...........175
mElectronic Speed Control Ð If Equipped......177
NActivating Electronic Speed Control........177
mOverhead Consoles.....................180
NFront Overhead Console Ð If Equipped.....180
mGarage Door Opener Ð If Equipped.........183
NProgramming HomeLinkt...............184
NGate Operator/Canadian Programming.....188
NSecurity............................188
NTroubleshooting Tips...................189
NGeneral Information...................189
mPower Sunroof Ð If Equipped.............189
NPower Sunroof Operation...............190
98 UNDERSTANDING THE FEATURES OF YOUR VEHICLE
Page 172 of 531
REAR PARK ASSIST SYSTEM Ð IF EQUIPPED
The Rear Park Assist System provides visual and audible
indications of the distance between the rear fascia and the
detected obstacle when backing up. When backing up the
driver should also use the inside rearview and outside
mirrors.
The Rear Park Assist System will remember the last
system state (enabled or disabled) from the last ignition
cycle when the ignition is changed to the RUN/ON
position.
The Rear Park Assist System can be active only when the
transaxle gear selector lever is in REVERSE. When in
REVERSE, the system scans for objects behind the vehicle
using four sensors located in the rear bumper.NOTE:The system will be active until the vehicle speed
is increased to approximately 11 mph (18 km/h) or
above. The system will be active again if the vehicle
speed is decreased to speeds less than approximately 10
mph (16 km/h).
Rear Park Assist Sensors
The four Rear Park Assist Sensors, located in the rear
fascia, monitor the area behind the vehicle that is within
the sensors' field of view. The monitored area seems oval
in shape. The sensors can detect obstacles from approxi-
mately 11.8 in (30 cm) up to 78.7 in (200 cm) from the rear
fascia in the horizontal direction, depending on the
location and orientation of the obstacle and the type of
obstacle.
170 UNDERSTANDING THE FEATURES OF YOUR VEHICLE
Page 173 of 531
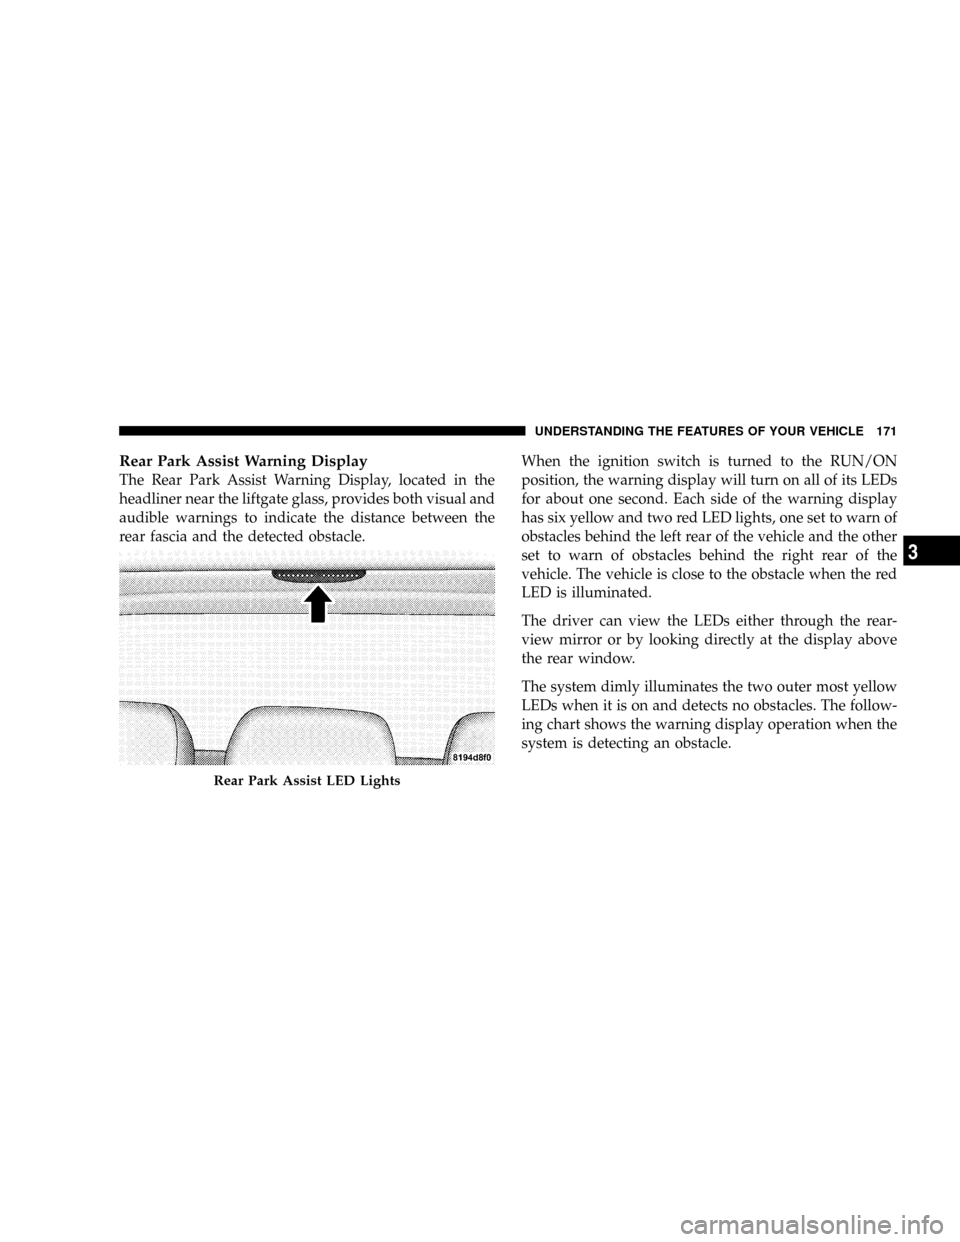
Rear Park Assist Warning Display
The Rear Park Assist Warning Display, located in the
headliner near the liftgate glass, provides both visual and
audible warnings to indicate the distance between the
rear fascia and the detected obstacle.When the ignition switch is turned to the RUN/ON
position, the warning display will turn on all of its LEDs
for about one second. Each side of the warning display
has six yellow and two red LED lights, one set to warn of
obstacles behind the left rear of the vehicle and the other
set to warn of obstacles behind the right rear of the
vehicle. The vehicle is close to the obstacle when the red
LED is illuminated.
The driver can view the LEDs either through the rear-
view mirror or by looking directly at the display above
the rear window.
The system dimly illuminates the two outer most yellow
LEDs when it is on and detects no obstacles. The follow-
ing chart shows the warning display operation when the
system is detecting an obstacle.
Rear Park Assist LED Lights
UNDERSTANDING THE FEATURES OF YOUR VEHICLE 171
3
Page 174 of 531
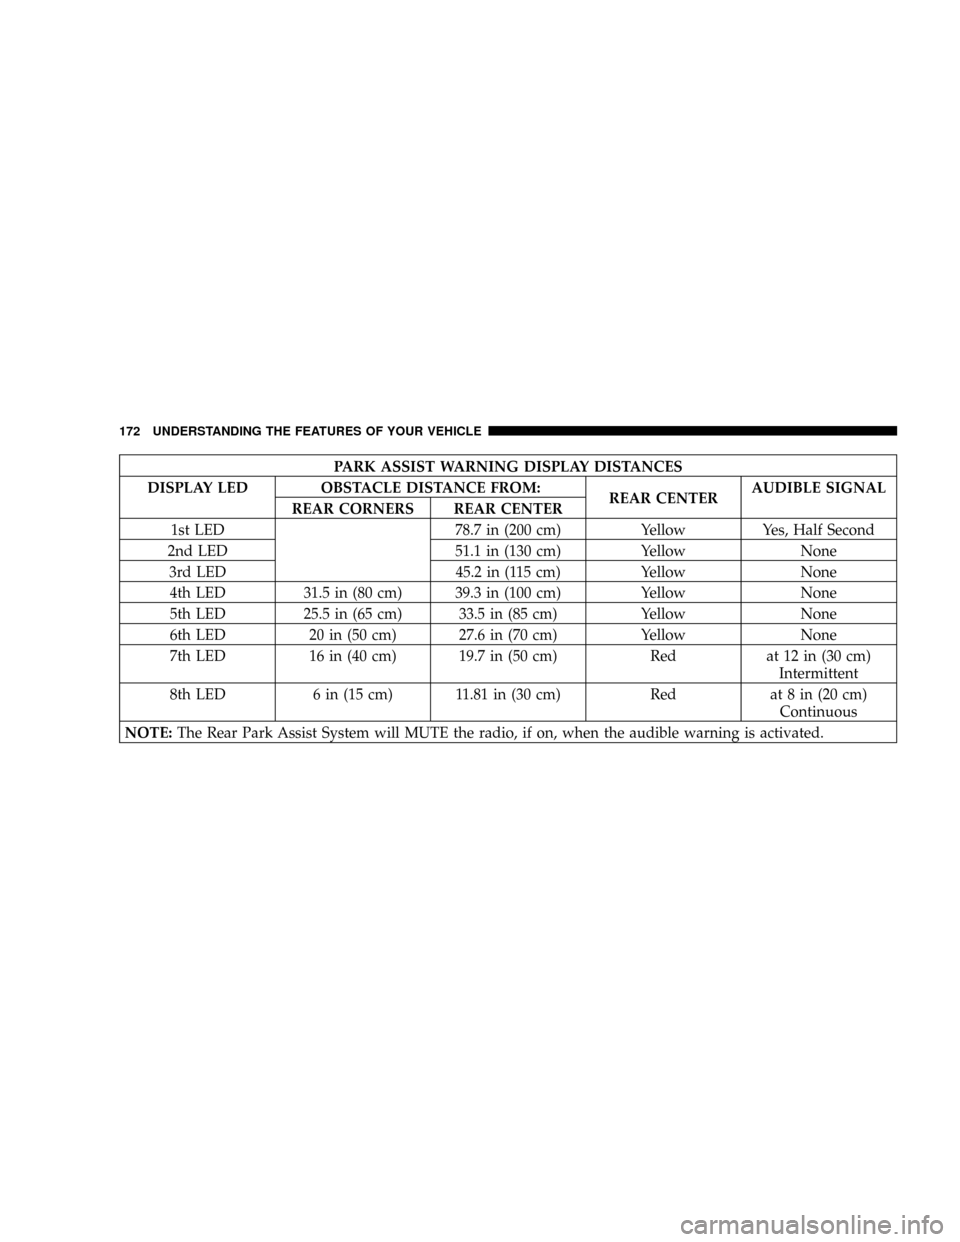
PARK ASSIST WARNING DISPLAY DISTANCES
DISPLAY LED OBSTACLE DISTANCE FROM:
REAR CENTERAUDIBLE SIGNAL
REAR CORNERS REAR CENTER
1st LED 78.7 in (200 cm) Yellow Yes, Half Second
2nd LED 51.1 in (130 cm) Yellow None
3rd LED 45.2 in (115 cm) Yellow None
4th LED 31.5 in (80 cm) 39.3 in (100 cm) Yellow None
5th LED 25.5 in (65 cm) 33.5 in (85 cm) Yellow None
6th LED 20 in (50 cm) 27.6 in (70 cm) Yellow None
7th LED 16 in (40 cm) 19.7 in (50 cm) Red at 12 in (30 cm)
Intermittent
8th LED 6 in (15 cm) 11.81 in (30 cm) Red at 8 in (20 cm)
Continuous
NOTE:The Rear Park Assist System will MUTE the radio, if on, when the audible warning is activated.
172 UNDERSTANDING THE FEATURES OF YOUR VEHICLE
Page 175 of 531
WARNING!
Drivers must be careful when backing up even when
using the Rear Park Assist System. Always check care-
fully behind your vehicle, and be sure to check for
pedestrians, animals, other vehicles, obstructions, or blind
spots before backing up. You are responsible for the safety
of your surroundings and must continue to pay attention
while backing up. Failure to do so can result in serious
injury or death.
Before using the Rear Park Assist System, it is strongly
recommended that the ball mount and hitch ball assembly
be disconnected from the vehicle when the vehicle is not
used for towing. Failure to do so can result in injury or
damage to vehicles or obstacles because the hitch ball will
be much closer to the obstacle than the rear fascia when
the warning display turns the red LEDs on. Also, the
sensors could detect the ball mount and hitch ball assem-
bly, depending on its size and shape, giving a false
indication that an obstacle is behind the vehicle.
CAUTION!
²To avoid vehicle damage the Rear Park Assist
System should only be used as a parking aid and
is unable to recognize every obstacle, including
small objects. Parking curbs might be temporarily
detected or not detected at all. Obstacles located
above or below the sensors will not be detected
when they are in close proximity to the rear of the
vehicle.
²To avoid vehicle damage the vehicle must be
driven slowly when using the Rear Park Assist
System to be able to stop in time when an obstacle
is detected. It is recommended that the driver look
over his/her shoulder when using the Rear Park
Assist System.
UNDERSTANDING THE FEATURES OF YOUR VEHICLE 173
3
Page 176 of 531
NOTE:
²Ensure that the rear bumper is free of dirt and debris
to keep the system operating properly.
²Jackhammers, large trucks, and other vibrations could
affect the performance of the system.
Enabling and Disassembling The Rear Park Assist
System
There are times when you may want to disable the Rear
Park Assist System, such as when towing a trailer.
NOTE:The manufacturer suggests disabling the Rear
Park Assist System when towing a trailer. Refer to the
following procedures.
Vehicles Equipped With the Electronic Vehicle
Information Center (EVIC)
You can turn the Rear Park Assist System on or off
through the EVIC. For details, refer to ªPersonal Settings(Customer Programmable Features)º under ªElectronic
Vehicle Information Center (EVIC)º in Section 4 of this
manual.
Vehicles Equipped With the Compass Mini-Trip
Computer (CMTC)
You can turn the Rear Park Assist System ON or OFF
through the CMTC by pressing the left reset button in the
instrument cluster. Turn the ignition switch to the ON
position, then press and hold the rest button for approxi-
mately two seconds.
Service The Rear Park Assist System
If the Rear Park Assist System malfunctions, the instru-
ment cluster will actuate a single chime, once per ignition
cycle, and it will display the(SERVICE PARK ASSIST
SYSTEM(message. Refer to ªCompass Mini Trip Com-
puter (CMTC) or ªElectronic Vehicle Information Center
(EVIC)º Ð as equipped, in Section 4 of this manual.
174 UNDERSTANDING THE FEATURES OF YOUR VEHICLE
Page 177 of 531
If(SERVICE PARK ASSIST SYSTEM(appears in the
Electronic Vehicle Information Center (EVIC), after mak-
ing sure the rear bumper is clean, please see your
authorized dealer.
Should this wrench symbol display with the
letterPnext to it, your Park Sense System
needs servicing. Contact your authorized
dealer.
Cleaning The Rear Park Assist System
Clean the Rear Park Assist Sensors with water, car wash
soap and a soft cloth. Do not use rough or hard cloths. Do
not scratch or poke the sensors, otherwise, you could
damage the sensors.
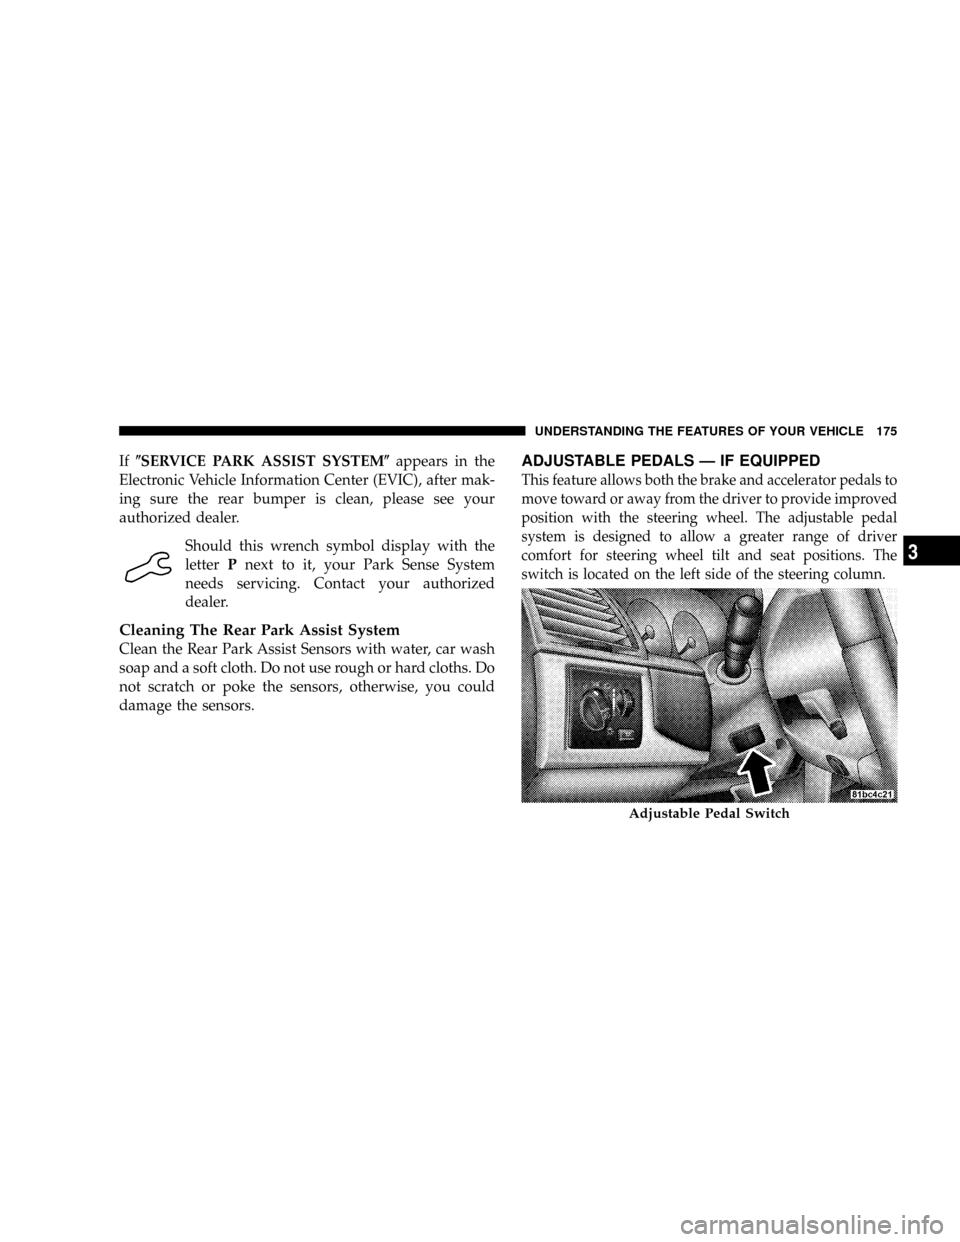
ADJUSTABLE PEDALS Ð IF EQUIPPED
This feature allows both the brake and accelerator pedals to
move toward or away from the driver to provide improved
position with the steering wheel. The adjustable pedal
system is designed to allow a greater range of driver
comfort for steering wheel tilt and seat positions. The
switch is located on the left side of the steering column.
Adjustable Pedal Switch
UNDERSTANDING THE FEATURES OF YOUR VEHICLE 175
3
Page 242 of 531
Compass Mini-Trip Computer (CMTC) Reset
Buttons
CMTC Reset Button
Press the left reset button located on the instrument
cluster to scroll through the sub menus (i.e., Trip Func-
tions: AVG Fuel Economy, DTE, Elapsed Time, and
Units).
To reset the display shown, turn the ignition switch to the
ON position, then press and hold the reset button for
approximately two seconds.When the appropriate conditions exist, the following
odometer messages will display:
NE. Eight-point compass headings are displayed (N, S, E,
W, NE, NW, SE, SW)
14ÉF............ Temperature (Fahrenheit or Celsius)
AV G......... AverageFuel Economy (U.S. or Metric)
DTE.......................Distance to Empty
ET............................Elapsed Time
P.......................... ParkAssist On/Off
Should this wrench symbol display with the
letterPnext to it, your Park Assist System
needs servicing. Contact your authorized
dealer.
NOTE:Temperature and Average Fuel Economy can be
changed from U.S. or Metric by pressing and holding the
left CMTC Reset Button located on the instrument cluster.
240 UNDERSTANDING YOUR INSTRUMENT PANEL
Page 247 of 531
²Left Rear Turn Signal Light Out
²Right Front Turn Signal Light Out
²Right Rear Turn Signal Light Out
²Park Assist Disabled
²Service Park Assist System
²Personal Settings Not Available ± Vehicle Not in Park
Oil Change Required
Your vehicle is equipped with an engine oil change
indicator system. TheOil Change Requiredmessage will
flash in the EVIC display for approximately 10 seconds
after a single chime has sounded to indicate the next
scheduled oil change interval. The engine oil change
indicator system is duty cycle based, which means the
engine oil change interval may fluctuate dependent upon
your personal driving style.Unless reset, this message will continue to display each
time you turn the ignition switch to the ON/RUN
position. To turn off the message temporarily, press and
release the Menu button. To reset the oil change indicator
system (after performing the scheduled maintenance)
refer to the following procedure.
1. Turn the ignition switch to the ON position (Do not
start the engine).
2. Fully depress the accelerator pedal slowly three times
within 10 seconds.
3. Turn the ignition switch to the OFF/LOCK position.
NOTE:If the indicator message illuminates when you
start the vehicle, the oil change indicator system did not
reset. If necessary repeat this procedure.
UNDERSTANDING YOUR INSTRUMENT PANEL 245
4
Page 254 of 531
when exiting the vehicle. To make your selection, press
and release the RESET button until 0, 30, 60, or 90
appears.
Turn Headlights On with Remote Key Unlock
When this feature is selected, the headlights will activate
and remain on for up to 90 seconds when the doors are
unlocked with the remote keyless entry transmitter. To
make your selection, press and release the RESET button
until OFF, 30 sec., 60 sec., or 90 sec. appears.
Delay Power Off to Accessories Until Exit
When this feature is selected, the power window
switches, radio, hands±free system (if equipped), DVD
video system (if equipped), power sunroof (if equipped),
and power outlets will remain active for up to 10 minutes
after the ignition switch is turned off. Opening a vehicle
door will cancel this feature. To make your selection,
press and release the RESET button until Off, 45 sec., 5
min., or 10 min. appears.
Rear Park Assist System Ð If Equipped
When ENABLE is selected, the Rear Park Assist System is
activated. When DISABLE is selected, the System is
deactivated and, the instrument cluster will display the
9PARK ASSIST DISABLED9message.
Display Units of Measure in
The EVIC, odometer, and navigation system (if
equipped) can be changed between English and Metric
units of measure. To make your selection, press and
release the RESET button until US or METRIC appears.
RADIO GENERAL INFORMATION
RADIO BROADCAST SIGNALS
Your radio will provide excellent reception under most
operating conditions. Like any system, however, car
radios have performance limitations, due to mobile op-
eration and natural phenomena, which might lead you to
believe your sound system is malfunctioning. To help
252 UNDERSTANDING YOUR INSTRUMENT PANEL