tire size CHRYSLER TOWN AND COUNTRY 2008 5.G Owners Manual
[x] Cancel search | Manufacturer: CHRYSLER, Model Year: 2008, Model line: TOWN AND COUNTRY, Model: CHRYSLER TOWN AND COUNTRY 2008 5.GPages: 531, PDF Size: 4.51 MB
Page 65 of 531
When To Use The Automatic Locking Mode
Use The Automatic Locking Mode anytime a child safety
seat is installed in a passenger seating position. Children
12 years old and younger should be properly restrained
in the rear seat whenever possible.
How To Use The Automatic Locking Mode
1. Buckle the combination lap/shoulder belt.
2. Grasp the shoulder portion and pull downward until
the entire belt is extracted.
3. Allow the belt to retract. As the belt retracts, you will
hear a clicking sound. This indicates the safety belt is
now in the automatic locking mode.
How To Disengage The Automatic Locking Mode
Disconnect the combination lap/shoulder belt and allow
it to retract completely to disengage the automatic lock-
ing mode and activate the vehicle sensitive (emergency)
locking mode.
Seat Belt Pretensioners
The seat belts for both front seating positions are
equipped with pretensioning devices that are designed to
remove slack from the seat belt in the event of a collision.
These devices improve the performance of the seat belt
by assuring that the belt is tight about the occupant early
in a collision. Pretensioners work for all size occupants,
including those in child restraints.
NOTE:These devices are not a substitute for proper seat
belt placement by the occupant. The seat belt still must be
worn snugly and positioned properly.
The pretensioners are triggered by the Occupant Re-
straint Controller (ORC). Like the front airbags, the
pretensioners are single use items. After a collision that is
severe enough to deploy the airbags and pretensioners,
both must be replaced.
THINGS TO KNOW BEFORE STARTING YOUR VEHICLE 63
2
Page 229 of 531
5. Tire Pressure Monitoring Telltale Lamp Ð If
Equipped
Each tire, including the spare (if provided),
should be checked monthly when cold and
inflated to the inflation pressure recommended
by the vehicle manufacturer on the vehicle
placard or tire inflation pressure label. (If your vehicle
has tires of a different size than the size indicated on the
vehicle placard or tire inflation pressure label, you should
determine the proper tire inflation pressure for those
tires.)
As an added safety feature, your vehicle has been
equipped with a Tire Pressure Monitoring System
(TPMS) that illuminates a low tire pressure telltale when
one or more of your tires is significantly under-inflated.
Accordingly, when the low tire pressure telltale illumi-
nates, you should stop and check your tires as soon as
possible, and inflate them to the proper pressure. Driving
on a significantly under-inflated tire causes the tire tooverheat and can lead to tire failure. Underinflation also
reduces fuel efficiency and tire tread life, and may affect
the vehicle's handling and stopping ability.
NOTE:Please note that the TPMS is not a substitute for
proper tire maintenance, and it is the driver 's responsi-
bility to maintain correct tire pressure, even if underin-
flation has not reached the level to trigger illumination of
the TPMS low tire pressure telltale.
Your vehicle has also been equipped with a TPMS
malfunction indicator to indicate when the system is not
operating properly. The TPMS malfunction indicator is
combined with the low tire pressure telltale. When the
system detects a malfunction, the telltale will flash for
approximately one minute and then remain continuously
illuminated. This sequence will continue upon subse-
quent vehicle start-ups as long as the malfunction exists.
When the malfunction indicator is illuminated, the sys-
tem may not be able to detect or signal low tire pressure
UNDERSTANDING YOUR INSTRUMENT PANEL 227
4
Page 230 of 531
as intended. TPMS malfunctions may occur for a variety
of reasons, including the installation of replacement or
alternate tires or wheels on the vehicle that prevent the
TPMS from functioning properly.
NOTE:Always check the TPMS malfunction telltale
after replacing one or more tires or wheels on your
vehicle to ensure that the replacement or alternate tires
and wheels allow the TPMS to continue to function
properly.CAUTION!
The TPMS has been optimized for the original
equipment tires and wheels. TPMS pressures and
warning have been established for the tire size
equipped on your vehicle. Undesirable system opera-
tion or sensor damage may result when using re-
placement equipment that is not of the same size,
type, and/or style. Aftermarket wheels can cause
sensor damage. Do not use aftermarket tire sealants
or balance beads if your vehicle is equipped with a
TPMS, as damage to the sensors may result.
For additional information on TPMS, refer to Section 5 Ð
Starting and Operating, ªTire Pressure Monitoring Sys-
temº of this manual.
228 UNDERSTANDING YOUR INSTRUMENT PANEL
Page 343 of 531
²A slight drop or fall away of the brake pedal at the end
of the stop.
WARNING!
²The Anti-Lock Brake System contains sophisti-
cated electronic equipment that may be suscep-
tible to interference caused by improperly in-
stalled or high output radio transmitting
equipment. This interference can cause possible
loss of anti-lock braking capability. Installation of
such equipment should be performed by qualified
professionals.
²Pumping of the Anti-Lock Brakes will diminish
their effectiveness and may lead to an accident.
Pumping makes the stopping distance longer. Just
press firmly on your brake pedal when you need
to slow down or stop.
WARNING!
²The Anti-Lock Brake System cannot prevent acci-
dents, including those resulting from excessive
speed in turns, following another vehicle too
closely, or hydroplaning. Only a safe, attentive,
and skillful driver can prevent accidents.
²The capabilities of an ABS-equipped vehicle must
never be exploited in a reckless or dangerous
manner which could jeopardize the user's safety
or the safety of others.
All vehicle wheels and tires must be the same size and
type, and tires must be properly inflated to produce
accurate signals for the computer.
STARTING AND OPERATING 341
5
Page 353 of 531
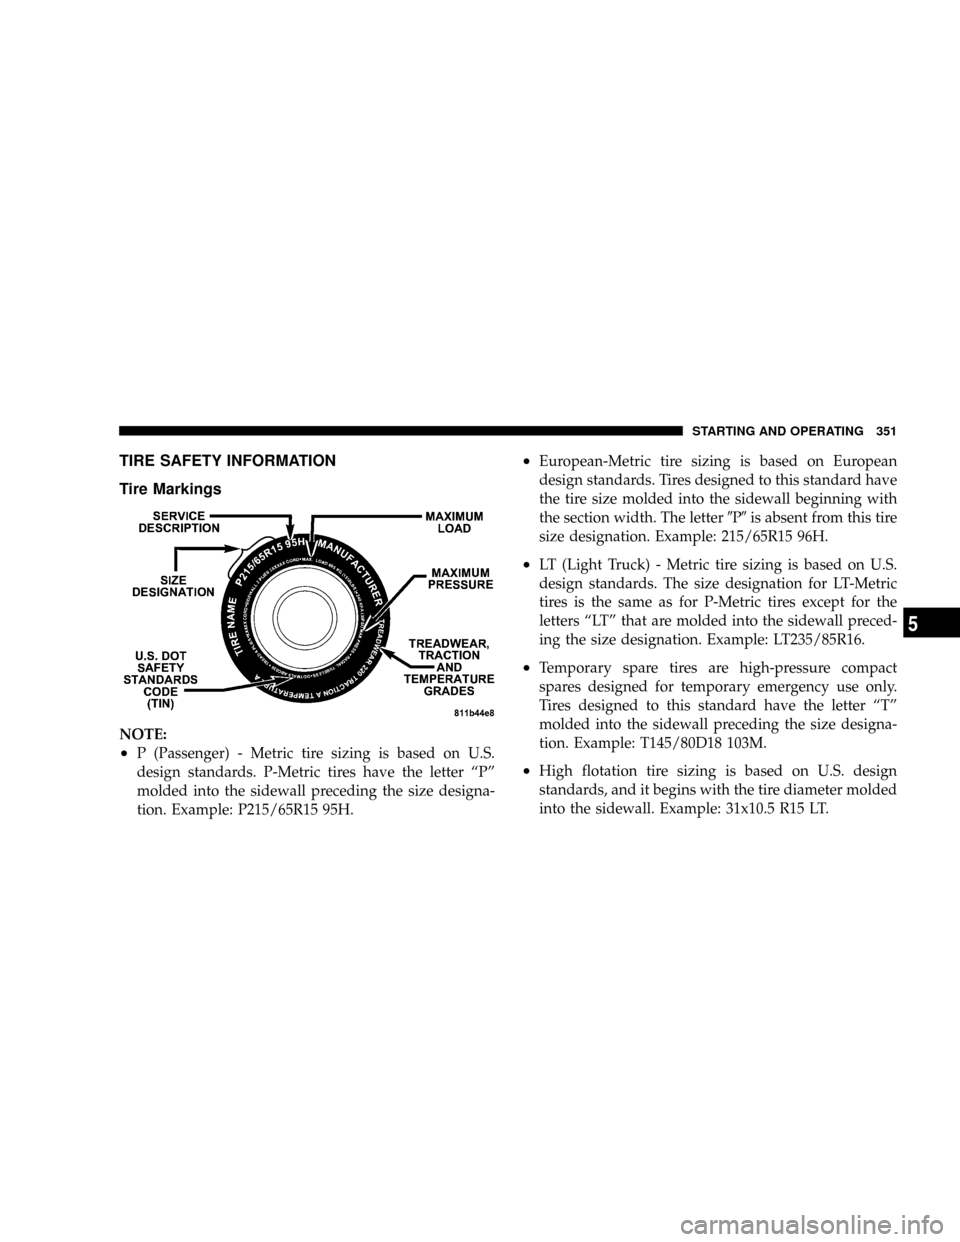
TIRE SAFETY INFORMATION
Tire Markings
NOTE:
²P (Passenger) - Metric tire sizing is based on U.S.
design standards. P-Metric tires have the letter ªPº
molded into the sidewall preceding the size designa-
tion. Example: P215/65R15 95H.
²European-Metric tire sizing is based on European
design standards. Tires designed to this standard have
the tire size molded into the sidewall beginning with
the section width. The letter9P9is absent from this tire
size designation. Example: 215/65R15 96H.
²LT (Light Truck) - Metric tire sizing is based on U.S.
design standards. The size designation for LT-Metric
tires is the same as for P-Metric tires except for the
letters ªLTº that are molded into the sidewall preced-
ing the size designation. Example: LT235/85R16.
²Temporary spare tires are high-pressure compact
spares designed for temporary emergency use only.
Tires designed to this standard have the letter ªTº
molded into the sidewall preceding the size designa-
tion. Example: T145/80D18 103M.
²High flotation tire sizing is based on U.S. design
standards, and it begins with the tire diameter molded
into the sidewall. Example: 31x10.5 R15 LT.
STARTING AND OPERATING 351
5
Page 354 of 531
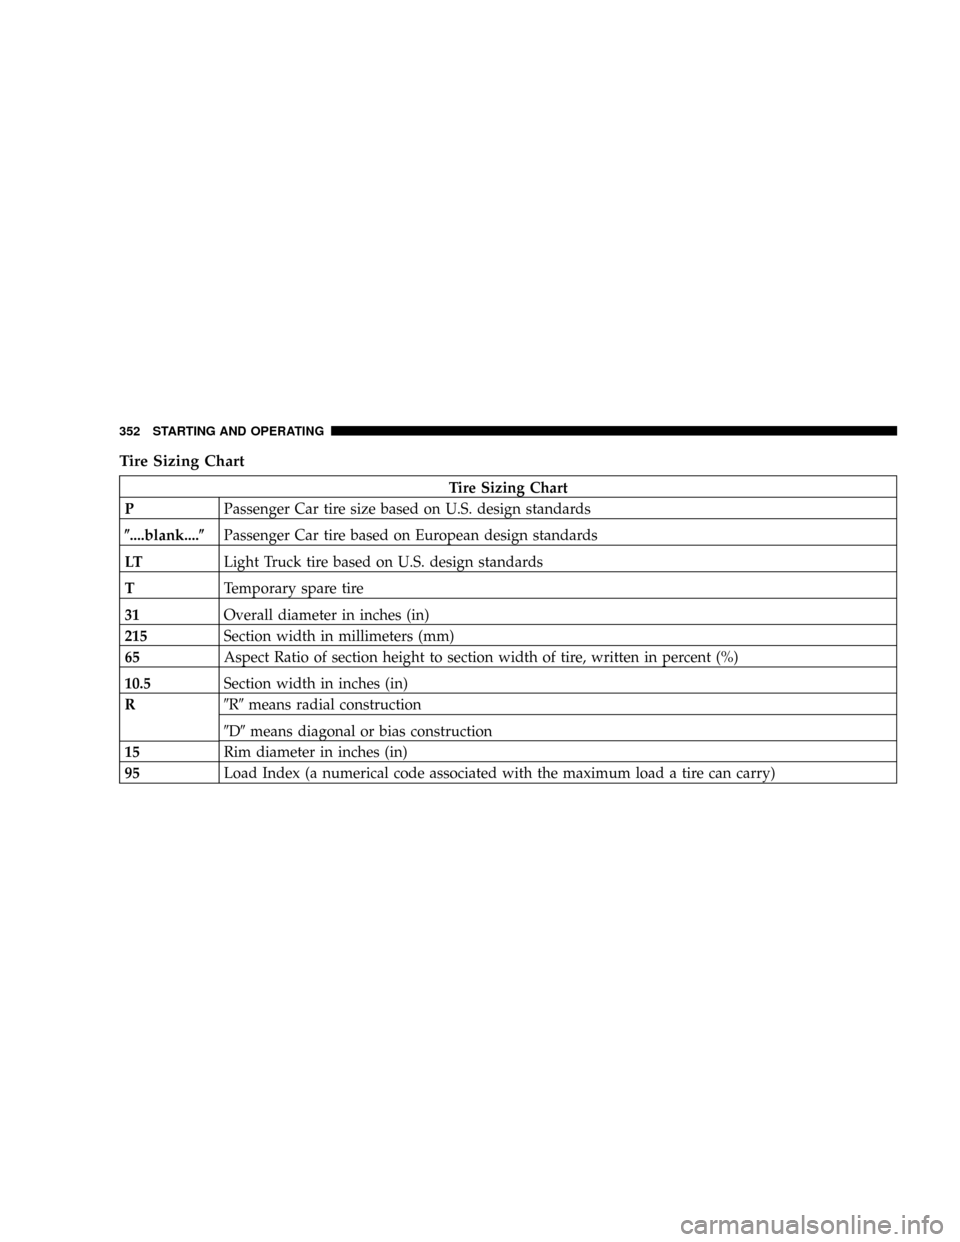
Tire Sizing Chart
Tire Sizing Chart
PPassenger Car tire size based on U.S. design standards
(....blank....(Passenger Car tire based on European design standards
LTLight Truck tire based on U.S. design standards
TTemporary spare tire
31Overall diameter in inches (in)
215Section width in millimeters (mm)
65Aspect Ratio of section height to section width of tire, written in percent (%)
10.5Section width in inches (in)
R9R9means radial construction
9D9means diagonal or bias construction
15Rim diameter in inches (in)
95Load Index (a numerical code associated with the maximum load a tire can carry)
352 STARTING AND OPERATING
Page 356 of 531
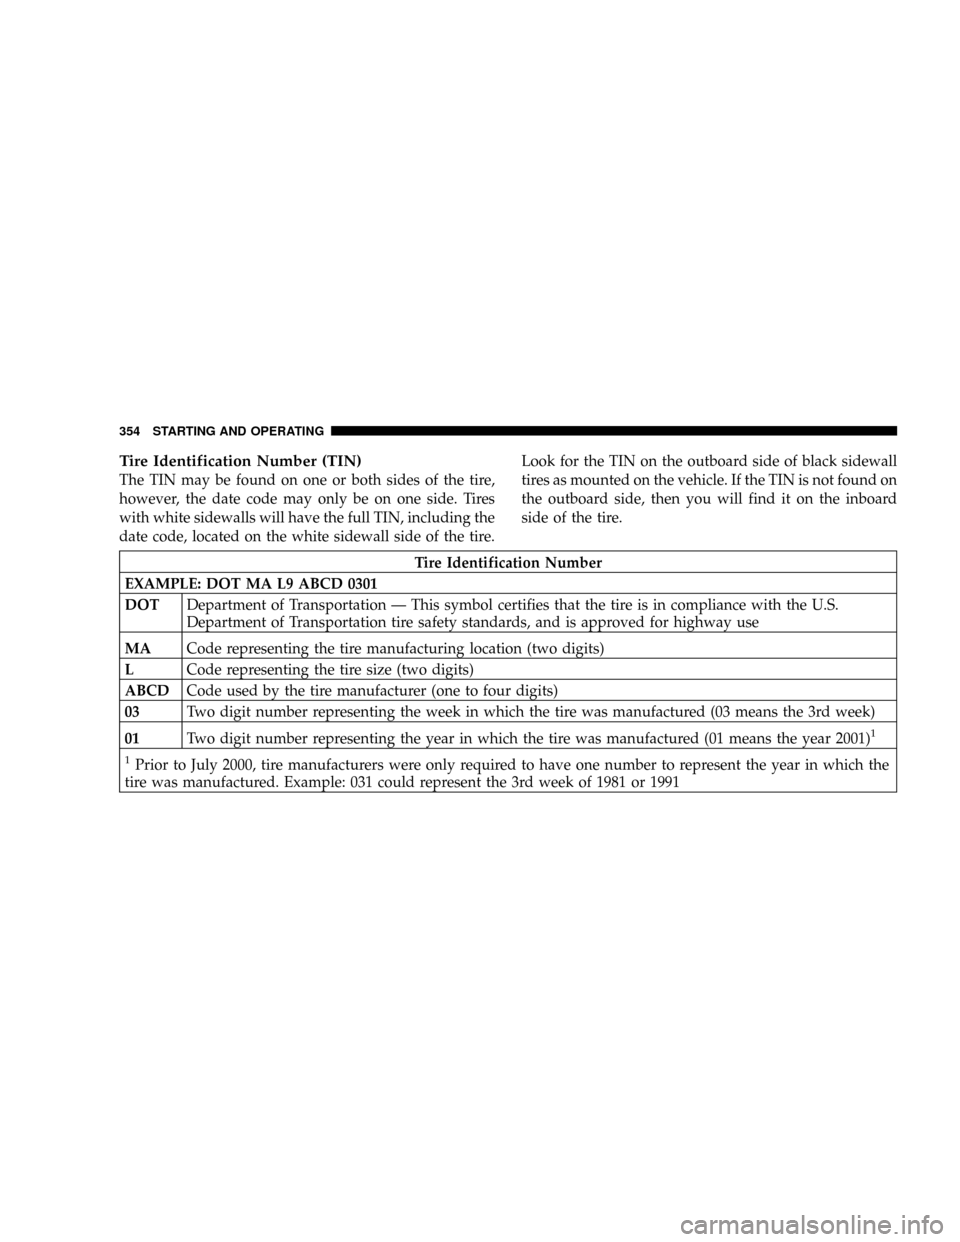
Tire Identification Number (TIN)
The TIN may be found on one or both sides of the tire,
however, the date code may only be on one side. Tires
with white sidewalls will have the full TIN, including the
date code, located on the white sidewall side of the tire.Look for the TIN on the outboard side of black sidewall
tires as mounted on the vehicle. If the TIN is not found on
the outboard side, then you will find it on the inboard
side of the tire.
Tire Identification Number
EXAMPLE: DOT MA L9 ABCD 0301
DOTDepartment of Transportation Ð This symbol certifies that the tire is in compliance with the U.S.
Department of Transportation tire safety standards, and is approved for highway use
MACode representing the tire manufacturing location (two digits)
LCode representing the tire size (two digits)
ABCDCode used by the tire manufacturer (one to four digits)
03Two digit number representing the week in which the tire was manufactured (03 means the 3rd week)
01Two digit number representing the year in which the tire was manufactured (01 means the year 2001)
1
1
Prior to July 2000, tire manufacturers were only required to have one number to represent the year in which the
tire was manufactured. Example: 031 could represent the 3rd week of 1981 or 1991
354 STARTING AND OPERATING
Page 357 of 531
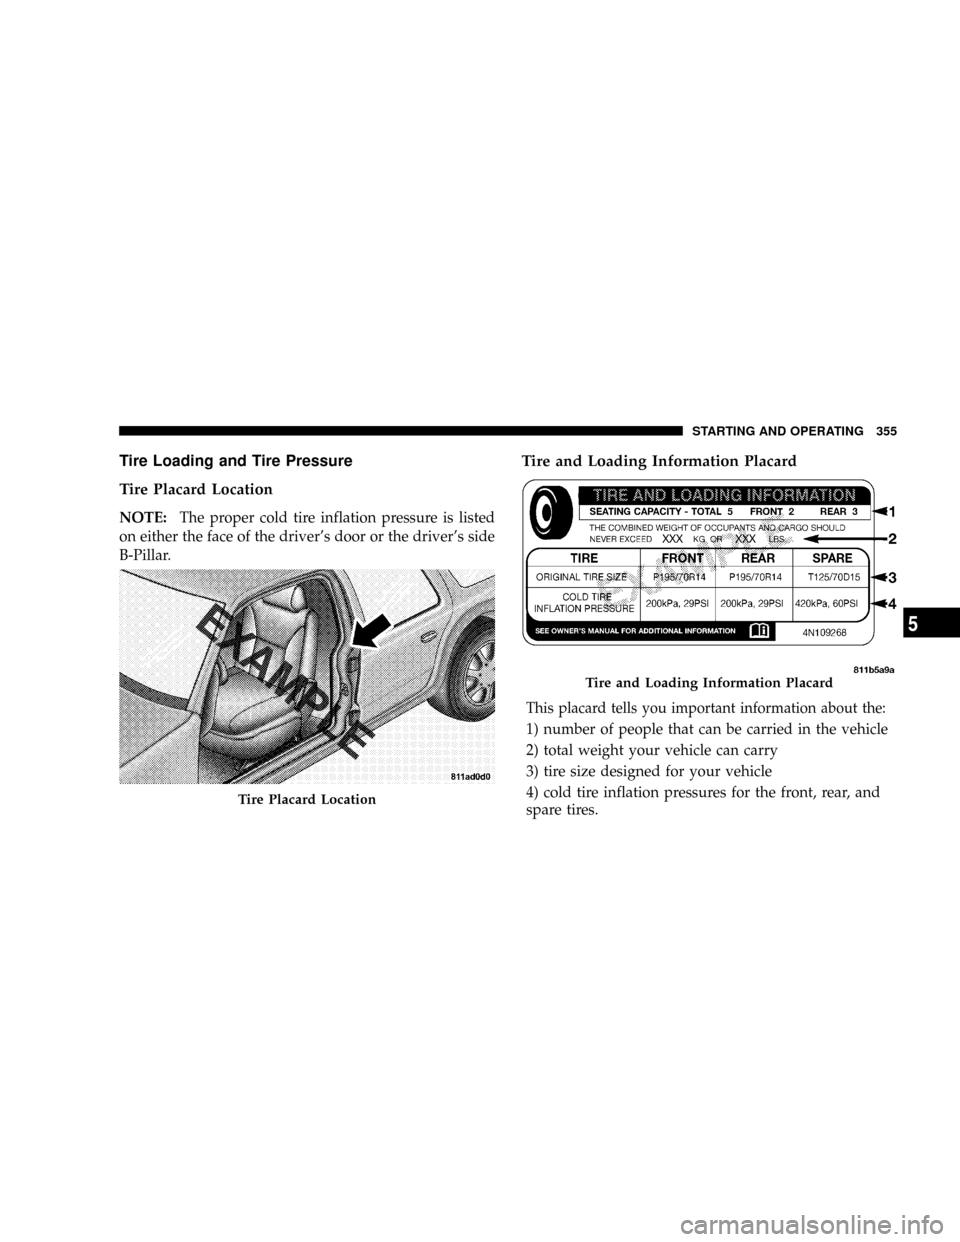
Tire Loading and Tire Pressure
Tire Placard Location
NOTE:The proper cold tire inflation pressure is listed
on either the face of the driver's door or the driver's side
B-Pillar.
Tire and Loading Information Placard
This placard tells you important information about the:
1) number of people that can be carried in the vehicle
2) total weight your vehicle can carry
3) tire size designed for your vehicle
4) cold tire inflation pressures for the front, rear, and
spare tires.
Tire Placard Location
Tire and Loading Information Placard
STARTING AND OPERATING 355
5
Page 358 of 531
Loading
The vehicle maximum load on the tire must not exceed
the load carrying capacity of the tire on your vehicle. You
will not exceed the tire's load carrying capacity if you
adhere to the loading conditions, tire size, and cold tire
inflation pressures specified on the Tire and Loading
Information placard and in the ªVehicle Loadingº section
of this manual.
NOTE:Under a maximum loaded vehicle condition,
gross axle weight ratings (GAWRs) for the front and rear
axles must not be exceeded. For further information on
GAWRs, vehicle loading, and trailer towing, refer to
ªVehicle Loadingº in this section.
To determine the maximum loading conditions of your
vehicle, locate the statement, ªThe combined weight of
occupants and cargo should never exceed XXX kg or XXX
lbs.º on the Tire and Loading Information placard. Thecombined weight of occupants, cargo/luggage and
trailer tongue weight (if applicable) should never exceed
the weight referenced here.
Steps for Determining Correct Load Limit
1. Locate the statement, ªThe combined weight of occu-
pants and cargo should never exceed XXX kg or XXX lbsº
on your vehicle's placard.
2. Determine the combined weight of the driver and
passengers that will be riding in your vehicle.
3. Subtract the combined weight of the driver and pas-
sengers from XXX kg or XXX lbs.
4. The resulting figure equals the available amount of
cargo and luggage load capacity. For example, if ªXXXº
amount equals 1,400 lbs (635 kg) and there will be five
each 150 lb (68 kg) passengers in your vehicle, the
356 STARTING AND OPERATING
Page 368 of 531
Many states have laws requiring tire replacement at this
point.
Tire Life
The service life of a tire is dependent upon varying
factors including but not limited to:
²Driving style
²Tire pressure
²Distance driven
WARNING!
Tires and spare tire should be replaced after six years,
regardless of the remaining tread. Failure to follow
this warning can result in sudden tire failure. You
could lose control and have an accident resulting in
serious injury or death.Keep dismounted tires in a cool, dry place with as little
exposure to light as possible. Protect tires from contact
with oil, grease, and gasoline.
Replacement Tires
The tires on your new vehicle provide a balance of many
characteristics. They should be inspected regularly for
wear and correct cold tire inflation pressure. The manu-
facturer strongly recommends that you use tires equiva-
lent to the originals in size, quality and performance
when replacement is needed. Please see ªTread Wear
Indicatorsº and ªTire and Loading Informationº placard
for the size designation of your tire in this section. The
service description and load identification will be found
on the original equipment tire. Failure to use equivalent
replacement tires may adversely affect the safety, han-
dling, and ride of your vehicle. We recommend that you
contact your original equipment manufacturer or an
authorized tire dealer with any questions you may have
on tire specifications or capability.
366 STARTING AND OPERATING