warning CHRYSLER TOWN AND COUNTRY 2010 5.G Owner's Manual
[x] Cancel search | Manufacturer: CHRYSLER, Model Year: 2010, Model line: TOWN AND COUNTRY, Model: CHRYSLER TOWN AND COUNTRY 2010 5.GPages: 92, PDF Size: 11.08 MB
Page 25 of 92
Overhead (Halo) Light
• Halo lights are strategically placed soft lighting that help illuminate specific areaswhile driving at night.
• Push the button to turn ON/OFF the overhead (halo) lighting.
SPEED CONTROL LEVER
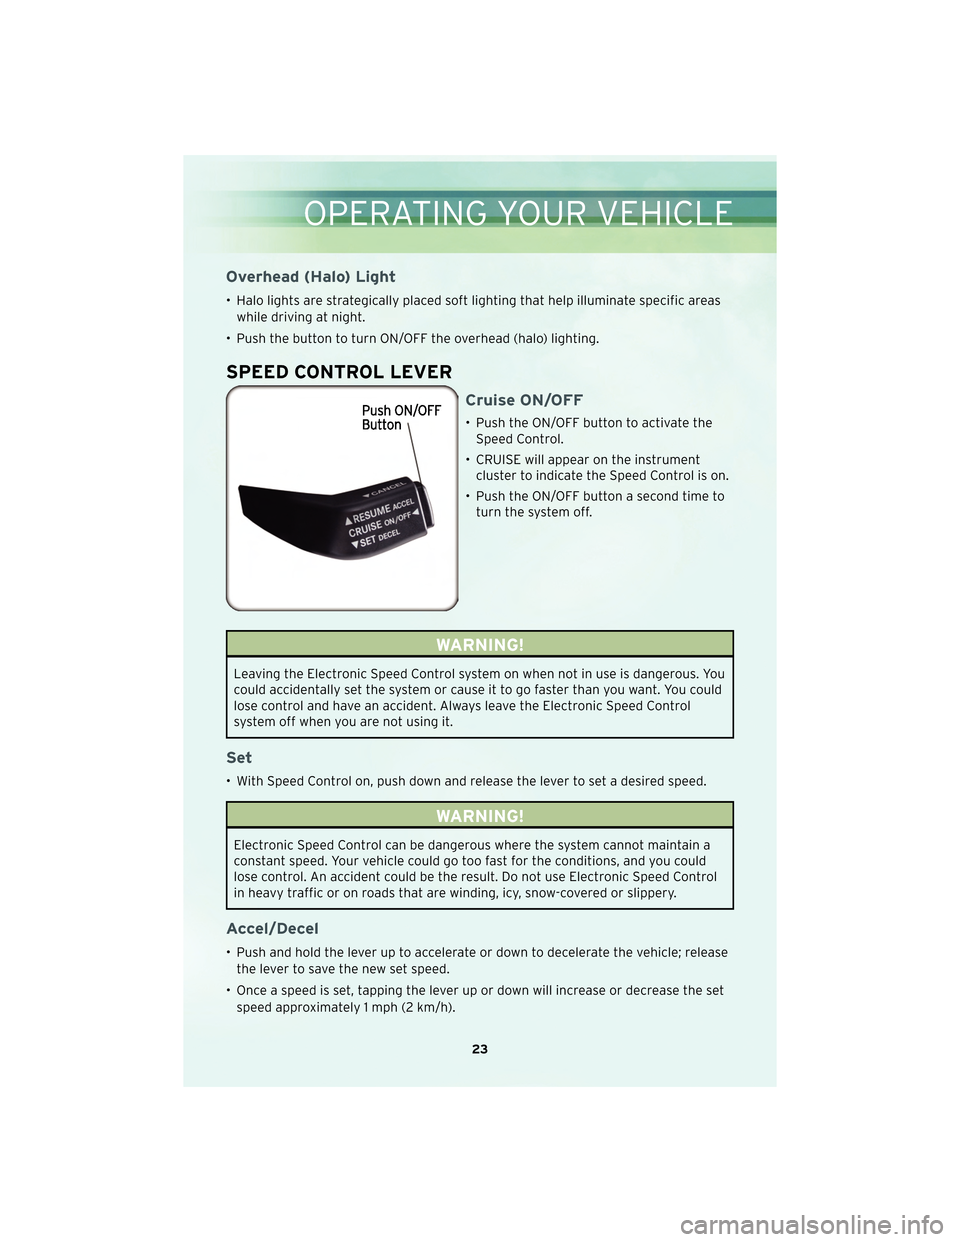
Cruise ON/OFF
• Push the ON/OFF button to activate the Speed Control.
• CRUISE will appear on the instrument cluster to indicate the Speed Control is on.
• Push the ON/OFF button a second time to turn the system off.
WARNING!
Leaving the Electronic Speed Control system on when not in use is dangerous. You
could accidentally set the system or cause it to go faster than you want. You could
lose control and have an accident. Always leave the Electronic Speed Control
system off when you are not using it.
Set
• With Speed Control on, push down and release the lever to set a desired speed.
WARNING!
Electronic Speed Control can be dangerous where the system cannot maintain a
constant speed. Your vehicle could go too fast for the conditions, and you could
lose control. An accident could be the result. Do not use Electronic Speed Control
in heavy traffic or on roads that are winding, icy, snow-covered or slippery.
Accel/Decel
• Push and hold the lever up to accelerate or down to decelerate the vehicle; release
the lever to save the new set speed.
• Once a speed is set, tapping the lever up or down will increase or decrease the set speed approximately 1 mph (2 km/h).
23
OPERATING YOUR VEHICLE
Page 31 of 92
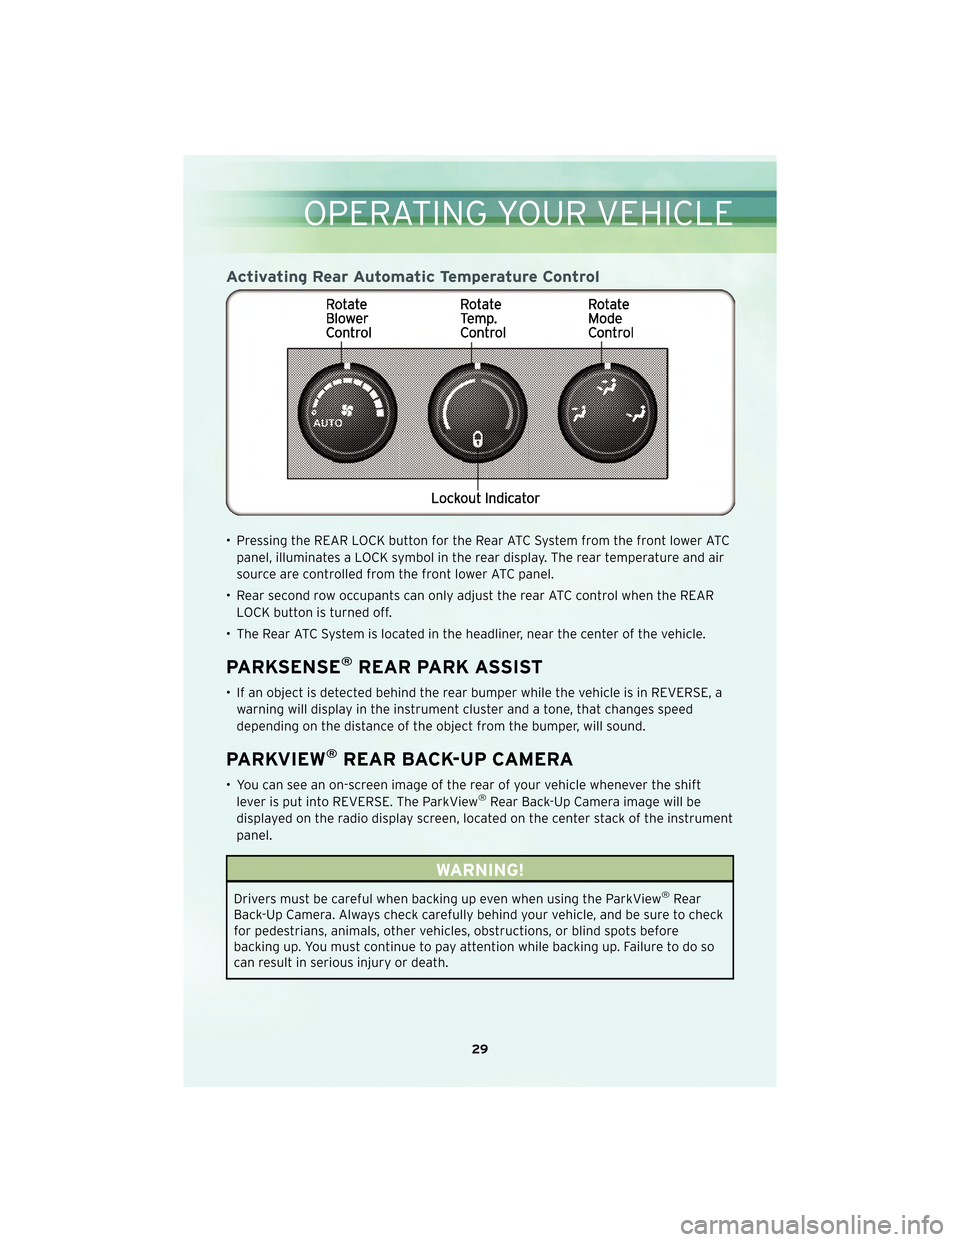
Activating Rear Automatic Temperature Control
• Pressing the REAR LOCK button for the Rear ATC System from the front lower ATCpanel, illuminates a LOCK symbol in the rear display. The rear temperature and air
source are controlled from the front lower ATC panel.
• Rear second row occupants can only adjust the rear ATC control when the REAR LOCK button is turned off.
• The Rear ATC System is located in the headliner, near the center of the vehicle.
PARKSENSE®REAR PARK ASSIST
• If an object is detected behind the rear bumper while the vehicle is in REVERSE, a warning will display in the instrument cluster and a tone, that changes speed
depending on the distance of the object from the bumper, will sound.
PARKVIEW®REAR BACK-UP CAMERA
• You can see an on-screen image of the rear of your vehicle whenever the shiftlever is put into REVERSE. The ParkView®Rear Back-Up Camera image will be
displayed on the radio display screen, located on the center stack of the instrument
panel.
WARNING!
Drivers must be careful when backing up even when using the ParkView®Rear
Back-Up Camera. Always check carefully behind your vehicle, and be sure to check
for pedestrians, animals, other vehicles, obstructions, or blind spots before
backing up. You must continue to pay attention while backing up. Failure to do so
can result in serious injury or death.
29
OPERATING YOUR VEHICLE
Page 32 of 92
REAR CROSS PATH WITH BLIND SPOT MONITORING
• The Blind Spot Monitoring (BSM) system warning light, located in the outsidemirrors, will illuminate if a vehicle moves into a blind spot zone.
• The BSM system can also be configured to sound an audible (chime) alert and mute the radio to notify you of objects that have entered the detection zones.
• Refer to your owner’s manual on the DVD for further details.
POWER SLIDING SIDE DOORS
Automatic/Manual Operation
• The power sliding door may be opened or closed manually or by using the buttons on the Key Fob, overhead console switch, or rear door switch.
• Pulling the inside or outside power sliding door handle will also power open the power sliding doors.
Sliding Side Door Child Protection Lock
• When this system is engaged, the inside manual door handle will not open thesliding door even though the inside door lock is in the unlocked position.
• To engage the Child Protection Door Lock, open the sliding side door. Slide the child protection door lock control, located on the rear of the sliding door, inward
(toward the vehicle) to engage.
• Repeat these steps on the opposite sliding door.
OPERATING YOUR VEHICLE
30
Page 36 of 92
POWER LIFTGATE
• The power liftgate may be opened and closed by pressing the button on the KeyFob or the button located on the overhead console. Press the button once to open,
and a second time to close the power liftgate.
• The power liftgate may be closed by the button, located in the upper left trim in the liftgate opening. Pressing once will only close the liftgate. This button cannot be
used to open the liftgate.
POWER SUNROOF
• The power sunroof switch is located on the overhead console.
WARNING!
• Never leave children in a vehicle with the key in the ignition switch. Occupants,particularly unattended children, can become entrapped by the power sunroof
while operating the power sunroof switch. Such entrapment may result in
serious injury or death.
• In an accident, there is a greater risk of being thrown from a vehicle with an open sunroof. You could also be seriously injured or killed. Always fasten your
seat belt properly and make sure all passengers are properly secured too.
• Do not allow small children to operate the sunroof. Never allow your fingers, other body parts, or any object to project through the sunroof opening. Injury
may result.
Opening Sunroof
Express
• Press the switch rearward and release. The sunroof will fully open and stopautomatically.
Closing Sunroof
Express
• Press the switch forward and release. The sunroof will close automatically from anyposition.
OPERATING YOUR VEHICLE
34
Page 46 of 92
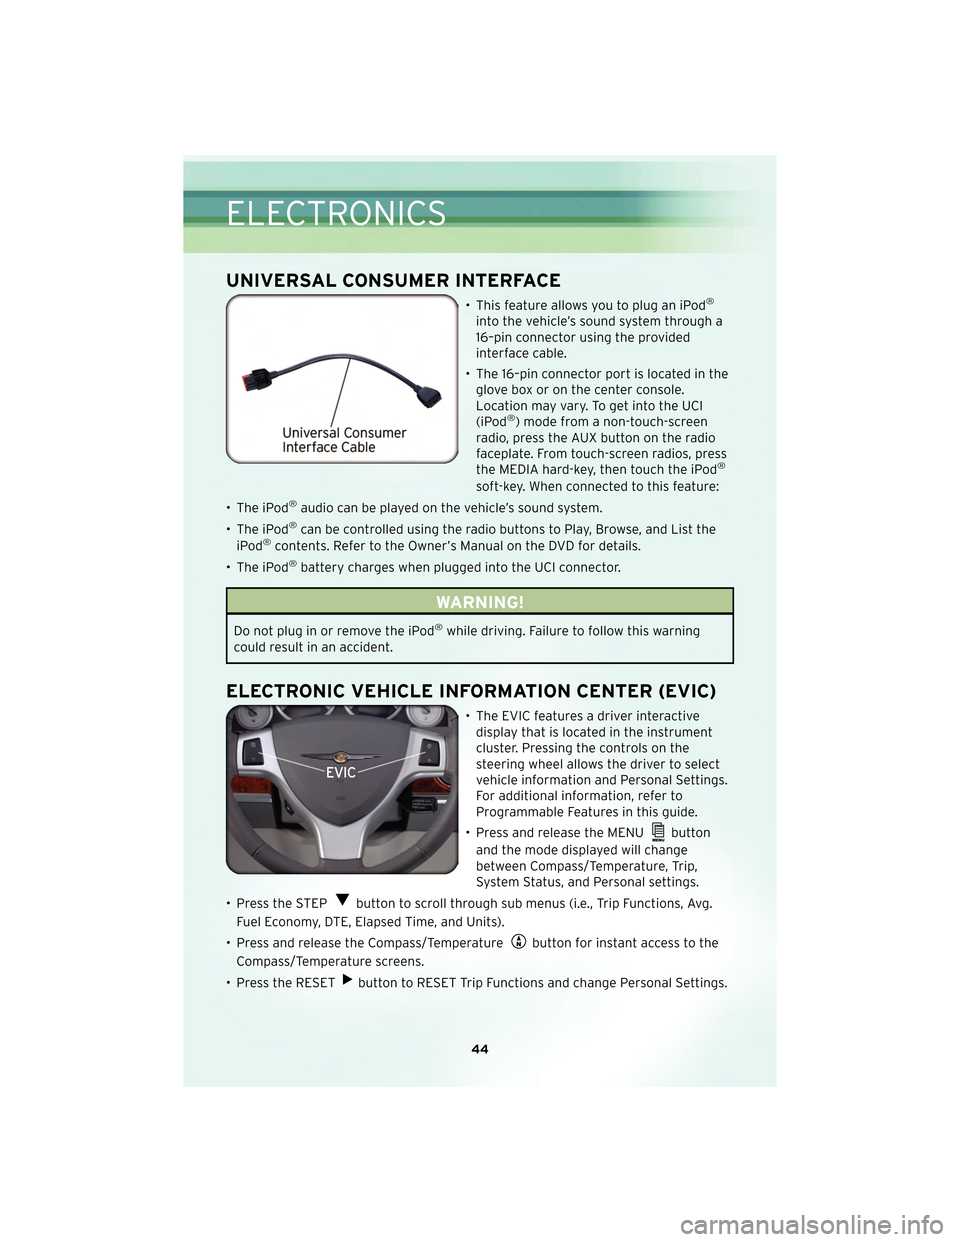
UNIVERSAL CONSUMER INTERFACE
• This feature allows you to plug an iPod®
into the vehicle’s sound system through a
16–pin connector using the provided
interface cable.
• The 16–pin connector port is located in the glove box or on the center console.
Location may vary. To get into the UCI
(iPod
®) mode from a non-touch-screen
radio, press the AUX button on the radio
faceplate. From touch-screen radios, press
the MEDIA hard-key, then touch the iPod
®
soft-key. When connected to this feature:
• The iPod
®audio can be played on the vehicle’s sound system.
• The iPod
®can be controlled using the radio buttons to Play, Browse, and List the
iPod®contents. Refer to the Owner’s Manual on the DVD for details.
• The iPod
®battery charges when plugged into the UCI connector.
WARNING!
Do not plug in or remove the iPod®while driving. Failure to follow this warning
could result in an accident.
ELECTRONIC VEHICLE INFORMATION CENTER (EVIC)
• The EVIC features a driver interactive display that is located in the instrument
cluster. Pressing the controls on the
steering wheel allows the driver to select
vehicle information and Personal Settings.
For additional information, refer to
Programmable Features in this guide.
• Press and release the MENU
button
and the mode displayed will change
between Compass/Temperature, Trip,
System Status, and Personal settings.
• Press the STEP
button to scroll through sub menus (i.e., Trip Functions, Avg.
Fuel Economy, DTE, Elapsed Time, and Units).
• Press and release the Compass/Temperature
button for instant access to the
Compass/Temperature screens.
• Press the RESET
button to RESET Trip Functions and change Personal Settings.
ELECTRONICS
44
Page 47 of 92
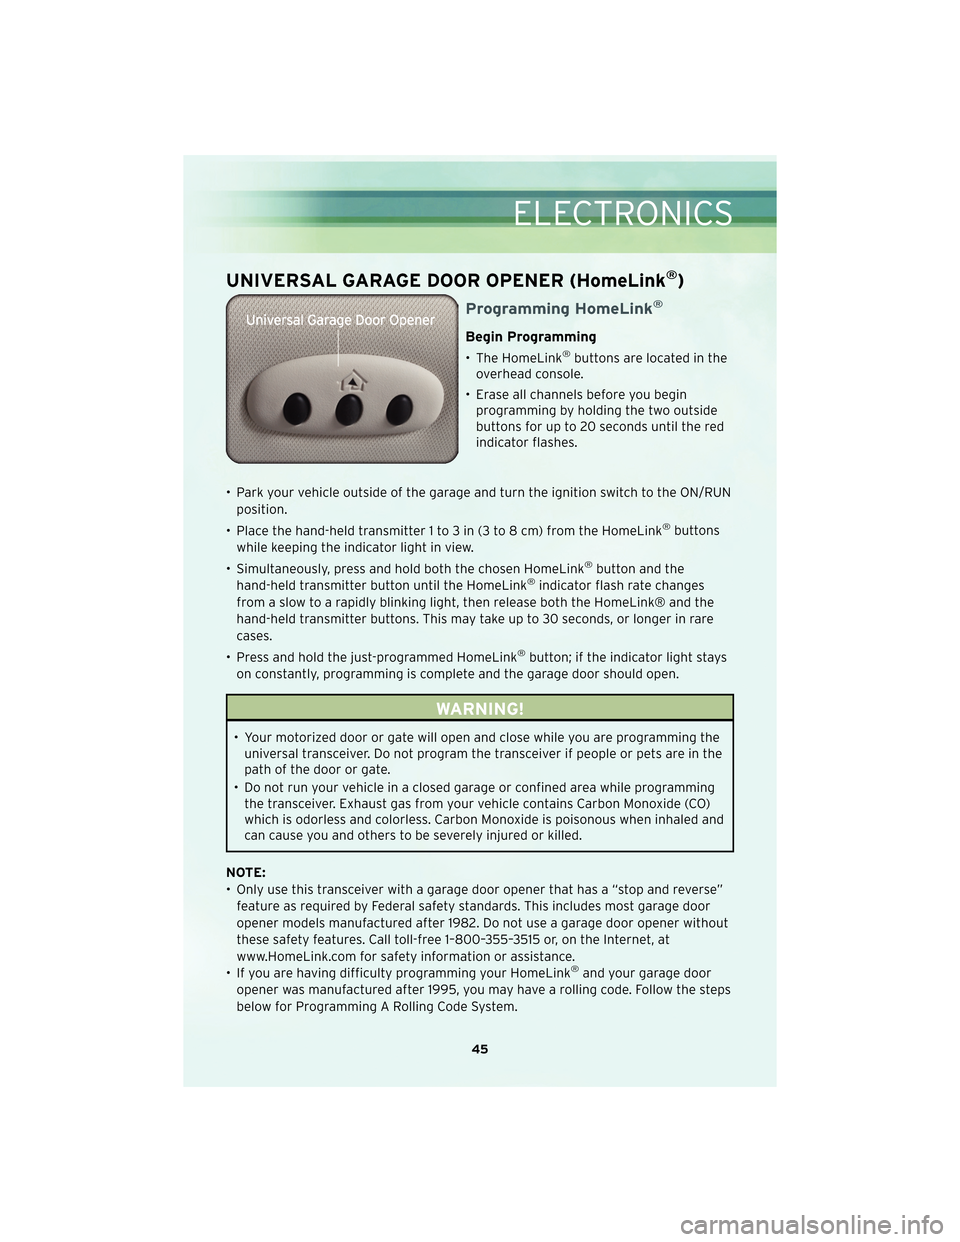
UNIVERSAL GARAGE DOOR OPENER (HomeLink®)
Programming HomeLink®
Begin Programming
• The HomeLink®buttons are located in the
overhead console.
• Erase all channels before you begin programming by holding the two outside
buttons for up to 20 seconds until the red
indicator flashes.
• Park your vehicle outside of the garage and turn the ignition switch to the ON/RUN position.
• Place the hand-held transmitter 1 to 3 in (3 to 8 cm) from the HomeLink
®buttons
while keeping the indicator light in view.
• Simultaneously, press and hold both the chosen HomeLink
®button and the
hand-held transmitter button until the HomeLink®indicator flash rate changes
from a slow to a rapidly blinking light, then release both the HomeLink® and the
hand-held transmitter buttons. This may take up to 30 seconds, or longer in rare
cases.
• Press and hold the just-programmed HomeLink
®button; if the indicator light stays
on constantly, programming is complete and the garage door should open.
WARNING!
• Your motorized door or gate will open and close while you are programming the universal transceiver. Do not program the transceiver if people or pets are in the
path of the door or gate.
• Do not run your vehicle in a closed garage or confined area while programming the transceiver. Exhaust gas from your vehicle contains Carbon Monoxide (CO)
which is odorless and colorless. Carbon Monoxide is poisonous when inhaled and
can cause you and others to be severely injured or killed.
NOTE:
• Only use this transceiver with a garage door opener that has a “stop and reverse” feature as required by Federal safety standards. This includes most garage door
opener models manufactured after 1982. Do not use a garage door opener without
these safety features. Call toll-free 1–800–355–3515 or, on the Internet, at
www.HomeLink.com for safety information or assistance.
• If you are having difficulty programming your HomeLink
®and your garage door
opener was manufactured after 1995, you may have a rolling code. Follow the steps
below for Programming A Rolling Code System.
45
ELECTRONICS
Page 49 of 92
WARNING!
To Avoid Serious Injury or Death: Do not use a three-prong adaptor. Do not insert
any objects into the receptacles. Do not touch with wet hands. Close the lid when
not in use. If this outlet is mishandled, it may cause an electric shock and failure.
POWER OUTLETS
• There are four 12 Volt power outlets in your vehicle.
• Two are located on the lower instrument panel, next to the open storage bin. Theupper power outlet is controlled by the ignition switch and the lower power outlet
is connected directly to the battery.
• One is located in the removable floor console and is also connected directly to the battery.
• One is located in the rear quarter panel near the liftgate. This outlet is also controlled by the ignition switch.
NOTE: Do not exceed the maximum power of 160 Watts (13 Amps) at 12 Volts. If the
160 Watt (13 Amp) power rating is exceeded the fuse protecting the system will need
to be replaced.
Uconnect™ Phone
• The Uconnect™ Phone is a voice-activated, hands-free, in-vehicle communications system.
• The Uconnect™ Phone allows you to dial a phone number with your cellular phone using simple voice commands.
• For vehicles equipped with Video Entertainment System (VES)™, refer to the Uconnect™ Phone section of the Uconnect™ User’s Manual on the DVD for further
details.
• For vehicles not equipped with VES™, refer to your vehicle Owner’s Manual on the DVD for further details.
WARNING!
• Any voice commanded system should be used only in safe driving conditionsfollowing local laws and phone use. All attention should be kept on the roadway
ahead. Failure to do so may result in an accident causing you and others to be
severely injured or killed.
• In an emergency to use Uconnect™ Phone, your cellular phone must be: • turned on,
• paired to Uconnect™ Phone,
• and have network coverage.
NOTE: The Uconnect™ Phone requires a cellular phone equipped with the
47
ELECTRONICS
Page 51 of 92
Transfer Ongoing Call Between Handset And Vehicle
• During a call, press the Voice Command button.
• (After the BEEP), say “transfer call”.
Changing The Volume
• Start a dialogue by pressing the Phone button, then adjust the volume during
a normal call.
• Use the radio ON/OFF VOLUME rotary knob to adjust the volume to a comfortable level while the Uconnect™ system is speaking. Please note the volume setting for
Uconnect™ is different than the audio system.
NOTE: To access the tutorial, press the Uconnect™ hard-key. After the BEEP, say
“tutorial”. Press any hard-key or touch the display to cancel the tutorial.
VOICE COMMAND
• The Voice Command system allows you to control your AM, FM radio, satellite radio, disc player, Uconnect™ Phone and a memo recorder.
• When you press the Voice Command button
located on the radio face plate
or steering wheel, you will hear a beep. The beep is your signal to give a command.
If you do not say a command within a few seconds, the system will present you with
a list of options. If you ever wish to interrupt the system while it lists options, press
the Voice Command button
, listen for the BEEP, and say your command.
• For vehicles equipped with Video Entertainment System (VES)™, refer to the Voice Command section of the Uconnect™ User’s Manual on the DVD for further details.
• For vehicles not equipped with VES™, refer to your vehicle Owner’s Manual on the DVD for Voice Command information.
Changing The Volume
• Start a dialogue by pressing the Voice Command button, then say a
command (for example, “tutorial”).
• Use the radio ON/OFF VOLUME rotary knob to adjust the volume to a comfortable level while the Voice Command system is speaking. The volume setting for Voice
Command is different than the audio system.
WARNING!
Any voice commanded system should be used only in safe driving conditions
following local laws and phone use. All attention should be kept on the roadway
ahead. Failure to do so may result in an accident causing you and others to be
severely injured or killed.
NOTE: To access the tutorial, press the Voice Command button
. After the
BEEP, say “tutorial”. Press any hard-key or touch the display to cancel the tutorial.
49
ELECTRONICS
Page 52 of 92

IN-FLOOR STORAGE –
STOW N’ GO®
Second Row Seat Storage
Bins
• Storage bins are located in the floorin front of the second row seats that
can be used when the second row
seat is in the upright position. Pull up
on the storage bin latch to open the
cover. Slide the storage bin locking
mechanism to the “Lock“ position to
allow greater access to the storage
bin.
WARNING!
In an accident, serious injury could
result if the seat storage bin covers
are not properly latched. DO NOT
drive the vehicle with the storage
bin covers open. Keep the storage
bin covers closed and latched while
the vehicle is in motion. DO NOT use
a storage bin latch as a tie down.
Cargo Area Storage
• The liftgate sill plate has a raised line
with the statement “Load To This
Line”. This line indicates how far
rearward cargo can be placed
without interfering with liftgate
closing.
UTILITY
50
Page 55 of 92
24-HOUR TOWING ASSISTANCE - U.S. ONLY
• Dial toll-free 1-800-521-2779 or 1-800-363-4869 for Canadian residents.
• Provide your name, vehicle identification number and license plate number.
• Provide your location, including telephone number, from which you are calling.
• Briefly describe the nature of the problem and answer a few simple questions.
• You will be given the name of the service provider and an estimated time of arrival.If you feel you are in an “unsafe situation”, please let us know. With your consent,
we will contact local police or safety authorities.
INSTRUMENT CLUSTER WARNING LIGHTS
- Electronic Stability Program (ESP) Indicator Light
• If this indicator light flashes during acceleration, apply as little throttle as possible.While driving, ease up on the accelerator. Adapt your speed and driving to the
prevailing road conditions. To improve the vehicle’s traction when starting off in
deep snow, sand or gravel, it may be desirable to switch the ESP system off.
- Tire Pressure Monitoring System (TPMS) Light
• Each tire, including the spare (if provided), should be checked monthly, when coldand inflated to the inflation pressure recommended by the vehicle manufacturer on
the vehicle placard or tire inflation pressure label. (If your vehicle has tires of a
different size than the size indicated on the vehicle placard or tire inflation
pressure label, you should determine the proper tire inflation pressure for those
tires.)
• As an added safety feature, your vehicle has been equipped with a Tire Pressure Monitoring System (TPMS) that illuminates a low tire pressure telltale when one or
more of your tires is significantly under-inflated. Accordingly, when the low tire
pressure telltale illuminates, you should stop and check your tires as soon as
possible, and inflate them to the proper pressure. Driving on a significantly
under-inflated tire causes the tire to overheat and can lead to tire failure.
Under-inflation also reduces fuel efficiency and tire tread life, and may affect the
vehicle’s handling and stopping ability.
• Please note that the TPMS is not a substitute for proper tire maintenance, and it is the driver’s responsibility to maintain correct tire pressure, even if under-inflation
has not reached the level to trigger illumination of the TPMS low tire pressure
telltale.
• Your vehicle has also been equipped with a TPMS malfunction indicator to indicate when the system is not operating properly. The TPMS malfunction indicator is
combined with the low tire pressure telltale. When the system detects a
malfunction, the telltale will flash for approximately one minute and then remain
continuously illuminated. This sequence will continue upon subsequent vehicle
start-ups as long as the malfunction exists.
53
WHAT TO DO IN EMERGENCIES