automatic transmission CHRYSLER TOWN AND COUNTRY 2011 5.G User Guide
[x] Cancel search | Manufacturer: CHRYSLER, Model Year: 2011, Model line: TOWN AND COUNTRY, Model: CHRYSLER TOWN AND COUNTRY 2011 5.GPages: 100, PDF Size: 3.24 MB
Page 13 of 100
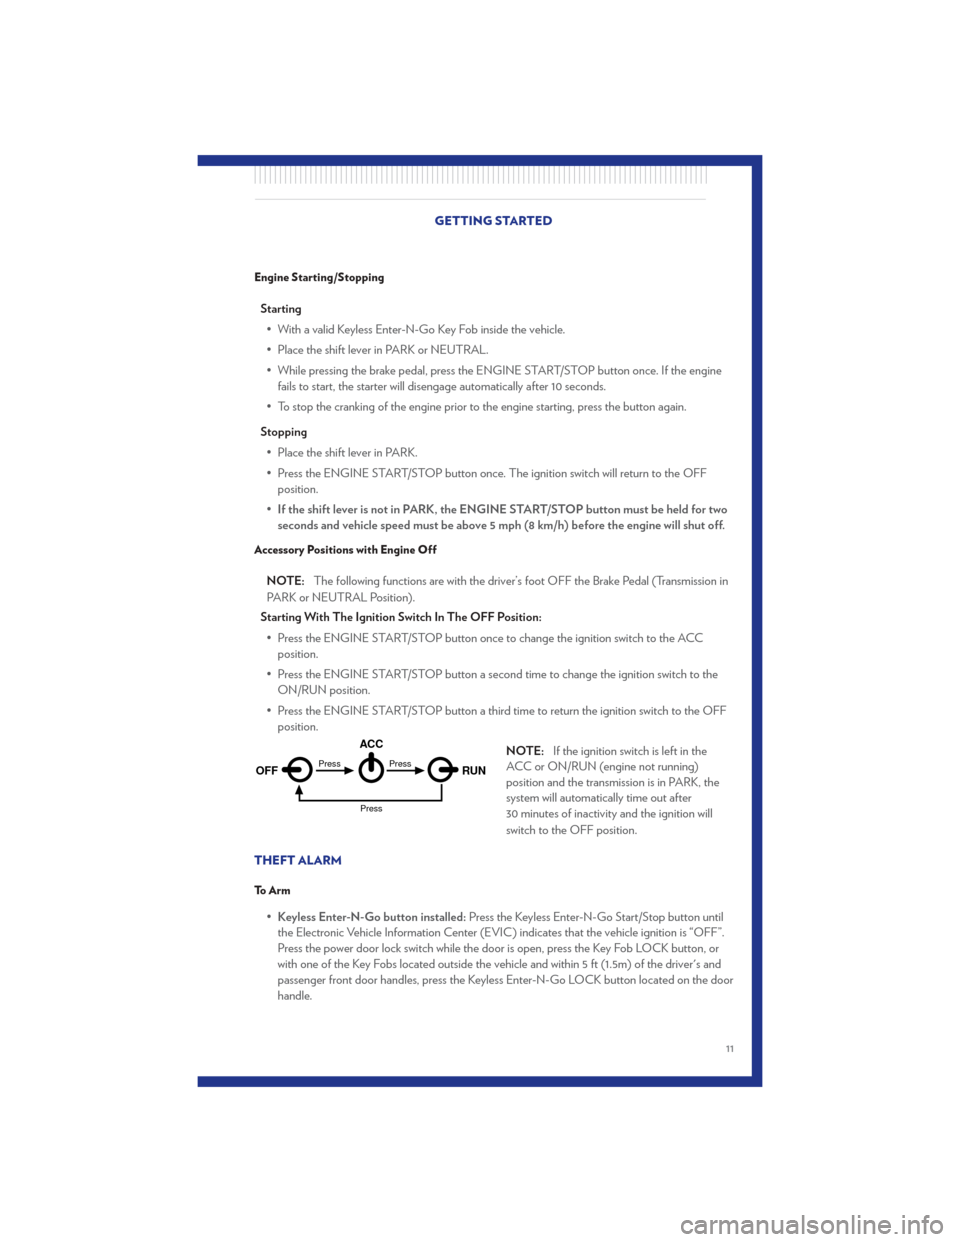
Engine Starting/Stopping
Starting• With a valid Keyless Enter-N-Go Key Fob inside the vehicle.
• Place the shift lever in PARK or NEUTRAL.
• While pressing the brake pedal, press the ENGINE START/STOP button once. If the engine fails to start, the starter will disengage automatically after 10 seconds.
• To stop the cranking of the engine prior to the engine starting, press the button again.
Stopping • Place the shift lever in PARK.
• Press the ENGINE START/STOP button once. The ignition switch will return to the OFF position.
• If the shift lever is not in PARK, the ENGINE START/STOP button must be held for two
seconds and vehicle speed must be above 5 mph (8 km/h) before the engine will shut off.
Accessory Positions with Engine Off
NOTE: The following functions are with the driver’s foot OFF the Brake Pedal (Transmission in
PARK or NEUTRAL Position).
Starting With The Ignition Switch In The OFF Position:
• Press the ENGINE START/STOP button once to change the ignition switch to the ACC position.
• Press the ENGINE START/STOP button a second time to change the ignition switch to the ON/RUN position.
• Press the ENGINE START/STOP button a third time to return the ignition switch to the OFF position.
NOTE:If the ignition switch is left in the
ACC or ON/RUN (engine not running)
position and the transmission is in PARK, the
system will automatically time out after
30 minutes of inactivity and the ignition will
switch to the OFF position.
THEFT ALARM
To Arm
• Keyless Enter-N-Go button installed: Press the Keyless Enter-N-Go Start/Stop button until
the Electronic Vehicle Information Center (EVIC) indicates that the vehicle ignition is “OFF”.
Press the power door lock switch while the door is open, press the Key Fob LOCK button, or
with one of the Key Fobs located outside the vehicle and within 5 ft (1.5m) of the driver's and
passenger front door handles, press the Keyless Enter-N-Go LOCK button located on the door
handle.
OFF RUN
ACCPress
Press
Press
GETTING STARTED
11
Page 58 of 100
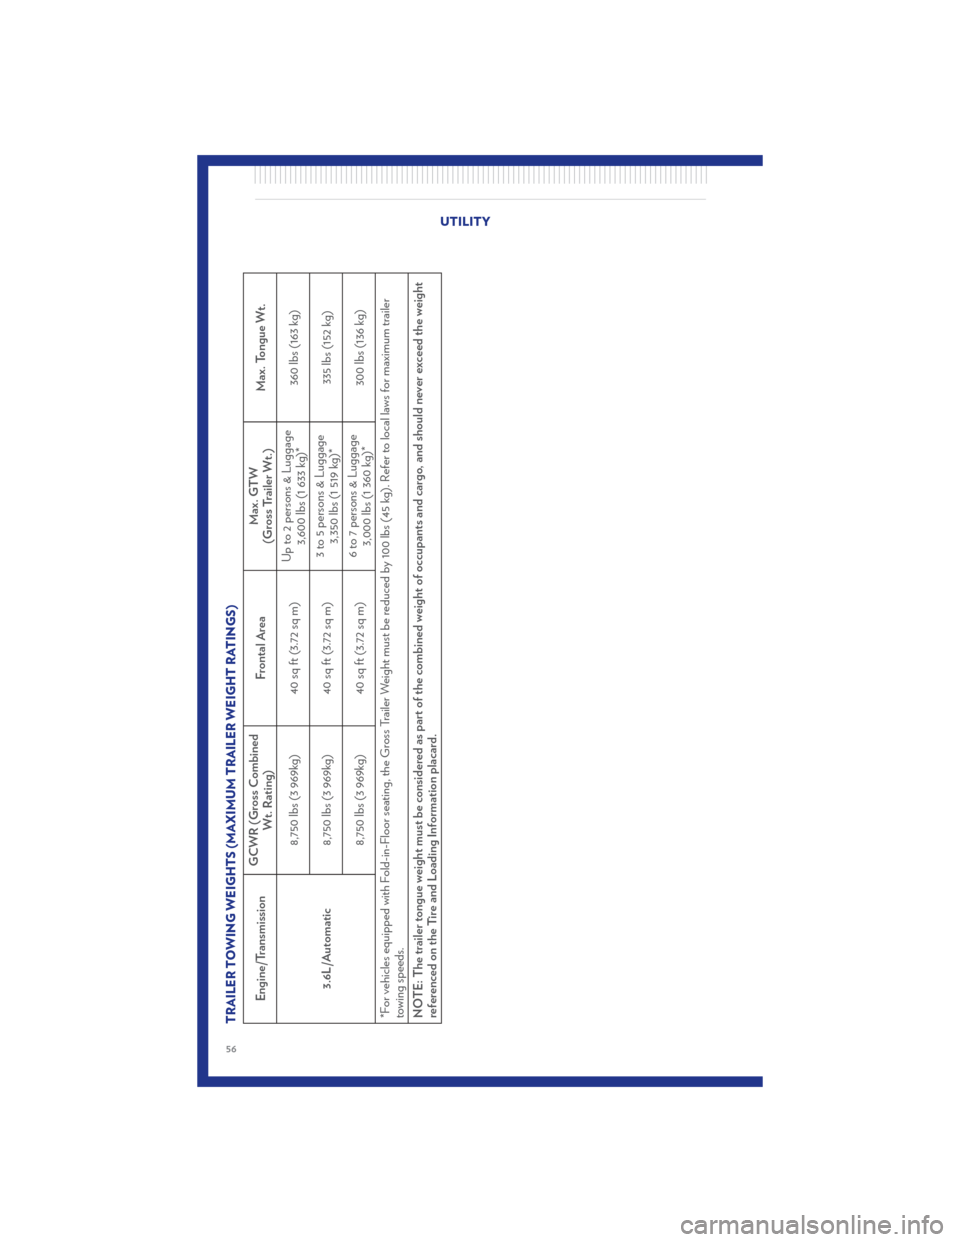
TRAILER TOWING WEIGHTS (MAXIMUM TRAILER WEIGHT RATINGS)
Engine/TransmissionGCWR (Gross Combined
Wt. Rating) Frontal Area Max. GTW
(Gross Trailer Wt.) Max. Tongue Wt.
3.6L/Automatic 8,750 lbs (3 969kg) 40 sq ft (3.72 sq m)
Up to 2 persons & Luggage
3,600 lbs (1 633 kg)* 360 lbs (163 kg)
8,750 lbs (3 969kg) 40 sq ft (3.72 sq m) 3 to 5 persons & Luggage
3,350 lbs (1 519 kg)* 335 lbs (152 kg)
8,750 lbs (3 969kg) 40 sq ft (3.72 sq m) 6 to 7 persons & Luggage
3,000 lbs (1 360 kg)* 300 lbs (136 kg)
*For vehicles equipped with Fold-in-Floor seating, the Gross Trailer Weight must be reduced by 100 lbs (45 kg). Refer to local laws for maximum trailer
towing speeds.
NOTE: The trailer tongue weight must be considered as part of the combined weight of occupants and cargo, and should never exceed the weight
referenced on the Tire and Loading Information placard.
UTILITY
56
Page 71 of 100
CAUTION!
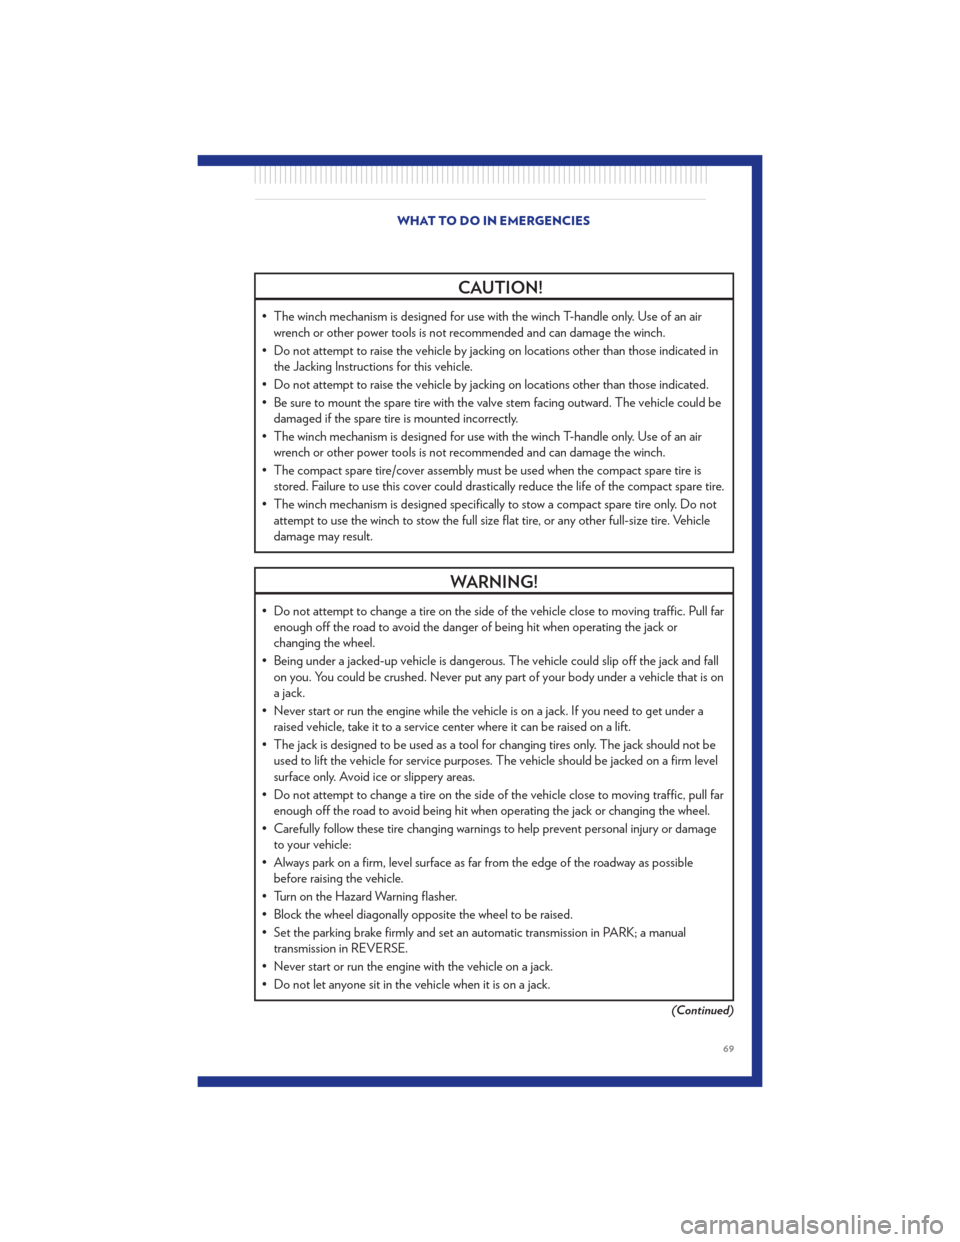
• The winch mechanism is designed for use with the winch T-handle only. Use of an airwrench or other power tools is not recommended and can damage the winch.
• Do not attempt to raise the vehicle by jacking on locations other than those indicated in the Jacking Instructions for this vehicle.
• Do not attempt to raise the vehicle by jacking on locations other than those indicated.
• Be sure to mount the spare tire with the valve stem facing outward. The vehicle could be damaged if the spare tire is mounted incorrectly.
• The winch mechanism is designed for use with the winch T-handle only. Use of an air wrench or other power tools is not recommended and can damage the winch.
• The compact spare tire/cover assembly must be used when the compact spare tire is stored. Failure to use this cover could drastically reduce the life of the compact spare tire.
• The winch mechanism is designed specifically to stow a compact spare tire only. Do not attempt to use the winch to stow the full size flat tire, or any other full-size tire. Vehicle
damage may result.
WARNING!
• Do not attempt to change a tire on the side of the vehicle close to moving traffic. Pull farenough off the road to avoid the danger of being hit when operating the jack or
changing the wheel.
• Being under a jacked-up vehicle is dangerous. The vehicle could slip off the jack and fall on you. You could be crushed. Never put any part of your body under a vehicle that is on
a jack.
• Never start or run the engine while the vehicle is on a jack. If you need to get under a raised vehicle, take it to a service center where it can be raised on a lift.
• The jack is designed to be used as a tool for changing tires only. The jack should not be used to lift the vehicle for service purposes. The vehicle should be jacked on a firm level
surface only. Avoid ice or slippery areas.
• Do not attempt to change a tire on the side of the vehicle close to moving traffic, pull far enough off the road to avoid being hit when operating the jack or changing the wheel.
• Carefully follow these tire changing warnings to help prevent personal injury or damage to your vehicle:
• Always park on a firm, level surface as far from the edge of the roadway as possible before raising the vehicle.
• Turn on the Hazard Warning flasher.
• Block the wheel diagonally opposite the wheel to be raised.
• Set the parking brake firmly and set an automatic transmission in PARK; a manual transmission in REVERSE.
• Never start or run the engine with the vehicle on a jack.
• Do not let anyone sit in the vehicle when it is on a jack.
(Continued)
WHAT TO DO IN EMERGENCIES
69
Page 73 of 100
Preparations for Jump-Start
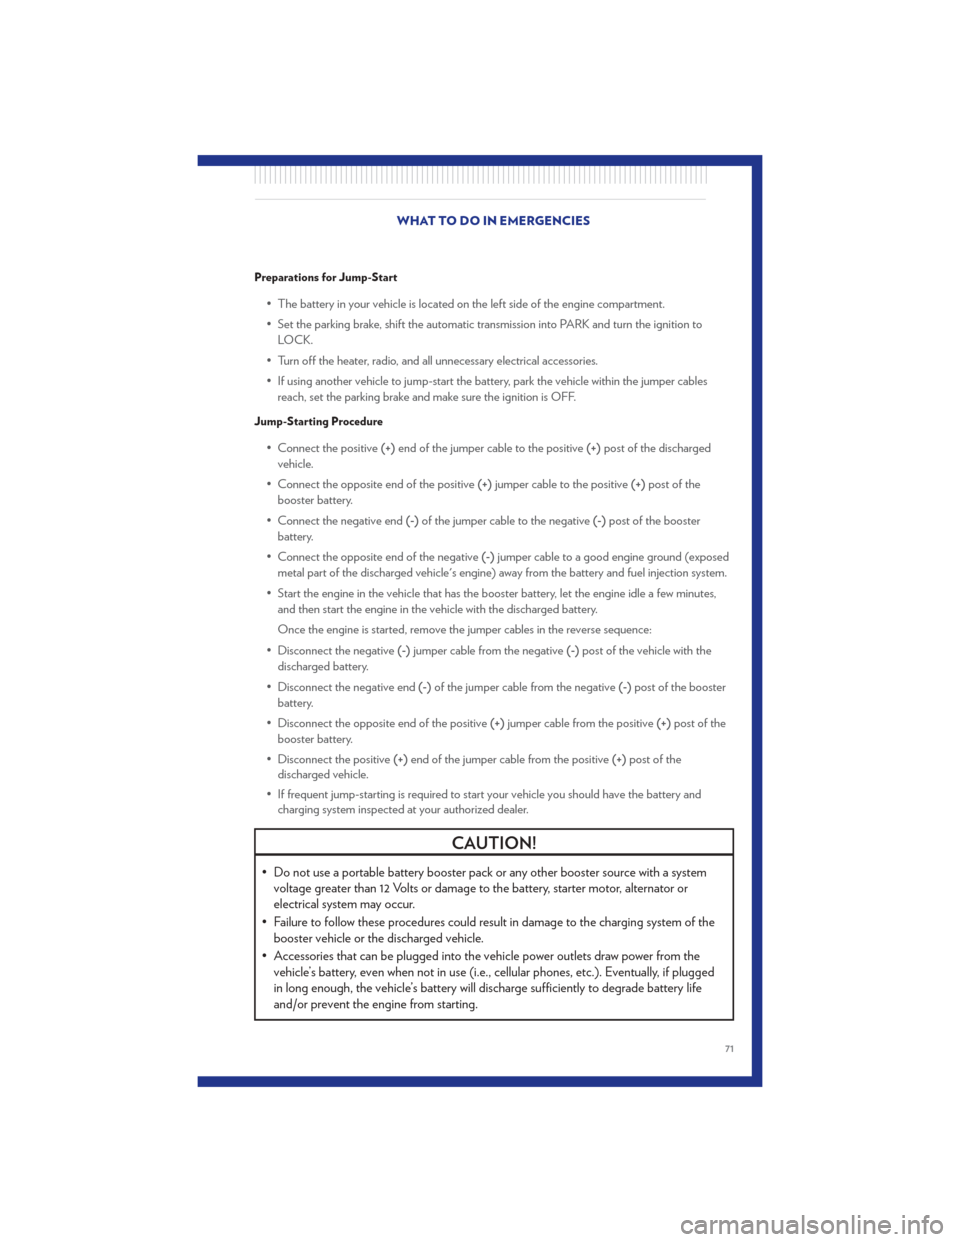
• The battery in your vehicle is located on the left side of the engine compartment.
• Set the parking brake, shift the automatic transmission into PARK and turn the ignition toLOCK.
• Turn off the heater, radio, and all unnecessary electrical accessories.
• If using another vehicle to jump-start the battery, park the vehicle within the jumper cables reach, set the parking brake and make sure the ignition is OFF.
Jump-Starting Procedure
• Connect the positive (+)end of the jumper cable to the positive (+)post of the discharged
vehicle.
• Connect the opposite end of the positive (+)jumper cable to the positive (+)post of the
booster battery.
• Connect the negative end (-)of the jumper cable to the negative (-)post of the booster
battery.
• Connect the opposite end of the negative (-)jumper cable to a good engine ground (exposed
metal part of the discharged vehicle's engine) away from the battery and fuel injection system.
• Start the engine in the vehicle that has the booster battery, let the engine idle a few minutes, and then start the engine in the vehicle with the discharged battery.
Once the engine is started, remove the jumper cables in the reverse sequence:
• Disconnect the negative (-)jumper cable from the negative (-)post of the vehicle with the
discharged battery.
• Disconnect the negative end (-)of the jumper cable from the negative (-)post of the booster
battery.
• Disconnect the opposite end of the positive (+)jumper cable from the positive (+)post of the
booster battery.
• Disconnect the positive (+)end of the jumper cable from the positive (+)post of the
discharged vehicle.
• If frequent jump-starting is required to start your vehicle you should have the battery and charging system inspected at your authorized dealer.
CAUTION!
• Do not use a portable battery booster pack or any other booster source with a systemvoltage greater than 12 Volts or damage to the battery, starter motor, alternator or
electrical system may occur.
• Failure to follow these procedures could result in damage to the charging system of the booster vehicle or the discharged vehicle.
• Accessories that can be plugged into the vehicle power outlets draw power from the vehicle’s battery, even when not in use (i.e., cellular phones, etc.). Eventually, if plugged
in long enough, the vehicle’s battery will discharge sufficiently to degrade battery life
and/or prevent the engine from starting.
WHAT TO DO IN EMERGENCIES
71
Page 81 of 100
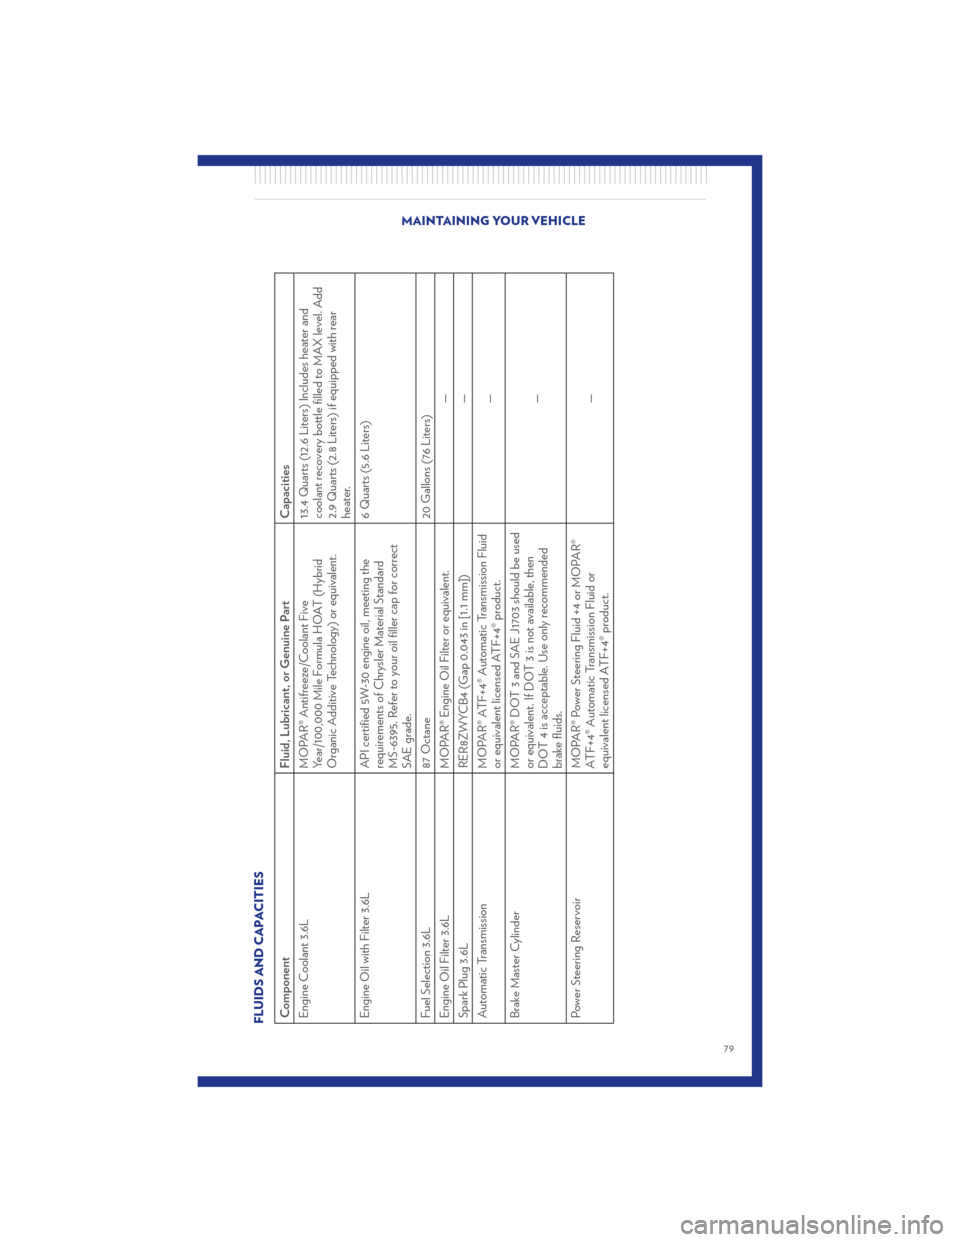
FLUIDS AND CAPACITIESComponentFluid, Lubricant, or Genuine Part Capacities
Engine Coolant 3.6L MOPAR® Antifreeze/Coolant Five
Year/100,000 Mile Formula HOAT (Hybrid
Organic Additive Technology) or equivalent. 13.4 Quarts (12.6 Liters) Includes heater and
coolant recovery bottle filled to MAX level. Add
2.9 Quarts (2.8 Liters) if equipped with rear
heater.
Engine Oil with Filter 3.6L API certified 5W-30 engine oil, meeting the
requirements of Chrysler Material Standard
MS-6395. Refer to your oil filler cap for correct
SAE grade. 6 Quarts (5.6 Liters)
Fuel Selection 3.6L 87 Octane20 Gallons (76 Liters)
Engine Oil Filter 3.6L MOPAR® Engine Oil Filter or equivalent. —
Spark Plug 3.6L RER8ZWYCB4 (Gap 0.043 in [1.1 mm]) —
Automatic Transmission MOPAR® ATF+4® Automatic Transmission Fluid
or equivalent licensed ATF+4® product. —
Brake Master Cylinder MOPAR® DOT 3 and SAE J1703 should be used
or equivalent. If DOT 3 is not available, then
DOT 4 is acceptable. Use only recommended
brake fluids. —
Power Steering Reservoir MOPAR® Power Steering Fluid +4 or MOPAR®
ATF+4® Automatic Transmission Fluid or
equivalent licensed ATF+4® product. —
MAINTAINING YOUR VEHICLE
79
Page 82 of 100
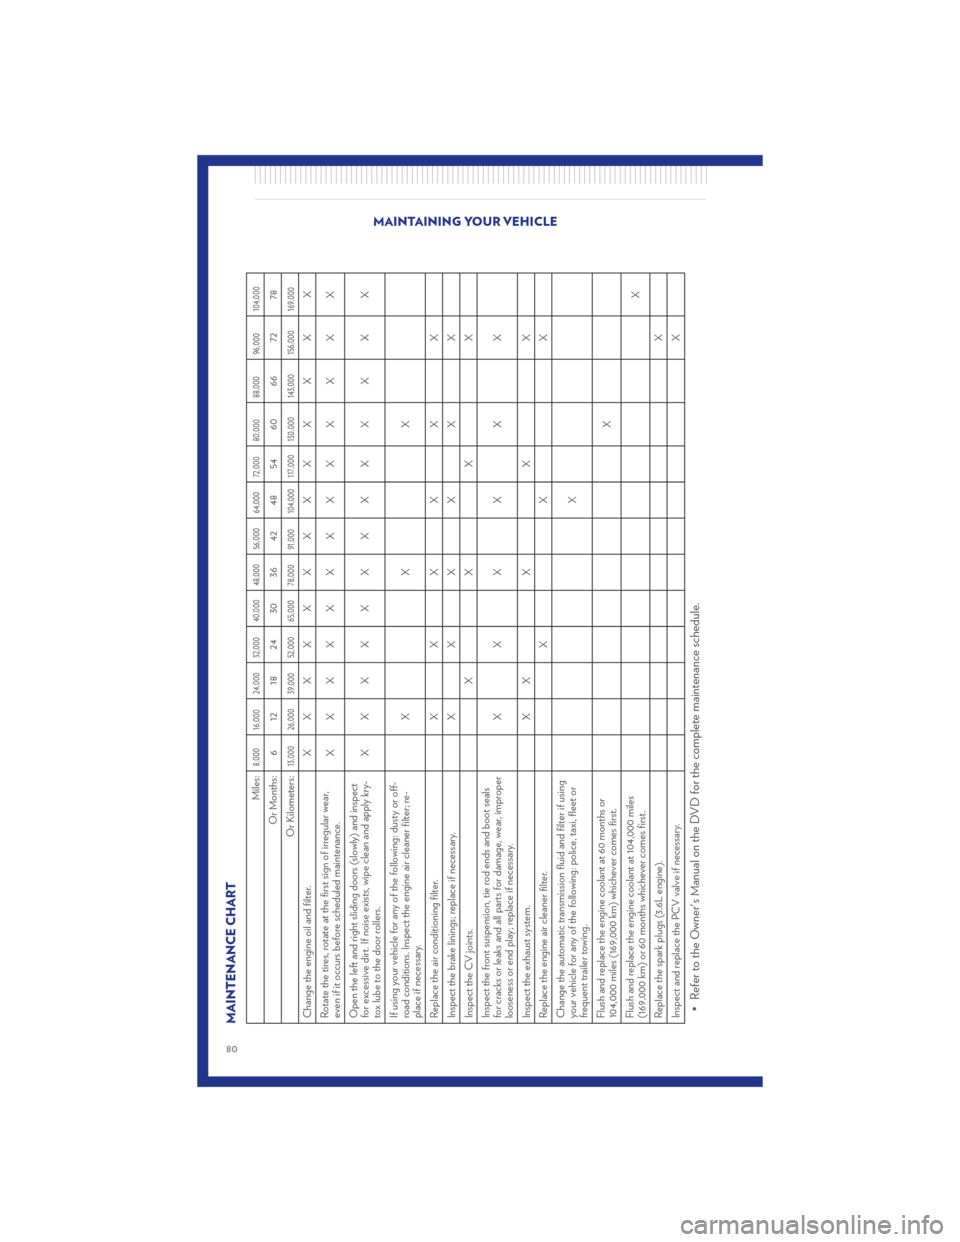
MAINTENANCE CHART
Miles:
8,000 16,000 24,000 32,000 40,000 48,000 56,000 64,000 72,000 80,000 88,000 96,000 104,000
Or Months: 6 12 18 24 30 36 42 48 54 60 66 72 78
Or Kilometers:
13,000 26,000 39,000 52,000 65,000 78,000 91,000 104,000 117,000 130,000 143,000 156,000 169,000
Change the engine oil and filter. X XXXXXXXX X X X X
Rotate the tires, rotate at the first sign of irregular wear,
even if it occurs before scheduled maintenance. XXXXXXXXX X X X X
Open the left and right sliding doors (slowly) and inspect
for excessive dirt. If noise exists, wipe clean and apply kry-
tox lube to the door rollers. XXXXXXXXX X X X X
If using your vehicle for any of the following: dusty or off-
road conditions. Inspect the engine air cleaner filter; re-
place if necessary. XX X
Replace the air conditioning filter. XXXX X X
Inspect the brake linings; replace if necessary. XXXX X X
Inspect the CV joints. XX X X
Inspect the front suspension, tie rod ends and boot seals
for cracks or leaks and all parts for damage, wear, improper
looseness or end play; replace if necessary. XXXX X X
Inspect the exhaust system. X XXX X
Replace the engine air cleaner filter. XX X
Change the automatic transmission fluid and filter if using
your vehicle for any of the following: police, taxi, fleet or
frequent trailer towing. X
Flush and replace the engine coolant at 60 months or
104,000 miles (169,000 km) whichever comes first. X
Flush and replace the engine coolant at 104,000 miles
(169,000 km) or 60 months whichever comes first. X
Replace the spark plugs (3.6L engine). X
Inspect and replace the PCV valve if necessary. X• Refer to the Owner's Manual on the DVD for the complete maintenance schedule.
MAINTAINING YOUR VEHICLE
80
Page 92 of 100
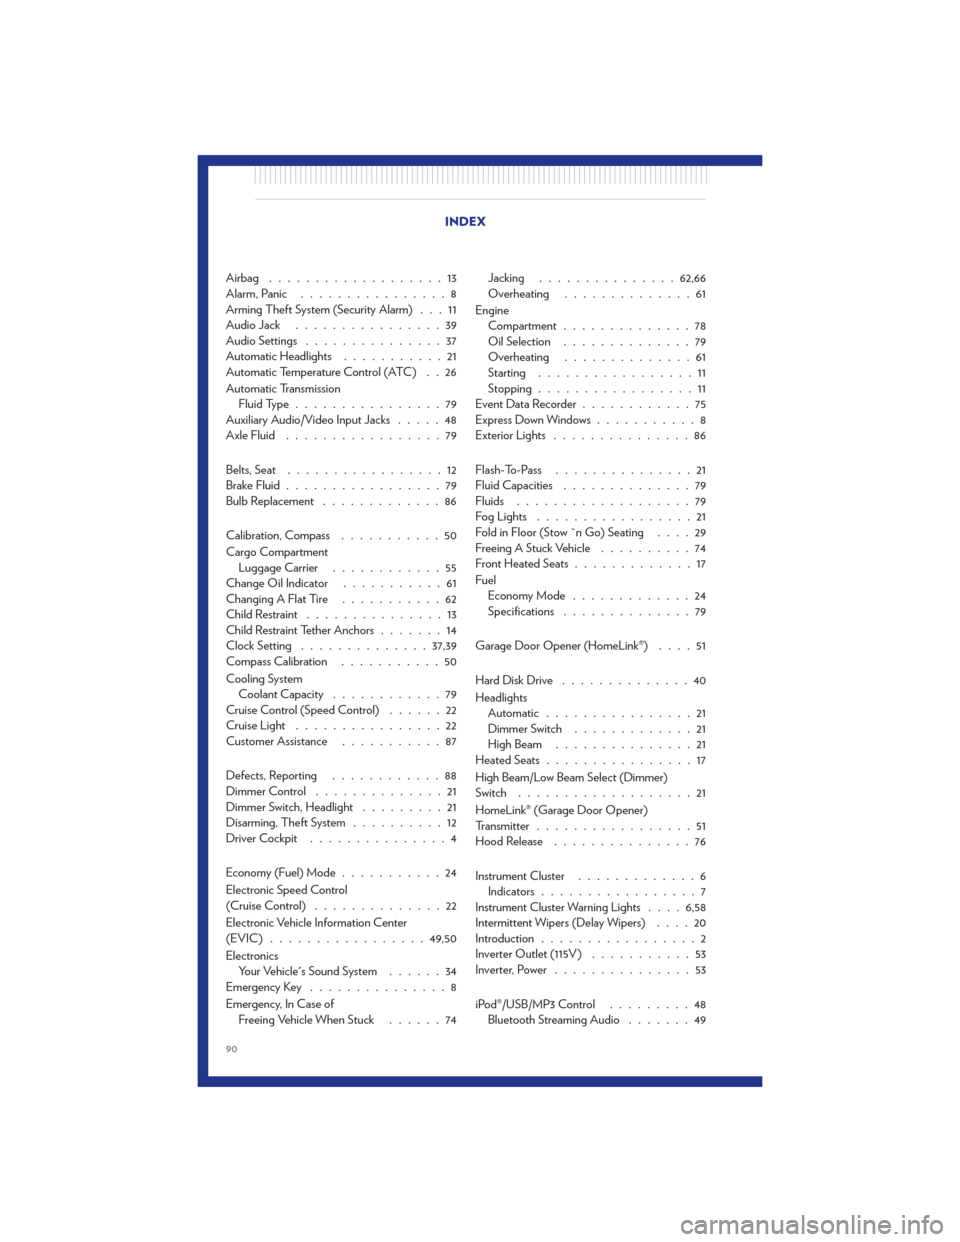
Airbag ...................13
Alarm, Panic................8
Arming Theft System (Security Alarm) . . . 11
Audio Jack ................39
Audio Settings ...............37
Automatic Headlights ...........21
Automatic Temperature Control (ATC) . . 26
Automatic Transmission Fluid Type ................79
Auxiliary Audio/Video Input Jacks .....48
Axle Fluid .................79
Belts, Seat .................12
Brake Fluid .................79
Bulb Replacement .............86
Calibration, Compass ...........50
Cargo Compartment Luggage Carrier ............55
Change Oil Indicator ...........61
Changing A Flat Tire ...........62
Child Restraint ...............13
Child Restraint Tether Anchors .......14
Clock Setting .............. 37,39
Compass Calibration ...........50
Cooling System Coolant Capacity ............79
Cruise Control (Speed Control) ......22
Cruise Light ................22
Customer Assistance ...........87
Defects, Reporting ............88
Dimmer Control ..............21
Dimmer Switch, Headlight .........21
Disarming, Theft System ..........12
DriverCockpit ...............4
Economy (Fuel) Mode ...........24
Electronic Speed Control
(Cruise Control) ..............22
Electronic Vehicle Information Center
(EVIC) .................49,50
Electronics Your Vehicle's Sound System ......34
Emergency Key ...............8
Emergency, In Case of Freeing Vehicle When Stuck ......74Jacking
............... 62,66
Overheating ..............61
Engine Compartment ..............78
Oil Selection ..............79
Overheating ..............61
Starting .................11
Stopping .................11
Event Data Recorder ............75
ExpressDownWindows...........8
Exterior Lights ...............86
Flash-To-Pass ...............21
Fluid Capacities ..............79
Fluids ...................79
Fog Lights .................21
F old
in Floor (Stow `n Go) Seating ....29
Freeing A Stuck Vehicle ..........74
Front Heated Seats .............17
Fuel EconomyMode .............24
Specifications ..............79
Garage Door Opener (HomeLink®) ....51
HardDiskDrive ..............40
Headlights Automatic ................21
Dimmer Switch .............21
HighBeam ...............21
Heated Seats ................17
High Beam/Low Beam Select (Dimmer)
Switch ...................21
HomeLink® (Garage Door Opener)
Transmitter .................51
Hood Release ...............76
Instrument Cluster .............6
Indicators .................7
Instrument Cluster Warning Lights ....6,58
Intermittent Wipers (Delay Wipers) ....20
Introduction .................2
Inverter Outlet (115V) ...........53
Inverter, Power ...............53
iPod®/USB/MP3 Control .........48
Bluetooth Streaming Audio .......49
INDEX
90