injec CHRYSLER TOWN AND COUNTRY 2015 5.G Owners Manual
[x] Cancel search | Manufacturer: CHRYSLER, Model Year: 2015, Model line: TOWN AND COUNTRY, Model: CHRYSLER TOWN AND COUNTRY 2015 5.GPages: 726, PDF Size: 20.14 MB
Page 560 of 726
For best results, a refueling pattern that avoids alternat-
ing between E-85 and unleaded gasoline is recom-
mended.
When you do switch fuel types it is recommended that:
•You do not add less than 5 gallons (19 Liters) when
refueling.
•You drive the vehicle immediately after refueling for at
least 5 miles (8 km).
Observing these precautions will avoid possible hard
starting and/or significant deterioration in driveability
during warm up.
NOTE:
•Use seasonally adjusted E-85 fuel (ASTM D5798). With
non-seasonally adjusted E-85 fuel, you may experience
hard starting and rough idle following start up even if
the above recommendations are followed, especially
when the ambient temperature is below 32°F (0°C).
•Some additives used in regular gasoline are not fully
compatible with E-85 and may form deposits in your
engine. To eliminate driveability issues that may be
caused by these deposits, a supplemental gasoline
additive, such as MOPAR® Injector Cleanup or
Techron may be used.
Selection Of Engine Oil For Flexible Fuel Vehicles
(E-85) And Gasoline Vehicles
FFV vehicles operated on E-85 require specially formu-
lated engine oils. These special requirements are included
in MOPAR® engine oils, and in equivalent oils meeting
Chrysler Specification MS-6395. The manufacturer only
recommends engine oils that are API Certified and meet
the requirements of Material Standard MS-6395. MS-6395
contains additional requirements, developed during ex-
tensive fleet testing, to provide additional protection to
Chrysler Group LLC engines. Use MOPAR® or an
equivalent oil meeting the specification MS-6395.
558 STARTING AND OPERATING
Page 586 of 726
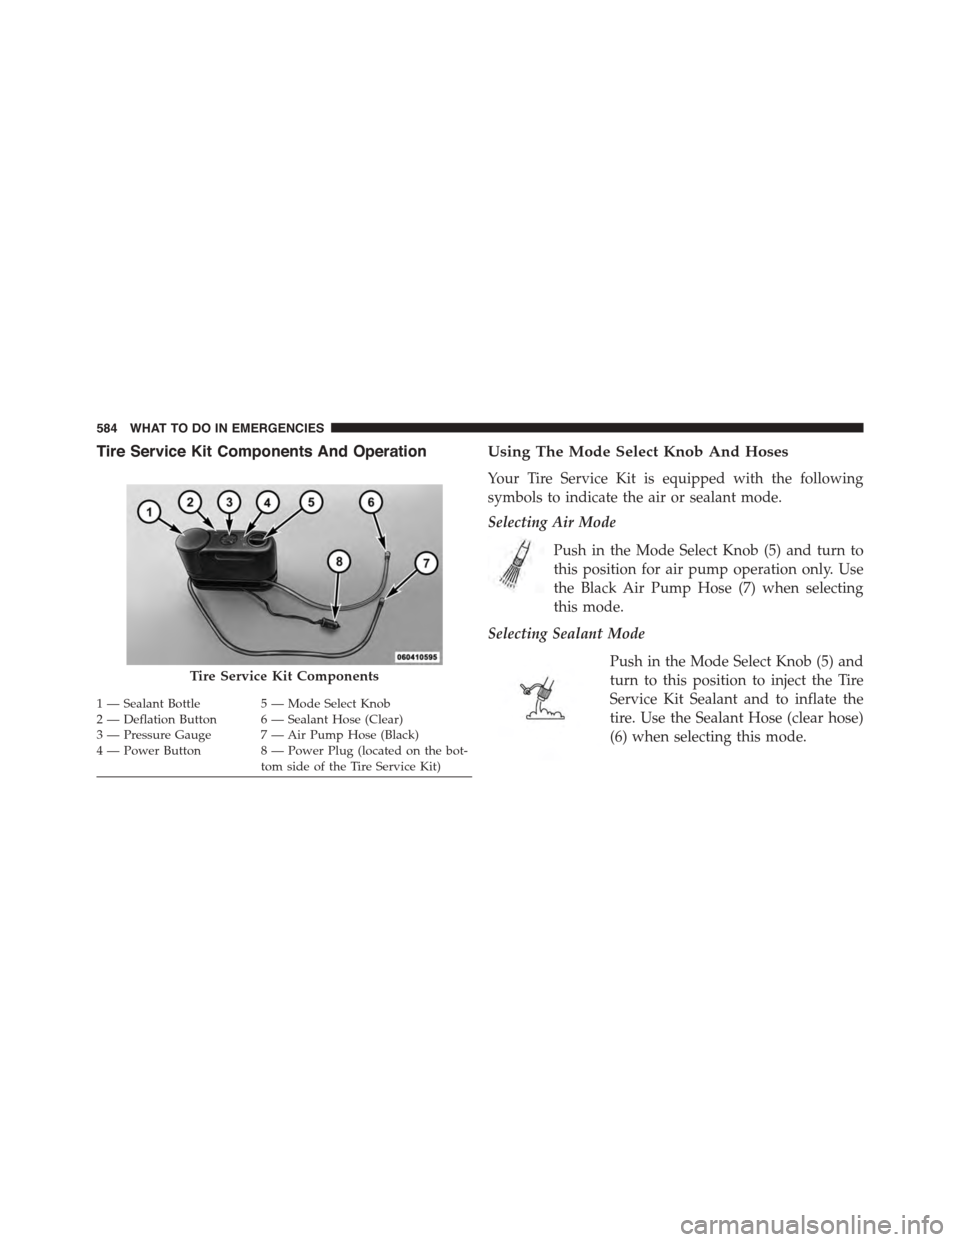
Tire Service Kit Components And OperationUsing The Mode Select Knob And Hoses
Your Tire Service Kit is equipped with the following
symbols to indicate the air or sealant mode.
Selecting Air Mode
Push in the Mode Select Knob (5) and turn to
this position for air pump operation only. Use
the Black Air Pump Hose (7) when selecting
this mode.
Selecting Sealant Mode
Push in the Mode Select Knob (5) and
turn to this position to inject the Tire
Service Kit Sealant and to inflate the
tire. Use the Sealant Hose (clear hose)
(6) when selecting this mode.
Tire Service Kit Components
1—SealantBottle 5—ModeSelectKnob2 — Deflation Button 6 — Sealant Hose (Clear)3—PressureGauge 7—AirPumpHose(Black)4—PowerButton 8—PowerPlug(locatedonthebot-tom side of the Tire Service Kit)
584 WHAT TO DO IN EMERGENCIES
Page 588 of 726
from the vehicle or tire and wheel components. Once
the sealant dries, it can easily be peeled off and
properly discarded.
•For optimum performance, make sure the valve stem
on the wheel is free of debris before connecting the Tire
Service Kit.
•You can use the Tire Service Kit air pump to inflate
bicycle tires. The kit also comes with two needles,
located in the Accessory Storage Compartment (on the
bottom of the air pump) for inflating sport balls, rafts,
or similar inflatable items. However, use only the Air
Pump Hose (7) and make sure the Mode Select Knob
(5) is in the Air Mode when inflating such items to
avoid injecting sealant into them. The Tire Service Kit
Sealant is only intended to seal punctures less than¼”
(6 mm) diameter in the tread of your vehicle.
•Do not lift or carry the Tire Service Kit by the hoses.
WARNING!
•Do not attempt to seal a tire on the side of the
vehicle closest to traffic. Pull far enough off the
road to avoid the danger of being hit when using
the Tire Service Kit.
•Do not use Tire Service Kit or drive the vehicle
under the following circumstances:
– If the puncture in the tire tread is approximately
1/4” (6 mm) or larger.
– If the tire has any sidewall damage.
– If the tire has any damage from driving with
extremely low tire pressure.
– If the tire has any damage from driving on a flat
tire.
– If the wheel has any damage.
– If you are unsure of the condition of the tire or
the wheel.
(Continued)
586 WHAT TO DO IN EMERGENCIES
Page 590 of 726
on the ground. This will provide the best positioning
of the kit when injecting the sealant into the deflated
tire and running the air pump. Move the vehicle as
necessary to place the valve stem in this position
before proceeding.
3. Place the transmission in PARK (auto transmission) or
in Gear (manual transmission) and turn Off the igni-
tion.
4. Set the parking brake.
(B) Setting Up To Use Tire Service Kit:
1. Push in the Mode Select Knob (5) and turn to the
Sealant Mode position.
2. Uncoil the Sealant Hose (6) and then remove the cap
from the fitting at the end of the hose.
3. Place the Tire Service Kit flat on the ground next to the
deflated tire.
4. Remove the cap from the valve stem and then screw
the fitting at the end of the Sealant Hose (6) onto the
valve stem.
5. Uncoil the Power Plug (8) and insert the plug into the
vehicle’s 12 Volt power outlet.
NOTE:Do not remove foreign objects (e.g., screws or
nails) from the tire.
(C) Injecting Tire Service Kit Sealant Into The
Deflated Tire:
•Always start the engine before turning ON the Tire
Service Kit.
NOTE:Manual transmission vehicles must have the
parking brake engaged and the shift lever in NEUTRAL.
•After pressing the Power Button (4), the sealant (white
fluid) will flow from the Sealant Bottle (1) through the
Sealant Hose (6) and into the tire.
588 WHAT TO DO IN EMERGENCIES
Page 591 of 726
NOTE:Sealant may leak out through the puncture in the
tire.
If the sealant (white fluid) does not flow within0–10
seconds through the Sealant Hose (6):
1. Press the Power Button (4) to turn Off the Tire Service
Kit. Disconnect the Sealant Hose (6) from the valve
stem. Make sure the valve stem is free of debris.
Reconnect the Sealant Hose (6) to the valve stem.
Check that the Mode Select Knob (5) is in the Sealant
Mode position and not Air Mode. Press the Power
Button (4) to turn On the Tire Service Kit.
2. Connect the Power Plug (8) to a different 12 Volt
power outlet in your vehicle or another vehicle, if
available. Make sure the engine is running before
turning ON the Tire Service Kit.
3. The Sealant Bottle (1) may be empty due to previous
use. Call for assistance.
NOTE:If the Mode Select Knob (5) is on Air Mode and
the pump is operating, air will dispense from the Air
Pump Hose (7) only, not the Sealant Hose (6).
If the sealant (white fluid) does flow through the
Sealant Hose (6):
1. Continue to operate the pump until sealant is no
longer flowing through hose (typically takes 30 - 70
seconds). As the sealant flows through the Sealant
Hose (6), the Pressure Gauge (3) can read as high as
70 psi (4.8 Bar). The Pressure Gauge (3) will decrease
quickly from approximately 70 psi (4.8 Bar) to the
actual tire pressure when the Sealant Bottle (1) is
empty.
2. The pump will start to inject air into the tire immedi-
ately after the Sealant Bottle (1) is empty. Continue to
operate the pump and inflate the tire to the pressure
indicated on the tire pressure label on the driver-side
6
WHAT TO DO IN EMERGENCIES 589
Page 593 of 726
(D) Drive Vehicle:
Immediately after injecting sealant and inflating the tire,
drive the vehicle 5 miles (8 km) or 10 minutes to ensure
distribution of the Tire Service Kit Sealant within the tire.
Do not exceed 55 mph (90 km/h).
WARNING!
Tire Service Kit is not a permanent flat tire repair.
Have the tire inspected and repaired or replaced after
using Tire Service Kit. Do not exceed 55 mph
(90 km/h) until the tire is repaired or replaced. Failure
to follow this warning can result in injuries that are
serious or fatal to you, your passengers, and others
around you.
(E) After Driving:
Pull over to a safe location. Refer to “Whenever You Stop
to Use Tire Service Kit” before continuing.
1. Push in the Mode Select Knob (5) and turn to the Air
Mode position.
2. Uncoil the power plug and insert the plug into the
vehicle’s 12 Volt power outlet.
3. Uncoil the Air Pump Hose (7) (black in color) and
screw the fitting at the end of hose (7) onto the valve
stem.
4. Check the pressure in the tire by reading the Pressure
Gauge (3).
6
WHAT TO DO IN EMERGENCIES 591
Page 619 of 726
4. Connect the opposite end of the negative(-)jumper
cable to a good engine ground (exposed metal part of
the discharged vehicle’s engine) away from the battery
and the fuel injection system.
WARNING!
Do not connect the jumper cable to the negative (-)
post of the discharged battery. The resulting electri-
cal spark could cause the battery to explode and
could result in personal injury. Only use the specific
ground point, do not use any other exposed metal
parts.
5. Start the engine in the vehicle that has the booster
battery, let the engine idle a few minutes, and then
start the engine in the vehicle with the discharged
battery.
6. Once the engine is started, remove the jumper cables
in the reverse sequence:
Disconnecting The Jumper Cables
1. Disconnect the negative(-)end of the jumper cable
from the engine ground of the vehicle with the dis-
charged battery.
2. Disconnect the opposite end of the negative(-)jumper
cable from the negative(-)post of the booster battery.
3. Disconnect the positive(+)end of the jumper cable
from the positive(+)post of the booster battery.
4. Disconnect the opposite end of the positive(+)jumper
cable from the positive(+)post of the vehicle with the
discharged battery.
If frequent jump-starting is required to start your vehicle
you should have the battery and charging system in-
spected at your authorized dealer.
6
WHAT TO DO IN EMERGENCIES 617