mirror CHRYSLER TOWN AND COUNTRY 2015 5.G User Guide
[x] Cancel search | Manufacturer: CHRYSLER, Model Year: 2015, Model line: TOWN AND COUNTRY, Model: CHRYSLER TOWN AND COUNTRY 2015 5.GPages: 164, PDF Size: 22.47 MB
Page 9 of 164
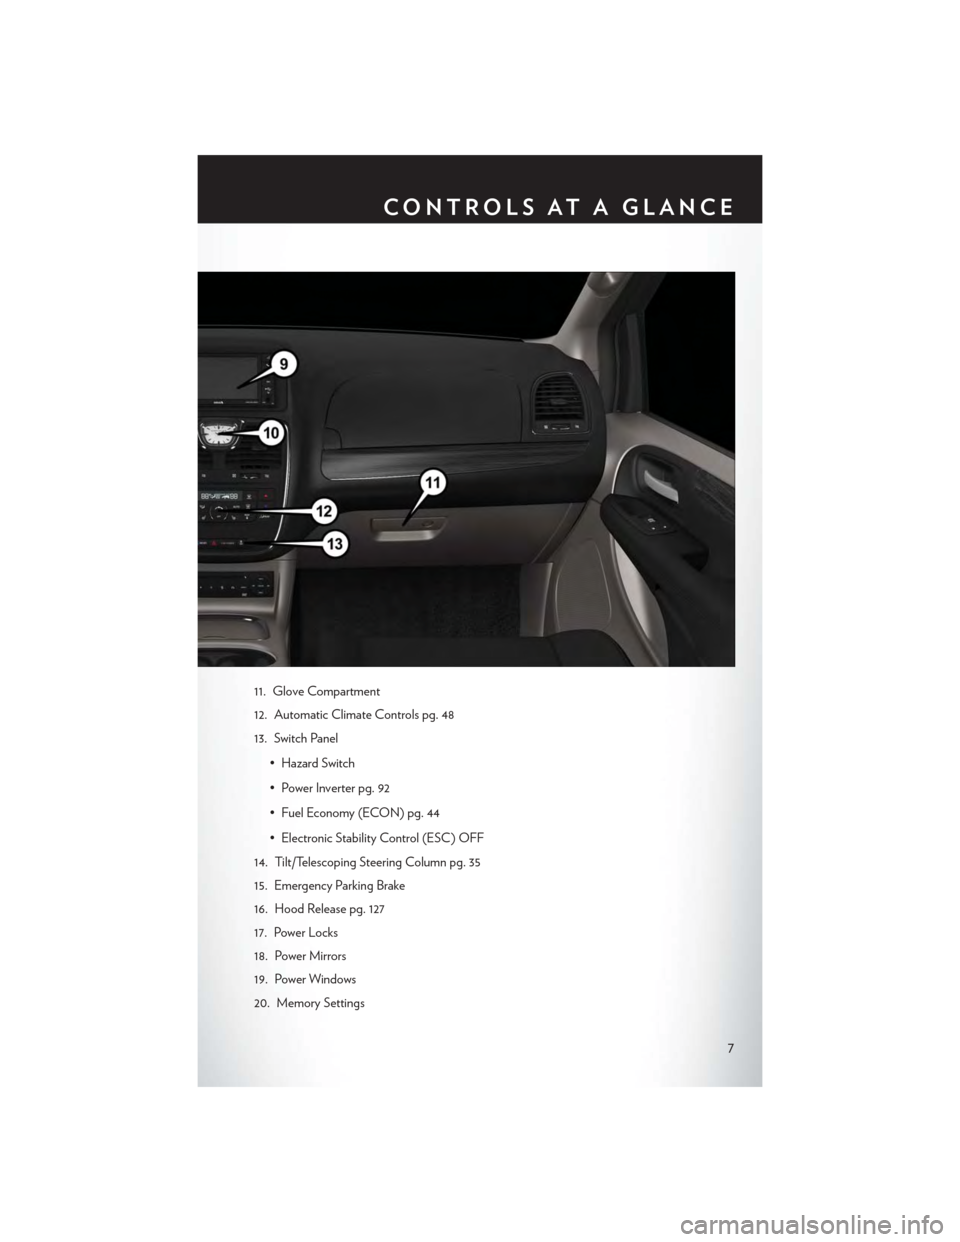
11. Glove Compartment
12. Automatic Climate Controls pg. 48
13. Switch Panel
• Hazard Switch
•PowerInverterpg.92
• Fuel Economy (ECON) pg. 44
• Electronic Stability Control (ESC) OFF
14. Tilt/Telescoping Steering Column pg. 35
15. Emergency Parking Brake
16. Hood Release pg. 127
17. Power Locks
18. Power Mirrors
19. Power Windows
20. Memory Settings
CONTROLS AT A GLANCE
7
Page 30 of 164
Memory Seat
The memory seat feature allows you to save
two different driver seating positions, driver's
outside mirror, adjustable brake and accelera-
tor pedals, and radio station preset settings.
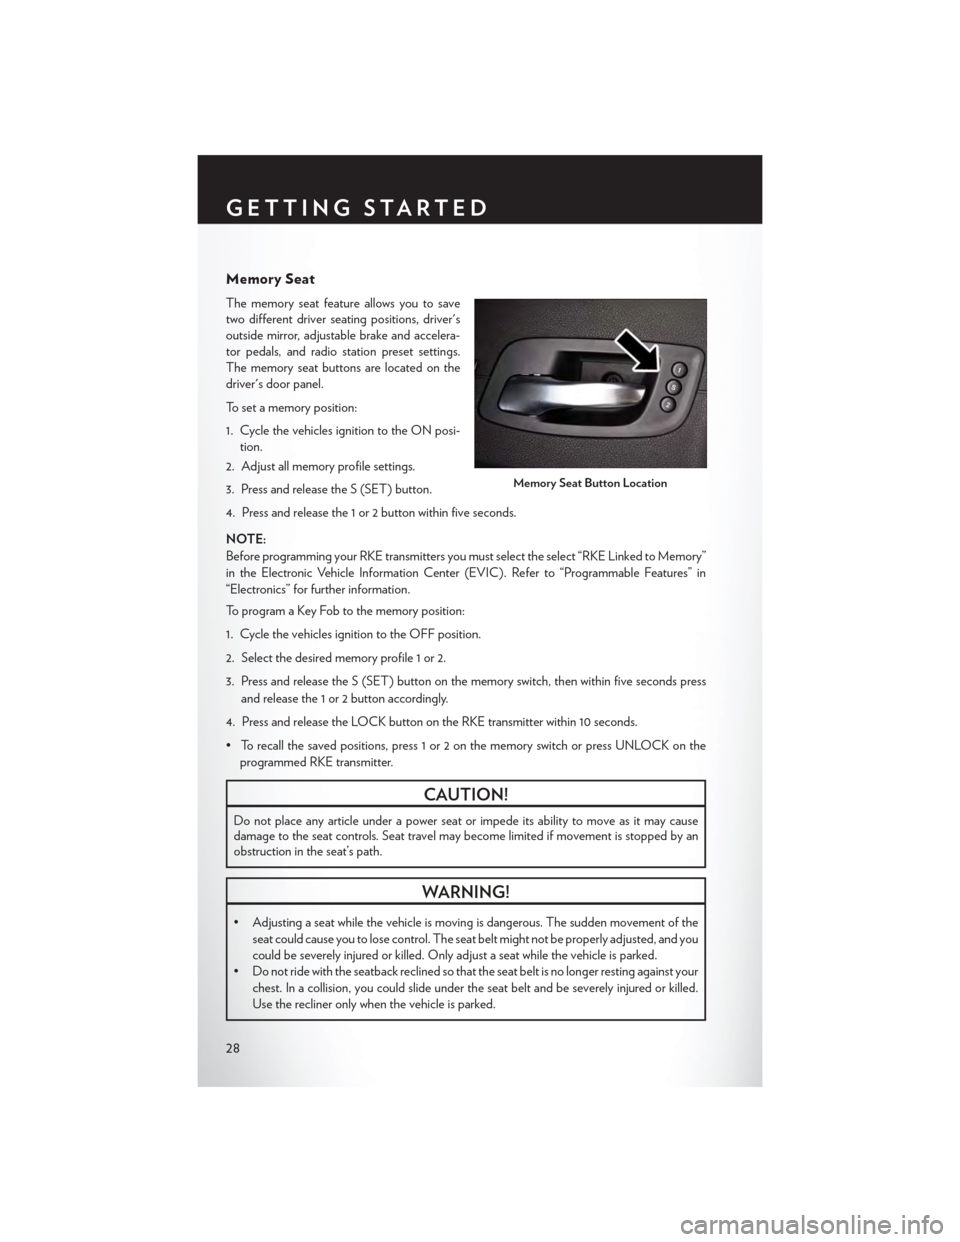
The memory seat buttons are located on the
driver's door panel.
To set a memory position:
1. Cycle the vehicles ignition to the ON posi-
tion.
2. Adjust all memory profile settings.
3. Press and release the S (SET) button.
4. Press and release the 1 or 2 button within five seconds.
NOTE:
Before programming your RKE transmitters you must select the select “RKE Linked to Memory”
in the Electronic Vehicle Information Center (EVIC). Refer to “Programmable Features” in
“Electronics” for further information.
To program a Key Fob to the memory position:
1. Cycle the vehicles ignition to the OFF position.
2. Select the desired memory profile 1 or 2.
3. Press and release the S (SET) button on the memory switch, then within five seconds press
and release the 1 or 2 button accordingly.
4. Press and release the LOCK button on the RKE transmitter within 10 seconds.
•Torecallthesavedpositions,press1or2onthememoryswitchorpressUNLOCKonthe
programmed RKE transmitter.
CAUTION!
Do not place any article under a power seat or impede its ability to move as it may causedamage to the seat controls. Seat travel may become limited if movement is stopped by anobstruction in the seat’s path.
WARNING!
•Adjustingaseatwhilethevehicleismovingisdangerous.Thesuddenmovementofthe
seat could cause you to lose control. The seat belt might not be properly adjusted, and you
could be severely injured or killed. Only adjust a seat while the vehicle is parked.
•Donotridewiththeseatbackreclinedsothattheseatbeltisnolongerrestingagainstyour
chest. In a collision, you could slide under the seat belt and be severely injured or killed.
Use the recliner only when the vehicle is parked.
Memory Seat Button Location
GETTING STARTED
28
Page 42 of 164

HEADLIGHT SWITCH AND HALO LIGHT SWITCH
Automatic Headlights/Parking
Lights/Headlights
• Rotate the headlight switch, located on
the instrument panel to the left of the
steering wheel, to the first detent for park-
ing lightsand to the second detent
for headlights.
•Withtheparkinglightsorlowbeamhead-
lights on, push the headlight switch once for
fog lights.
• Rotate the headlight switch to AUTO for
Automatic Headlights.
•WhensettoAUTO,thesystemautomati-
cally turns the headlights on or off based on
ambient light levels.
Automatic High Beams
The Automatic High Beams system provides
increased forward lighting at night by automat-
ing high beam control through the use of a digital
camera mounted on the inside rearview mirror.
This camera detects vehicle specific light and
automatically switches from high beams to low beams until the approaching vehicle is out of view.
Instrument Panel Dimmer
•Rotatethedimmercontroltotheextremebottompositiontofullydimtheinstrumentpanel
lights and prevent the interior lights from illuminating when a door is opened.
•Rotatethedimmercontroluptoincreasethebrightnessoftheinstrumentpanelwhenthe
parking lights or headlights are on.
• Rotate the dimmer control up to the next detent position to fully brighten the odometer and
radio when the parking lights or headlights are on.
• Rotate the dimmer control up to the last detent position to turn on the interior lighting.
If your vehicle is equipped with a touchscreen, the dimming is programmable through the
Uconnect® system. Refer to “Uconnect® Settings ” in “Understanding Your Instrument Panel” in
the Owner's Manual on the DVD for further details.
Overhead (Halo) Light
• To activate the Halo lights, rotate the Halo switch control upward or downward to increase or
decrease the lighting.
Headlight Switch/Halo Light Switch
1 — Auto2 — Push Fog Light3 — Rotate Halo Light Dimmer Control4 — Rotate Dimmer Control5 — Rotate Headlight Switch
OPERATING YOUR VEHICLE
40
Page 47 of 164

MANUAL CLIMATE CONTROLS
Air Recirculation
• Use Recirculation for maximum A/C operation.
• For window defogging, turn the Recirculation button off.
•Recirculationisallowedinflooranddefrost/floor(mixmodes)forapproximatelyfiveminutes.
Heated Mirrors
The mirrors are heated to melt frost or ice. This feature is activated whenever you turn on the rear
window defroster.
Rear Window Defroster
•Pushing the rear window defroster button will turn on the defroster for approximately 10 minutes.
An indicator in the button will illuminate when the rear window defroster is on. For an additional
10 minutes of operation, Push the button a second time.
Manual Climate Controls
1—PushModeControlButtons2 — Push A/C Button3 — Push Air Recirculation Button4 — Rotate Passenger Temp. Control
5—PushModeControlButton6 — Push Front Defrost Button7 — Push Rear Window Defrost Button
OPERATING YOUR VEHICLE
45
Page 48 of 164

THREE ZONE MANUAL CLIMATE CONTROLS
Air Recirculation
• Use Recirculation for maximum A/C operation.
• For window defogging, turn the Recirculation button off.
•Recirculationisallowedinflooranddefrost/floor(mixmodes)forapproximatelyfiveminutes.
Heated Mirrors
The mirrors are heated to melt frost or ice. This feature is activated whenever you turn on the rear
window defroster.
Three Zone Manual Climate Controls
1—PushModeControlButtons2 — Push A/C Button3—RotateDriverTemp.Control4 — Push Air Recirc. Button5 — Rotate Front Blower Control6 — Rotate Passenger Temp. Control
7—PushModeControlButton8 — Push Front Defrost Button9 — Push Rear Window Defrost Button10 — Rotate Rear Temp. Control11 — Rotate Rear Blower Control
OPERATING YOUR VEHICLE
46
Page 51 of 164

SYNC Temperature Button
•PushtheSYNCbuttononcetocontroldriverandpassengertemperaturessimultaneously.
Push the SYNC button a second time to control the temperatures individually.
Air Recirculation
• Use Recirculation for maximum A/C operation.
• For window defogging, turn the Recirculation button off.
•IftheRecirculationbuttonispressedwhenthesystemisinDefrostmodetheRecirculation
LED indicator will flash three times to indicate Recirculation mode is not allowed.
Heated Mirrors
The mirrors are heated to melt frost or ice. This feature is activated whenever you turn on the rear
window defroster.
Rear Window Defroster
•Pushing the rear window defroster button will turn on the defroster for approximately 10 minutes.
An indicator in the button will illuminate when the rear window defroster is on. For an additional
10 minutes of operation, Push the button a second time.
OPERATING YOUR VEHICLE
49
Page 53 of 164
PA R K S E N S E ® R E A R PA R K A S S I S T
If an object is detected behind the rear bumper while the vehicle is in REVERSE, a warning will
display in the instrument cluster and a tone will sound, (closer the object the faster the tone) that
changes speed depending on the distance of the object from the bumper, will sound.
When the Instrument Cluster reads either “Clean Sensor” or “Blinded”, clean off the bumper
sensors to see if the condition is corrected.
PA R K V I E W ® R E A R B AC K- U P C A M E R A
Yo u c a n s e e a n o n - s c r e e n i m a g e o f t h e r e a r o f y o u r v e h i c l e w h e n e v e r t h e s h i f t l e v e r i s p u t i n t o
REVERSE. The ParkView® Rear Back-Up Camera image will be displayed on the radio display
screen, located on the center stack of the instrument panel.
If the radio display screen appears foggy, clean the camera lens located on the liftgate.
Refer to your Owner's Manual on the DVD for further details.
WARNING!
Drivers must be careful when backing up; even when using the ParkView® Rear Back-Up
Camera. Always check carefully behind your vehicle, and be sure to check for pedestrians,
animals, other vehicles, obstructions, or blind spots before backing up. You must continue to
pay attention while backing up. Failure to do so can result in serious injury or death.
BLIND SPOT MONITORING WITH REAR
CROSS PATH
The Blind Spot Monitoring (BSM) system uses two radar-based sensors, located inside the rear
bumper fascia, to detect Highway licensable vehicles (automobiles, trucks, motorcycles etc.) that
enter the blind spot zones from the rear/front/side of the vehicle.
The Blind Spot Monitoring (BSM) system warning light, located in the outside mirrors, will
illuminate if a vehicle moves into a blind spot zone.
The BSM system can also be configured to sound an audible (chime) alert and mute the radio to
notify you of objects that have entered the detection zones.
Refer to your Owner's Manual on the DVD for further details.
OPERATING YOUR VEHICLE
51
Page 141 of 164
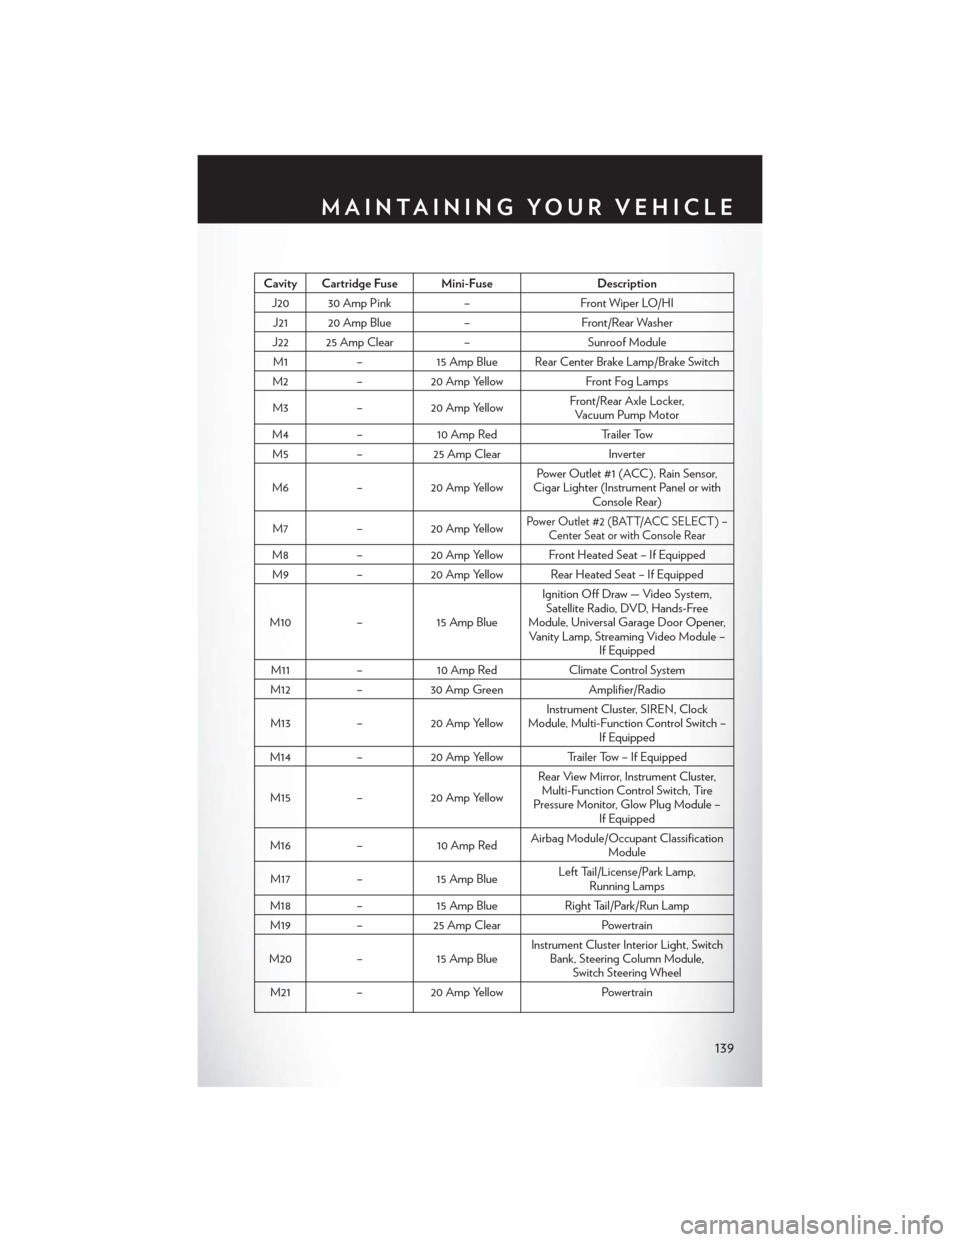
Cavity Cartridge Fuse Mini-FuseDescription
J20 30 Amp Pink–Front Wiper LO/HI
J21 20 Amp Blue–Front/Rear Washer
J22 25 Amp Clear–Sunroof Module
M1–15 Amp Blue Rear Center Brake Lamp/Brake Switch
M2–20 Amp YellowFront Fog Lamps
M3–20 Amp YellowFront/Rear Axle Locker,Vacuum Pump Motor
M4–10 Amp RedTr a i l e r To w
M5–25 Amp ClearInverter
M6–20 Amp YellowPower Outlet #1 (ACC ), Rain Sensor,Cigar Lighter (Instrument Panel or withConsole Rear)
M7–20 Amp YellowPower Outlet #2 (BATT/ACC SELECT ) –Center Seat or with Console Rear
M8–20 Amp Yellow Front Heated Seat – If Equipped
M9–20 Amp Yellow Rear Heated Seat – If Equipped
M10–15 Amp Blue
Ignition Off Draw — Video System,Satellite Radio, DVD, Hands-FreeModule, Universal Garage Door Opener,Vanity Lamp, Streaming Video Module –If Equipped
M11–10 Amp RedClimate Control System
M12–30 Amp GreenAmplifier/Radio
M13–20 Amp YellowInstrument Cluster, SIREN, ClockModule, Multi-Function Control Switch –If Equipped
M14–20 Amp YellowTrailer Tow – If Equipped
M15–20 Amp Yellow
Rear View Mirror, Instrument Cluster,Multi-Function Control Switch, TirePressure Monitor, Glow Plug Module –If Equipped
M16–10 Amp RedAirbag Module/Occupant ClassificationModule
M17–15 Amp BlueLeft Tail/License/Park Lamp,Running Lamps
M18–15 Amp BlueRight Tail/Park/Run Lamp
M19–25 Amp ClearPowertrain
M20–15 Amp BlueInstrument Cluster Interior Light, SwitchBank, Steering Column Module,Switch Steering Wheel
M21–20 Amp YellowPowertrain
MAINTAINING YOUR VEHICLE
139
Page 142 of 164
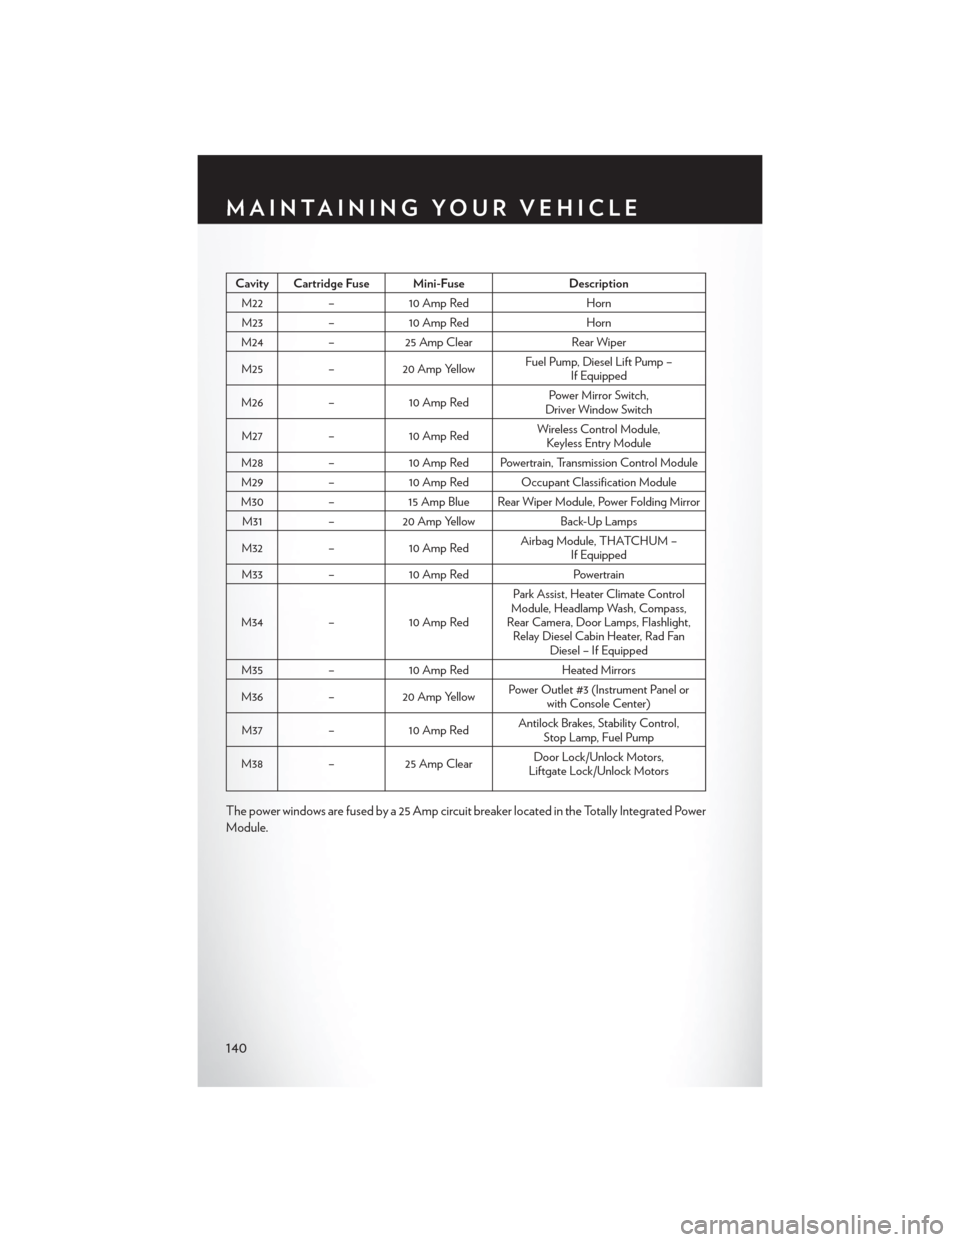
Cavity Cartridge Fuse Mini-FuseDescription
M22–10 Amp RedHorn
M23–10 Amp RedHorn
M24–25 Amp ClearRear Wiper
M25–20 Amp YellowFuel Pump, Diesel Lift Pump –If Equipped
M26–10 Amp RedPower Mirror Switch,Driver Window Switch
M27–10 Amp RedWireless Control Module,Keyless Entry Module
M28–10 Amp Red Powertrain, Transmission Control Module
M29–10 Amp Red Occupant Classification Module
M30–15 Amp Blue Rear Wiper Module, Power Folding Mirror
M31–20 Amp YellowBack-Up Lamps
M32–10 Amp RedAirbag Module, THATCHUM –If Equipped
M33–10 Amp RedPowertrain
M34–10 Amp Red
Park Assist, Heater Climate ControlModule, Headlamp Wash, Compass,Rear Camera, Door Lamps, Flashlight,Relay Diesel Cabin Heater, Rad FanDiesel – If Equipped
M35–10 Amp RedHeated Mirrors
M36–20 Amp YellowPower Outlet #3 (Instrument Panel orwith Console Center)
M37–10 Amp RedAntilock Brakes, Stability Control,Stop Lamp, Fuel Pump
M38–25 Amp ClearDoor Lock/Unlock Motors,Liftgate Lock/Unlock Motors
The power windows are fused by a 25 Amp circuit breaker located in the Totally Integrated Power
Module.
MAINTAINING YOUR VEHICLE
140
Page 154 of 164
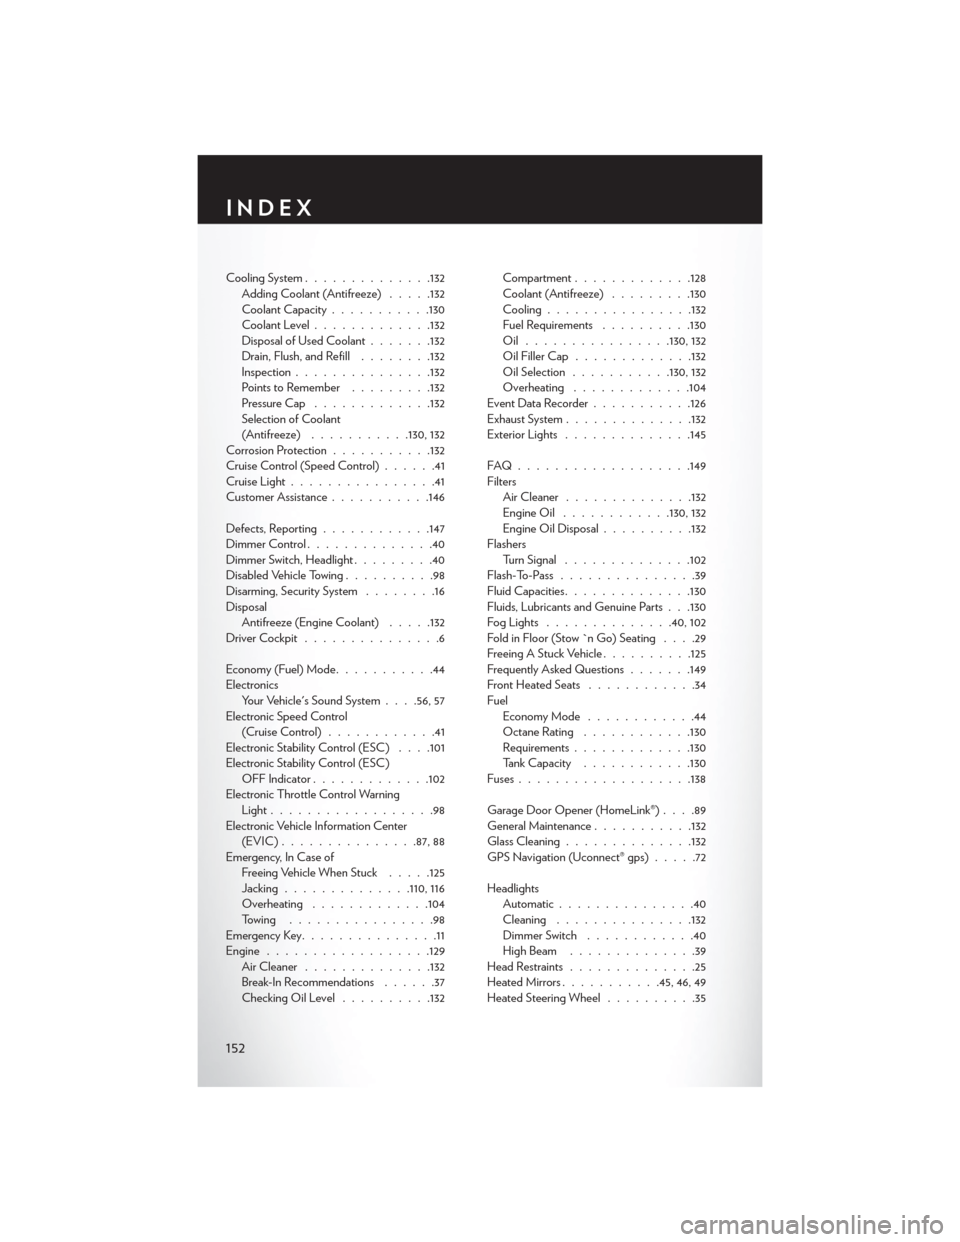
Cooling System..............132Adding Coolant (Antifreeze).....132Coolant Capacity...........130Coolant Level.............132Disposal of Used Coolant.......132Drain, Flush, and Refill........132Inspection...............132Points to Remember.........132Pressure Cap.............132Selection of Coolant(Antifreeze)...........130, 132Corrosion Protection...........132Cruise Control (Speed Control)......41Cruise Light................41Customer Assistance...........146
Defects, Reporting............147Dimmer Control..............40Dimmer Switch, Headlight.........40Disabled Vehicle Towing..........98Disarming, Security System........16DisposalAntifreeze (Engine Coolant).....132Driver Cockpit . . . . . . . . . . . . . . .6
Economy (Fuel) Mode...........44ElectronicsYo u r Ve h i c l e ' s S o u n d S y s t e m. . . .56, 57Electronic Speed Control(Cruise Control)............41Electronic Stability Control (ESC) . . . .101Electronic Stability Control (ESC)OFF Indicator.............102Electronic Throttle Control WarningLight . . . . . . . . . . . . . . . . . .98Electronic Vehicle Information Center(EVIC) . . . . . . . . . . . . . ..87, 88Emergency, In Case ofFreeing Vehicle When Stuck.....125Jacking..............110, 116Overheating.............104To w i n g . . . . . . . . . . . . . . . . 9 8Emergency Key...............11Engine . . . . . . . . . . . . . . . . ..129Air Cleaner..............132Break-In Recommendations......37Checking Oil Level..........132
Compartment.............128Coolant (Antifreeze).........130Cooling................132Fuel Requirements..........130Oil . . . . . . . . . . . . . . ..130, 132Oil Filler Cap.............132Oil Selection...........130, 132Overheating.............104Event Data Recorder . . . . . . . . . ..126Exhaust System..............132Exterior Lights..............145
FAQ . . . . . . . . . . . . . . . . . ..149FiltersAir Cleaner..............132Engine Oil............130, 132Engine Oil Disposal..........132FlashersTurn Signal..............102Flash-To-Pass...............39Fluid Capacities..............130Fluids, Lubricants and Genuine Parts . . .130Fog Lights . . . . . . . . . . . . ..40, 102Fold in Floor (Stow `n Go) Seating....29Freeing A Stuck Vehicle..........125Frequently Asked Questions.......149Front Heated Seats............34FuelEconomy Mode . . . . . . . . . . . .44Octane Rating............130Requirements.............130Ta n k C a p a c i t y............130Fuses...................138
Garage Door Opener (HomeLink®)....89General Maintenance...........132Glass Cleaning..............132GPS Navigation (Uconnect® gps).....72
HeadlightsAutomatic...............40Cleaning...............132Dimmer Switch............40High Beam . . . . . . . . . . . . . .39Head Restraints..............25Heated Mirrors...........45, 46, 49Heated Steering Wheel..........35
INDEX
152